
Windows Azure is about cloud computing. Cloud computing, though, is a vague description of different aspects. Windows Azure is actually a platform that is offered to you as a service (PaaS, meaning Platform as a Service). PaaS enables us to fully concentrate on the application itself and leave all the plumbing to the cloud provider, in this case Microsoft. PaaS offers the management of networking, storage, servers, virtualization, OS, databases, and runtimes. The only thing that's left is the actual application, and that is most important for us since the application is our added value.
Windows Azure runs in large datacenters all around the world. A datacenter is filled with containers, and containers have a lot of servers inside (around 2,000).
Windows Azure offers abstraction to the developer by offering computing power (CPU and memory), storage (disk), and bandwidth (networking hardware). This enables us to treat Windows Azure as a black box without bothering about the internals, although we are curious about the way it works! Well, at least I was.
The best way to describe how a cloud application is created and finally deployed onto a machine in the datacenter is to use an example. Back in the early days, when you wanted to deploy an application, you needed to order hardware, be patient, and install operating systems, database servers, runtimes, and other bits. In the new world of cloud computing, you only need a credit card and a Live ID.
From a developer's perspective, the main entrance to Windows Azure is through the Windows Azure portal (or through the Service Management API, but I'll cover that later in this book). Operators can look at Windows Azure from the Microsoft System Center.
When you go to http://windowsazure.com, you are able to sign up to the Windows Azure Platform. After creating a billing relationship with Microsoft by using your credit card or the invoicing option, you are able to access Windows Azure. The Windows Azure platform portal is your main entrance to massive-scale computing and storage. The following screenshot shows what the portal looks like and how you can access the different features of Windows Azure.
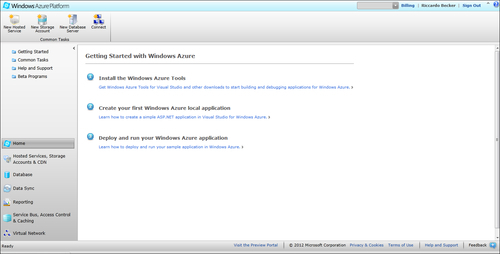
From this portal, you can create applications (hosted services, as per June 2012, called cloud services), enable storage, create databases, and access other offerings from the Windows Azure platform. Let's have a close look at the New Hosted Service option and actually create your first Windows Azure application. Let's prepare the next step by creating a logical area on Windows Azure for your first application.
Click on New Hosted Service, and fill out the Create a New Hosted Service screen, as shown in the following screenshot:

You need to pick another name, since the URL prefix needs to be globally unique, and of course, your subscription will be a different one. After clicking on OK, the environment is created for you, and the DNS name entered in the URL textbox is reserved. If you choose the Do not deploy option, only the DNS name will be reserved and you will not get a bill yet, but you can also decide to create the hosted service together with deployment, if you have your binaries and configuration files ready. Hosted services that you create can easily be deleted, and the DNS name will be available again for others.
In order to get your application running on Windows Azure, you need to follow a few initial steps.
Perform the following steps to create and deploy a website:
Install the prerequisites on your machine (you can find them at http://www.microsoft.com/download/en/details.aspx?id=15658).
After downloading and installing both the Windows Azure SDK and Windows Azure Tools for Microsoft Visual Studio 2010, you are able to create your first web application, which can be deployed to Windows Azure.
Start Visual Studio 2010 (make sure you select Run as administrator), go to File | New | Project, and select Cloud from the Installed Templates tab. Name it
MyFirstAzureProjectand click on OK. The following screen appears:
As you can see, creating a Windows Azure service does not mean that you need to learn new skills or new tools; you can leverage your existing .NET skills.
Select ASP.NET MVC3 Web Role and name it MyFirstAzureMVC3Website. A Web Role is in fact a Windows 2008 virtual machine with Internet Information Services enabled. This enables the Web Role to be accessible through the Internet. By picking the MVC3 Web Role, we can again benefit from the already available knowledge on MVC3.
After clicking on OK, you need to pick what project template is used to create the MVC3 Website. For now, it's ok to select the Internet Application and leave the rest of the options at their default values.
Now click on OK, and the solution is created for you:

Your solution looks like an ordinary Visual Studio 2010 solution, but with a few additions to it. As it is a cloud project, not only is the MVC3 project created, but also a cloud project. In the MVC3 project, you will see a class file named WebRole.cs. This standard MVC3 website is ready to be deployed to Windows Azure. The website will run, but some default settings point to local development storage; these will cause the application to crash if somebody tries to reach the deployed website. We will get back to that later on.
To demonstrate upgrade and fault domains, change the ServiceConfiguration.Cloud.cscfg file, and change the Instances count to
2:<Instances count="2" />
This causes two instances of your web role to be deployed on Windows Azure. They are identical, with the same binaries, but having two instances of the same web role running increases availability and enables the website to handle more traffic.
This configuration spins up two servers, has your application deployed onto them, and also creates a load balancer on top of them. Try to imagine how much work this is in a traditional datacenter.
This section will guide you through the deployment of your Windows Azure project.
Right-click on the
MyFirstAzureProjectnode in your solution and select Package.A new popup window appears, but for now it is sufficient to click on the Package button.
Windows Azure Tools will now build your project, zip the binaries, and create the service configuration file.
A Windows Explorer window is opened, and you will see the result of the "packaging" action—a large binary package (
.cspkg) and the configuration file. Copy the location of this folder.Go back to the Windows Azure portal and select the recently created hosted service.
Right-click on the Hosted Service entry and select New Production Deployment.
Name your deployment, select the recently created files in the Package location and Configuration file textboxes, and click on OK.
Note
A warning appears, telling you that you need to create at least two instances to guarantee the 99.95 percent uptime the Windows Azure Compute service-level agreement (SLA) offers.
An SLA is a service contract in which the level of service is formally defined. Please go to http://www.windowsazure.com/en-us/support/legal/sla/ to get details about the SLA.
When two or more instances of a role are running in different fault and upgrade domains, Microsoft can offer at least a 99.95 percent (of the time) Internet connectivity of the designated roles. An availability of 99.95 percent means that your service is guaranteed less than 5 minutes down per week, inside the Fabric.
In the previous section, we deployed our Windows Azure project by using the Windows Azure portal and the Package option in Visual Studio. But what actually happened after uploading the package?
Upgrade domains are groups of nodes that are updated consecutively when there is a new Windows Azure OS version available or when you update your role. As stated before, the Windows Azure SLA is based on having two instances of each distinctive role run in at least two upgrade domains. You can choose to have only one instance of your role running, but this means that on every upgrade (OS, patch, security fix, or role upgrade) that causes a reboot your service will be unreachable.
Organizing your roles in more than one upgrade domain prevents your service from being offline because when one instance is down because of the update, the other one is still running, since it's in a different upgrade domain. The number of upgrade domains your role instances are put in is configurable in the service definition file (ServiceDefinition.csdef) in your solution. By default, the number is five, but you can change this at any time. After redeploying your service, your roles will be distributed among the number of upgrade domains you defined using the Fabric Controller. The capacity of your service during an OS upgrade is one, divided by the number of update domains. So, when you have five role instances running in five upgrade domains, your service capacity will be reduced by 20 percent during the whole upgrade process.
A fault domain is a physical unit of failure and can be mapped to physical infrastructure. A fault domain can be a complete rack or a single computer depending on the organization of the datacenter. Fault domains are meant to enhance fault tolerance of services. Keep your service running at all times, even during a hardware failure in the datacenter. Deploying your services into more than one fault domain will keep your service running, even when, for example, a top rack switch breaks down. Fault domains are physically grouped hardware areas inside the datacenter.
The Fabric Controller (FC) acts like the "kernel" for the datacenters. It has two major tasks:
Resource allocation and provisioning of described hardware and network resources (datacenter hardware)
Service lifecycle and health management based on applied service model and binaries (Windows Azure services)
The FC itself is an application running across different fault domains (just like your services) to ensure its availability. The FC runs on several nodes, and only one instance is the primary FC. All other instances are running in sync with the primary one.
The FC is in charge of all the hardware inside the datacenter.
Note
Servers are placed in racks, racks are organized in clusters, and all the clusters together form the datacenter. A cluster contains approximately 1,000 servers.
Before being able to deploy your service on a single (or several) node(s), the FC actually turns on a node. After that the following process takes place:
The node boots from the network using Preboot Execution Environment (PEX). A maintenance OS image is downloaded to the node and boots into it. The maintenance OS contains a fabric agent, and the FC communicates directly with this host agent.
The maintenance OS downloads a VHD with the operating system for the host partition. This OS contains an FC host agent. The maintenance OS then restarts the node and boots onto the operating system for the host partition.
The FC tells the FC host agent how many partitions need to be set up, depending on the "deployment" request. If a user wants to deploy a multicore VM size, this automatically means that the node can contain fewer instances, since fewer CPUs are available. On the partition, there is a base VHD and a differencing disk. This works in a similar way with Hyper-V technology, since the OS is a version of Hyper-V, written for Windows Azure. The guest VHD contains a modified Windows 2008 Server version, so that it can integrate with the Windows Azure hypervisor.
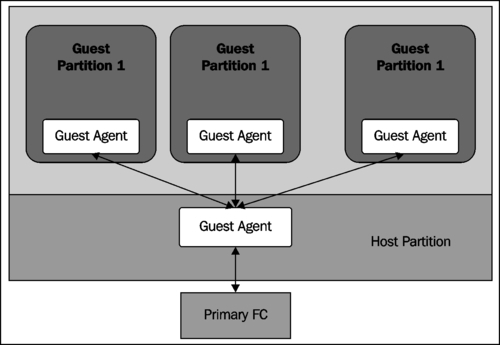
The following figure presents what a node looks like after the partitioning and provisioning of the guest OSs, including the agents that are needed to enable communication between the FC and the guest OSs.
After these steps, the FC can deploy the MVC3 website we created in previous sections.
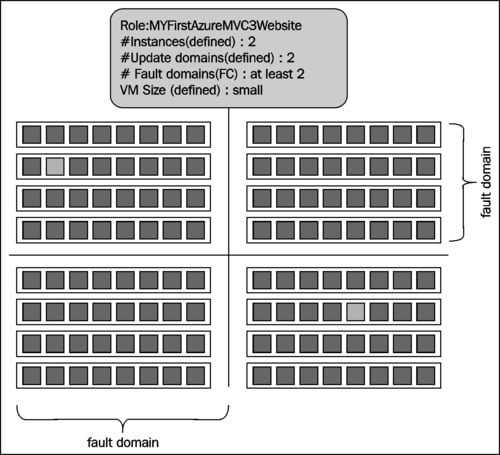
The FC processes the service model you provided during the deployment step. In this case, we told the FC to deploy two instances of our MyFirstAzureMVC3Website node. The VM size is Small, by default. This means 1 CPU core, 1.75 GB of memory, about 230 GB of local storage, and reserved bandwidth of 100 Mbps.
Note
For more information on the characteristics of VM sizes, please visit http://msdn.microsoft.com/en-us/library/windowsazure/ee814754.aspx.
The FCs create two guest partitions, as described in the previous sections, located in two different upgrade and fault domains. The FC then pushes the package (containing the binaries and the configuration file) to the target host agents. The host agents both create a guest partition that fulfills the service model we provided and starts the guest partitions. The guest agents both start the web role we created and call the role entry point, which is located in WebRole.cs. From this point, the role reports the heartbeats back to the host agent, so that the FC can monitor and maintain the health of roles. A role without a heartbeat for a period of time is considered unhealthy and is restarted.
The final step is that the FC programs a load balancer (LB) that routes the traffic to our website and divides it to the two role instances. Windows Azure equally spreads traffic across web role instances that are part of the same deployment. Having multiple instances of the same web role enables your website to handle more user traffic. The following figure shows where the instances are copied and run inside the datacenter, bearing in mind the upgrade and fault domains.
Our website is running now, has an uptime of 99.95 percent, and remains available, even in case of hardware failure or OS updates initiated by Windows Azure.