
While SmartList exports are great for sending Dynamics GP data to Excel for analysis, they aren't an ideal solution for a dashboard. SmartList sends data to a new Excel file each time. It's a lot of work to export data and rebuild a dashboard every month. An improved option is to use a SmartList Export Solution.
SmartList Export Solutions let you export GP data to a saved Excel workbook. They also provide the option to run an Excel macro before and/or after the data populates in Excel. As an example, we will format the header automatically after exporting financial summary information.
We have a little setup work to do for this one first. Since these exports are typically repetitive, the setup is worth the effort. Here is how it's done:
Select the Microsoft Dynamics GP menu from the top and click on SmartList.
Select Financial | Account Summary on the left to generate a SmartList.
Click on the Excel button to send the SmartList to Excel.
Next, we need to turn on the Developer Ribbon in Excel:

A SmartList Export Solution allows you to run an Excel macro before or after the data arrives to format or manipulate the information so you only have to do it once. Let's record our Excel macro.
Click on the Developer tab and select Record Macro. Accept the default name of Macro1 and click OK.

In Excel 2013, highlight Rows 1-5, right-click, and select Insert.
Bold the titles in cells A6-F6 by highlighting them and clicking the B icon on the Home ribbon.
In cell A1 enter
Sample Excel Solution.From the Developer tab, select Stop Recording.
Highlight and delete all the rows.
Save the blank file containing just the macro on the C: with the name as
AccountSummary.xlsm.
Now that we've prepared our Excel 2013 workbook to receive a SmartList, we need to set up and run the SmartList Export Solution:
In Dynamics GP, select Microsoft Dynamics GP and then select SmartList.
Select Financial | Account Summary in the left pane to generate a SmartList.
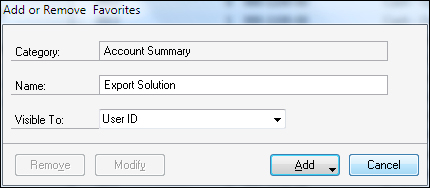
Click on Favorites. Name the favorite Export Solution and click Add | Add Favorite. The favorite can be named anything. I'm using Export Solution for our example:
Back on the SmartList window, select SmartList | Export Solutions. Name the solution as
Export Solution. Set the path toC:\AccountSummary.xlsmand the completion macro toMacro1.Check the box next to the SmartList favorite under Account Summary named Export Solution:

Click Save and close the window.
Back in the SmartList window, select the Export Solution favorite under Account Summary and click on the Excel button.
Instead of immediately opening Excel, there are now two options. The Quick Export option performs a typical Excel export. We want the second option. Click on the Export Solutions option. This will open the Excel file named
AccountSummary.xlsm, export the data, and run the macro namedMacro1, all with one click.
Click on the Export Solution option and watch the file open and the macro execute:

Dynamics GP includes a feature called Navigation Lists. These lists provide centralized information views and access to tasks around common areas. For example, the Account Transactions List includes the ability to review journal entries, drill back to additional information, and enter transactions, all from a single screen.
Navigation Lists don't have a large Excel button like SmartLists, but they do include the ability to export to Excel.
To export a Navigation List to Excel:
Select Financial from the Navigation Pane.
At the top of the Navigation Pane, select Accounts to open up the Accounts list.
Check the white box in the header next to Account Number to select all the accounts.

On the ribbon at the top, select Go To | Send to Excel.
Tip
Like the
Dex.iniswitch that can improve exports to Excel from SmartLists, there is a similar, unsupported switch to speed Navigation List exports to Excel. To activate this switch, add the following line to theDex.inifile and restart Dynamics GP 2013. The same caveats apply; test this on a test server first.ListsFastExcelExport=TRUE