
If you are developing a Windows Phone application, the odds are you will have more than one page which you want to show to the user. Luckily for us, Microsoft has provided a basic navigation framework for navigating from one screen to another. This type of navigation is very similar to how you would navigate from one web page to another. It supports query strings similar to websites. This simple navigation example will be used throughout the book as a starting point for many other examples. This is a popular way to build applications that a user can easily navigate.
We will create a business information application that simply displays information about a fictional company called ACME and allows you to navigate from one screen to another easily. We will include the following pages:
Home
About ACME
Contact ACME
Locations
Corporate Office
Satellite Office
Although this application is very simple, it is designed to give you the fundamental building blocks for creating a complex Windows Phone application.
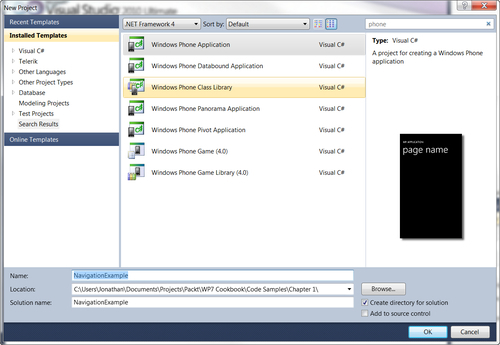
Before we begin, we need to create a new Windows Phone Application after clicking New Project in Visual Studio:
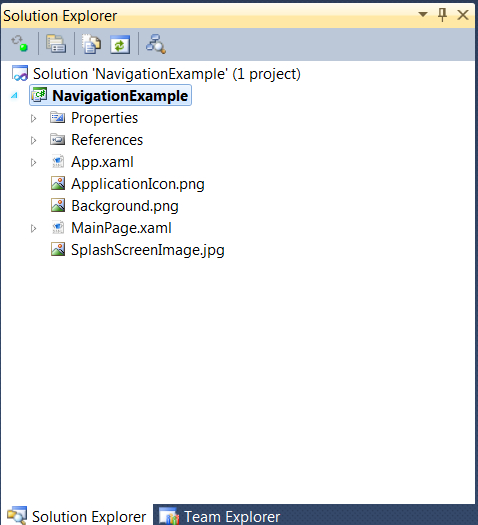
Now that you have created the Navigation Project, in the following example, you will see the basic structure of the application on the right-hand side of Visual Studio:
Add some folders to the structure of the application by right-clicking on the NavigationExample project in the Solution Explorer, selecting Add | New Folder, and then renaming the folder as Views.
1. Now, to add the first pages to the application, right-click on the new Views folder, select Add | New Item, then select the Windows Phone Portrait page, enter
About.xamlas the name, and click OK.2. Repeat this step for the Contact page, naming it as
Contact.xaml:
3. We will then repeat steps 1 and 2 for creating a sub folder named Locations under the Views folder and adding two more Windows Phone Portrait pages named
CorporateOffice.xamlandSatelliteOffice.xaml. This will create a project that should look like this:
In the previous steps, we had only spent time in Visual Studio. Now it is time to swap over to Expression Blend. OK, so you may be asking yourself, "Can't I just stay in Visual Studio?". The answer is yes you can, but you will find it much easier to do many of the design-related items like adding controls and setting properties of controls in Blend. The good news is that Blend and Visual Studio both use the same project files, so you can leave both Visual Studio and Blend open with the same project and they will update each other when you save the files:
1. To open this project in Blend, right-click on the
MainPage.xamland select Open in Expression Blend….2. The first things you will want to change are the two TextBlocks at the top of the page. To do this, simply double-click on the text to begin editing the text on the top-most label and enter the text ACME Co.. Then double-click the larger TextBlock and type Home.
3. Now that we have the home page labels renamed, let's do the same thing for the sub pages by double-clicking on them in the solution explorer, double-clicking the TextBlocks, and entering appropriate titles. For the Corporate Office page, enter ACME Co. as the upper title and Corporate Office in the larger TextBlock. Also do this for the Satellite Office page.
4. What we want to do now is provide a basic navigation of the
MainPage.xamlto the About, Contact, and Location Pages by using theHyperlinkButtoncontrol. We do this by clicking the assets button at the bottom of the tool box on the left-hand side of Blend. This will expand and give you a search box where you can search forHyperLinkButton:
After finding the control in the assets window, drag-and-drop them onto your
control.Blend.5. Once you have the hyperlinks on your design surface, double-click on them to edit the text of the first one as About, the second as Contact, and the last one as Locations. This should create a screen that looks like the following:

6. Enable each of these links to navigate to the corresponding pages when a user touches the link on the phone. This is easily done by selecting the hyperlink button, and then on the properties window setting the
NavigationUriproperty to the correspondingpage, as seen in the following screenshot:
7. In this example, we are selecting the
NavigationUrifor the About button. Simply select theAbout.xaml. Repeat this step for the Contact and Locations links.8. Now run the application by hitting F5. You can now see that clicking on the items in the emulator navigates to the corresponding pages in your application. This includes using the back button that is located on the phone.
This simple form of navigation works by utilizing the underlying navigation framework built into the application. In Silverlight, pages are defined in the System.Windows.Controls.Page class. The Windows Phone Portrait Page items you added to the solution are instances of a subclass of the type, Microsoft.Phone.Controls.PhoneApplicationPage. It defines phone-platform-specific events and properties including the BackKeyPress event, which is raised when the phone's hardware back button is pressed.
When you set the NavigationUri property of each link, what is actually happening is that it is setting this property in the XAML, as you can see in the following code:
<Grid x:Name="ContentPanel" Grid.Row="1" Margin="12,0,12,0">
<HyperlinkButton Content="About" Grid.Row="1" NavigateUri="/NavigationExample;component/Views/About.xaml"/>
<HyperlinkButton Content="Contact" Grid.Row="2" NavigateUri="/NavigationExample;component/Views/Contact.xaml"/>
<HyperlinkButton Content="Locations" Grid.Row="3" NavigateUri="/NavigationExample;component/Views/CompanyLocations. xaml"/>
</Grid>
Note
Downloading the example code
You can download the example code files for all Packt books you have purchased from your account at http://www.PacktPub.com. If you purchased this book elsewhere, you can visit http://www.PacktPub.com/support and register to have the files e-mailed directly to you.
As you can see, it doesn't just set the NavigationUri to a simple file path like you might expect if you have done web development before. Instead it is setting it to a path that includes the namespace of the project. In this case, the namespace is NavigationExample. This allows you, in more complex examples, to navigate to controls that are merely referenced in other assemblies.
While this navigation is simple, you usually want to pass some information from one control to another. You can do this with a query string much like you would do in a traditional web application. For example, your NavigateUri may look something more like this:
"/NavigationExample;component/Views/DetailsPage.xaml?selectedItem=2"
Then on your details page, you would need to retrieve the value by handling the query string in the navigation load of your DetailsPage.xaml, as seen in the following code:
protected override void OnNavigatedTo(NavigationEventArgs e)
{
string selectedIndex = "";
if (NavigationContext.QueryString. TryGetValue("selectedItem", out selectedIndex))
{
int index = int.Parse(selectedIndex);
DataContext = App.ViewModel.Items[index];
}
}
This provides you with the basic functionality for passing values from one page to another.