
Registering as an Apple developer and enrolling in one of the iOS Developer Programs are prerequisites for anyone wishing to write iOS apps.
Although you can enroll in a free program, if you want to install your applications on devices and distribute them in the App Store, you will need to pay a $99 annual fee to join the standard program.
Those developing with the iOS SDK can select the free program and test their apps using the iOS simulator, which is provided with Apple's official development tools. Unfortunately, native iOS apps built with Flash Professional do not run on the simulator. Therefore, if you want to fully test the examples provided in this book, you will need to install them on an iOS device.
Note
Within Flash Professional, you can use the AIR Debug Launcher (ADL) to test your applications on the desktop; however, no iOS device capabilities are supported thus restricting ADL's usefulness.
Let us take a look at the steps required to enroll.
Enrollment takes place on the Apple Developer website. If you aren't using Apple's Safari browser, then it is recommended that you download and install it, as problems are reported from time to time when trying to use certain areas of the site on other browsers.
Safari is the default web browser preinstalled on Mac OS X. Those using Windows, who don't already have Safari, can download it from www.apple.com/safari/download.
If you already have Safari installed, then make sure that you have the most recent version.
Tip
There are several paths you can take during the enrollment process and once you have completed it, it may not be possible to change some of your choices. Think carefully before submitting your enrollment details and purchasing your Developer Program. You may want to first read through this recipe in its entirety to ensure that you are fully aware of all the options available to you.
Visit the Apple developer website at http://developer.apple.com. Scroll down the page until you see the Join the iOS Developer Program link as shown in the following screenshot:

Click on the link. You will be taken to the iOS Developer Program page where you will find an Enroll Now button at the top of the page.
Click on the Enroll Now button to move to the Enroll in the Apple Developer Programs page. The three main steps required for enrollment are listed on this page. They are:
Register as an Apple Developer
Select Your Programs
Complete Your Purchase
At the bottom of the page is a Continue button, which will begin the process of taking you through each of these steps. Go ahead and click on it.
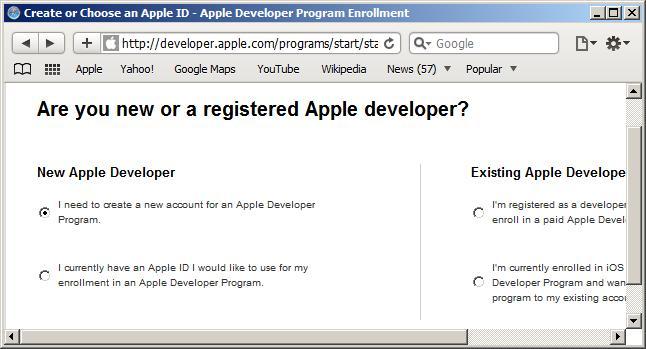
From the Are you new or a registered Apple developer? page, you will be able to register as a new Apple developer. Within the New Apple Developer column, click on the I need to create a new account and Apple ID for an Apple Developer Program radio button as shown in the following screenshot:
Click on the Continue button to move to the Are you Enrolling as an Individual or Company? page.
Two options are provided. Enroll as an individual or enroll on behalf of a company.
Depending on your needs, click on either the Individual or the Company button at the bottom of the page.
Now complete your personal profile by performing the following tasks:
Specify a desired Apple ID and password.
Set up some security information that can be used to verify your identity.
Submit your personal information.
Note
When submitting your contact information, the name you specify will appear as the "seller" for any apps you distribute on the App Store.
Do not attempt to add an alias or organization name within the name fields. This will most likely result in failure of your Apple Developer registration or suspension of your account when the error is eventually noticed by Apple.
If you want to have a company name to appear as the "seller", then enroll as a company and provide Apple with the relevant legal documentation to verify your identity.
If you are registering as an individual, then enter your first and last name into the Company/Organization field.
Read the information provided on the displayed page carefully and once you have completed the form, click on the Continue button which will take you to the Complete your professional profile page.
For the Which Apple platforms do you develop with? field, check on the iOS checkbox. This will reveal a list of additional fields that must be populated.
When you come to the Please select the primary category for your application(s) field, ensure that you click on the Commercial Applications radio button.
Note
By selecting to develop commercial applications, you will have to provide your banking details before you can distribute your apps; however, you won't be asked for this information as part of the enrollment process. If you plan only to distribute free apps, then you can select the Free Applications radio button and no banking details will be required. This option will suffice for the examples within this book; however, if you plan to sell apps at some point, then stick with the Commercial Applications option.
Once you have provided answers for all the fields in the form, click on the Continue button at the bottom of the page.
Carefully read the Registered Apple Developer Agreement that is displayed. Acknowledge that you have read it by checking on the checkbox and then clicking on the I Agree button at the bottom of the page.
A verification code will be sent to your e-mail address. Retrieve the code and enter it into the text field provided on the Enter the verification code sent to your email page. Click on Continue.
A second e-mail will be sent confirming that you are now a registered Apple developer.
Within your web browser you will be taken to the Enter your billing information for identity verification page.
Enter your first and last name exactly as they appear on your credit card. Also provide your credit card billing address.
Click on the Continue button at the bottom of the page.
The Select Your Program page will appear. As shown in the following screenshot, check on the iOS Developer Program checkbox and click on Continue at the bottom of the page:

The next page will let you review your enrollment information. Verify that you have selected the iOS Developer Program and that your personal details and billing information are correct. If any of the information is incorrect, click on the Go Back button at the bottom of the page and make any necessary alterations.
Click on Continue to submit your enrollment information to Apple.
The Program License Agreement page will appear. Acknowledge that you have read it by checking on the checkbox, then click on the I Agree button at the bottom of the page.
A purchase page will appear. Click on Add to cart to proceed to your country's online store in order to purchase your program.
A new browser window will open and you will be taken to the Apple Store. Confirm that your iOS Developer Program is in your basket and click on the Checkout Now button on the right side of the page to purchase the item.
An activation e-mail will be sent to you within 24 hours. When you receive it, follow the instructions to activate your iOS Developer Program.
Registering as an Apple developer and activating your Developer Program enables you to access the iOS Provisioning Portal through Apple's iOS Dev Center website. The iOS Provisioning Portal takes you through the necessary steps to test and distribute your apps on iOS devices, and will be used throughout this chapter.
You will use the Apple ID and password that you set up to log into the iOS Dev Center at http://developer.apple.com/devcenter/ios.
The following additional pieces of information are worth considering.
If you opt to enroll as a company, then you can add additional team members to your account who can access iOS Developer Program resources. This will allow, for example, other team members to generate and download the developer files required to build and deploy apps to an iOS device.
If you enroll as an individual, then you will be the sole developer who has access to the program resources. It will be your responsibility to generate all required developer files and manage the list of test devices.
The iOS Dev Center contains a wealth of resources. While the documentation and tools available are aimed at developers using the iOS SDK, you will find some that will be of use when building your own apps with Flash Professional.
An important document to start with is the iOS Human Interface Guidelines at http://developer.apple.com/library/ios/#documentation/UserExperience/Conceptual/MobileHIG. It describes the guidelines and principles that help you create apps that feel as though they were designed specifically for iOS.
Also, if you are planning to release your apps on the App Store, then read the App Store Review Guidelines at http://developer.apple.com/appstore/guidelines.html.
If you are developing on Mac OS X you may also want to download the developer toolset. While this book will not cover Apple's developer tools, spend some time exploring the Instruments application, which comes as part of the bundle, and provides powerful profiling and debugging features that can help you fine tune your apps.
A good place to start is the Introduction to Instruments User Guide at http://developer.apple.com/library/ios/#documentation/DeveloperTools/Conceptual/InstrumentsUserGuide/Introduction.