
Pages is the equivalent of Microsoft Word in iWork, and its touch interface makes it an entirely different experience. Editing involves a lot of tapping, twisting, panning, and dragging. In this recipe, we'll create a very basic document, inserting text, images, and shapes. We'll also discuss templates and just how useful they can be.
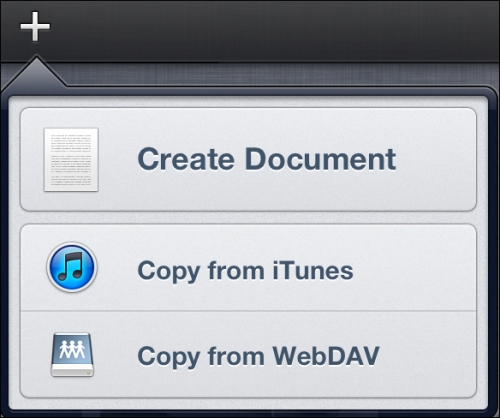
Open Pages and tap the plus icon in the upper-left corner of the screen, as shown in the following screenshot. Select Create Document and choose Blank:
Let's begin by creating a very basic document with some text, an image, and a shape. We'll be using the plus icon and its variations a lot as this is our way of adding elements to the page.
In our blank document, select the plus icon in the upper-right corner, as shown in the following screenshot:

Select a photo from the Photo Library. It will display on the page, and we're able to resize it by tapping and dragging on the circles surrounding the image. We can rotate our image by using the two-finger gesture, twisting the image around, as follows:

Let's go ahead and use the plus icon in the upper-right corner to select an arrow shape for our document, as follows:

After you've selected the right-facing arrow and it's displaying on the page, tap and select Copy, duplicating the arrow so we have two arrows on the screen. Tap outside of the arrow and hit Paste. You can now position the arrows as you please.
Let's give Copy and Paste a try with the image we selected from our photo gallery. Tap to select the image, select Copy, tap outside of the image, and select Paste. We can always undo our work by tapping Undo in the upper-left corner. Tap and hold the Undo button and we see a Redo button appear. This will return our edit to its state prior to the undo action.
Now we've got two images and two arrows. Let's label our images with some text. Once again, select the plus icon in the upper-right corner of the screen. In Shapes, just as we did for the arrow, we'll select the T icon. A textbox appears, and the keyboard will pop up. Let's describe our images by adding text and moving it around the page. This will give us a final result of two images, two shapes, and two text fields, as shown in the following screenshot:

That's all there is to it. We've created a basic document using three elements.
We use the plus icon a lot when we're creating documents from a blank page. Along with the plus icon, utilizing tools such as Copy, Paste, Undo, and the options within the brush icon will help with all of your element needs. Formatting text is a bit more complicated, and for that, it's best to start with a template. This helps us gain an understanding of how to format text.
Creating a document from a blank page isn't our only option, so let's run through using a template.
Back out of our newly created document by hitting the Documents button.
Tap the plus icon and select Create Document.
The top of the screen will say Choose a Template, and that's exactly what we'll do.
Select Modern Photo Letter.
After the page has loaded, tap on each paragraph of the page. Notice the upper formatting bar. The font size, paragraph style, and other elements will change in order to reflect the item's formatting. Tapping on the brush icon will give you a deeper look at the formatting, more so than the top formatting toolbar. Inspect the images and notice the differences in the upper toolbar, such as font size and styling, as shown in the following screenshot:

Have fun playing with the different templates. It's the best way to hone your formatting skills.
In the next recipe, we'll share the basic document we just created. We'll breeze through it as we find it to be almost identical to sharing in Keynote and Numbers.