

Sometimes, a processing function needs to be applied only to a portion of an image. OpenCV incorporates an elegant and simple mechanism to define a subregion in an image and manipulate it as a regular image. This recipe will teach you how to define a region of interest inside an image.
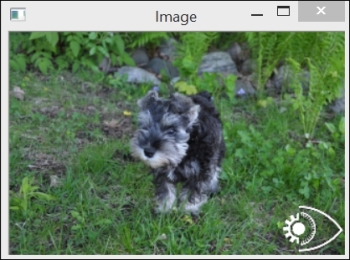
Suppose we want to copy a small image onto a larger one. For example, let's say we want to insert the following small logo in our test image:

To do this, a Region Of Interest (ROI) can be defined over which the copy operation can be applied. As we will see, the position of the ROI will determine where the logo will be inserted in the image.
The first step consists of defining the ROI. Once defined, the ROI can be manipulated as a regular cv::Mat instance. The key is that the ROI is indeed a cv::Mat object that points to the same data buffer as its parent image and has a header that specifies the coordinates of the ROI. Inserting the logo would then be accomplished as follows:
  // define image ROI at image bottom-right
  cv::Mat imageROI(image,
              cv::Rect(image.cols-logo.cols, //ROI coordinates
                       image.rows-logo.rows,
                       logo.cols,logo.rows));// ROI size

  // insert logo
  logo.copyTo(imageROI);
Here, image is the destination image, and logo is the logo image (of a smaller size). The following image is then obtained by executing the previous code:
One way to define an ROI is to use a cv::Rect instance. As the name indicates, it describes a rectangular region by specifying the position of the upper-left corner (the first two parameters of the constructor) and the size of the rectangle (the width and height are given in the last two parameters). In our example, we used the size of the image and the size of the logo in order to determine the position where the logo would cover the bottom-right corner of the image. Obviously, the ROI should always be completely inside the parent image.
The ROI can also be described using row and column ranges. A range is a continuous sequence from a start index to an end index (excluding both). The
cv::Range structure is used to represent this concept. Therefore, an ROI can be defined from two ranges; in our example, the ROI could have been equivalently defined as follows:
imageROI= image(cv::Range(image.rows-logo.rows,image.rows),
                cv::Range(image.cols-logo.cols,image.cols));
In this case, the operator() function of cv ::Mat returns another cv::Mat instance that can then be used in subsequent calls. Any transformation of the ROI will affect the original image in the corresponding area because the image and the ROI share the same image data. Since the definition of an ROI does not include the copying of data, it is executed in a constant amount of time, no matter the size of the ROI.
If you want to define an ROI made of some lines of an image, the following call can be used:
cv::Mat imageROI= image.rowRange(start,end);
Similarly, for an ROI made of some image columns, the following can be used:
cv::Mat imageROI= image.colRange(start,end);
The OpenCV methods and functions include many optional parameters that are not discussed in the recipes of this book. When you wish to use a function for the first time, you should always take the time to look at the documentation to learn more about the possible options that this function offers. One very common option is the possibility to define image masks.
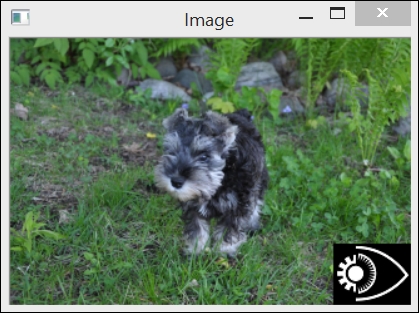
Some OpenCV operations allow you to define a mask that will limit the applicability of a given function or method, which is normally supposed to operate on all the image pixels. A mask is an 8-bit image that should be nonzero at all locations where you want an operation to be applied. At the pixel locations that correspond to the zero values of the mask, the image is untouched. For example, the copyTo method can be called with a mask. We can use it here to copy only the white portion of the logo shown previously, as follows:
// define image ROI at image bottom-right
imageROI= image(cv::Rect(image.cols-logo.cols,
                         image.rows-logo.rows,
                       logo.cols,logo.rows));
// use the logo as a mask (must be gray-level)
cv::Mat mask(logo);

// insert by copying only at locations of non-zero mask
logo.copyTo(imageROI,mask);
The following image is obtained by executing the previous code:
The background of our logo was black (therefore, it had the value 0); therefore, it was easy to use it as both the copied image and the mask. Of course, you can define the mask of your choice in your application; most OpenCV pixel-based operations give you the opportunity to use masks.
The
rowandcolmethods that will be used in the Scanning an image with neighbor access recipe of Chapter 2, Manipulating Pixels. These are a special case of therowRangeandcolRangemethods in which the start and end indexes are equal in order to define a single-line or single-column ROI.