
We have completed the first step of configuring our development environment to develop and run Vaadin applications. Now let's get started with the real cool stuff: the code.
Open the file WelcomeUI.java (or MyVaadinUI.java if you are using NetBeans or Maven). You will see something like this:
package com.example.welcome;

import com.vaadin.server.VaadinRequest;
import com.vaadin.ui.Button;
import com.vaadin.ui.Button.ClickEvent;
import com.vaadin.ui.Label;
import com.vaadin.ui.UI;
import com.vaadin.ui.VerticalLayout;

public class WelcomeUI extends UI {

  protected void init(VaadinRequest request) {
    final VerticalLayout layout = new VerticalLayout();
    layout.setMargin(true);
    setContent(layout);

    Button button = new Button("Click Me");
    button.addClickListener(new Button.ClickListener() {
      public void buttonClick(ClickEvent event) {
        layout.addComponent(new Label("Thank you for clicking"));
      }
    });
    layout.addComponent(button);
  }
}
This is going to be like a crash course on Vaadin 7. Let's pretend that we have created the previous class starting with an empty one like the following (package and import declarations will be omitted):
public class WelcomeUI {
}
This class will be the root of all our UI components. When you create a Vaadin application, and once the user browses to the URL the application has been deployed to, a web page will be automatically generated using the logic you've implemented in a certain method of this class. Which method? One overridden from the UI class, so first, we got to extend the UI class as follows:
public class WelcomeUI extends UI {
}
And the method to override is as follows:
public class WelcomeUI extends UI {

  protected void init(VaadinRequest request) {
  }

}
Note
Where is the init method called from? A Java web application is implemented using the Servlet technology. In short, a Servlet is a class that adds functionality to a web server. You can pair URLs with your own Servlet implementations and call any code you need to fulfill the requirements for your application. You do this in the web.xml file (or using annotations). Vaadin has a custom Servlet implementation which can be configured to call your own UI class implementation. Take a look at the web.xml file and find the Vaadin Servlet (com.vaadin.server.VaadinServlet).
Because this method will be called when the user browses to the application URL, you have the chance to build the user interface here. This is done by building a components tree. It's like a hierarchy where the components are arranged. We have already created the root component for the hierarchy, our WelcomeUI class. Now we can add visual components into the root component. But let's first see graphically how the component hierarchy should look when we finish our piece work:
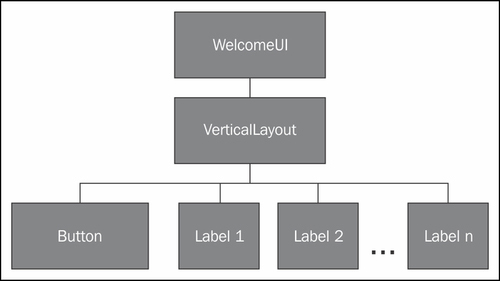
What we have here is a WelcomeUI having a VerticalLayout which has a Button and some Labels. VerticalLayout, what's that? Think of it as an invisible component that allows you to arrange its child components vertically on the page, one upon another. So the button is on the top, then goes the first label, then the second label, and so forth.
Ok, back to the code. Take a look at how we can add that VerticalLayout invisible thing:
public class WelcomeUI extends UI {

  protected void init(VaadinRequest request) {
    VerticalLayout layout = new VerticalLayout();
    setContent(layout);
  }

}
We've created an instance of VerticalLayout and then set it to be the content of the UI. By calling the setContent(layout) method we are saying that layout is a child of our WelcomeUI instance.
Now we have a layout in which we can add the button and all the n labels. Let's do it for the button:
public class WelcomeUI extends UI {

  protected void init(VaadinRequest request) {
    VerticalLayout layout = new VerticalLayout();
    setContent(layout);

    Button button = new Button("Click Me");
    layout.addComponent(button);
  }

}
No rocket science. We create an instance of Button and add it to the layout. This means the button is a child of layout, it will be displayed inside the VerticalLayout.
At this point, if we run the application, a button will be shown but it won't produce any response when clicked. Let's change that boredom:
public class WelcomeUI extends UI {

  protected void init(VaadinRequest request) {
    VerticalLayout layout = new VerticalLayout();
    setContent(layout);

    Button button = new Button("Click Me");
    button.addClickListener(new Button.ClickListener() {
      public void buttonClick(ClickEvent event) {
        // this will be called when button is clicked
      }
    });
    layout.addComponent(button);
  }

}
Don't be afraid, we've added five lines of code, but most of them are brackets or comments. Button has a method that allows you to add click listeners. A click listener is a class that listens to click events, that's it. Here, we are using an anonymous class (you know Java, right?):
new Button.ClickListener() {
  public void buttonClick(ClickEvent event) {
    // this will be called if button is clicked
  }
}
This class is an anonymous implementation of the
Button.ClickListener interface. We are passing the just created instance to the addClickListener method in order to connect our code with the click event on the button. This kind of usage of anonymous classes is very common when developing Vaadin applications, especially in places where you need this callback behavior.
We are ready to add the logic needed to dynamically add all those labels into the layout. We have a listener defining a method that will be called each time the button is clicked. So let's add the corresponding logic in that method:
public class WelcomeUI extends UI {

  protected void init(VaadinRequest request) {
    final VerticalLayout layout = new VerticalLayout();
    setContent(layout);

    Button button = new Button("Click Me");
    button.addClickListener(new Button.ClickListener() {
      public void buttonClick(ClickEvent event) {
        Label label = new Label("Thank you for clicking");
        layout.addComponent(label);
      }
    });
    layout.addComponent(button);
  }

}
This is similar to when we added a button to the layout. This time we're adding a label. A label allows you to show non-editable texts.
Label components can display text in several formats. You can display plain text (that's the default), preformatted text, and HTML text. What if you want to display the "Thank you" part of the message on the label using a bold font?
You are one line far of doing that. Try it! Use the setContentMode method of Label and the ContentMode enumeration to display HTML messages on your page.
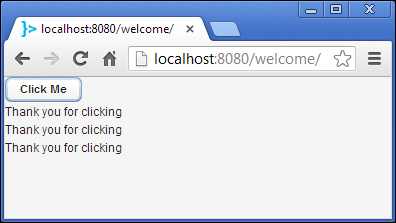
If we run the application right now, we will see a screen as shown in the following screenshot (before clicking the button several times, of course):
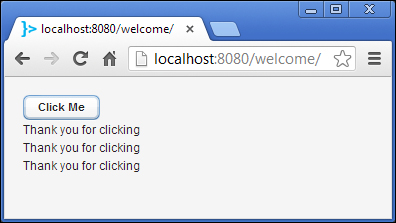
It looks a little tight on the page. We can add some space around the layout using the setMargin method as shown in the following code snippet:
public class WelcomeUI extends UI {

  protected void init(VaadinRequest request) {
    final VerticalLayout layout = new VerticalLayout();
    layout.setMargin(true);
    setContent(layout);

    Button button = new Button("Click Me");
    button.addClickListener(new Button.ClickListener() {
      public void buttonClick(ClickEvent event) {
        Label label = new Label("Thank you for clicking");
        layout.addComponent(label);
      }
    });
    layout.addComponent(button);
  }

}
Now it will appear as follows:
That's it. If you make some little refactor, you will get the original application that your IDE (or Maven) created.