

In this recipe we will cover how to download and install Java Development Kit (JDK) and Eclipse; we will also create our sample project that we will use for our debugging purposes throughout the book, and at the end of this recipe I will give you a cheat sheet containing some of the most useful key shortcuts that will help you to navigate through your project.
Eclipse is written in Java, so one of the prerequisites for using Eclipse is JDK. There are a couple of JDKs available. I advise you to use OpenJDK for Linux as it is installable with a single command, and Oracle Java for Windows/Solaris.
If you are using OSX, you are lucky. OSX comes with JDK, so you don't need to install it. You can proceed directly to the part where you download and install Eclipse.
Installing JDK on Linux
First of all, let's ensure that Java is not already installed in your system. Open Terminal and type [aspektor@*]$ java –version.
If you see something like the following, it means that most probably Java is not installed in your system:
-bash: java: command not found
If you see an output like the following, it means that you already have Java installed, so you can proceed to install Eclipse:
java version "1.7.0_09-icedtea"
OpenJDK Runtime Environment (fedora-2.3.3.fc17.1-x86_64)
OpenJDK 64-Bit Server VM (build 23.2-b09, mixed mode)
To install the latest Java version of OpenJDK, perform the following steps:
Go to http://openjdk.java.net/install/index.html and find a command for JDK (not JRE) that corresponds to your version of Linux. For example, I am using Fedora 17, and currently the latest OpenJDK version is JDK 7. So I go to the OpenJDK website http://openjdk.java.net/install/index.html, and then copy and paste the following command to my Terminal (if you are using Ubuntu or Debian, make sure that you copy the right command):
[aspektor@*]$ su -c "yum install java-1.7.0-openjdk"After the installation is completed you need to make sure that Java is installed. Type
[aspektor@*]$ java -version. My output is as follows:java version "1.7.0_09-icedtea" OpenJDK Runtime Environment (fedora-2.3.3.fc17.1-x86_64) OpenJDK 64-Bit Server VM (build 23.2-b09, mixed mode)
If you have the same output, good job! You can now move to the part where you install Eclipse.
Installing JDK on Windows
First of all we need to make sure that JDK is not already installed on your Windows machine.
Open Command Prompt and type
C:\> java –version.If you get something similar to the following output, it means that Java is most probably not installed on your machine:
'java' is not recognized as an internal or external command operable program or batch file,If you see the output similar to the following, it means that Java is already installed on your machine and you can proceed directly to the Eclipse installation part:
Java version "1.7.0_09"
Java <TM> SE Runtime Environment Standard Edition .....
To install the latest JDK to your Windows machine you will need to go to the Oracle Java website http://www.oracle.com/technetwork/java/javase/downloads/index.html.
There you will see different Java configurations. You will need to download the latest version of Java Platform (JDK) (for now, the latest version is 7u9) as shown in the following screenshot:
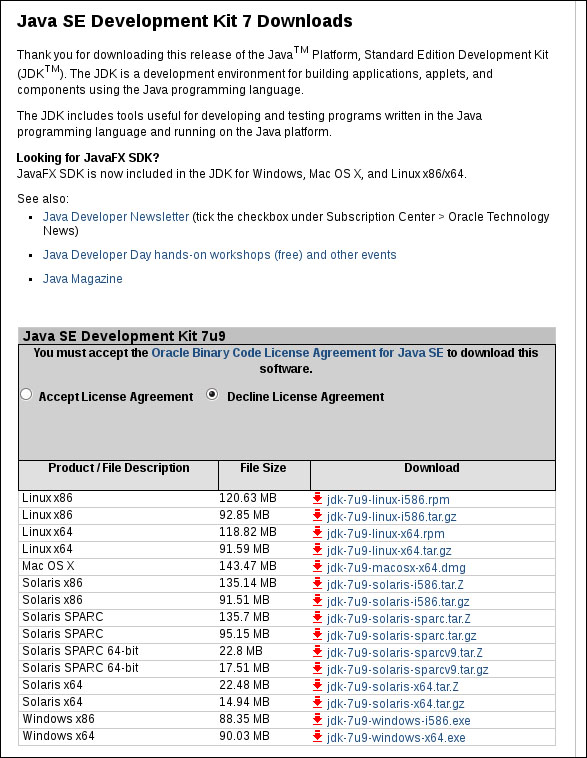
Click on Accept License Agreement, choose your architecture, and start downloading.
When the file finishes downloading, open it, click on Next, and you will see a window similar to the following screenshot:
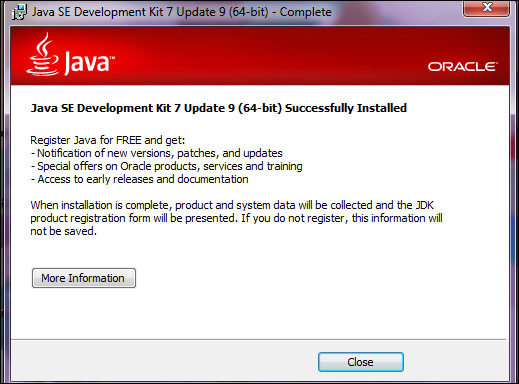
Click on Close, open Command Prompt, and check that you have Java installed, as shown in the following screenshot:

If you see an output similar to mine, good job! Let's proceed to install Eclipse.
Now we can proceed with the downloading and installation of Eclipse. The good news is that no matter what platform you are on, the downloading and installation process is almost the same.
With the following steps, let's see how to download and install Eclipse:
The first step is to download Eclipse from the official Eclipse website, http://www.eclipse.org/downloads.

There are a couple of options available, but as we are going to work with Java, we will need to download Eclipse IDE for Java Developers, which is the second option in the previous screenshot.
Choose your architecture (32 or 64 bit) and start downloading.
If you are installing Eclipse on Windows, please make sure that your Eclipse architecture corresponds to the architecture of JDK. (Installing JDK on Windows shows how to check your Java version.)
When the file finishes downloading, unzip it to the directory of your choice.
Go to the
eclipsedirectory (the one you have just unzipped) and run the Eclipse.exefile.After a couple of moments you will see a window offering to select a workspace. If you haven't used Eclipse in your machine before, leave the workspace as it is (for example, for me it is
/Users/anatolyspektor/Documents/workspace), whereas if you have installed Eclipse and the workspace already exists, rename the workspace toworkspace1or something similar. Click on Ok. It will load the workbench, and then you will be prompted to the Eclipse interface.
If your interface is similar to mine, congratulations! You have just downloaded and successfully installed Eclipse.
To start debugging we need to create our sample project first. Let's do that with the following steps:
Go to File | New | Java Project.
In the Create a Java Project window, name the project as
how-to-debugand click on Finish.Close the Welcome tab and you should see something similar to the following screenshot:

Now expand the how-to-debug project's tree (click on the gray arrow before the project's name) and you will see that there is an src folder. In this folder we will store our classes.
Right-click on the src folder and select New | Class. In the Java class window enter
how.to.eclipseas a package,Employeeas a name, and check the public static void main(String[] args) option. It will give us a template of themain()method so that we don't have to write it ourselves. Your Java class window should look like the following screenshot:
Click on Finish. You should see that a new class file has appeared in your Package Explorer area under the src folder. The class is populated with the
main()method. It should look like the following screenshot: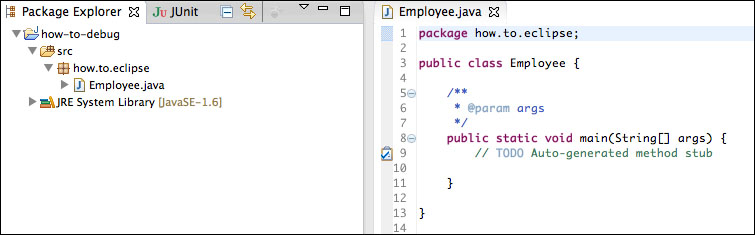
Now let's fill in the
Employeeclass with a couple of variables such as the position of the employee, employee number, and employee age. Let's also create methods that will set these variables and invoke this information if needed. Finally, let's override thetoString()method so that we can see the output of our program.
Our sample program will look like the following code:
1.   package how.to.eclipse;
2.
3.   import java.util.Arrays;
4.
5.
6.   public class Employee {
7.
8.   private String position; // Employee Position
9.   private int number; // Employee Number
10.  private int age; // Employee Age
11.
12.  // Declaring Constants
13.  private static final String[] validPositions  = {"engineer", "tester","executive"};
14.  public static final int MIN_AGE = 19;
15.  public static final int MAX_AGE = 84;
16.  public static final int MAX_EMPLOYEE_NUM = 9999;
17.  public static final int MIN_EMPLOYEE_NUM = 0;
18.
19.
20.  /**
21.  * Setter function that sets Employee position
22.  * <p>
23.  * This method checks if the position is in the validPositions array,
24.  * if it exists, it sets the Employee class variable to position provided by user.
25.  * <p>
26.  * @param _position employee position set by user
27.  * @param validPositions array of valid positions
28.  *
29.  */
30.  public void setPosition (String _position) {
31.     if (Arrays.asList(validPositions).contains(_position)){
32.       position = _position;
33.     }
34.  }
35.
36.
37.  /**
38.  * Setter function that sets Employee number
39.  * <p>
40.  * This method checks if the Employee number is in the valid range
41.  * and sets the class Employee number variable to Employee number provided by user.
42.  * <p>
43.  * @param _numer employee number set by user
44.  */
45.  public void setNumber (int _number) {
46.     if (_number >= MIN_EMPLOYEE_NUM && _number <= MAX_EMPLOYEE_NUM ){
47.       number = _number;
48.     }
49.  }
50.
51.  /**
52.  * Setter function that sets Employee age
53.  * <p>
54.  * This method checks if the Employee age is in the valid range
55.  * and sets the Employee age to Employee age provided by user.
56.  * <p>
57.  * @param _age employee number set by user
58.  *
59.  */
60.  public void setAge (int _age) {
61.     if ( _age >= MIN_AGE && _age <= MAX_AGE){
62.       age = _age;
63.     }
64.  }
65.
66.  /**
67.  * Getter functions that returns employee position
68.  *
69.  * @return employee position
70.  */
71.  public String getPosition () {
72.     return position;
73.  }
74.
75.  /**
76.  * Getter functions that returns employee age
77.  *
78.  * @return employee number
79.  */
80.  public int getAge () {
81.     return age;
82.  }
83.
84.  /**
85.  * Getter functions that returns employee number
86.  * <p>
87.  * @return employee number
88.  */
89.  public int getNumber () {
90.     return number;
91.  }
92.
93.  @Override
94.  public String toString () {
95.     return "\nEmployee No: "+this.getNumber()+
96.     "\nEmployee Position: "+this.getPosition()+
97.     "\nEmployee Age: "+this.getAge()+"\n";
98.
99.  }
100.
101. /**
102. * main method
103. */
104. public static void main (String[] args) {
105. /*
106. Creating new object called andrew,
107. setting all three parameters and printing them out.
108. */
109. Employee andrew = new Employee ();
110. andrew.setNumber(123);
111. andrew.setAge(28);
112. andrew.setPosition("tester");
113. System.out.println("-=Employee Andrew=-"+andrew.toString());
114. }
115. }
Tip
Downloading the example code
You can download the example code files for all Packt books you have purchased from your account at http://www.packtpub.com. If you purchased this book elsewhere, you can visit http://www.packtpub.com/support and register to have the files e-mailed directly to you.
This will be our sample program that we will upgrade throughout the book. To run it, just click on the  icon located on the upper panel.
The output should look like the following screenshot:

Now, as we have just created our first sample project, it would be a good idea to learn how to navigate through the code.
Eclipse provides a series of useful shortcuts that will allow you to be much more efficient when coding and debugging your Java project.
Useful Eclipse shortcuts
Before we move to the default Eclipse shortcuts, I want to let you know that you can change any shortcut by going to Window | Preferences | General | Keys. However, I advise you to use the default shortcuts, because when you change one shortcut, it can affect other shortcuts, or in some cases override the default key functionality. For example, if you set the run command to Shift + R, you won't be able to use capital R anymore, as every time you type Shift + R, the run command will be invoked. This is something you should keep in mind.
Let's take a look at the table showing some of the most used Eclipse shortcuts:
|
Navigation |
Description |
|---|---|
|
Ctrl + L |
Go to line |
|
F3 |
Open declaration |
|
Ctrl + O |
Go to a method or variable (start typing when a list of method and variables is populated to narrow the search) |
|
Ctrl + E |
Quickly switch between the opened files |
|
Alt + →/Alt + ← |
Navigate through the places you have recently visited |
|
Ctrl + Shift + P |
Go to the matching bracket |
|
Ctrl + Q |
Go to the last modification |
|
Ctrl + T |
Go to the super class |
|
Search |
Description |
|
Ctrl + F |
Find and replace |
|
Ctrl + H |
Smart search |
|
Ctrl + Shift + R |
Search for the filename within the project (start typing when the window with the filenames is populated to narrow the search) |
|
Ctrl + Shift + T |
Search for Java types |
|
Select method/variable + Ctrl + Shift + G |
Search where the method/variable was used in the whole project |
|
Code editing |
Description |
|
Ctrl + Space |
Populate the Auto-Completion dialog (use when typing in the text editor) |
|
Ctrl + Z |
Undo |
|
Ctrl + Shift + Z |
Redo |
|
Ctrl + C |
Copy |
|
Ctrl + V |
Paste |
|
Alt + Shift + R |
Refactoring (globally renames your method/variable) |
|
Debug |
Description |
|
Ctrl + Shift + B |
Add/Remove a breakpoint |
|
F5 |
Step Into |
|
F6 |
Step Over |
|
F7 |
Step Return |
|
Code formatting |
Description |
|
Select Code + Tab |
Indent multiple lines to the right-hand side |
|
Select Code + Shift + Tab |
Indent multiple lines to the left-hand side |
Try these shortcuts yourself to see how they work. Knowing these shortcuts and using them in your coding with Eclipse will save you a lot of time. Also, if you want to find more key combinations, you can go to Window | Preferences | General | Keys for the entire list.
On this wonderful note, I think we are ready to start exploring Eclipse Debug Perspective.