

This section outlines the steps to getting your own fully functional Chef Server installed and configured. There are two other primary ways to use Chef, which we will not discuss: Chef solo (local installation missing some features), or using a hosted Chef environment from Opscode. This section assumes that you will be installing the Chef Server on a Linux-based system. With some work it can be installed on other operating systems (notably systems like Unix) and possibly even on Microsoft Windows (assuming all the dependencies were available), but these are not officially supported platforms for the Chef Server.
Before we start installing software it would be good to know what components are going to be installed and see how they work together. Chef is, as has been touched on, a multi-component service that works together to provide a full set of functionality for managing system infrastructure. At the core of the system lies the Chef API service, which is responsible for delivering run lists to and receiving information from nodes as well as providing a way for a system administrator to configure recipes, run lists, data bags, and the like.
The components that make up a Chef service are:
Chef API service
Message queue (AMQP)
Data storage
Search service
Management console (optional but useful)
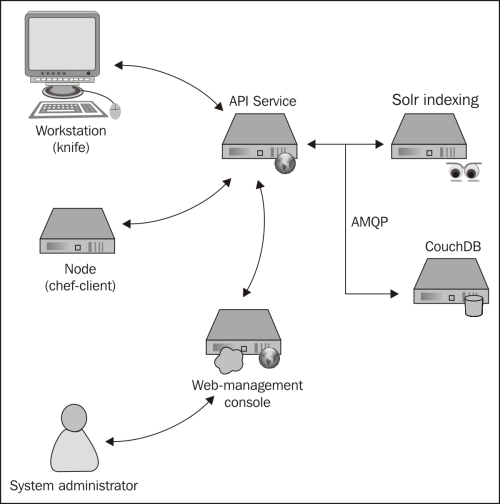
Together, these services provide a cohesive system for distributing, storing, indexing, and managing the information to manage your infrastructure's configuration.
Depending on your platform of choice, there may be binary packages available for quick installation. Specifically, Debian-based and RedHat-based distributions are supported and will have their own installation instructions outlined in this section. For those who are not using such a distribution, we will cover manually installing Chef and configuring the components needed to get started.
Tip
To get started quickly, using a Debian-based system will provide the path of least resistance. All the dependencies for Chef Server and Chef Server itself are easily available using Advanced Packaging Tool (APT).
If you will be running the server on a Debian-based Linux distribution, then you are in luck. Most modern Ubuntu and Debian releases are supported using this method and it is very simple and straightforward. The steps involved in setting up a Chef Server using a supported Debian-based distribution are as follows:
Adding the Opscode repository to your APT sources
Adding the GnuPG key to your keyring
Updating your APT repositories
Installing the Chef Server
Opscode maintains an APT repository for 0.9.x and 0.10.x releases of the Chef system. The base URL for this repository is http://apt.opscode.com/ and contains support for Ubuntu 8.04 (Hardy Heron) through the most current release of 12.10 (Quantal Quetzal) and Debian 5.0 (lenny) through the current release, wheezy.
To use the repository, you need to add the following to your sources (either directly to /etc/apt/sources.list or /etc/apt/sources.list.d/opscode.com.list, depending on your distribution):
deb http://apt.opscode.com/<distribution_codename>-0.10 main
Where distribution_codename indicates which release of the distribution you are using. If you don't already know it, you can find the distribution code name using the lsb_release utility provided by the lsb release package on Debian and Ubuntu. You can automate creating the sources.list entry using the following command:
echo "deb 'lsb_release –cs'-0.10 main" >> /etc/apt/sources.list
An example entry for Debian 6.0 (squeeze) would look like the following URL:
deb http://apt.opscode.com/ squeeze-0.10 main
In order to use the packages provided by Opscode without APT complaining about unsigned packages, you will want to add the GnuPG key (0x83EF826A) that was used to sign the packages from gnupg.net. You will need to have the gnupg package installed in order for this to work.
sudo mkdir -p /etc/apt/trusted.gpg.d
gpg --keyserver keys.gnupg.net --recv-keys 83EF826A
gpg --export [email protected] > /tmp/opscode.gpg
sudo cp /tmp/opscode.gpg /etc/apt/trusted.gpg.d/opscode-keyring.gpg
Once you have added the GnuPG key to your list of trusted keys for APT, you can update the package list for APT with the following command:
sudo apt-get update
After updating your APT repositories, you can install Chef, Chef Server, and the Opscode keyring packages (the last will keep the Opscode package key up to date):
sudo apt-get install opscode-keyring chef chef-server
During the process, a script will prompt you for three pieces of information: the Chef Server API URL (this would be the public URL that nodes and workstations would connect to, such as http://chefserver.yourcompany.com:4000/), a password for the RabbitMQ message bus, and the web management interface administrator's password.
Tip
Do not leave any of the passwords blank, doing so will likely cause you to have to re-install the Chef Server. Also note that the Chef web UI requires a password of at least six characters in length.
After you have inputted the requested information, the Chef Server will have installed and configured all the components required to run the Chef Server including the configuration files, dependencies, and init.d scripts so that the services run at boot.
After your system is up and running, you can easily proxy requests for the web interface and the API through Apache, nginx, or any other HTTP proxy frontend. Doing so will require you to update this URL but will allow you to use SSL certificates to encrypt communication to and from the API.
If you are not using a distribution that has a package-based installation method available, then you will have to install and configure Chef Server by hand. For manual installation from source code alone (including Ruby), you will need to install GCC (with C and C++), autotools (automake, autoconf, libtool), GNU make, and the OpenSSL libraries. You will also need to install some software packages that Chef Server relies on. As of this writing, those pieces, and their versions are as follows:
|
Package |
Purpose |
Version |
|---|---|---|
|
|
Chef API is written using Ruby + Merb |
1.8.7 + |
|
|
Install chef and Ruby library dependencies |
1.8.10 + |
|
|
Data storage server |
0.9.1 + |
|
|
AMQP message server |
1.6 + |
|
|
Chef Server dependency |
3.5 + |
|
|
Chef-solr search engine dependency | |
|
|
Chef-solr search engine dependency |
Most distributions have some sort of mechanism for installing Ruby, but if you are installing Ruby by hand, please make sure to enable SSL as Chef will not be able to sign requests without SSL support. For more information on how to install Ruby, either see the official Ruby website, or try installation via rbenv or rvm.
Installing Rubygems, once Ruby is installed, is straightforward, and will yield a binary named gem that you can use to install Ruby packages:
$> mkdir –p ~/src
$>cd ~/src
$>wget http://production.cf.rubygems.org/rubygems/rubygems-1.8.24.tgz
$>tar xvfz rubygems-1.8.24.tgz
$>cd rubygems-1.8.24
$>sudo ruby setup.rb
For more information on installing Rubygems, see the Rubygems website at http://rubygems.org
For those unfamiliar with the Ruby world, gems are Ruby's way of distributing libraries and modules that have been developed and packaged for distribution. Chef is no different, as it is written in Ruby and open source.
Assuming that you have installed Ruby and Rubygems as a system-wide installation, you will need to run the following command (as an administrator):
$>sudo gem install chef
This will query rubygems.org for the latest version of Chef (10.16.2 as of this writing) and any dependencies that Chef needs (which may, in turn require that you install some auxiliary libraries or packages on your system, depending on your configuration). Some of these libraries are written and maintained by Opscode, others are publicly available open source gems. For a complete and current list of what it is dependent upon, see the Rubygems database entry for Chef at http://rubygems.org/gems/chef.
CouchDB and RabbitMQ are both developed using Erlang. If there are no packages available for these two pieces of software, and no way to install Erlang via package, you may have to install it from source, along with RabbitMQ and CouchDB. For information about these, see the following resources:
Once they are installed, CouchDB requires no special configuration beyond setting it up to run at boot; Chef Server will create its own database when it first starts up if the database does not exist yet.
RabbitMQ requires a little bit of configuration to make things work—you need to set up a message bus for Chef Server to use. This message bus is used to send data to Solr for indexing at the same time as sending it to CouchDB. By default, Chef expects an Advanced Message Queuing Protocol (AMQP) service to be available and provide an endpoint of /chef with the user chef having permission to read from and write to the queue. To do that, use the following commands:
sudo rabbitmqctl add_vhost /chef
sudo rabbitmqctl add_user chef <password>
sudo rabbitmqctl set_permissions -p /chef chef ".*" ".*" ".*"
This will construct the endpoint, create a Chef user with the password specified, and then grant permissions to Chef on /chef to configure, write, and read all resources matching the regular expression .* (that is, everything). For more information on configuring RabbitMQ, see http://www.rabbitmq.com/man/rabbitmqctl.1.man.html.
If you are this far, installing the server itself is quite simple. The server and the services it depends on are available via Rubygems:
sudo gem install chef-server chef-server-api \
                 chef-server chef-solr chef-server-webui
This will install any dependencies that these gems have that are not yet installed on the system.
Installation via APT takes care of this for you, but if you are installing manually, you will need to come up with a server.rb configuration file to tell the services where to find things and how to connect to AMQP and each other. An example server.rb file would look like the following example:
# Common log settings / URL
log_level          :info
log_location       STDOUT
ssl_verify_mode    :verify_none
chef_server_url    "http://chefserver.yourdomain.com:4000"
# Server settings
cookbook_path      [ "/var/chef/cookbooks" ]
sandbox_path       "/var/cache/chef/sandboxes"
checksum_path      "/var/chef/cookbook_index"
file_cache_path    "/var/chef/cache"
node_path          "/var/chef/nodes"
openid_store_path  "/var/chef/openid/store"
openid_cstore_path "/var/chef/openid/cstore"
role_path          "/var/chef/roles"
cache_options({ :path => "/var/cache/chef/checksums",
                :skip_expires => true})
# Client config
validation_client_name "chef-validator"
validation_key         "/etc/chef/validation.pem"
client_key             "/etc/chef/client.pem"

# Web UI configuration
web_ui_client_name     "chef-webui"
web_ui_key             "/etc/chef/webui.pem"
web_ui_admin_user_name "admin"
web_ui_admin_default_password "somerandompasswordhere"
# Chef Solr settings
search_index_path  "/var/chef/search_index"
solr_jetty_path "/var/lib/chef/solr/solr-jetty"
solr_home_path  "/var/lib/chef/solr"
solr_data_path  "/var/cache/chef/solr/data"
solr_heap_size  "256M"
# AMQP password for /chef vhost as configured above
amqp_pass          "<password>"
# Timestamp logs
Mixlib::Log::Formatter.show_time = true
You will want to review this and change any paths to match your system, make sure you create directories that are in this configuration file that do not yet exist, and check for any configuration-specific changes you would like to make. Again this is a Ruby script that configures the services so any valid Ruby can be used (such as File.join to make things simpler).
After you have the configuration file tailored to your system, you will need to start the services. Those can be started with the following commands:
sudo chef-solr
sudo chef-server -N -e production
sudo chef-server-webui -p 4040 -e production
You will likely want to figure out a way to get these to run at bootup, via init scripts, supervisord or some other method.
Once you have things installed, we should verify that things are up and running and talking to one another. The installation of Chef Server yields a number of system-services that will need to be up and running in order to successfully use the system. You should have the following components running and (optionally) listening on the following network ports:
|
Component |
What to look for |
Port |
Public? |
|---|---|---|---|
|
Chef API server |
chef-server |
4000 |
Yes |
|
Web management console |
chef-server-webui |
4040 |
Yes |
|
Data indexer |
chef-expander |
N/A |
N/A |
|
Solr |
java (running |
8983 |
No |
|
CouchDb |
|
5984 |
No |
|
RabbitMQ |
|
5672 |
No |
Public services need to be made open to any clients, nodes, or end users that expect to be using the Chef service. If any of these services are not running, you will need to consult the log files generated by the service to determine what might be preventing them from starting up.
Once we have set up the server, we need a way to interact with it. Chef provides a command-line utility, knife, that an administrator uses to interact with the service. It is run from a workstation and provides many commands for viewing, searching, interacting with, and editing data provided by the Chef service. Once you have installed and verified that all the mandatory services are running, we can move on to setting up knife.
Tip
You will see that the "standard" place to store your Chef configuration data is in $HOME/.chef (on a Unix-like system.) This is not mandatory and these files can be stored anywhere you would like.
Knife communicates with the Chef Server via HTTP and uses certificates for authentication between the client or node and the server. Once you have installed the components, create a location for your configuration, and copy over the certificates that were generated by the server during the installation, and then change their owner to your user:
mkdir $HOME/.chef
sudo cp /etc/chef/validation.pem $HOME/.chef
sudo cp /etc/chef/webui.pem $HOME/.chef
sudo chown –R $UID $HOME/.chef
Note
Chef uses signed header authentication for requests to the API, which means there must be an initial shared key for signing requests. Chef Server will generate the validation.pem file when it is first run. New nodes or clients use the validation.pem file to sign the requests used to self register.
Once you have these files copied into your working directory, it is time to configure knife itself. Fortunately, knife has an interactive configuration mode, which you can invoke using knife configure -i. Running this command will walk you through generating an initial configuration file. You will be prompted by the following questions, which you can answer with the defaults for mostly everything (non-default answers in bold):
user@chefserver:~% knife configure -i
WARNING: No knife configuration file found
Where should I put the config file? [~/.chef/knife.rb]
Please enter the chef server URL: [http://localhost:4000]
Please enter a clientname for the new client: [user]
Please enter the existing admin clientname: [chef-webui]
Please enter the location of the existing admin client's private key: [/etc/chef/webui.pem] ~/.chef/webui.pem
Please enter the validation clientname: [chef-validator]
Please enter the location of the validation key: [/etc/chef/validation.pem] ~/.chef/validation.pem
Please enter the path to a chef repository (or leave blank):
Creating initial API user...
Created (or updated) client[user]
Configuration file written to /home/user/.chef/knife.rb
Running this has two effects: first, it uses the validation key and client name specified at the prompts to contact the API service and register a new client (user) with the service and, secondly, it generates a configuration file for knife.
Because Chef and its components are written in Ruby, the resulting configuration file is (perhaps unsurprisingly) a Ruby script which contains some code that configures knife so that it knows which API server to connect to, which key files to use, what client name to use, and so on.
An inspection of the configuration file that was generated by the previous command would look like the following:
log_level                :info
log_location             STDOUT
node_name                'user'
client_key               '/home/user/.chef/user.pem'
validation_client_name   'chef-validator'
validation_key           '/home/user/.chef/chef-validator.pem'
chef_server_url          'http://localhost:4000'
After setting up knife, we can use it to validate that it was configured correctly by querying the Chef Server by using some simple commands. Knife commands follow the format knife <command><subcommand> where command is one of: client, configure, cookbook, cookbook site, data bag, environment, exec, help, index, node, recipe, role, search, ssh, status, or tag. Subcommands will vary with the command but typically include things such as show, create, list, delete, and so on.
As there will initially be no nodes, cookbooks, recipes, roles, data bags, or other pieces of information, we will query the list of clients that the server knows about. Initially, this should be a list of three users: the webui (as it is a consumer of the API itself), the chef-validator (or else nobody could register a new client), and the username you just created (in our case user).
To perform this, you would use the command client with the subcommand list to generate a list of clients that the server has in its database. An example of this, given our setup so far, would look like this:
user@chefserver:~% knife client list
  chef-validator
  chef-webui
  user
If you do not get that output, but instead get an error, you will need to go back and make sure that all the previous steps are completed and verified. Once you know that it works, you can use knife to interact with the API. Unfortunately, we do not have much data in the system just yet, but we can at least use the show subcommand in conjunction with the client command and a client name to display more detailed information about a client:
user@chefserver:~% knife client show chef-webui
_rev:        1-3f5c4e183c5ea4e96c1a26c17c991a97
admin:       true
chef_type:   client
json_class:  Chef::ApiClient
name:        chef-webui
public_key:  -----BEGIN RSA PUBLIC KEY-----
             ... omitted ...
             -----END RSA PUBLIC KEY-----
Now that you have successfully connected to the server with knife, let's move on to the next section and do some cooking!