

Now that you have a functioning Chef Server running and the tools needed to interact with it, we will discuss the steps involved in setting up nodes that talk to the Chef service and will use the information provided to install software and set up the server.
This section will take you through the process of using Chef to provision a new Ubuntu 12.10 server and set it up as a LAMP (Linux, Apache, MySQL, and PHP) server as this is a very simple and quite common server configuration at the moment. The basic steps will be as follows:
Setting up the server.
Downloading and examining cookbooks.
Uploading cookbooks into your Chef Server.
Creating and assigning roles to the node.
Completing the process by applying changes to the node.
Note
In order to provide the instructions for this section to work without modification, you will need administrative access to a system running Ubuntu 12.04 LTS with SSH service running and accessible via a network. Additionally, the system will need to be able to access the Chef Server and the public Internet for package updates and gem installation.
Bootstrapping is the process of setting up something without external intervention. Chef uses bootstrap scripts that are executed (over SSH) on a remote server to perform any initial configuration that you desire. These scripts are written using ERB (a Ruby template language) and serve as a launching pad to setting up a new server. Typically these scripts would be run on a brand new server, but can be applied to any server that you can SSH into.
Additionally, bootstrap files are Linux-distribution and Ruby-distribution dependent because they have commands that are specific to particular distributions. For example, an Ubuntu Linux server with Ruby 1.9 installed from source, or a RedHat Enterprise Linux server with Ruby 1.8.7 installed from EPEL.
In addition to any initial configuration, bootstrapping registers the node with the Chef Server so that it becomes a member of the infrastructure and can have configurations and roles applied to it.
The bootstrapping begins with developing a bootstrap script that targets the distribution and version of that distribution that is running on the server you are looking to provision. Once the script is written, the knife tool is used to remotely log into the new system and run the script to perform the initial configuration.
Knife does some interpolation locally of the bootstrap script before it is run on the server. This means that you can leverage Chef's data and configuration during the bootstrap process. Common uses here would include setting up initial firewall rules, routes, users, or other mandatory initial provisioning.
Chef provides some pre-written bootstrap scripts for the following platforms, making it easy to get started:
centos5-gems
fedora13-gems
ubuntu10.04-gems
ubuntu10.04-apt
ubuntu12.04-gems
If you are looking for an example of what a bootstrap file contains, you can find the ones provided with chef in lib/chef/knife/bootstrap inside the directory containing your Chef gem (which, if you used the Opscode packages on a Debian system, would reside in /usr/lib/ruby/vendor_ruby/chef).
I strongly suggest reading over the bootstrap script you will be using so that you have a good idea of what you're running on your system as root before doing so.
Bootstrapping a server is quite simple and involves a single invocation of knife (once your bootstrap script is complete). Knife looks for bootstrap files in a directory called bootstrap in your local Chef directory. Good names for bootstrap files would include the distribution name as well as the version and type of Ruby installation you are performing (that is, centos5-ruby19, ubuntu11.10-rvm-ruby19, and so on).
In our case, we will be using the pre-supplied bootstrap script that configures Ubuntu 12.04 with gems to bootstrap our new system. For example:
export SERVER_IP="11.22.33.44"
export USER="ubuntu_user"
knife bootstrap -x $USER --sudo $SERVER_IP -d ubuntu12.04-gems
This is where the environment variable, $SERVER_IP, is set to the IP address of your newly setup server and $USER is set to the user you created on your Ubuntu server that can execute sudo.
When executed, this command tells knife to execute the bootstrap command, which is responsible for loading the bootstrap script specified by the -d flag (-d is for distribution) over SSH logging into the remote server specified by the environment variable, $SERVER_IP using the remote user specified by the -x flag. In this case, it would run the following steps:
SSH as ubuntu_user to 11.22.33.44
Execute the contents of
ubuntu12.04-gems.erbon the remote server usingsudo
Once that is complete, the server will be bootstrapped according to the steps in the bootstrap file, which, if you were to look at the provided bootstrap script, you would see the following:
Update the APT repository
Install Ruby 1.8 and some development dependencies from APT
Install the latest version of RubyGems
Update the local Ruby gems
Use gem to install ohai, the system-reporting agent
Use gem to install Chef
Copy the validation certificate file to the server
Copy the encrypted data bag secret (if applicable)
Generate any ohai hints needed
Copy the Chef Client configuration to the server
Copy the first-run JSON data to the server
Execute the Chef Client in order to:
Register the node
Run any initially configured run list data
Once this has been completed, we can verify that the node has been registered with the Chef Server in either of two ways: using knife, or using the web console.
To verify the node was registered with the Chef Server, we will be using the client command provided by knife. This can be accomplished with the list subtask like this:
user@server:$> knife client list
host1
host2
new-host-name
Where new-host-name would be the hostname of the node you just bootstrapped (Chef Client will automatically determine the hostname when it registers itself using the bootstrapped machine's FQDN as you set it up).
To verify that the node was registered using the web console, we must first log into our Chef Server using the administrative credentials that were configured during setup. Once logged in, there will be a set of tabs along the top where you can switch between the different data collections you can manage. The URL of the web console will vary between installations, but if you followed the instructions earlier, it would be accessible at http://chefserver.yourdomain.com:4040.

As you can see, there are tabs for managing environments, roles, nodes, cookbooks, data bags, clients, and users. Additionally, there is a tab for performing searches, which is useful for validating search queries to be used in recipes.
Once you are on the Nodes tab, you will see a list of nodes that Chef knows about, which will look like the following screenshot:
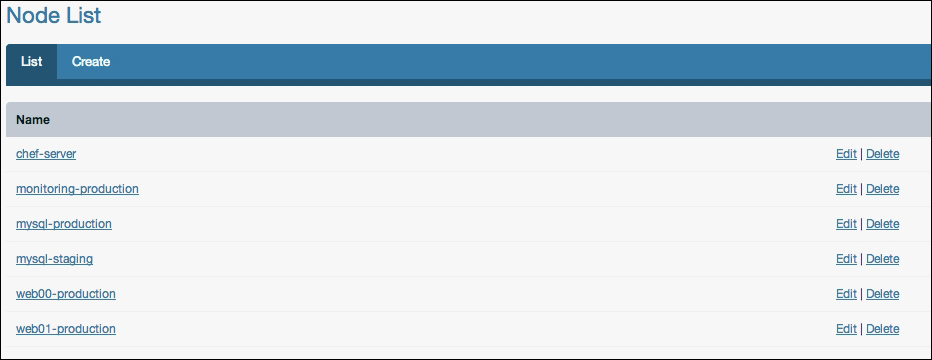
In our case, chef-server is the Chef Server itself that we registered during the installation phase, and monitoring-production is the hostname of the newly registered server.
Once we have some nodes to manage, we need to provide Chef with some cookbooks that we can use. Cookbooks are one of the most important parts of the Chef ecosystem—they contain all the steps required to actually manage our systems. Without cookbooks, there isn't a whole lot that can be done.
Fortunately, there are lots of places to find cookbooks that are freely available and already written by fellow Chef users. Two of the most common places to find cookbooks are directly from Opscode's collection of cookbooks, and on GitHub. We will cover downloading cookbooks from Opscode using knife, and later discuss how to fetch them from GitHub as well as write our own.
Knife, among all its other uses, has a command for downloading cookbooks from the Opscode repository. You can find a searchable interface that you can browse through on Opscode's community website at http://community.opscode.com/cookbooks.
There, you will find recipes for a lot of common software packages and configurations, each one has been versioned, tagged, and (hopefully) documented.
Once you have found a cookbook that you are interested in, you will need to use knife to download the cookbook using the cookbook command in combination with the site download subcommand followed by the recipe name.
As an example, we will start with downloading a cookbook for MySQL. To download it you would use the following command:
knife cookbook site download mysql
This would then fetch the latest version of the mysql cookbook for the user. For this exercise, we will be installing a typical LAMP stack, which means that in addition to the MySQL cookbook, we will also want Apache and PHP. A good place to keep your cookbooks is in the hidden Chef directory inside your home, so to fetch all the cookbooks we will need to get started, we would perform the following:
mkdir -p $HOME/.chef/cookbooks
cd $HOME/.chef/cookbooks
knife cookbook site download apache2
knife cookbook site download mysql
knife cookbook site download php
Each knife command will download an archive containing the cookbook and its files. For example, as of this writing, the latest version of the PHP cookbook is 1.1.0, which downloads an archive file named php-1.1.0.tar.gz. (Note that the cookbook version is not related to the software version, as it is the version of the cookbook's recipes, metadata, and scripts.)
Once the downloads have completed, you can decompress them and remove the archive file. You should now have a set of directories matching the names of the packages downloaded:
 [user:~/.chef/cookbooks]% ls -al
total 0
drwxr-xr-x   5 user  staff  170 Dec  6 23:24 .
drwxr-xr-x   4 user  staff  136 Dec  6 23:23 ..
drwxr-xr-x  16 user  staff  544 Nov 29 11:36 apache2
drwxr-xr-x  15 user  staff  510 Nov 28 10:02 mysql
drwxr-xr-x  16 user  staff  544 Aug 30 20:38 php
Inside each of these directories is a specific structure containing the attributes, providers, recipes, resources, and templates associated with that particular cookbook. For example, the apache2 cookbook contains the following files:
 [user:~/.chef/cookbooks]% ls -al apache2
total 224
drwxr-xr-x  16 user staff    544 Nov 29 11:36 .
drwxr-xr-x   5 user staff    170 Dec  6 23:24 ..
-rw-r--r--   1 user staff     23 Nov 29 11:36 .gitignore
-rw-r--r--   1 user staff   3482 Nov 29 11:36 CHANGELOG.md
-rw-r--r--   1 user staff  10811 Nov 29 11:36 CONTRIBUTING.md
-rw-r--r--   1 user staff    171 Nov 29 11:36 Gemfile
-rw-r--r--   1 user staff   3216 Nov 29 11:36 Gemfile.lock
-rw-r--r--   1 user staff  10850 Nov 29 11:36 LICENSE
-rw-r--r--   1 user staff  22228 Nov 29 11:36 README.md
drwxr-xr-x   6 user staff    204 Nov 29 11:36 attributes
drwxr-xr-x   6 user staff    204 Nov 29 11:36 definitions
drwxr-xr-x   3 user staff    102 Nov 29 11:36 files
-rw-r--r--   1 user staff  36346 Nov 29 11:36 metadata.json
-rw-r--r--   1 user staff   8996 Nov 29 11:36 metadata.rb
drwxr-xr-x  49 user staff   1666 Nov 29 11:36 recipes
drwxr-xr-x   3 user staff    102 Nov 29 11:36 templates
Now that we have downloaded some cookbooks, we can upload them into our Chef Server so that we can use them to install software on our newly provisioned node!
Installing cookbooks is as simple as downloading them from Opscode, if not even easier. Once again, we turn to our trusty friend, knife to get us going. Here we will leverage the cookbook command with the upload subcommand to push the newly downloaded and unpacked cookbooks up to our Chef installation.
First, we will upload our Apache2 cookbook:
 [user:~/.chef/cookbooks]% knife cookbook upload -o . apache2
Uploading apache2             [1.3.2]
upload complete
You can see that knife has uploaded the version of the apache2 cookbook we just downloaded to the server. The version that is being uploaded is specified in the square brackets. Because we did not set a cookbook path when we set up our knife client in the previous section, we need to tell knife where to look for the cookbook we want to upload. This is done using the -o [cookbook path] command-line flag (in our case, the current directory is where we wanted knife to search).
You can verify that it was successful by again using the cookbook list command:
 [user:~/.chef/cookbooks]% knife cookbook list
apache2           1.3.2
At present, we only have the one cookbook that we uploaded, but over time this list will grow. Let's upload the others now so that we have enough to set up our LAMP stack, starting with the MySQL cookbook:
 [user:~/.chef/cookbooks]% knife cookbook upload -o . mysql
Uploading mysql             [2.0.2]
ERROR: Cookbook mysql depends on cookbook build-essential version >= 0.0.0,
ERROR: which is not currently being uploaded and cannot be found on the server.
Oops! Looks like we are missing a cookbook that the MySQL cookbook is dependent upon (in this case a cookbook called build-essentials). To solve this, we can simply download the dependency the same way we fetched apache2, msyql, and php. If you do this, even after uploading the build-essentials cookbook, mysql will have another dependency issue, openssl. Because we are downloading our packages from the community repository, you can check the Requirements section on the package's Opscode community page so you know what other packages you need to download.
To save you from hunting down the dependencies manually, the complete list of cookbooks you will need to download is as follows:
apache2
mysql
php
xml
build-essential
openssl
To quickly download and install them, place the following bash script into a file called fetch_packages.sh and execute it:
#!/bin/bash
for pkg in apache2 mysql php xml build-essential openssl;
do;
  knife cookbook site download ${pkg};
  tar zxvf ${pkg}*.tar.gz
done
rm *.tar.gz
knife cookbook upload -o . apache2 php \
     mysql xml build-essential openssl
Executing this script will download the packages, decompress them, and install them. To verify, a quick application of knife cookbook list or a quick look at the web management console will verify that these cookbooks have been installed in the Chef Server for you to use. Now that we have the required cookbooks, let's start setting up some roles!
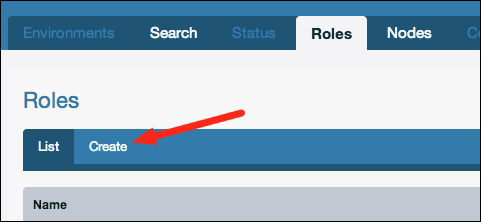
Roles are Chef's way of organizing a group of recipes and settings into a set of things that can be applied to a node. The simplest way to manage these at first is through the web management console, but knife provides you command-line tools to manage these as well, which we will talk about in the next section.
In the web management console, choose the Roles tab, this will provide you with a view of all the roles currently in the system. Initially, we will not have any, so we are going to create some. The first one will be our LAMP server role—click on Create under the Roles tab as shown in the following screenshot:
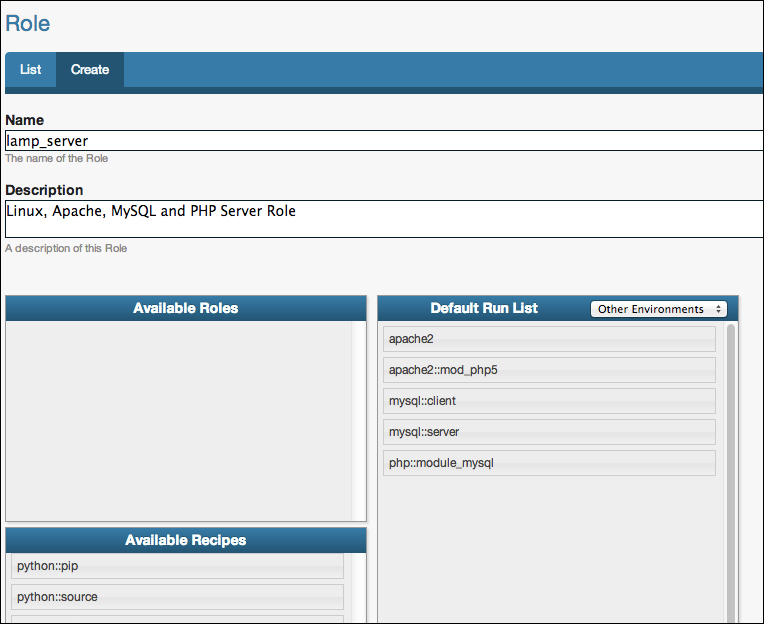
This will bring you to the page to edit the new role. Here, we will name our new role lamp_server, and add some recipes to the role. You will notice that in the recipes section there are more recipes than there are cookbooks, this is because each cookbook can contain multiple recipes. Here we will want to choose the following recipes by dragging them from the section titled Available Recipes into the section titled Default Run List:
apache2
apache2::mod_php5
mysql::client
mysql::server
php::module_mysql
Tip
Order is important here, the run list is executed in the order specified. Therefore, the php::module_mysql should come after the mysql::client recipe as it requires having the MySQL client libraries available. Similarly, the apache2::mod_php5 recipe is placed after the apache2 recipe.
When you are finished, the console will resemble the following screenshot:
At the bottom of the page is a button labeled Create Role—be sure to click this in order to save your newly created role. After saving the new role, you will be returned to the list of roles and see that it contains your newly created lamp_server role.
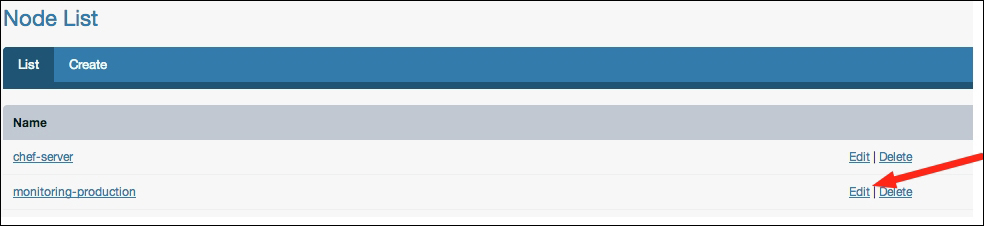
The next step is applying our new role to the server we just bootstrapped. To do this, we return to the Nodes tab in the administrative console and click on the Edit action for our server:
This will bring you to the edit screen for the node you have chosen, which is where we can select roles, edit attributes, and view the run list for that node. At this point, we are concerned only with assigning roles to the server, so we will drag our newly created lamp_server role from the Available Roles section into the Run List section as shown in the following screenshot:
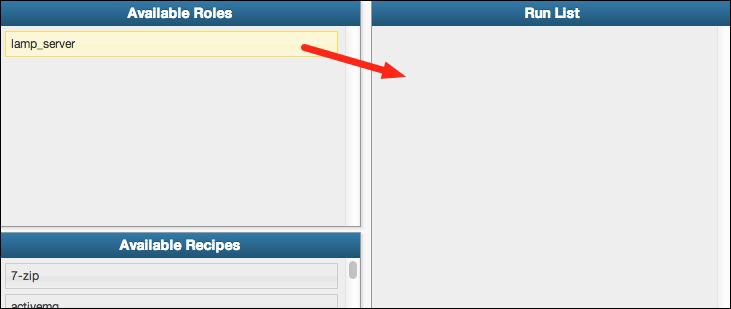
As with the role creation, be sure to click the Save Node button at the bottom of the console before you leave the page, otherwise your new run list will not be saved.
The run list for a node can be seen from the node details page (http://chefserver.yourdomain.com:4000/nodes/<node_name>) or by using knife node show -r node_name from the command line.
Once our roles are set up and applied to our node, it's time to start cooking! To apply our new infrastructure configuration to our server, we need to log in to our node and run the chef-client command as an administrative user, which will download the run list for that node and apply them in order.
This can either be done directly by logging into our server via SSH, or can be accomplished using knife (a big surprise, right?). In order to do this, we will be using the ssh command within knife.
The ssh command has the following signature:
knife ssh QUERY COMMAND (options)
So, for example, we can issue the following command:
knife ssh "roles:lamp_server" "sudo chef-client"
This tells the ssh command that the query is for all nodes containing our newly created role, lamp_server, and connecting to each of them and issuing the command sudo chef-client which is much better than logging into potentially hundreds of servers to run a command.
When you issue the chef-client command, you will see pages of text scroll by describing the actions that are being taken on the node. At this point, all should go well, if it does not, the output contains log entries with the FATAL log level such as the following output:
[Fri, 02 Dec 2012 10:10:12 -0700] FATAL: Stacktrace dumped to /var/cache/chef/chef-stacktrace.out
This will allow you to view what Chef was doing at the time it failed. Common errors include things such as permissions errors, HTTP permission problems (if you haven't registered the node), clock synchronization errors, invalid certificates, or logical issues arising from the order in which you specified your run list.
At this point, assuming that everything has been done as outlined, your new node should have the following software packages installed:
Apache 2 HTTP server with mod_php5
PHP5 with MySQL extensions
MySQL 5.x Database server
On the new server, you should be able to visit the newly installed Apache server and view the default web page by visiting http://yournewserver.yourdomain.com/ and being greeted by the Apache initial welcome page.
Now that you have the basics down, let's move on to some more advanced topics such as writing our own recipes and cookbooks, more advanced usage of knife, queries, data bags, and developing our own bootstrap configurations.