
Apache Camel is a regular Java library. All the rules applicable to a Java library apply here as well and, as with any Java library, there are two basic ways to add Apache Camel to your project: using a dependency management tool and manually; each one has its pros and cons. Here, we will tell you just how to start using Apache Camel depending on your situation.
Depending on what you use to manage your project, there are different ways to start using Camel libraries. You can use either Maven or Gradle as both are very similar to each other. Maven is a de facto standard in the Java world for managing projects and it provides much better support than other libraries among most popular IDEs, so we will be using it for our examples later in the book, but our setup could easily be translated into Gradle scripts.
First, if you don't have a project yet, create one with the following command line (assuming that you want your application's name to be cuscom and packages to start with com.company, if not, change the command accordingly):
mvn archetype:generate -DgroupId=com.company -DartifactId=cuscom -DarchetypeArtifactId=maven-archetype-quickstart -DinteractiveMode=false
Now, go to the project directory cuscom.
To make specifying the version of Apache Camel and its modules easier, add the following to your POM file:
<properties>
  <camel-version>2.10.4</camel-version>
</properties>
Tip
Downloading the example code
You can download the example code files for all Packt books you have purchased from your account at http://www.packtpub.com. If you purchased this book elsewhere, you can visit http://www.packtpub.com/support and register to have the files e-mailed directly to you.
If you already have the properties element, just put the camel-version element inside it.
Add the following lines to the list of the dependencies in your pom.xml file:
<dependency>
  <groupId>org.apache.camel</groupId>
    <artifactId>camel-core</artifactId>
    <version>${camel-version}</version>
</dependency>
If you are planning on working with your project using Eclipse, run:
mvn eclipse:eclipse
If you are planning on working with your project using IntelliJ IDEA, run:
mvn idea:idea
That is it. Depending on the IDE you use, if any, you might need to update dependencies before you are able to start using them in your code.
As you may have noticed, we have added camel-core, which contains only the basic components and core functionality. The real power of Apache Camel stems from its modularity and the availability of various components that let developers integrate different systems and mediate data between them.
Managing JAR files for your project in a manual way might be suitable in some cases, for instance, if you are using an IDE and have a project directories layout that is very specific and different from the standard Maven directories layout.
Step 1 – downloading Apache Camel
First, you have to go to http://camel.apache.org/download.html and download a ZIP or tar.gz archive with the Apache Camel release. At present, the latest Apache Camel release is 2.10.4, so we download the apache-camel-2.10.4.zip file. Unpack it with % unzip apache-camel-2.10.4.zip.
If we now go to the directory apache-camel-2.10.4, we will see the following structure:
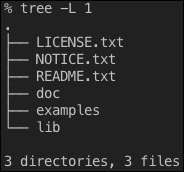
Inside the doc/ directory, there are HTML and PDF versions of the Apache Camel user's manual. These are very useful documents.
Inside the examples/ directory, there are quite a few example applications using Apache Camel and its components. All of these examples use Maven and they are a good starting point for your application.
Inside the lib/ directory, there are JAR files. The JAR file that would bring Apache Camel functionality into our application is camel-core-2.10.4.jar.
Other JAR files are Apache Camel components which we will talk about in the following section. Also, there are two subdirectories: optional/ with optional libraries, for example, the Log4j logging library, and spring/ with Spring Framework 3.0 release files.
Note
Logging in Java has been a notoriously confusing subject. There are multiple ways to have a logging functionality in your application, which may sometimes not work perfectly, especially when it comes to an application deployed on an application container. As of now, consensus recommends using the SLF4J logging library in your code and then adapting it to whichever library is used for logging, Log4J, java.util.logging, and so on.