

For the purposes of this book, we'll continue using Apache Maven for project structure management, given that Drools already relies on this tool and learning a bit about it may assist you in navigating the Drools source code. However, we'll begin with creating a new project with Eclipse and the Drools plugin. While this will not provide you with a Maven-enabled project or reflect what you'll typically find in an enterprise development structure, it does provide you with the basics needed to start tinkering with rules right away.
First things first, let's start a new project using the plugin's Drools Project Wizard to get things up and going.
Select Project... by navigating to File | New.
Expand the Drools folder and select Drools Project, then hit Next.
Give your new project a name such as
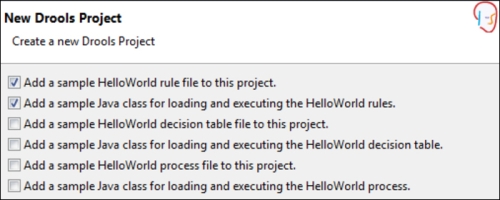
TacoShop, and hit Next.In this screen, the default settings are fine, but I wanted to point out a few things the wizard is capable of that we're not going to use. Leave the top two boxes checked only, but take note of the other options. Hit Next.
Since this is the first time you've created a Drools project, you're unlikely to have a Drools runtime environment created, as reflected by the warning, so let's do that now. Click on the blue link named Configure Workspace Settings....
At this screen, click on Add, and then on the Create a new Drools 5 Runtime... button.
Specify a location for the plugin to place your JAR files.

Back at the runtime screen, place a check next to the newly created Drools runtime location and hit OK.
Now click on Finish and let the plugin do its thing.
Congratulations! You've now got a working rules application. If you're in a hurry to see what DRL, or the Drools Rule Language, looks like, you can navigate to Sample.drl and have a look. You'll find the executable portion of code inside the file called DroolsTest.java. You can run it and see the output in your console by right-clicking the file name and selecting Run As | Java Application.
Checking your console, you should now see two lines of output. The first reads Hello World, and the second reads Goodbye cruel world. If you're seeing both, then it's a success! You've just set up and executed your first rules-integrated application.
Tip
Downloading the example code
You can download the example code files for all Packt books you have purchased from your account at http://www.packtpub.com. If you purchased this book elsewhere, you can visit http://www.packtpub.com/support and register to have the files e-mailed directly to you.
The creation wizard cranked out a lot of code for us, and if we were to just continue on with this project, we'd be omitting explanation of the most vital parts of the code, so let's build up our own project piece by piece and find out what makes it tick.
We'll be creating a simple rules system that will aid us in rewarding customers of our fictional company, Tucker's Taco Shop, for large purchases and combo deals.
In a new or existing Maven project, let's add the required drools dependencies. I've created a new project called DiscountProgram. Your pom.xml file should look something like this:
<?xml version="1.0" encoding="UTF-8"?>
<project xmlns="maven.apache.org/POM/4.0.0"
         xmlns:xsi="www.w3.org/2001/XMLSchema-instance"
         xsi:schemaLocation="maven.apache.org/POM/4.0.0 maven.apache.org/xsd/maven-4.0.0.xsd">
    <modelVersion>4.0.0</modelVersion>

    	<groupId>com.tacoshop</groupId>
  		<artifactId>DiscountProgram</artifactId>
  	<version>0.0.1-SNAPSHOT</version>

	<properties>
        <droolsVersion>5.5.0.Final</droolsVersion>
    </properties>

    <dependencies>

        <dependency>
            <groupId>org.drools</groupId>
            <artifactId>drools-compiler</artifactId>
            <version>${droolsVersion}</version>
        </dependency>
        <dependency>
            <groupId>junit</groupId>
            <artifactId>junit</artifactId>
            <version>4.11</version>
            <scope>test</scope>
        </dependency>
        <dependency>
            <groupId>commons-lang</groupId>
            <artifactId>commons-lang</artifactId>
            <version>2.6</version>
        </dependency>
    </dependencies>
</project>
So what have we done here? We've specified some information about our project, mainly the groupId, artifactId, and version number—all things that Maven uses to identify your application. Secondly, we've added a property called droolsVersion to keep life simple so that we can't accidentally forget to change one of the Drools component version numbers in the future. Next, we've included the three main JAR files we'll need to utilize the Drools rules engine. The first is the drools-compiler dependency. It's worth mentioning here that by including drools-compiler, we've pulled two transitive dependencies worthy of noting, knowledge-api and drools-core. When the time comes to start digging into drools code, you'll see these API names again. Lastly, we've included commons-lang, another required dependency, and junit at the test scope level, to provide some mechanism to run our rules.
Before we go much further, let's stop and think up a basic set of rules we'd like to include in our discount program. Let's allow customers a discount of 10 percent on purchases over $15. Let's also give 15 percent off for purchases over $25. Finally, we'll allow a combo deal discount of an additional 5 percent off for purchases containing two or more tacos and at least one drink. Remember, rules tend to follow the format of When...then, so let's word them as such:
When a customer makes a purchase greater than $15, then provide a 10 percent discount
When a customer makes a purchase greater than $25, then provide a 15 percent discount
When a customer makes a purchase containing two or more tacos and at least one drink, then provide an additional 5 percent discount
Now that we know what rules we'll have, let's figure out what facts we need to know about. Since we're intentionally sticking to a simple rule set, we only need to know about one thing, the purchase; we need to know how much it costs, what it consisted of, and the discount total.
With a fact model in mind, we need to create a Plain Old Java Object (POJO) class to represent our model.
Create a new class which will represent the
Purchaseobject.Add properties to our class for each trait that we've deemed important to us.
Add getters and setters for said properties.
package com.tacoshop;

import java.math.BigDecimal;

public class Purchase {

  private BigDecimal total;

  private int tacoCount;

  private boolean drinkIncluded;

  private double discount;

  public Purchase(BigDecimal total, int tacoCount, boolean drinkIncluded) {
    this.total = total;
    this.tacoCount = tacoCount;
    this.drinkIncluded = drinkIncluded;
    this.discount = 0;
  }

  public BigDecimal getTotal() {
    return total;
  }

  public void setTotal(BigDecimal total) {
    this.total = total;
  }

  public int getTacoCount() {
    return tacoCount;
  }

  public void setTacoCount(int tacoCount) {
    this.tacoCount = tacoCount;
  }

  public boolean isDrinkIncluded() {
    return drinkIncluded;
  }

  public void setDrinkIncluded(boolean drinkIncluded) {
    this.drinkIncluded = drinkIncluded;
  }

  public double getDiscount() {
    return discount;
  }

  public void setDiscount(double discount) {
    this.discount = discount;
  }
}
Nothing too out of the ordinary in there. We've got a simple POJO with a constructor, some properties, and their getters and setters. Moving along!
So we've established a data model and we've already defined what rules we need, so now let's build our DRL file.
Create a new file in
src/main/rulescalleddiscountRules.drl. I've used a package calledcom.tacoshop.rulesinside my rules file.If you're using the Eclipse plugin, you can take advantage of their Rule Resource wizard by navigating to New | Other... | Drools | Rule Resource.
Add the following to your new rules file and save it:
package com.tacoshop.rules

import com.tacoshop.Purchase

rule "purchase over 15 and less than 25 dollars"
when
  $p : Purchase ( total > 15, total <= 25 )
then
  $p.setDiscount(0.10);
  System.out.println("Level 1 discount: " + $p.getDiscount());
end

rule "purchase over 25 dollars"
when
  $p : Purchase ( total > 25 )
then
  $p.setDiscount(0.15);
  System.out.println("Level 2 discount: " + $p.getDiscount());
end

rule "purchase contains combo" salience -1
when
  $p : Purchase ( drinkIncluded, tacoCount >= 2 )
then
  $p.setDiscount($p.getDiscount() + 0.05);
  System.out.println("Combo discount: " + $p.getDiscount());
end
Now let's break it down...hey, stop dancing, that's not what I meant. The rules! The package and import statements, as seen here at the top of the file, are structured the same way as they are in Java class files. The rules, however, aren't so familiar to us. Notice that each starts with a rule name, and follows the format of when ... then ... end. We've discussed something similar to that construct once or twice by now, right? It's all coming together.
Our rule conditions (the when bit) use a dialect called MVFLEX Expression Language (MVEL), which makes them seem a little foreign to us. For one, we're not calling getters to access properties. MVEL takes care of that for us. It helps to read each condition aloud to yourself:
$p : Purchase ( total > 25 )
The previous code can be read aloud as "There exists some purchase having a total greater than 25." In the case that such a purchase is found, we set it to a variable, $p. In the consequences of our rules, we take some action desired when our condition is met. Notice the consequences in the rules look like Java, but also reference the $p variable set from the conditions. In our first rule consequence, we set a discount of 10 percent to $p and we print something to the console showing us that the discount has been added. The rest of the rules follow the same format. Feel free to take a moment to look them over and read them aloud. The last thing I should mention before we move on is the keyword seen on the combo rule, salience. This keyword sets priority to a rule. By default, all rules have a salience of zero. You can specify a negative or positive salience, so in our case, we've used a negative one. Why? Because we want our combo discount to be in addition to any other discounts added to the order, so we need to give it a lower priority to ensure it's done last.
Take a quick break, maybe grab some coffee (try not to think about coffee rules, it's a break). This is going to be a big one. I'll wait here.
Moving on! So now that we have a data model and a proper rule resource, we can get to executing our rules. We're going to create a JUnit test that will compile our rules, build a session, insert some facts, and fire our rules. Let's get started by taking a look at the whole test, then we can examine the contents:
@Test
  public void testRules() {

    StatefulKnowledgeSession session = null;

    try {
      KnowledgeBuilder builder = KnowledgeBuilderFactory.newKnowledgeBuilder();
      builder.add(ResourceFactory.newClassPathResource("discountRules.drl"), ResourceType.DRL);
      if (builder.hasErrors()) {
          throw new RuntimeException(builder.getErrors().toString());
      }

      KnowledgeBase knowledgeBase = KnowledgeBaseFactory.newKnowledgeBase();
      knowledgeBase.addKnowledgePackages(builder.getKnowledgePackages());

      session = knowledgeBase.newStatefulKnowledgeSession();

      // purchase > $15 and <= $25
        Purchase firstPurchase = new Purchase(new BigDecimal("16"), 1, false);
      FactHandle purchaseFact = session.insert(firstPurchase);
          session.fireAllRules();

    } catch(Throwable t) {
       t.printStackTrace();
     } finally {
      if (session != null) {
          session.dispose();
        }
     }
  }
Let's start at the top! We've made a standard JUnit test (for now, let's ignore the fact that we're not really asserting anything inside our test—we'll get to that later):
@Test
  public void testRules() {
It's good practice to wrap your rules code in a try/catch block. For that reason, we've extracted a variable declaration needed within the finally block to outside of the try block:
StatefulKnowledgeSession session = null;
Let's talk a bit about what StatefulKnowledgeSession is. Our session is the main means of communication with the rules engine. It provides us with some handy methods for inserting, updating, and retracting our facts. It also gives us methods for setting global variables (more on these later), as well as a method I like to refer to as the Big Red Button, fireAllRules().
Whenever you work with a session, it's important to always remember to use the dispose() function to dispose of it when you're done. If you don't, the garbage collector won't be able to free up the resources for you, and that means problems. The purpose of our finally block is to ensure that won't be an issue. So how do we build a session? Let's start with KnowledgeBuilder:
 try {
   KnowledgeBuilder builder = KnowledgeBuilderFactory.newKnowledgeBuilder();
   builder.add(ResourceFactory.newClassPathResource("discountRules.drl"), ResourceType.DRL);
   if (builder.hasErrors()) {
    throw new RuntimeException(builder.getErrors().toString());
   }
What's happening here is the compilation of our rules resource. The KnowledgeBuilder is responsible for taking resources and compiling them into rule packages. If we have any syntax or other compilation errors within our rules (notice I didn't say logic!), now's the time that they'd show up. Once it's built, we'll need to do something with our nifty rule package. Moving on to KnowledgeBase:
 KnowledgeBase knowledgeBase = KnowledgeBaseFactory.newKnowledgeBase();
 knowledgeBase.addKnowledgePackages(builder.getKnowledgePackages());
Notice that KnowledgeBase accepts the packages created by our builder. The KnowledgeBase can be thought of as a manager for our collection of knowledge packages, or as I've been referring to it, rule packages. It primarily provides us with an interface for inserting and removing packages, as well as a method for creating sessions populated with our rule information:
session = knowledgeBase.newStatefulKnowledgeSession();
So now we have a rule session loaded up with our logic. Next it's time for the data. Let's throw something in so we can see some results:
 // purchase > $15 and <= $25
 Purchase firstPurchase = new Purchase(new BigDecimal("16"), 1, false);
 FactHandle purchaseFact = session.insert(firstPurchase);
 session.fireAllRules();
We've initialized a Purchase variable with an amount of $16, one taco, and no drink (man, that's an expensive taco!). If we refer back to our rules, we'll see that this should be enough to trigger our first rule. Notice the fireAllRules() function in there? We're executing now and should see some output from our rule consequence. Success! The console confirms that a discount of 10 percent has been added to our purchase:
Level 1 discount: 0.1
So our rules have done their thing and we're ready to close up shop. We finish up with a catch block that will relay any issues encountered, as well as dispose of the session:
 } catch(Throwable t) {
    t.printStackTrace();
 } finally {
    if (session != null) {
       session.dispose();
    }
 }
What if we wanted to trigger our other rules as well? Let's add a few more lines to our test after the first call to fireAllRules() to flex the other two rules as well. You may have noticed we set something called a FactHandle at the same time we inserted a Purchase fact. We'll use that to update our rule session once we've made some changes to the Purchase object. Add these lines immediately after fireAllRules() and rerun the test:
 System.out.println("----------------");

 // purchase > $25
 firstPurchase = new Purchase(new BigDecimal("26"), 1, false);
 session.update(purchaseFact, firstPurchase);
 session.fireAllRules();
 System.out.println("----------------");

 // combo purchase containing 3 tacos and a drink
 firstPurchase = new Purchase(new BigDecimal("26"), 3, true);
 session.update(purchaseFact, firstPurchase);
 session.fireAllRules();

Level 1 discount: 0.1
----------------
Level 2 discount: 0.15
----------------
Level 2 discount: 0.15
Combo discount: 0.2
Congratulations! You're now working with Drools rules. If you'd like to download the accompanying code for this book (which includes better format and comments!) you can find it at http://www.packtpub.com/.