
In this task, we will combine the things we did in the previous two tasks and add some TTS objects to our Drama thread. We will need two robot actors for this scene speaking with different voices, and since we want to build robots containing a speaker each, we need one of our TTS objects to speak on the left speaker and the other one on the right.
Unfortunately, FreeTTS only comes with one male voice, so we will have to increase the pitch of the voice for our Juliet-Robot.
First, we open the sketch from the previous task and start by creating two
TTSobjects, one for each of our robot actors. Both use the default voice namedkevin16, but we change the pitch for our Juliet-Robot.void setup() { size( 800, 400 ); textFont( createFont( "Georgia", 24 )); String[] rawLines = loadStrings( "romeo_and_juliet.txt" ); ArrayList lines = new ArrayList(); for ( int i=0; i<rawLines.length; i++) { if (!"".equals(rawLines[i])) { String[] tmp = rawLines[i].split("#"); lines.add( new Line( tmp[0], tmp[1].trim() )); } } TTS romeo = new TTS(); TTS juliet = new TTS(); juliet.setPitchShift( 2.4 ); drama = new Drama( lines, romeo, juliet ); }Switch to the
Dramathread and add two variables to our actors.public class Drama extends Thread { TTS romeo; TTS juliet; int current; ArrayList lines; boolean running; …We also need to extend the constructor of our
Dramaclass to enable us to add the actors.public Drama( ArrayList lines, TTS romeo, TTS juliet ) { this.lines = lines; this.romeo = romeo; this.juliet = juliet; current = 0; running = false; }
In the
run()method, we take the current line and choose the actor object depending on the actor variable we added to each line. We also don't need thedelay()and theprintln()methods anymore.public void run() { running = true; for ( int i =0; i < lines.size(); i++) { current = i; Line l = (Line)lines.get(i); if ( "J".equals( l.speaker )) { juliet.speak( l.text ); } if ( "R".equals( l.speaker )) { romeo.speak( l.text ); } } running = false; }Since each of our robots gets his own speaker, we don't want to hear the text on both speakers. We want one robot to use the right one and the other robot, the left one. Fortunately, ttslib provides a
speakLeft()and aspeakRight()method, which do exactly what we need. So change the twospeak()methods to look like the following:... if ( "J".equals( l.speaker )) { juliet.speakLeft( l.text ); } if ( "R".equals( l.speaker )) { romeo.speakRight( l.text ); } ...Currently, our
draw()method is somewhat boring and also somewhat misleading if thedramathread is already running. So we will change it to display five lines of the currently read script. Add anifstatement to thedraw()method that checks the state of therunningvariable we added to ourDramathread earlier.void draw() { background(255); textAlign(CENTER); fill(0); if ( !drama.isRunning() ) { text( "Click here for Drama", width/2, height/2 ); } else { } }Now we add a
forloop that displays the previous two lines, the line that's currently being read, and the next two lines of text in our sketch window. We will now change the text alignment so that it matches the speaker of our robot actors. The text will be aligned to the right if our robot usesspeakRight(), and it will be aligned to the left if our robot usesspeakLeft().void draw() { background(255); textAlign(CENTER); fill(0); if ( !drama.isRunning() ) { text( "Click here for Drama", width/2, height/2 ); } else { int current = drama.getCurrent(); for ( int i = -2; i < 3; i ++) { Line l = drama.getLine(i + current); if ( l != null) { if ( "J".equals( l.speaker )) { textAlign( LEFT ); text( l.text, 10, height/2 + i * 30 ); } else { textAlign( RIGHT ); text( l.text, width - 10, height/2 + i * 30 ); } } } } }To show the current line more prominently, we will change the color of the text. We set the color of the current line to black and all other lines to a lighter gray by adding a
fill()statement to theforloop.for ( int i = -2; i < 3; i ++) { fill( abs(i) * 100 ); Line l = drama.getLine(i + current); if ( l != null) { if ( "J".equals( l.speaker )) { textAlign( LEFT ); text( l.text, 10, height/2 + i * 30 ); } else { textAlign( RIGHT ); text( l.text, width - 10, height/2 + i * 30 ); } } }Now run your code and click on the sketch window to start the
dramathread.
In this task of our current mission, we added two TTS objects and changed the voice parameters to make them sound different in step 1. Then we extended our Drama thread and added TTS objects for the voices of our robot actors. In steps 4 and 5, we modified the run method to use the voices we just created instead of just printing the text lines.
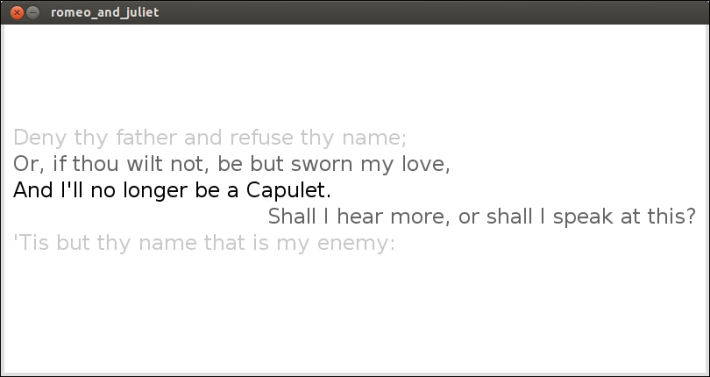
In steps 6 to 9, we made changes to the draw() method and made it display five lines of text. The line that's currently spoken is black, and the two lines before and after it fade to a light gray.
The fill() method is used to change not only the fill color of an object, but also the text color. Because the index of our for loop runs from -2 to 2, we can simply take the absolute value and multiply it with 100 to get the gray level. The following is a screenshot of the running sketch:
FreeTTS and ttslib also allow you to use a binary TTS engine named MBROLA. Unfortunately, it's only distributed in binary form, and at the time of writing, it only works on Linux. So if you are using Linux and want to give it a try, you can make the following changes to our Romeo and Juliet sketch:
Open http://tcts.fpms.ac.be/synthesis/mbrola.html in your browser and click on Download. Download the MBROLA binary for your platform.
Download the
female_us1voice from the MBROLA site.Create a folder for the MBROLA binary and unzip the two packages you just downloaded. Make sure that the path to the MBROLA binary contains no blanks, since FreeTTS can't deal with it.
Rename the MBROLA binary to
mbrola.Now go back to your Romeo and Juliet sketch and add the following highlighted line to your
setup()method:void setup() { System.setProperty("mbrola.base", "/path/to/mbrola/"); size( 800, 400 ); textFont( createFont( "Georgia", 24 )); String[] rawLines = loadStrings( "romeo_and_juliet.txt" ); ArrayList lines = new ArrayList(); for ( int i=0; i<rawLines.length; i++) { if (!"".equals(rawLines[i])) { String[] tmp = rawLines[i].split("#"); lines.add( new Line( tmp[0], tmp[1].trim() )); } } drama = new Drama( lines ); TTS romeo = new TTS(); TTS juliet = new TTS(); juliet.setPitchShift( 2.4 ); drama = new Drama( lines, romeo, juliet ); }Make the path of the system property point to the folder where your
mbrolabinary and theus1voice are located.Now you can change the Juliet
TTSobject to the following:TTS juliet = new TTS( "mbrola_us1" );
You will also need to change the pitch of the voice as
mbrola_us1is already a female voice and we don't need to simulate it anymore.
MBROLA is a text-to-speech engine developed at the Faculte Polytechnique de Mons in Belgium. The author requires every publication that mentions their work to mention their book, An Introduction To Text-To-Speech Synthesis, Thierry Dutoit, Kluwer Academic Publishers, Dordrecht, Hardbound, ISBN 1-4020-0369-2, April 1997, 312 pp.