

In this recipe we are going to take a look at a messaging pattern known as request/response messaging.
We will use two examples for this recipe: jms-requester and jms-responder. Together they implement a simple request/response application.
To run the samples for this recipe, you will need to perform the following steps:
Open a terminal and start a broker.
Open a second terminal, change to the directory where the jms-responder example is located, and run it by typing
mvn compile exec:java. (You can shut down the example by pressing Ctrl + C when done or allow it to stop on its own after five minutes.)Open a third terminal, change to the directory where the jms-requester example is located, and run the example by typing
mvn compile exec:java.
In the terminal where you started the jms-requester, you will see the following output indicating that the request application is sending request messages and receiving responses:
Starting Requester example now...
Job Request
Job Request
Job Finished
Job Request
Job Request
Job Finished
Job Request
Job Finished
Job Finished
Woohoo! Work's all done!
Finished running the Requester example.
And in the terminal window where you started the jms-responder example, you should see that the responder is receiving the request events from our requester example.
Starting Responder example now...
Job Request
Job Request
Job Request
Job Request
Job Request
Job Request
While decoupling of messaging applications is a primary driver of the JMS specification, there are cases where an application needs to send a request and will not continue until it receives a response indicating its request was handled. This sort of messaging pattern is known as request/response messaging, and you can think of it as a sort of Remote Procedure Call (RPC) over JMS if that helps.
Traditionally, this type of architecture has been implemented using TCP client and server applications that operate synchronously across a network connection. There are several problems that arise in this implementation, the biggest of which can be scaling. Because the TCP client and server are tightly coupled, it's difficult to add new clients to handle an increasing workload. Using messaging based architecture we can reduce or eliminate this scaling issue along with other issues of fault tolerance and so on. In the messaging paradigm, a requester sends a request message to a queue located on a remote broker and one or more responders can take this message, process it, and return a response message to the requester. In the following diagram, we see a visual depiction of the typical implementation of the request/response pattern over JMS:
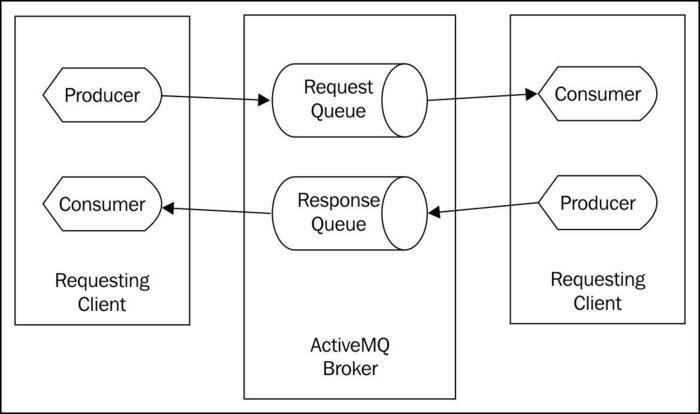
The JMS request/response pattern
As we can see in the previous diagram, each JMS request/response application follows a simple fixed pattern. But there are a lot of moving parts we need to understand. Let's now examine the source code for the examples we executed earlier and see how this messaging pattern is implemented in our JMS applications.
Our simpler requester application places several requests onto a queue on our ActiveMQ Broker, and then it waits until all its outstanding requests are processed before finishing. Let's take a look at this in the following code:
public class RequesterExample implements MessageListener {

  private final String connectionUri = "tcp://localhost:61616";
  private ActiveMQConnectionFactory connectionFactory;
  private Connection connection;
  private Session session;
  private Destination destination;
  private static final int NUM_REQUESTS = 10;
  private final CountDownLatch done = new CountDownLatch(NUM_REQUESTS);

  public void before() throws Exception {
    connectionFactory = new
        ActiveMQConnectionFactory(connectionUri);
    connection = connectionFactory.createConnection();
    connection.start();
    session = connection.createSession(
        false, Session.AUTO_ACKNOWLEDGE);
    destination = session.createQueue("REQUEST.QUEUE");
  }

  public void run() throws Exception {
    TemporaryQueue responseQ = session.createTemporaryQueue();
    MessageProducer requester =
        session.createProducer(destination);
    MessageConsumer responseListener =
        session.createConsumer(responseQ);
    responseListener.setMessageListener(this);

    for (int i = 0; i < NUM_REQUESTS; i++) {
        TextMessage request =
            session.createTextMessage("Job Request");
        request.setJMSReplyTo(responseQ);
        request.setJMSCorrelationID("request: " + i);
        requester.send(request);
    }
    if (done.await(10, TimeUnit.MINUTES)) {
        System.out.println("Woohoo! Work's all done!");
    }
    else {
        System.out.println("Doh!! Work didn't get done.");
    }
  }

  public void onMessage(Message message) {
    try {
        String jmsCorrelation = message.getJMSCorrelationID();
        if (!jmsCorrelation.startsWith("request")) {
            System.out.println("Received an unexpected response: " + jmsCorrelation);
        }
        TextMessage txtResponse = (TextMessage) message;
        System.out.println(txtResponse.getText());
        done.countDown();
    }
    catch (Exception ex) {
    }
  }
}
As you can see in the preceding code, the request application creates a JMS MessageProducer object for sending its request along with a MessageConsumer object to listen for the response. We've already seen code similar to this in other recipes; the question here is about how we told the responder where to send its response.
The JMSReplyTo property for a JMS message was added just for this sort of messaging pattern. The responder application doesn't have to know anything about preconfigured destinations for sending responses, it just needs to query the message for its JMSReplyTo address. This is yet another example of the benefits of the loose coupling that comes from using the JMS API.
In our sample application, we create a JMS temporary queue and assign that to JMSReplyTo for every request message we send. A JMS temporary destination works a lot like its non-temporary counterpart, however there are three key differences:
The lifetime of a temporary destination is tied to that of the connection object that created it. Once the connection is closed, the temporary destination is destroyed.
Only a
MessageConsumerobject created from the connection that created the temporary destination can consume from that temporary destination.Temporary destinations don't offer the message persistence or reliability guarantees that normal destinations do.
Did you notice that we also assign a correlation ID to each request? Why do we do that? Since there could be multiple responses for requests we've sent, we might want to match up each response to ensure all our work gets done. For example, our application could have stored the correlation IDs in a map along with the job data and matched up the responses. Also, our application could have checked on a timeout if any outstanding requests hadn't arrived and could have resubmitted the unfinished job, or logged a warning to the administrator. The JMSCorrelationID field allows you to build this sort of book keeping into your request/response applications easily.
In order to implement our simple responder application, we assemble many of the same JMS elements we did in the requester example; lets take a look at this in the following code:
public class ResponderExample implements MessageListener {

  private final String connectionUri = "tcp://localhost:61616";
  private ActiveMQConnectionFactory connectionFactory;
  private Connection connection;
  private Session session;
  private Destination destination;
  private MessageConsumer requestListener;
  private MessageProducer responder;

  public void before() throws Exception {
    connectionFactory = new
        ActiveMQConnectionFactory(connectionUri);
    connection = connectionFactory.createConnection();
    connection.start();
    session = connection.createSession(
        false, Session.AUTO_ACKNOWLEDGE);
    destination = session.createQueue("REQUEST.QUEUE");
    responder = session.createProducer(null);
    requestListener = session.createConsumer(destination);
    requestListener.setMessageListener(this);
  }

  public void run() throws Exception {
    TimeUnit.MINUTES.sleep(5);
  }

  public void onMessage(Message message) {
    try {
        Destination replyTo = message.getJMSReplyTo();
        if (replyTo != null) {
            TextMessage textMessage = (TextMessage) message;
            System.out.println(textMessage.getText());
            Message response =
                session.createTextMessage("Job Finished");
            response.setJMSCorrelationID(
                message.getJMSCorrelationID());
            responder.send(replyTo, response);
        }
    }
    catch (Exception e) {
        System.out.println(
            "Encounted an error while responding: " +
            e.getMessage());
    }
  }
}
As you can see, we create both a producer and consumer for our response example once again; however, we did something a bit different here. Did you spot it? The MessageProducer object we created was assigned a null destination; this is called an anonymous producer. We can use the anonymous producer to send messages to any destination, which is great since we don't know at startup which destination we are going to publish our responses to. We'd rather not create a new MessageProducer object every time a message arrives since that would add more network traffic and load to our broker.
When a request message is received by the responder application, it queries the message for the JMSReplyTo destination to which it should send the response. Once the responder knows where to send its answer, it constructs the appropriate response message and assigns it the JMSCorrelationID method that the requester will use to identify the response prior to sending it back to the responder.
Now we can start to imagine how our request/response applications can scale as the number of responders can grow with the increasing workload. If we need a new responder, we can spin up another instance on a different machine; it will share the load with all the others by taking one request at a time off the shared request queue and eventually sending its response back when its done. If, for instance, each request takes about a minute to complete, our sample would finish in about ten minutes. But if we add another responder application, we can cut that time in half.
Every JMS request/response application we develop follows the basic pattern we saw in this recipe. Looking at the code, we start to see how JMS code can become a bit tedious with all the setup of connections, sessions, producers and consumers. Fortunately, there are ways to reduce the amount of work needed by using other software components that exist on top of the JMS API and provide simpler abstractions to problems such as the request/response pattern. One such solution is the Apache Camel project (http://camel.apache.org/). Apache Camel is what's known as an integration framework that implements well-known Enterprise Integration Patterns (EIPs) such as request/response.
Not only do Camel as well as other EIP frameworks provide a simpler way of implementing patterns such as request/response, they also build in error handling and recovery mechanics that make the developer's life simpler. It's a good idea to explore an EIP framework when you need to implement the more complex messaging patterns.
In an application that does a lot of request/response messaging, using temporary destinations for each response can create a large build up of resource utilization on the ActiveMQ Broker. Remember that temporary destinations don't go away until the connection that created them does. So, for a long running application that uses a connection, those destination resources created by the connection would never be recovered. In ActiveMQ, it's possible to configure a periodic cleanup of older inactive destinations to recover otherwise wasted resources. The documentation for this feature can be found at: http://activemq.apache.org/delete-inactive-destinations.html