

One of the advantages of using a graphical IDE is the ability to have multiple windows open, and learning how to customize their size and layout in Visual Studio is important for maximizing their productivity. Given the multitude of windows (editors, debugger output, and so on) Visual Studio has open, it can be helpful to learn how to place them where you want so that you can focus on your work without being slowed down by clutter.
Tab pinning allows you to mark individual windows so they stay open while you navigate through the editor. Previewing documents is a useful way to navigate across several files without cluttering your tabs with several open documents. This recipe will explore both options.
Open either the VS2010_Web sample solution or use a solution of your choice. Ensure that the Solution Explorer window is open.
The following steps will show how the position of open windows can be positioned to your liking. Let's get started:
In the Solution Explorer window, locate the
Default.aspx.csfile in theVS2010_Webproject and double-click on it. The source file will open in the main window area as in the previous versions of Visual Studio. However, you will now notice that the document tab features a pin icon next to the tab name, as you can see in the following screenshot. You'll use that pin in just a few steps:
Using the Solution Explorer window, open both the
About.aspx.csandGlobal.asax.csfiles by double-clicking on them. You should now have three documents open with their tabs showing in the tab well (this refers to the row of tabs for each open document in the editor), as shown in the following screenshot:
Click on the
Default.aspx.cstab to select it and then click on the pin. The pin will change to point downwards indicating that the document is now pinned. Visual Studio 2013 will always keep pinned tabs visible in the tab well. These pinned tabs will remain visible even when Visual Studio needs to start hiding unpinned tabs to save screen display space. The pinned document tab will be moved to the left next to any other pinned documents you may have open, as shown in the following screenshot:
Right-click on the
Global.asax.csdocument tab and click on the Close All But This option to close all open documents except for the one currently selected. This will include closing any pinned documents, which are shown in the following screenshot:Note
There is a related option: Close All But Pinned. This is useful when you would like to only keep pinned files open.

Reopen both the
Default.aspx.csandAbout.aspx.csfiles that you closed by double-clicking on them in Solution Explorer.One of the usability problems with document tabs in Visual Studio 2010 was that you could accidentally float documents by double-clicking on a document tab.
In Visual Studio 2013, this behavior has changed. Double-click on a document tab of your choice and notice how Visual Studio sets the focus to this tab instead of floating it. (This is the same behavior as single-clicking on a document tab.)
Press Ctrl + Shift + F to open the Find in Files dialog box. Enter the class in the Find what field and ensure Look in is set to Solution, then click on the Find All button.
In the Find Results 1 window, select a result from the
ChangePassword.aspxfile.The file will open in the preview tab, located on the right-hand side of the tab well.
The preview tab shows the contents of the currently selected document if it is not already open. In the Find Results 1 window, select a result from the
Login.aspxfile. It will now be opened automatically in the preview tab, and theChangePassword.aspxdocument will be closed.Assume you now want to keep the
Login.aspxfile open for a while. Either click on the Keep Open icon on the tab or change the contents of the file. Any document in the preview tab that is changed is automatically promoted to a normal tab.
Visual Studio will move the document from the preview tab area into the main tab area. The color of the tab will also be changed from purple to blue indicating that the tab is now a normal document tab.
Pinning documents works much like pinning does in any other part of Visual Studio, and is very handy for keeping the documents that you are working on regularly within easy reach, especially when you have many documents open at once.
The preview document tab is a great way to prevent tab clutter and becomes very useful while debugging deeply nested code. You may recall that Go To Definition as one function that uses the preview document tab. For example, multiple source files may be opened as you trace a program's operation across methods and classes. The preview document tab helps you cycle quickly through these files while preventing the tab well from filling up with documents that aren't needed for more than a few moments.
As always, there are ways to customize the behavior of the document tabs in Visual Studio.
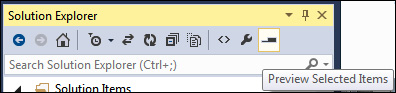
The preview tab isn't restricted to just the Find Results window. It can also be used from within the Solution Explorer. If you activate the Preview Selected Items button in the Solution Explorer toolbar, then every item you click on will automatically be opened in the preview tab. The Preview Selected Items button is a toggle button (shown in the following screenshot). If you want to disable the behavior, you only need to click on the button to deselect it and the preview behavior will be turned off:
Navigating to Tools | Options in Visual Studio will show the following dialog box:
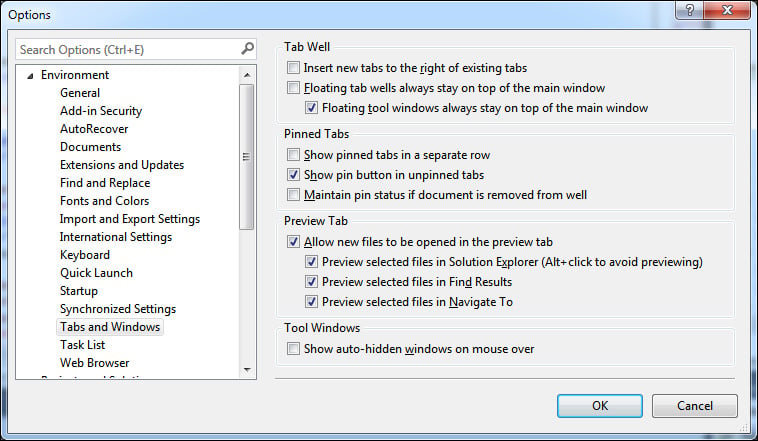
There are a number of options here that let you control how the tabs behave. With Visual Studio 2010 Productivity Power Tools, many developers found different ways to configure their tab well to get the experience they wanted, and while not everything from the power tools came across to the final Visual Studio 2012 product, a number of features most certainly did. Feel free to experiment with the Tabs and Windows settings to get Visual Studio working the way you like it most.