
Once the data model is in place, the next step is to build the ADF Business Components. The description in this book is fairly brief and assumes that you have worked a little bit with ADF earlier, for example, by going through a basic ADF tutorial on the Oracle Technology Network website (otn.oracle.com). You can find links to some relevant tutorials on the book companion website (www.enterpriseadf.com).
For the Proof of Concept, we will leave all business components in the default location: the Model project in the Proof of Concept application workspace. However, when building a real-life enterprise ADF application, you will be splitting up your application into multiple application workspaces and using ADF Libraries to compile these into the master application. Working with smaller workspaces enforces modularity in the code, makes it faster for the developer to find what he's looking for, allows faster checkouts from source control, and JDeveloper also runs faster and better when it is not handling thousands of objects at the same time.
We'll return to the proper structuring of workspaces in Chapter 3, Getting Organized.
As you might have noticed from the application checklist, the first step after Plan your Application is to create a connection to the database schema where your application tables reside. Press Ctrl + N (or command + N on Mac) to bring up the New Gallery dialog, choose Connections (under General), and then choose Database Connection.
Tip
Each application workspace has its own connections, but you can also create general connections in JDeveloper that you can later copy into your applications. To create general connections, set the value of Create Connection in to IDE Connections.
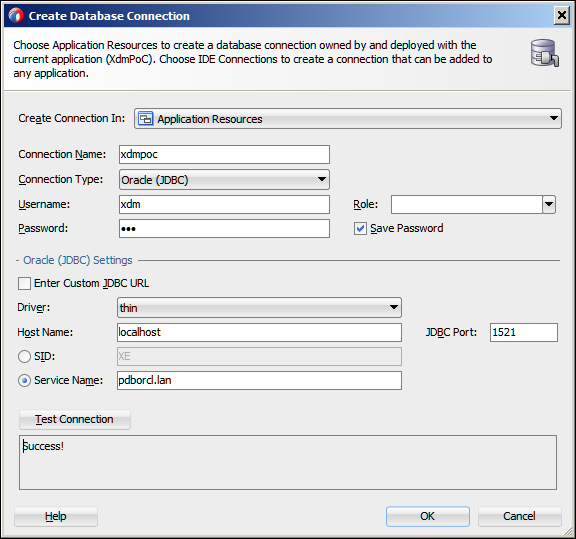
In the Create Database Connection dialog, give your connection a name (xdmpoc) and provide a username, password, and connection information. If you are working locally with the small, free version of the Oracle Database (Oracle Express Edition 11g), you choose the "thin" driver, localhost as Host Name, leave JDBC Port at the default value of 1521, and enter xe in the SID field. A default local installation of other database editions (version 11g and earlier) would use the same values for Host Name and JDBC Port, but the value of SID would be orcl.
If you are running against a local Oracle 12c database and have decided to implement the
multitenant architecture, your data should live in a pluggable database (PDB), not in the
container database (CDB). If you perform a default Oracle 12c database installation and call
your database orcl, you get a pluggable database called pdborcl. To connect to this PDB,
set the Service Name to pdborcl.lan. Just using SID orcl will connect to the CDB.
If you are running against a remote database, ask your database administrator for connection information. Click on Test Connection to check that you have entered everything correctly and then click on OK, as shown in the following screenshot:
For the Proof of Concept, we will only be building entity objects for the tables for which we need to meet the requirements of the two use cases. To start building, right-click on the Model project, choose New from the context menu, and then click on Entity Object.
Tip
Make sure that you select the Model project before you start creating business components. A default ADF Fusion Web Application workspace comes with two projects: a Model project for the business components and a ViewController project for the user interface.
The Initialize Business Components Project dialog appears the first time you create a business object. In this dialog, leave the database selection to Online Database, select your database connection, and set SQL Platform to Oracle and Data Type Map to Java Extended for Oracle. Then click on OK.
Tip
This book assumes that you use an Oracle database, and the above selections are recommended for this. If you are not using an Oracle database, you can choose SQL92 as SQL Platform and Java as Data Type Map. Click on the Help button in the dialog for more information on these choices.
In the
Create Entity Object dialog, name the entity object Person and enter XDM_PERSONS in the Schema Object field. You can also click on Browse to query the database. Then click on Next.
Tip
Naming standards
When you start your enterprise application development project in earnest, you need naming standards for everyone to follow. We'll return to naming standards in Chapter 3, Getting Organized.
In step 2 of the wizard, just click on Next to create entity object attributes for every column in the database. In ADF, there is no overhead at run time for having attributes for unused columns—when the ADF framework issues a SELECT statement to the database, it retrieves only those attributes that are actually needed by the view object.
In step 3 of the wizard, you can define the entity attributes in detail. One thing that often needs to be changed here is the type for primary key columns. If the table has a numeric ID column and a database trigger that sets this value when the record is created in the database, you need to set the Type to DBSequence. Do this for the PersId attribute, as shown in the following screenshot:
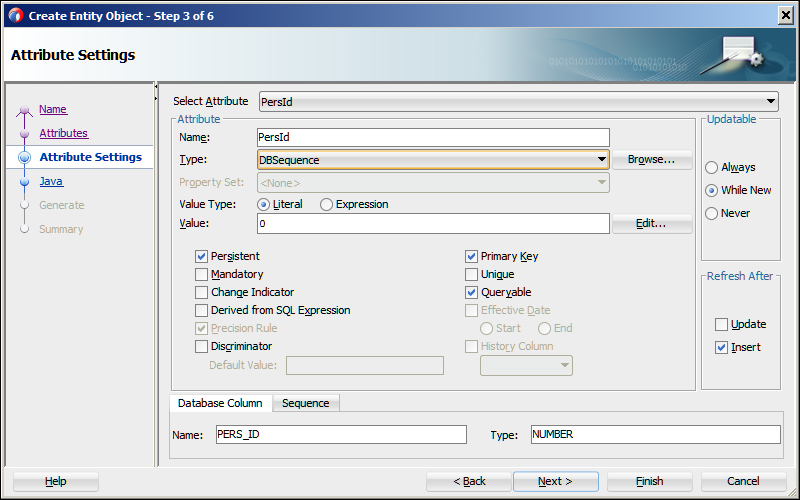
Notice that the ADF framework has now changed the values in the right-hand side of the dialog box: Updatable is now set to While New, and in the Refresh After box, the checkbox for Insert is now checked. This means that the entity object will automatically retrieve the primary key value created by your trigger. If you are using an Oracle database, ADF will use the RETURNING feature in Oracle SQL to get the ID back as part of the INSERT command (without having to make a second round-trip to the database).
You don't have to make any changes in steps 4 through 6, so you can simply click on Finish here to close the wizard and create your entity object.
For the Proof of Concept, repeat the procedure discussed earlier and create the following entity objects:
ProgrammefromXDM_PROGRAMMES(choose DBSequence for the attributeProgId)TaskfromXDM_TASKS(choose DBSequence for theTaskIdattribute)ElementfromXDM_ELEMENTS(doesn't need DBSequence for any attribute)
When you are done, the Model project in the application navigator should look as shown in the following screenshot:
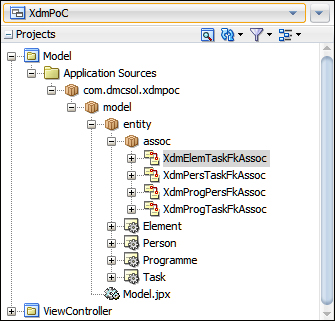
When you have created the entity objects, you will normally find that JDeveloper has automatically discovered the relationships between them based on the foreign keys defined in the database.
If you have configured JDeveloper Preferences as recommended in the introduction, all of the associations can be found in the application navigator under model > entity > assoc, as shown in the preceding screenshot.
To determine which view objects to build, you must look at the screens you need. This allows you to determine both the data you need to present and the value lists you'll need.
Looking at the Task Overview screen (UC008), we see that all data is at the same level (no master-detail level), so we will just need one Tasks view object to display the data.
Additionally, we'll need three value lists:
Programmes (for the Programme drop-down list for search)
Persons (for the Responsible drop-down list for search)
Services (for the Service drop-down list in the data table)
Looking at the Person Task Timeline screen (UC104), there are clearly no value lists. As data is presented graphically, it's not immediately obvious whether the data contains any master-detail relationship. To determine if that is the case, consider how you would display the same information in ordinary fields and tables. Such a screen might show:
One person
A number of tasks assigned to that person
This shows us that there is actually a master-detail relationship hidden here, so we need one view object for Persons, one view object for their Tasks, and a view link connecting the two.
To create view objects for persons, right-click on the Model project and navigate to New | View Object. It's a good idea to give your view object a name that indicates its intended usage as a list of values. For the list of persons, use the name PersonLOV. Leave the data source at Entity Object.
Tip
Always use entity objects
In ADF 10g and earlier versions, the recommendation was to use SQL Query when you did not need to change the data. Since ADF 11g, the benefit of caching those entity objects outweighs the slight performance benefit from executing SQL directly. The recommendation is, therefore, to access data through entity objects always.
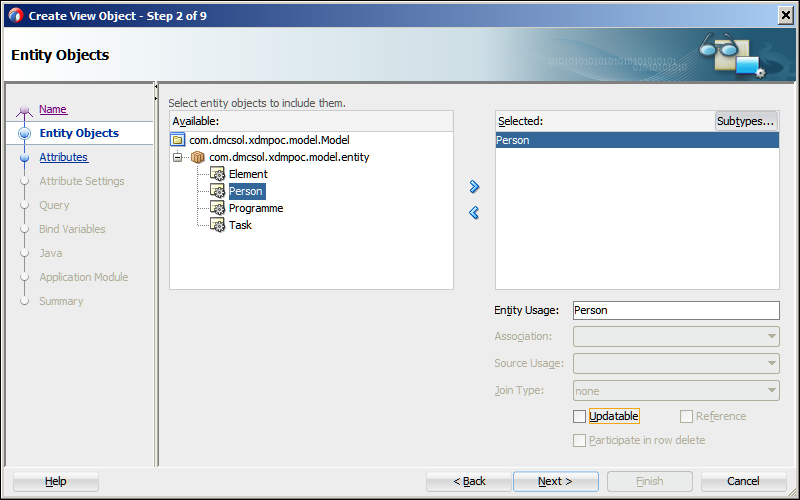
In step 2 of the wizard, choose the Person entity object and move it to the box to the right. You can remove the checkmark in the Updatable box since we will only be using this view object for the drop-down list, as shown in the following screenshot:
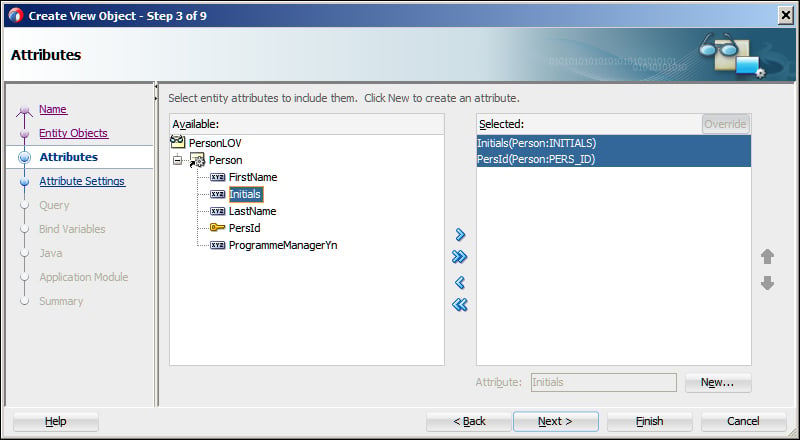
In step 3 of the wizard, move the fields you want to the right-hand side—in this case, we just need Initials. Note that the primary key attribute will always be included, as shown in the following screenshot:
In step 5 (Query), you define the ordering of records by entering Initials in the Order By field. Then, click on Finish to create the view object.
Repeat this procedure to create the other two value list view objects, which are as follows:
ProgrammeLOV(based on theProgrammeentity object, not updatable; select the attribute calledName, order byname)ServiceLOV(based on theElemententity object, not updatable; select the attribute calledDescription, order bydescription)
To create a view object for tasks, look at the Task Overview, Edit page (UC008), and data model. You'll notice that we need fields for date and time, text, start where, flight number, end where, number of passengers, and service. All of this data comes from the XDM_TASKS table through the Task entity object.
Create a new view object (AllTasksVO), leaving the data source at Entity Object. In step 2 of the wizard, choose the Task entity object and move it to the right-hand side. As we will actually be updating data through the AllTasksVO view object, we leave the check mark in the Updatable checkbox.
In step 3, shuttle the following fields to the right-hand side:
StartDateTextStartWhereFlightNoEndWherePaxElemKey
Note that in the Available box on the left-hand side, all attributes are shown in alphabetical order, not in the order you placed them in the entity objects or the order they have in the database table.
Click on Next twice and choose to order by start_date. Then click on Next to get to Bind Variables (step 6).
Tip
Bind variables
Bind variables are placeholders in your SQL that you fill with values at run time. The ADF framework enforces the good practice of always using bind variables when you need to change the WHERE condition of a query. You should never simply concatenate values into an SQL statement; if you do, the database can't tell that it already knows the SQL statement and will waste time parsing it again, and a malicious user could potentially insert extra statements into your SQL.
Looking at the search box at the top of the screen sketch, you can see that we need to limit the tasks displayed by responsible person, programme, and text. Use the New button to create three bind variables called pResponsible, pProgramme, and pText (all of them of type String). You can leave the other settings in this step of the wizard at their default values.
When you're done, click on the Back button to return to step 5 of the wizard and add a WHERE clause that uses the bind variables. It should look similar to the following code:
 (:pResponsible is null or PERS_ID = :pResponsible)
and (:pProgramme is null or PROG_ID = :pProgramme)
and (:pText is null or upper(TEXT) like '%' || upper(:pText) || '%')
When you are done entering the WHERE clause, click on the Test and Explain button to verify that your SQL is valid. If you do not get the Query executed successfully message, fix your SQL.
In this case, we allow null values for the bind variables, so the SQL statement has to contain an OR branch handling this case. We are converting both the database TEXT column and the pText bind variable to upper case to achieve case-insensitive matching. We are also concatenating a wildcard character before and after the parameter value to search for occurrences of the search text anywhere in the database value.
Tip
Point-and-click Where clauses
You can also define Named View Criteria on your view objects (on the Query subtab). These allow you to build a WHERE clause by pointing and clicking. Read about named view criteria and the associated af:query component in the online Help section.
When you click on Finish, the AllTasksVO view object is created and appears in the application navigator.
However, we are not quite done with the view object—we still need to define which data elements use lists of values. You might remember from the page layout illustration that Service was rendered as a drop-down listbox. Double-click on the AllTasksVO view object to edit it and choose the Attributes subtab on the left-hand side. Choose the ElemKey attribute and then select the List of Values tab at the bottom of the view object window. Click on the green plus sign to bring up the Create List of Values dialog, as shown in the following screenshot:
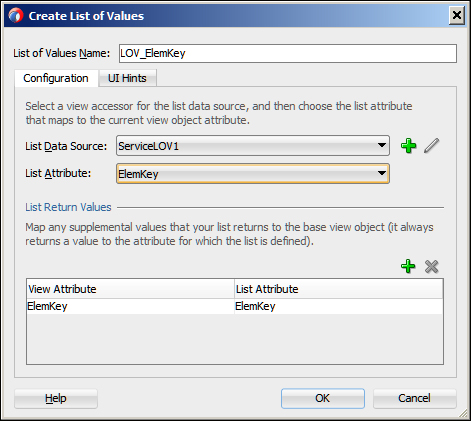
In this dialog, click on the green plus sign to add the List Data Source. Choose the ServiceLOV view object and then ElemKey as List Attribute.
Since we don't want to display the actual key value (ElemKey) to the user, choose the UI Hints tab and move the Description attribute to the right-hand side box. Uncheck the Include "No Selection" Item checkbox and then click on OK.
The Attributes tab also allows you to define some hints to the user interface components about rendering the component. Click on the StartDate attribute and choose the UI Hints tab at the bottom of the view object window. Set the label to Start time, set Format Type to Simple Date, and in the Format field, enter the format mask, dd-MMM-yy HH:mm.
Tip
The date format string used here is Java SimpleDateFormat, not the SQL data format strings you might be familiar with from the database.
Click on the remaining elements and set the label text, referring to the user interface sketch for UC008 (Format is only used for date and number objects).
Tip
Taking a hint
The control hints defined here are just hints. When building the user interface, these will be the default, but you can still decide to use another label text or format when you use the view object on a page. For simplicity, we are hardwiring labels into the application—in a real-life application, texts should go into separate resource bundles. Refer to Appendix, Internationalization, for more information.
To create an application module for tasks, right-click on the Model project and navigate to New | Application Module. Name the application module as EditTaskService. In step 2 of the wizard, expand the tree in the left-hand side and shuttle the AllTasksVO view object to the right, together with the PersonLOV and ProgrammeLOV that we need to create the search criteria value lists. This is all you need to do, so you can simply click on Finish to close the wizard.
Tip
Note that the view object instances on the right-hand side get the name of the view object with a number appended to them by default. For example, the AllTasksVO view object becomes the view object instance, AllTasksVO1. The instance name is part of the contract between the business service and the user interface—if you want to change it, do so before anybody starts building the user interface. The reason for this default is that it is possible to have several view object instances based on the same view object in an application module.
Now, you can verify that your application module works the way you expected it to. In the Applications window, right-click on the EditTaskService application module node (the icon that looks like a little suitcase) and choose Run from the context menu. This will start the Oracle ADF Model Tester where you can work with all of the view objects that are part of your application module.
Tip
Always test your business components using the Oracle ADF Model Tester before you start using them in pages. Whenever your page doesn't run the way you expected, always use the ADF Model Tester to determine if the error is in the frontend or the backend part of the application.
Double-click on the AllTasksVO1 view object instance. A pop-up dialog appears, allowing you to assign values to all the bind variables defined in the view objects. To begin, just click on OK to leave all bind variables at the NULL value. You should see the data in the AllTasksVO view object, as shown in the following screenshot:
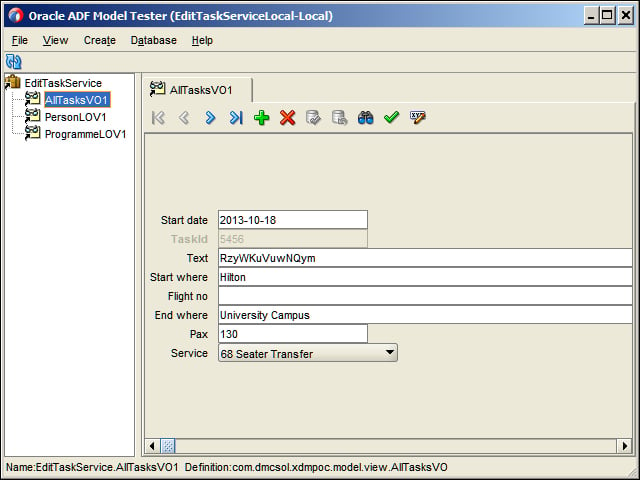
Here, you can page through the existing data, as well as insert and delete rows, using the green plus and red cross symbols. Click on the Edit Bind Variables button (to the right of the toolbar, with the little pencil icon) to change bind variable values and notice how the data is filtered.
For the scheduling screen, we need two view objects: one for persons and one for the tasks assigned to persons.
We already have a view object showing persons, but this view object only contains the initials (because it was intended for the Persons drop-down list in UC008). We could create a new Persons view object for UC104; however, we'll change the existing view object instead.
First, you need to change the name of the view object from PersonLOV to PersonsVO to reflect that it's no longer just used for a list of values. Changing the name or package for existing objects is called refactoring, and JDeveloper makes this easy. Simply right-click on the PersonLOV view object and choose Refactor | Rename from the context menu. JDeveloper will change the name of the object and automatically update all of the references to it, as shown in the following screenshot:

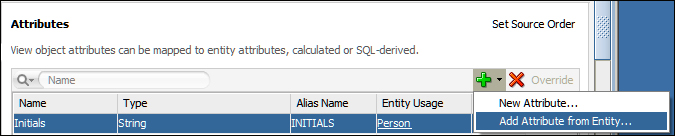
Next, the view object needs some more attributes. To add these, open the view object by double-clicking on it and choose the Attributes subtab. Click on the little triangle next to the green plus sign above the attributes and choose Add Attribute from Entity, as shown in the following screenshot. Don't just click on the plus sign—you need to select the little triangle to get access to the Add Attribute from Entity menu item.
In the Attributes dialog, add the FirstName and LastName attributes to the Selected list and click on OK. Then, select the new FirstName attribute, select the UI Hints tab at the bottom of the view object window, and set a Label. Repeat this procedure for the LastName attribute.
Next, create another view object, giving it the name ScheduledTasksVO. In step 2 of the wizard, move the Task entity object to the right-hand side. As we won't be updating tasks either, you can remove the checkbox in the Updatable field here. In step 3 of the wizard, you only need to select the StartDate and EndDate attributes—note that the TaskId primary key attribute is automatically added.
In step 5 of the wizard, we need to add a WHERE clause so that the view object will only show tasks with both, a start and an end date. Enter the following WHERE clause:
start_date is not null and end_date is not null
Then, click on Finish.
Since there is a master-detail relationship between persons and tasks, we also need to create a view link. Right-click on the Model project and choose New | View Link. Name your view link PersonsTasksLink.
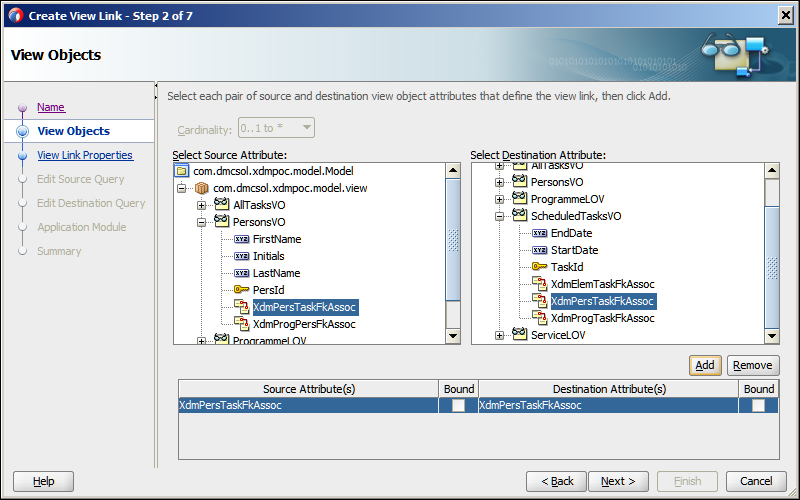
In step 2 of the wizard, we need to define the relationship between the two view objects. These are connected by the foreign key, XDM_PERS_TASK_FK, that defines the connection between a person and the tasks assigned to that person. Leave the Cardinality selection at 0..1 to * (this means that one person may have one or more tasks), expand the PersonsVO node on the left-hand side, and choose XdmPersTaskFkAssoc at the left-hand side of the link. On the right-hand side, expand the ScheduledTasksVO node and choose PersTaskFkAssoc again, this time at the right-hand side of the link. Then, click on Add. You can see the source and destination attributes added at the bottom of the dialog box, as shown in the following screenshot:
You don't need to change any of the remaining settings in this wizard, so you can simply click on Next and then Finish to close the dialog box.
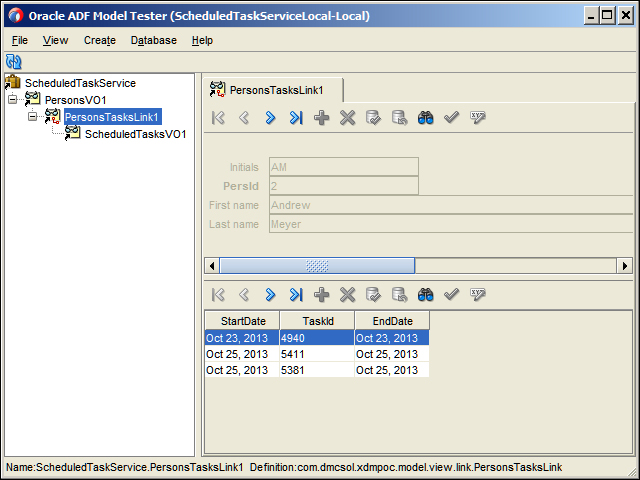
Create another application module for the UC104 Person Task Timeline screen, giving it the name ScheduledTaskService.
Tip
One lump or two?
You want to modularize your application so that each piece of functionality is completely developed and delivered by one team. This means that each subsystem gets its own application module. When you put together the final application, you can choose whether you want each subsystem (and each application module) to have its own transaction and database connection or whether they should share the transaction context. We'll return to the discussion of the proper number of application modules in Chapter 3, Getting Organized.
In step 2 of the wizard, first move the PersonsVO view object to the right-hand side. Then, select the PersonsVO1 view object instance on the right-hand side and the node ScheduledTasksVO via PersonTasksLink on the left-hand side, and click on the > button to move ScheduledTasksVO to the right-hand side box, as shown in the following screenshot:

Note the difference between choosing ScheduledTasksVO on its own and choosing ScheduledTasksVO as a child of PersonsVO. If you choose the view object as a child of another view object, the ADF framework will automatically implement the master-detail relationship; the view object will only display the records that are children of the current record in the parent (master) view object. If you choose the view object on its own, it will not have any relationship to the master view object and will simply display all child records.
Then, click on Finish to close the wizard.
Run your new application module in the ADF Model Tester. In the left-hand side, you'll see the master view object, the view link, and the detail view object. Double-click on the view link to see the master and detail records together. When you use the navigation buttons at the master level, you will see different detail records displayed, as shown in the following screenshot: