
Any nontrivial Java EE application will connect to a Relational Database Management System (RDBMS). Supported RDBMS systems include Java DB, Oracle, Derby, Sybase, DB2, PointBase, MySQL, PostgreSQL, Informix, Cloudscape, and SQL Server. In this section, we will demonstrate how to set up GlassFish to communicate with a MySQL database. The procedure is similar for other RDBMS systems.
Note
GlassFish comes bundled with an RDBMS called JavaDB. This RDBMS is based on Apache Derby. To limit the download and configuration needed to follow this book's code, all examples needing an RDBMS will use the bundled JavaDB RDBMS. The instructions in this section are to illustrate how to connect GlassFish to a third-party RDBMS.
Opening and closing the database connections is a relatively slow operation. For performance reasons, GlassFish and other Java EE application servers keep a pool of open database connections; when a deployed application requires a database connection, one is provided from the pool; when the application no longer needs the database connection, the said connection is returned to the pool.
The first step to follow when setting up a connection pool is to copy the JAR file containing the JDBC driver for our RDBMS in the lib directory of the domain (consult your RDBMS documentation for information on where to obtain this JAR file). If the GlassFish domain where we want to add the connection pool is running when copying the JDBC driver, it must be restarted for the change to take effect. The domain can be restarted by executing the following command:
asadmin restart-domain domainname
Once the JDBC driver has been copied to the appropriate location and the application server has been restarted, log in to the admin console by pointing the browser to http://localhost:4848.
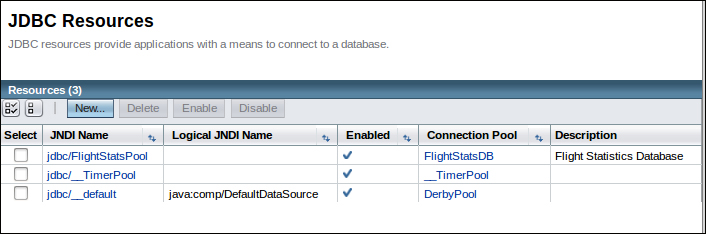
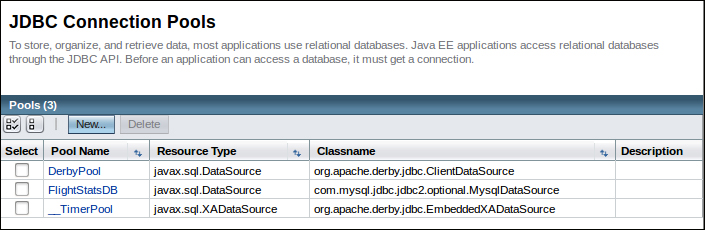
Then, navigate to Resources | JDBC | JDBC Connection Pools. The browser should now look something like what is shown in the following screenshot:

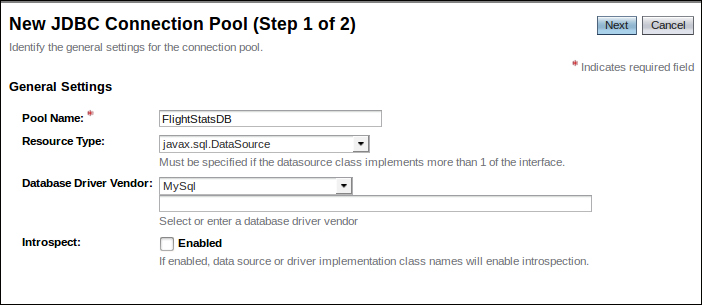
Click on the New... button. After entering the appropriate values for our RDBMS, the main area of the page should look something like the following screenshot:
After clicking on the Next button, we should see a page similar to the one shown in the following screenshot:
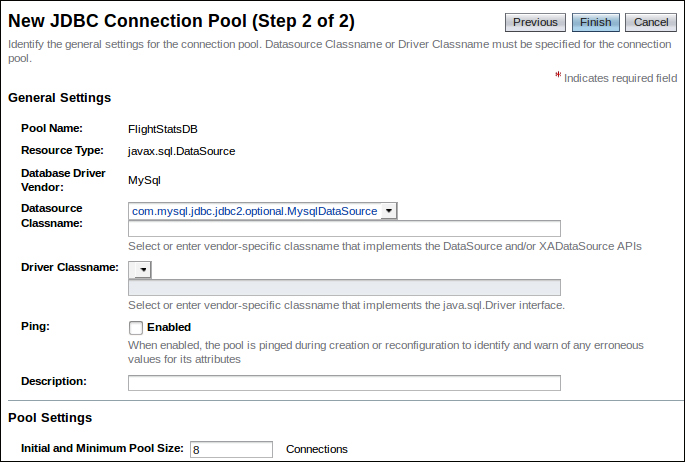
Most of the default values on the top portion of the page shown in the preceding screenshot are sensible. Scroll all the way down and enter the appropriate property values for our RDBMS (at a minimum, username, password, and URL). Then, click on the Finish button at the top right of the screen.
Property names vary depending on the RDBMS we are using, but usually there is a URL property where we should enter the JDBC URL for our database, plus username and password properties where we should enter authentication credentials for our database.
Our newly created connection pool should now be visible in the list of connection pools as shown in the following screenshot:
In some cases, the GlassFish domain may need to be restarted after setting up a new connection pool.
We can verify that our connection pool was successfully set up by clicking on its pool name and then enabling the Ping button on the resulting page as shown in the following screenshot:
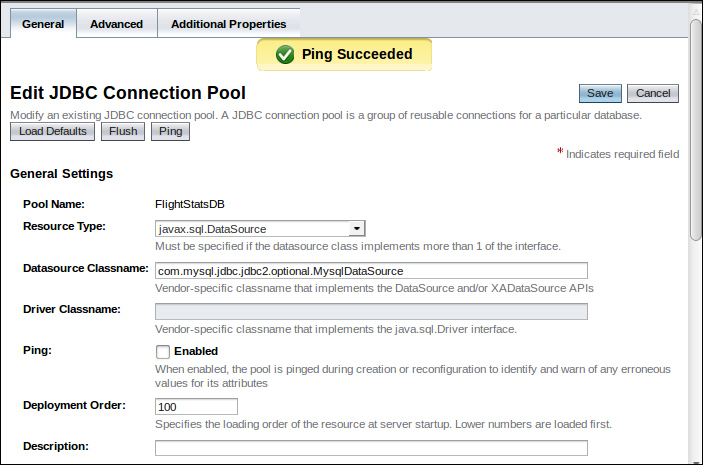
Our connection pool is now ready to be used by our applications.
Java EE applications don't access connection pools directly; they access a data source instead, which points to a connection pool. To set up a new data source, click on the JDBC icon under the Resources menu item on the left-hand side of the web console, then click on the JDBC Connection Pools tab, and then click on the New... button. After filling out the appropriate information for our new data source, the main area of the web console should look something like what is shown in the following screenshot:

After clicking on the OK button, we can see our newly created data source as shown in the following screenshot: