
BizTalk Services deployment can be created using the Windows Azure Management Portal or using PowerShell. We will use the former in this example.
Certificates are required for communication using SSL, and Access Control Service is used to secure the endpoints of the BizTalk Services deployment. First, you need to know whether you need a custom domain for the BizTalk Services deployment. In the case of test or developer deployments, the answer is mostly no. A BizTalk Services deployment will autogenerate a self-signed certificate with an expiry of close to 5 years. The ACS required for deployment will also be autocreated. Certificate and Access Control Service details are required for sending messages to bridges and agreements and can be retrieved from the Dashboard page post deployment.
You need to create an Azure SQL database for tracking data. It is recommended to use the Business edition with the appropriate size; for test purposes, you can start with the 1 GB Web edition. You also need to pass the storage account credentials to archive message data. It is recommended that you create a new Azure SQL database and Storage account for use with BizTalk Services only.
Now that we have the security and storage details figured out, let us create a BizTalk Services deployment from the Azure Management Portal:
From the Management portal, navigate to New | App Services | BizTalk Service | Custom Create.
Enter a unique name for the deployment, keeping the following values—EDITION: Developer, REGION: East US, TRACKING DATABASE: Create a new SQL Database instance.
In the next page, retain the default database name, choose the SQL server, and enter the server login name and password.
In the next page, choose the storage account for archiving and monitoring information.
Deploy the solution.
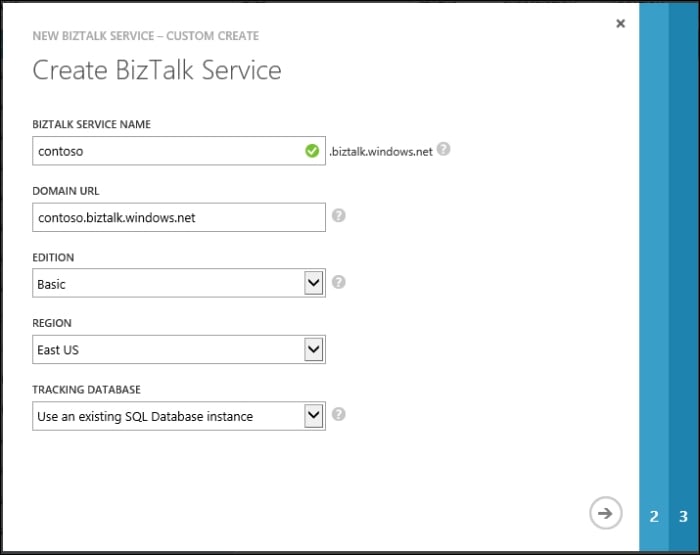
The BizTalk Services create wizard from Windows Azure Management Portal
The deployment takes roughly 30 minutes to complete. After completion, you will see the status of the deployment as Active. Navigate to the deployment dashboard page; click on CONNECTION INFORMATION and note down the ACS credentials and download the deployment SSL certificate. The SSL certificate needs to be installed on the client machine where the Visual Studio SDK will be used.
We have one step remaining, and that is to configure the BizTalk Services Management portal to view agreements, bridges, and their tracking data. For this, perform the following steps:
Click on Manage from the Dashboard screen.
This will launch
<mydeployment>.portal.biztalk.windows.net, where the BizTalk Portal is hosted.Some of the fields, such as the user's live ID and deployment name, will be auto-populated.
Enter the ACS Issuer name and ACS Issuer secret noted in the previous step and click on Register.
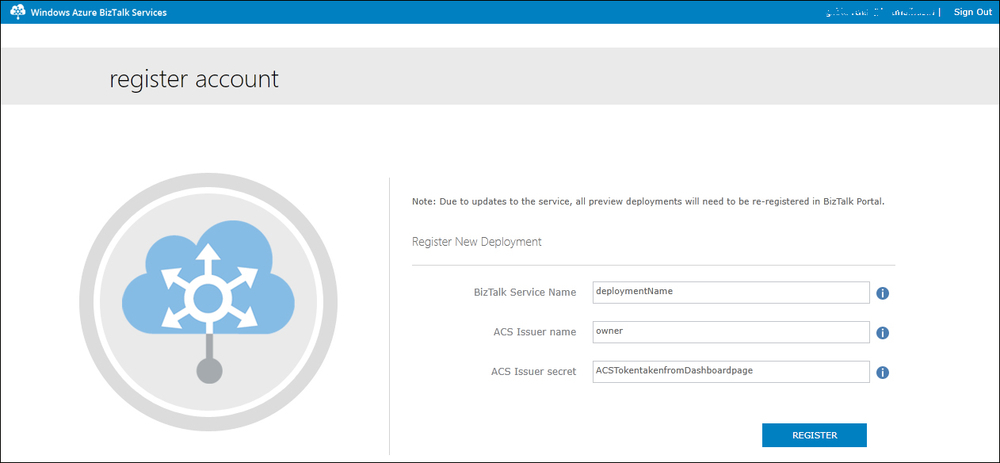
BizTalk Services Portal registration