

After you have created the application, it is time to create one or more forms and reports. First let's get started with a simple form. We will build a tabular form with insert, update, and delete possibilities.
Make sure that the table our form is based on contains a Primary Key and a sequence to update the Primary Key. In this case, we will be using the EMP table, so we have to make sure it is available in our database schema.
Also, we have to make sure the application that we created in the previous recipe is available.
The starting point for this recipe is the overview of the intranet application we created in the previous recipe.
Click on the Create Page button.
You will get an overview of page types. Select Form.
Now you get an overview of types of forms, such as forms based on a procedure, forms based on a table or view, or forms based on a query. Select Tabular form.
The next step is to choose the table owner and the allowed operations. Here you can decide what your form should do: update only, update and insert, update and delete, or all operations (update, insert, and delete). Select all operations.
Select the table or view your form should be based on. If you know the table name, you can type it in the text field. Otherwise, click on the button next to the field and select a table from the pop-up list. We choose the employees table,
EMP.Now you can select the columns, which should be visible in the form. You can select columns by clicking on the column while holding the Ctrl key. To select all columns, you can click on the first column and drag your mouse to the last column.
If a Primary Key constraint is defined on the table we use, then it will automatically be selected. Otherwise, select the primary key by hand. APEX needs to know this to be able to update the changed rows.
Next, you can choose which way the Primary Key is automatically filled. Maybe you created a trigger which updates the Primary Key in case it is empty. However, we choose to update the Primary Key via an existing sequence. Select this option, and in the following listbox, select the appropriate sequence and proceed to the next step.
Next, you can select which columns in the form should be updatable. Select the desired columns and click on Next.
In this step, you can give the page a name and a page ID. Furthermore, you can specify a region title, a region template, a report template and decide if your forms page should contain breadcrumbs. A breadcrumb is a navigation component that shows the path to the current page. Leave the options as they are and click on Next.
We are not going to use tabs, so leave this option on its default selection and click on Next.
Next, fill in the names that should appear on the buttons in the form and click next.
In this step, you must define the branches. Branches are links to other pages. It is important to know which ID a page had in order to fill in the branches at this point. Usually, the Cancel button branches to the main page of the application. But it's also possible to find the page to branch to by using the LOV button. For the Page Submit branch, select the page ID assigned to the page we want to branch to. Click on Next.
The last step in the wizard is the confirmation page. Check the data. If something is wrong, you can go back using the Previous button. Otherwise, click on the Finish button.
The form will be created and here you can choose to run the form to see how it looks or you can edit the form to define things. When running the form, it should look like the following:
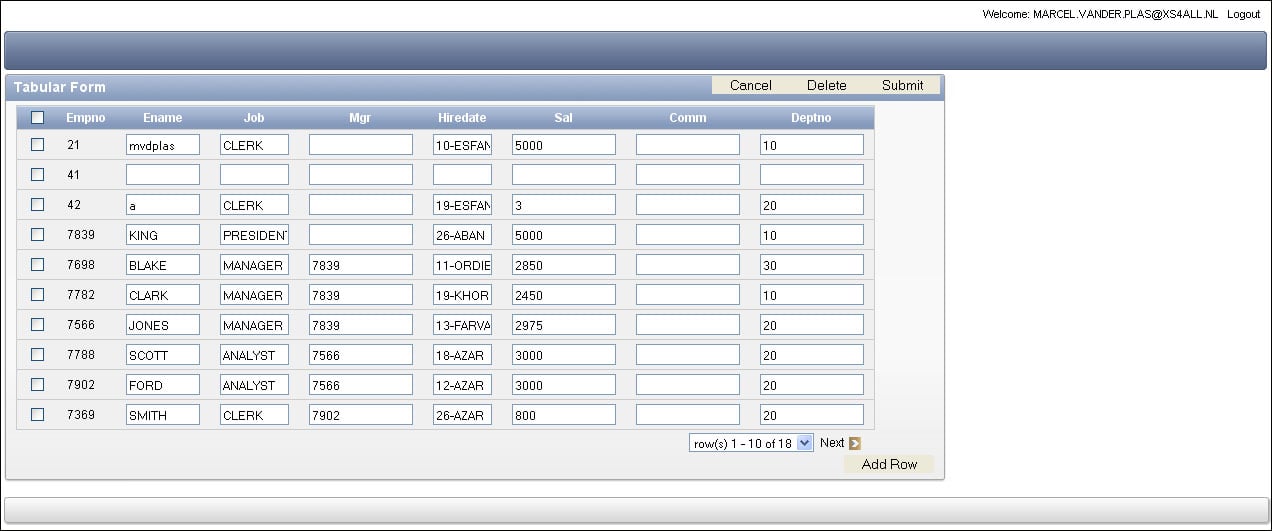
A tabular form is actually an updateable report. In the Region section, you can find the query that populates the data to show on the screen. By default, every row of the table is shown. We can restrict the result set by adding a where clause to this query.
When we edit the page, m we can see that the wizard created the four buttons and the processes for the data manipulation language (DML). The tree view shows an overview of the components the page is built up of. On the left-hand side we can see the components used for the rendering of the page (Regions, Items, and so on). It is built up in such a way that we can see the order of the components that are rendered when the page is loaded.
The middle section shows the components used for the processes on the page; in this case, these are validations, data manipulation, and branching. The right-hand side section shows an overview of all shared components used on this page, if any are available.
We can right-click on any component in the tree view to see the possible actions for that component:
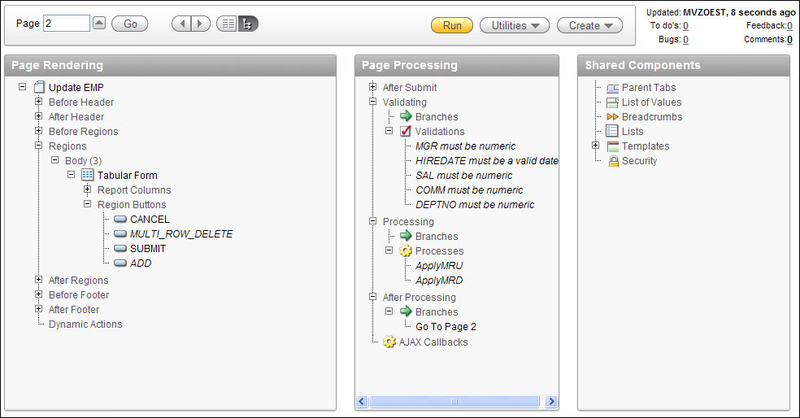
You can see that there are two multirow update processes. The first one is triggered by the Submit button and updates the changed rows. The Add Rows button initiates two processes: the second multirow update process and the add rows process. So, actually the Add Rows button submits the changes the user made so far and after that it creates an empty row.
The delete button initiates a JavaScript process that asks the user for confirmation. And this confirmation starts the delete process. This JavaScript function can be found in the HTML header section of the page properties.
You can also make a simple single record form. Here's how to do it.
In the Application Builder, click on the created application.
Click on the form icon.
Click on the form in the table or view.
Select the schema where the employees table resides and click on Next.
Enter the table name (in this case, it is
EMP) and click on Next.In the page number and page name dialogs, just leave the settings as they are and click on Next.
Select Do not use tabs and click on Next.
Select the Primary Key and click on Next.
Select Existing and select the desired sequence name in the listbox. Click on Next.
Change the button labels or leave them as they are and click on Next.
Enter the page numbers APEX should call when submitting or cancelling and click on Next.
In the confirmation dialog, click on Finish.
In the success message dialog, click on Edit.