
The initial installation of Jenkins on Microsoft Windows is straightforward. The Microsoft Windows Jenkins MSI package comes complete with the Java Runtime Environment (JRE) prerequisite and Microsoft .NET 2.0 framework. This bundling provides a seamless Jenkins installation experience, and alleviates the need for any external prerequisite software installations.
By using the MSI installation package, the Jenkins installation wizards will automatically install itself as a Windows service. By installing Jenkins as a Microsoft Windows service it will become easier to manage and control. Windows services provide an easy way to specify what the system should do when Jenkins crashes.
Once Jenkins has been installed we will want to verify that Jenkins has properly been installed and configured as a Windows service. To do this we will need to open the Services area in the Control Panel and locate the entry for Jenkins. To navigate to the Windows services management area, go to Start-> Control Panel -> Administrative Tools -> Services.
If Jenkins is installed properly as a Windows service, we will see an entry for it listed in the Windows Services panel, as shown in the following screenshot:
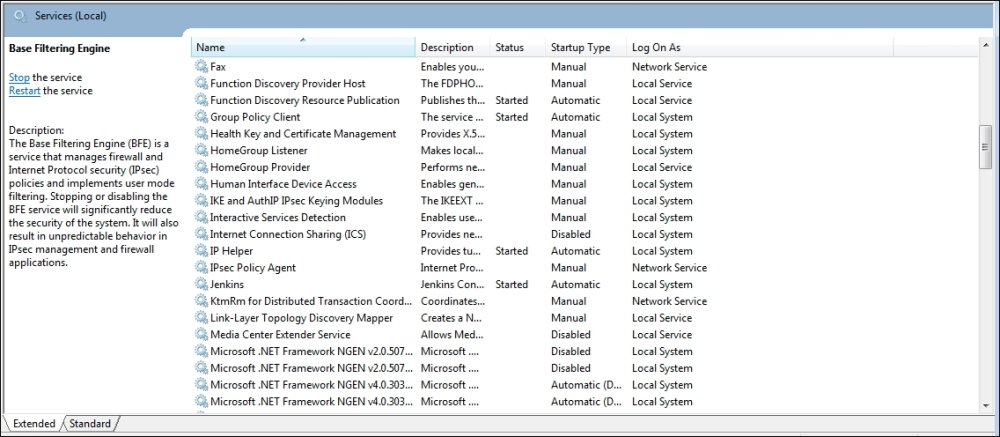
Figure 1-1: The Windows Services panel
The Windows service properties dialog displays the available options for Windows services. From this screen, we can modify how the service is started, what user account the service runs under, and even manage how Microsoft Windows recovers the Jenkins service if it encounters any problems.
To open the Windows service properties panel for Jenkins, double-click on the Jenkins entry on the main Windows Services panel. Windows will then display the Jenkins Properties dialog, as shown here:
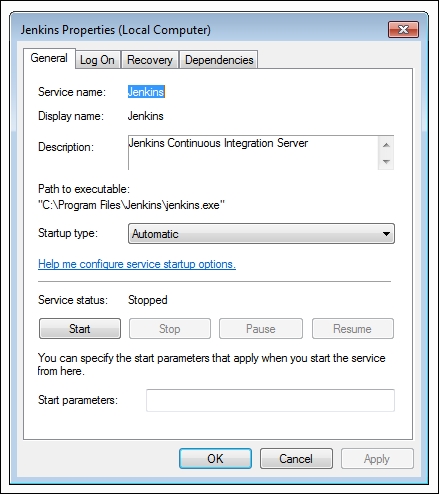
Figure 1-2: The Jenkins Properties dialog
Let's make Jenkins more fault tolerant. To do this, we need to modify the Jenkins Windows service definition and implement a more reliable way for our Jenkins service to recover from failure. Click on the Recovery tab, as shown here:
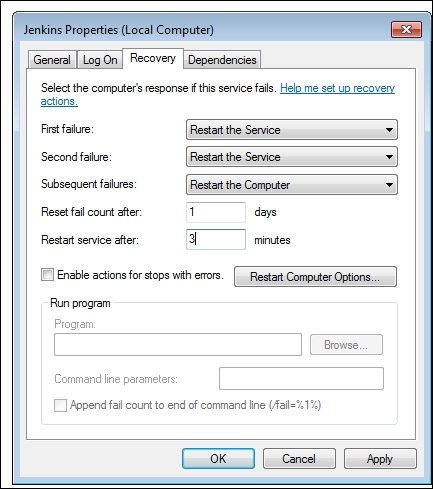
Figure 1-3: The Recovery tab in the Jenkins Properties dialog
From here, we can direct Microsoft Windows to automatically restart the Jenkins service if it fails. In the example shown in the preceding screenshot, we have implemented fault tolerance for Jenkins by updating the fields in the dialog.
To proceed update your Jenkins service to reflect the above implementation. Click on Apply and restart the Jenkins service.
Java web-ui applications, including Jenkins, run on port 8080. To change this listening port, we need to modify the Java startup configuration file.
In Microsoft Windows, we can customize all of the Java JVM options by modifying the Jenkins.xml configuration file. The primary Jenkins configuration file can be found at $JENKINS_HOME/jenkins.xml.
On Microsoft Windows, the $JENKINS_HOME directory and primary XML configuration file can usually be found in one of the following locations:
C:\Program Files\Jenkins\jenkins.xmlC:\Program Files (x86)\Jenkins\jenkins.xml
The primary XML configuration file contains a number of settings and options that pertain to the JVM. One of these settings is the listening port. Let's proceed in changing the listening port. We will walk through these steps together.
Edit the primary XML configuration file in a text editor and locate the
<arguments>node. An example of the argument node is shown here:<!-- if you'd like to run Jenkins with a specific version of Java, specify a full path to java.exe. The following value assumes that you have java in your PATH. --> <executable>%BASE%\jre\bin\java</executable> <arguments>-Xrs -Xmx256m -Dhudson.lifecycle=hudson.lifecycle.WindowsServiceLifecycle -jar "%BASE%\jenkins.war" --httpPort=8080</arguments>Change the value for
–httpPortand save the configuration file.Restart the Jenkins service and verify that Jenkins is running on the preferred port.
Now that we have completed the adjustments to the listening port, let's take a look at some of the other available JVM options.
A default Jenkins installation is allocated 256 MB of memory. The initial memory allocated is sufficient for basic operations. As a Jenkins instance grows and becomes more complex it will inevitably run out of memory. Before we start to see build failures related to Java heap space, or PermGen memory we should allocate additional memory to Java and Jenkins.
Java v1.7, and earlier, uses permanent generation memory and maximum permanent generation memory allocations. With the advent of Java v1.8, Oracle has replaced the permanent generation memory options with metaspace memory options. This has added a bit of confusion surrounding how to properly manage memory in Java. To better understand the JVM and its memory knobs, let's take a look at the following table. It describes what each of the available memory options:
|
Setting Name |
Example Argument |
Description |
|---|---|---|
|
Initial heap size |
|
Sets the initial Java heap size |
|
Maximum heap size |
|
Sets the max Java heap size |
|
Initial permanent generation memory |
|
Sets the initial available permanent generation memory |
|
Maximum permanent generation memory |
|
Sets the highest amount of PermGen memory that can be allocates |
|
Maximum metaspace |
|
Sets the max metaspace amount (similar to PermGen but dynamic by default) |
Java memory arguments and descriptions for Windows
Allocating too little memory may cause Jenkins and Java to throw memory errors. However, allocating too much memory will degrade the operating system's performance. It is important to adjust these settings carefully, and find a balance suitable for the target system. These settings will need to be customized to fit your specific hardware and operating system configuration. Here is an example to increase the maximum heap size:
<arguments>-Xrs –Xmx512m -Dhudson.lifecycle=hudson.lifecycle.WindowsServiceLifecycle -jar "%BASE%\jenkins.war" --httpPort=8080</arguments>
While customizing the Java options, there are a number of things to keep in mind. Here are a few tips and notes on allocating memory to Microsoft Windows and Java:
Microsoft Windows has a required overhead for the OS. Be sure to leave enough RAM available for the OS to function properly (more than 128MB).
The larger the initial heap and/or maximum heap memory size, the larger the permanent generation memory allocation will need to be. This is because the permanent generation memory stores data about the contents of the heap.
The metaspace switch is only available in Java v1.8 or higher versions.
The permanent generation memory has been deprecated and removed in Java v1.8.
The memory values you specify must be a multiple of 1,024 and greater than 1 MB.