
If you haven't installed Qt 5, refer to http://www.qt.io/download to install the latest version of it. It's recommended that you install the Community version, which is totally free and compliant with GPL/LGPL. Typically, the installer will install both Qt Library and Qt Creator for you. In this book, we will use Qt 5.4.0 and Qt Creator 3.3.0. Later versions may have slight differences but the concept remains the same. It's highly recommended that you install Qt Creator if you don't have it on your computer, because all the tutorials in this book are based on it. It is also the official IDE for the development of Qt applications. Although you may be able to develop Qt applications with other IDEs, it tends to be much more complex. So if you're ready, let's go for it by performing the following steps:
Open Qt Creator.
Navigate to File | New File or Project.
Select Qt Widgets Application.
Enter the project's name and location. In this case, the project's name is
layout_demo.
You may wish to follow the wizard and keep the default values. After this process, Qt Creator will generate the skeleton of the project based on your choices. The UI files are under the Forms directory. When you double-click on a UI file, Qt Creator will redirect you to the integrated designer. The mode selector should have Design highlighted, and the main window should contain several sub-windows to let you design the user interface. This is exactly what we are going to do. For more details about Qt Creator UI, refer to http://doc.qt.io/qtcreator/creator-quick-tour.html.
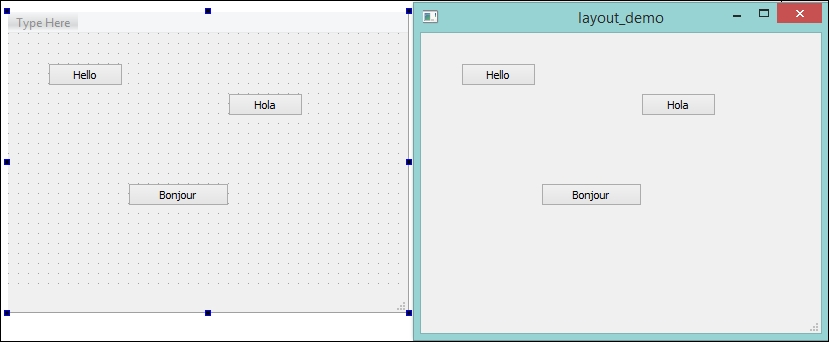
Drag three push buttons from the widget box (widget palette) into the frame of MainWindow in the center. The default text displayed on these buttons is PushButton, but you can change the text if you want by double-clicking on the button. In this case, I changed the buttons to Hello, Hola, and Bonjour, accordingly. Note that this operation won't affect the objectName property. In order to keep it neat and easy to find, we need to change the objectName property. The right-hand side of the UI contains two windows. The upper-right section includes Object Inspector and the lower-right side includes Property Editor. Just select a push button; you can easily change objectName in Property Editor. For the sake of convenience, I changed these buttons' objectName properties to helloButton, holaButton, and bonjourButton respectively.
Tip
It's a good habit to use lowercase for the first letter of objectName and an uppercase letter for Class name. This helps your code to be more readable by people who are familiar with this convention.
Okay, it's time to see what you have done to the user interface of your first Qt application. Click on Run on the left-hand side panel. It will build the project automatically and then run it. It's amazing to see that the application has the exact same interface as the design, isn't it? If everything is alright, the application should appear similar to what is shown in the following screenshot:
You may want to look at the source code and see what happened there. So, let's go back to the source code by returning to the Edit mode. Click on the Edit button in the mode selector. Then, double-click on main.cpp in the Sources folder of the Projects tree view. The code for main.cpp is shown as follows:
#include "mainwindow.h"
#include <QApplication>

int main(int argc, char *argv[])
{
    QApplication a(argc, argv);
    MainWindow w;
    w.show();

    return a.exec();
}Actually, you don't need to and you probably won't change too much in this file. The first line of the main scope just initializes the applications on a user's desktop and handles some events. Then there is also an object, w, which belongs to the MainWindow class. As for the last line, it ensures that the application won't terminate after execution but will keep in an event loop, so that it is able to respond to external events such as mouse clicks and window state changes.
Last but not least, let's see what happens during the initialization of the MainWindow object, w. It is the content of mainwindow.h, shown as follows:
#ifndef MAINWINDOW_H
#define MAINWINDOW_H

#include <QMainWindow>

namespace Ui {
    class MainWindow;
}

class MainWindow : public QMainWindow
{
    Q_OBJECT

public:
    explicit MainWindow(QWidget *parent = 0);
    ~MainWindow();

private:
    Ui::MainWindow *ui;
};

#endif // MAINWINDOW_H
You may feel a bit surprised seeing a Q_OBJECT macro if this is your first time writing a Qt application. In the QObject documentation, it says:
The
Q_OBJECTmacro must appear in the private section of a class definition that declares its own signals and slots or that uses other services provided by Qt's meta-object system.
Well, this means that QObject has to be declared if you're going to use Qt's meta-object system and (or) its signals and slots mechanism. The signals and slots, which are almost the core of Qt, will be included later in this chapter.
There is a private member named ui, which is a pointer of the MainWindow class of the Ui namespace. Do you remember the UI file we edited before? What the magic of Qt does is that it links the UI file and the parental source code. We can manipulate the UI through code lines as well as design it in Qt Creator's integrated designer. Finally, let's look into the construction function of MainWindow in mainwindow.cpp:
#include "mainwindow.h"
#include "ui_mainwindow.h"

MainWindow::MainWindow(QWidget *parent) :
    QMainWindow(parent),
    ui(new Ui::MainWindow)
{
    ui->setupUi(this);
}

MainWindow::~MainWindow()
{
    delete ui;
}
Did you see where the user interface comes from? It's the member setupUi function of Ui::MainWindow that initializes it and sets it up for us. You may want to check what happens if we change the member function to something like this:
MainWindow::MainWindow(QWidget *parent) :
    QMainWindow(parent),
    ui(new Ui::MainWindow)
{
    ui->setupUi(this);
    ui->holaButton->setEnabled(false);
}
What happened here? The Hola button can't be clicked on because we disabled it! It has the same effect if the enabled box is unchecked in the designer instead of writing a statement here. Please apply this change before heading to the next topic, because we don't need a disabled push button to do any demonstrations in this chapter.