Book Image

ArcGIS Blueprints

By : Donald Eric Pimpler, Eric Pimpler
Book Image

ArcGIS Blueprints

By: Donald Eric Pimpler, Eric Pimpler

Overview of this book

This book is an immersive guide to take your ArcGIS Desktop application development skills to the next level It starts off by providing detailed description and examples of how to create ArcGIS Desktop Python toolboxes that will serve as containers for many of the applications that you will build. We provide several practical projects that involve building a local area/community map and extracting wildfire data. You will then learn how to build tools that can access data from ArcGIS Server using the ArcGIS REST API. Furthermore, we deal with the integration of additional open source Python libraries into your applications, which will help you chart and graph advanced GUI development; read and write JSON, CSV, and XML format data sources; write outputs to Google Earth Pro, and more. Along the way, you will be introduced to advanced ArcPy Mapping and ArcPy Data Access module techniques and use data-driven Pages to automate the creation of map books. Finally, you will learn advanced techniques to work with video and social media feeds. By the end of the book, you will have your own desktop application without having spent too much time learning sophisticated theory.
Table of Contents (18 chapters)
ArcGIS Blueprints
Credits
About the Author
About the Reviewers
www.PacktPub.com
Preface
Index

Making the data frame and layer time-enabled


In this section, you will learn how to make a layer and data frame time-enabled. You will then add a tool to the Migration Patterns toolbox that cycles through the time range for the layer and exports a PDF map showing the movement of the elk over time and space:

  1. If necessary, open C:\ArcGIS_Blueprint_Python\ch2\ElkMigration.mxd in ArcMap.

  2. First, we'll symbolize the features so that we display them differently for wet and dry seasons. Right-click on the Betsy feature class and select Properties.

  3. Click on the Symbology tab and then define the symbology, as shown in the following screenshot:

  4. Now, select the Time tab, as shown in the following screenshot:

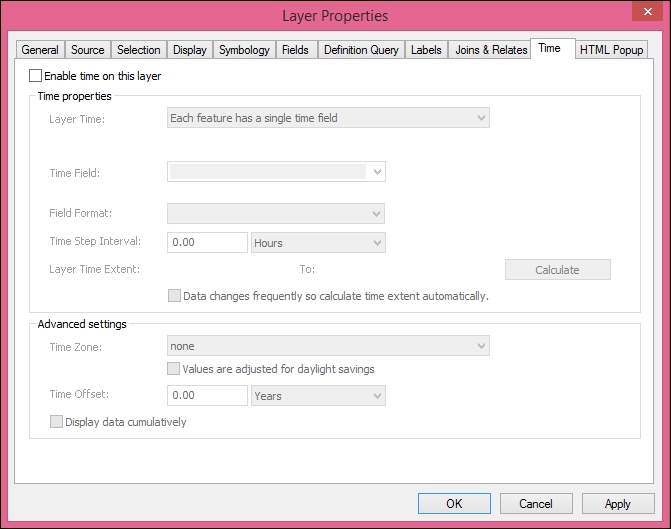
  5. Enable the time for the layer by clicking on the Enable time for this layer checkbox.

  6. Define Layer Time Extent by clicking on the Calculate button.

  7. Under Time properties, select Each feature has a single time field for Layer Time. Select the date field for Time Field. Define a Time Step Interval of 1 Days...