
We now have to create the Task class that will hold our data (task name and completed status). This class will have its form file separated from MainWindow. Qt Creator provides an automatic tool to generate a base class and the associated form.
Click on File | New File or Project | Qt | Qt Designer Form Class. There are several form templates; you will recognize Main Window, which Qt Creator created for us when we started the todo app project. Select Widget and name the class Task, then click on Next. Here is a summary of what Qt Creator will do:
Create a
Task.hfile and aTask.cppfile.Create the associated
Task.uiand do the plumbing to connect it toTask.h.Add these three new files to
todo.proso they can be compiled.
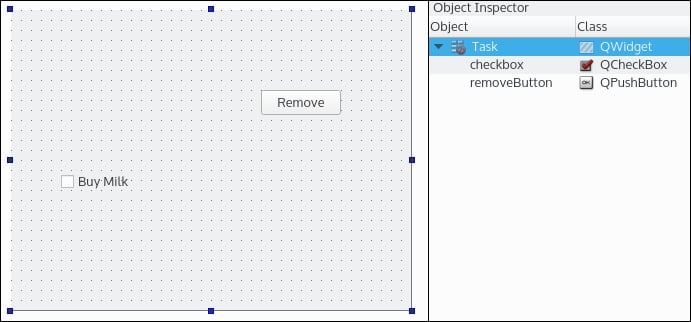
Finish and, voilà , the Task class is ready to be filled. We will jump into the Task.ui first. Start by dragging and dropping a Check Box (put checkbox in the objectName) and a Push Button (objectName = removeButton):
My alignment looks great, let's ship this to the customers!
Unless you have a pixel-perfect eye, your items are not very well aligned. You need to indicate how your widgets should be laid out and how they should react when the window geometry changes (for example, when the user resizes the window). For this, Qt has several default layout classes:
Vertical Layout: In this layout, widgets are vertically stackedHorizontal Layout: In this layout, widgets are horizontally stackedGrid Layout: In this layout, widgets are arranged in a grid that can be subdivided into smaller cellsForm Layout: In this layout, widgets are arranged like a web form, a label, and an input
Every layout will try to constrain all widgets to occupy equal surfaces. It will either change the widgets' shape or add extra margins, depending on each widget's constraints. A Check Box will not be stretched but a Push Button will.
In our Task object, we want this to be horizontally stacked. In the Form Editor tab, right-click on the window and select Lay out | Lay out Horizontally. Each time you add a new widget in this layout, it will be arranged horizontally.
Now add a Push Button (objectName = editButton) line just after the checkbox object.
The Form Editor window offers a realistic preview of how your UI will render. If you stretch the window now, you can observe how each widget will react to this event. When resizing horizontally, you can note that the push buttons are stretched. It looks bad. We need something to "hint" to the layout that these buttons should not be stretched. Enter the Spacer widget. Take the Horizontal Spacer in the widget box and drop it after the checkbox object:

A spacer is a special widget that tries to push (horizontally or vertically) adjacent widgets to force them to take up as little space as possible. The editButton and removeButton objects now take up only the space of their text and will be pushed to the edge of the window when it is resized.
You can add sub layouts of any type in a form (vertical, horizontal, grid, form) and create a complex-looking application with a combination of widgets, spacers, and layouts. These tools are targeted at designing a good-looking desktop application that can react properly to different window geometries.
The Designer part is finished, so we can switch to the Task source code. Since we created a Qt Designer Form class, Task is closely linked to its UI. We will use this as leverage to store our model in a single place. When we create a Task object, it has to have a name:
#ifndef TASK_H
#define TASK_H

#include <QWidget>
#include <QString>

namespace Ui {
class Task;
}

class Task : public QWidget
{
    Q_OBJECT

public:
    explicit Task(const QString& name, QWidget *parent = 0);
    ~Task();

    void setName(const QString& name);
    QString name() const;
    bool isCompleted() const;

private:
    Ui::Task *ui;
};

#endif // TASK_H
The constructor specifies a name, and as you can see there are no private fields storing any state of the object. All this will be done in the form part. We also added some getters and setters that will interact with the form. It is better to have a model completely separated from the UI, but our example is simple enough to merge them. Moreover, Task implementation details are hidden from the outside world and can still be refactored later on. Here is the content of the Task.cpp file:
#include "Task.h"
#include "ui_Task.h"

Task::Task(const QString& name, QWidget *parent) :
        QWidget(parent),
        ui(new Ui::Task)
{
    ui->setupUi(this);
    setName(name);
}

Task::~Task()
{
    delete ui;
}

void Task::setName(const QString& name)
{
    ui->checkbox->setText(name);
}

QString Task::name() const
{
    return ui->checkbox->text();
}

bool Task::isCompleted() const
{
   return ui->checkbox->isChecked();
}
The implementation is straightforward; we store the information in our ui->checkbox and the name() and isCompleted() getters take their data from the ui->checkbox.