

"Do not dwell in the past, do not dream of the future, concentrate the mind on the present moment." | ||
| --The Shakyamuni Buddha | ||
In this chapter, I will show you one last project. If you've worked well in the rest of the book, this example should be easy. I tried my best to craft it in a way that it will neither be too hard for those who have only read the book, nor too simple for those who also took the time to work on the examples, and maybe have read up on the links and topics I suggested.
One problem that we all have these days is remembering passwords. We have passwords for everything: websites, phones, cards, bank accounts, and so on. The amount of information we have to memorize is just too much, so many people end up using the same password over and over again. This is very bad, of course, so at some point, tools were invented to alleviate this problem. One of these tools is called KeepassX, and basically it works like this: you start the software by setting up a special password called master password. Once inside, you store a record for each password you need to memorize, for example, your e-mail account, the bank website, credit card information, and so on. When you close the software, it encrypts the database used to store all that information, so that the data can only be accessed by the owner of the master password. Therefore, kind of in a Lord of The Rings fashion, by just owning one password, you rule them all.
Our goal in this chapter is to create something similar but web-based, and the way I want to implement it is by writing two applications.
One will be an API written in Falcon. Its purpose will be twofold, it will be able to both generate and validate passwords. It will provide the caller with information about the validity and a score which should indicate how strong the password is.
The second application is a Django website, which will provide the interface to handle records. Each record will retain information such as the username, e-mail, password, URL, and so on. It will show a list of all the records, and it will allow the user to create, update and delete them. Passwords will be encrypted before being stored in the database.
The purpose of the whole project is, therefore, to mimic the way KeepassX works, even though it is in a much simpler fashion. It will be up to you, if you like this idea, to develop it further in order to add other features and make it more secure. I will make sure to give you some suggestions on how to extend it, towards the end.
This chapter will therefore be quite dense, code-wise. It's the price I have to pay for giving you an interesting example in a restricted amount of space.
Before we start, please make sure you are comfortable with the projects presented in Chapter 10, Web Development Done Right so that you're familiar with the basics of web development. Make sure also that you have installed all the pip packages needed for this project: django, falcon, cryptography, and nose-parameterized. If you download the source code for the book, you'll find everything you need to install in the requirements folder, while the code for this chapter will be in ch12.
I hope you're comfortable with the concepts presented in Chapter 10, Web Development Done Right which was mostly about Django. If you haven't read it, this is probably a good time, before reading on here.
In your root folder (ch12, for me), which will contain the root for the interface and the root for the API, start by running this command:
$ django-admin startproject pwdweb
This will create the structure for a Django project, which we know well by now. I'll show you the final structure of the interface project here:
$ tree -A pwdweb pwdweb ├── db.sqlite3 ├── manage.py ├── pwdweb │ ├── __init__.py │ ├── settings.py │ ├── urls.py │ └── wsgi.py └── records ├── admin.py ├── forms.py ├── __init__.py ├── migrations │ ├── 0001_initial.py │ └── __init__.py ├── models.py ├── static │ └── records │ ├── css │ │ └── main.css │ └── js │ ├── api.js │ └── jquery-2.1.4.min.js ├── templates │ └── records │ ├── base.html │ ├── footer.html │ ├── home.html │ ├── list.html │ ├── messages.html │ ├── record_add_edit.html │ └── record_confirm_delete.html ├── templatetags │ └── record_extras.py ├── urls.py └── views.py
As usual, don't worry if you don't have all the files, we'll add them gradually. Change to the pwdweb folder, and make sure Django is correctly set up: $ python manage.py runserver (ignore the warning about unapplied migrations).
Shut down the server and create an app: $ python manage.py startapp records. That is excellent, now we can start coding. First things first, let's open pwdweb/settings.py and start by adding 'records', at the end of the INSTALLED_APP tuple (note that the comma is included in the code). Then, go ahead and fix the LANGUAGE_CODE and TIME_ZONE settings according to your preference and finally, add the following line at the bottom:
ENCRYPTION_KEY = b'qMhPGx-ROWUDr4veh0ybPRL6viIUNe0vcPDmy67x6CQ='
This is a custom encryption key that has nothing to do with Django settings, but we will need it later on, and this is the best place for it to be. Don't worry for now, we'll get back to it.
We need to add just one model for the records application: Record. This model will represent each record we want to store in the database:
records/models.py
from cryptography.fernet import Fernet
from django.conf import settings
from django.db import models
class Record(models.Model):
DEFAULT_ENCODING = 'utf-8'
title = models.CharField(max_length=64, unique=True)
username = models.CharField(max_length=64)
email = models.EmailField(null=True, blank=True)
url = models.URLField(max_length=255, null=True, blank=True)
password = models.CharField(max_length=2048)
notes = models.TextField(null=True, blank=True)
created = models.DateTimeField(auto_now_add=True)
last_modified = models.DateTimeField(auto_now=True)
def encrypt_password(self):
self.password = self.encrypt(self.password)
def decrypt_password(self):
self.password = self.decrypt(self.password)
def encrypt(self, plaintext):
return self.cypher('encrypt', plaintext)
def decrypt(self, cyphertext):
return self.cypher('decrypt', cyphertext)
def cypher(self, cypher_func, text):
fernet = Fernet(settings.ENCRYPTION_KEY)
result = getattr(fernet, cypher_func)(
self._to_bytes(text))
return self._to_str(result)
def _to_str(self, bytes_str):
return bytes_str.decode(self.DEFAULT_ENCODING)
def _to_bytes(self, s):
return s.encode(self.DEFAULT_ENCODING)Firstly, we set the DEFAULT_ENCODING class attribute to 'utf-8', which is the most popular type of encoding for the web (and not only the web). We set this attribute on the class to avoid hardcoding a string in more than one place.
Then, we proceed to set up all the model's fields. As you can see, Django allows you to specify very specific fields, such as EmailField and URLField. The reason why it's better to use these specific fields instead of a plain and simple CharField is we'll get e-mail and URL validation for free when we create a form for this model, which is brilliant.
All the options are quite standard, and we saw them in Chapter 10, Web Development Done Right but I want to point out a few things anyway. Firstly, title needs to be unique so that each Record object has a unique title and we don't want to risk having doubles. Each database treats strings a little bit differently, according to how it is set up, which engine it runs, and so on, so I haven't made the title field the primary key for this model, which would have been the natural thing to do. I prefer to avoid the pain of having to deal with weird string errors and I am happy with letting Django add a primary key to the model automatically.
Another option you should understand is the null=True, blank=True couple. The former allows the field to be NULL, which makes it non-mandatory, while the second allows it to be blank (that is to say, an empty string). Their use is quite peculiar in Django, so I suggest you to take a look at the official documentation to understand exactly how to use them.
Finally, the dates: created needs to have auto_add_now=True, which will set the current moment in time on the object when it's created. On the other hand, last_modified needs to be updated every time we save the model, hence we set auto_now=True.
After the field definitions, there are a few methods for encrypting and decrypting the password. It is always a very bad idea to save passwords as they are in a database, therefore you should always encrypt them before saving them.
Normally, when saving a password, you encrypt it using a one way encryption algorithm (also known as a one way hash function). This means that, once you have created the hash, there is no way for you to revert it back to the original password.
This kind of encryption is normally used for authentication: the user puts their username and password in a form and, on submission, the code fetches the hash from the user record in the database and compares it with the hash of the password the user has just put in the form. If the two hashes match, it means that they were produced by the same password, therefore authentication is granted.
In this case though, we need to be able to recover the passwords, otherwise this whole application wouldn't be very useful. Therefore, we will use a so-called symmetric encryption algorithm to encrypt them. The way this works is very simple: the password (called plaintext) is passed to an encrypt function, along with a secret key. The algorithm produces an encrypted string (called cyphertext) out of them, which is what you store in the database. When you want to recover the password, you will need the cyphertext and the secret key. You feed them to a decrypt function, and you get back your original password. This is exactly what we need.
In order to perform symmetric encryption, we need the cryptography package, which is why I instructed you to install it.
All the methods in the Record class are very simple. encrypt_password and decrypt_password are shortcuts to encrypt and decrypt the password field and reassign the result to itself.
The encrypt and decrypt methods are dispatchers for the cypher method, and _to_str and _to_bytes are just a couple of helpers. The cryptography library works with bytes objects, so we need those helpers to go back and forth between bytes and strings, using a common encoding.
The only interesting logic is in the cypher method. I could have coded it directly in the encrypt and decrypt ones, but that would have resulted in a bit of redundancy, and I wouldn't have had the chance to show you a different way of accessing an object's attribute, so let's analyze the body of cypher.
We start by creating an instance of the Fernet class, which provides us with the symmetric encryption functionality we need. We set the instance up by passing the secret key in the settings (ENCRYPTION_KEY). After creating fernet, we need to use it. We can use it to either encrypt or decrypt, according to what value is given to the cypher_func parameter. We use getattr to get an attribute from an object given the object itself and the name of the attribute. This technique allows us to fetch any attribute from an object dynamically.
The result of getattr(fernet, cypher_func), with cyper_func being 'encrypt', for example, is the same as fernet.encrypt. The getattr function returns a method, which we then call with the bytes representation of the text argument. We then return the result, in string format.
Here's what this function is equivalent to when it's called by the encrypt dispatcher:
def cypher_encrypt(self, text):
fernet = Fernet(settings.ENCRYPTION_KEY)
result = fernet.encrypt(
self._to_bytes(text))
return self._to_str(result)When you take the time to understand it properly, you'll see it's not as difficult as it sounds.
So, we have our model, hence it's time to migrate (I hope you remember that this will create the tables in the database for your application):
$ python manage.py makemigrations $ python manage.py migrate
Now you should have a nice database with all the tables you need to run the interface application. Go ahead and create a superuser ($ python manage.py createsuperuser).
By the way, if you want to generate your own encryption key, it is as easy as this:
>>> from cryptography.fernet import Fernet >>> Fernet.generate_key()
We need a form for the Record model, so we'll use the ModelForm technique we saw in Chapter 10, Web Development Done Right.
records/forms.py
from django.forms import ModelForm, Textarea
from .models import Record
class RecordForm(ModelForm):
class Meta:
model = Record
fields = ['title', 'username', 'email', 'url',
'password', 'notes']
widgets = {'notes': Textarea(
attrs={'cols': 40, 'rows': 4})}We create a RecordForm class that inherits from ModelForm, so that the form is created automatically thanks to the introspection capabilities of Django. We only specify which model to use, which fields to display (we exclude the dates, which are handled automatically) and we provide minimal styling for the dimensions of the notes field, which will be displayed using a Textarea (which is a multiline text field in HTML).
There are a total of five pages in the interface application: home, record list, record creation, record update, and record delete confirmation. Hence, there are five views that we have to write. As you'll see in a moment, Django helps us a lot by giving us views we can reuse with minimum customization. All the code that follows belongs to the records/views.py file.
Just to break the ice, here are the imports and the view for the home page:
from django.contrib import messages
from django.contrib.messages.views import SuccessMessageMixin
from django.core.urlresolvers import reverse_lazy
from django.views.generic import TemplateView
from django.views.generic.edit import (
CreateView, UpdateView, DeleteView)
from .forms import RecordForm
from .models import Record
class HomeView(TemplateView):
template_name = 'records/home.html'We import a few tools from Django. There are a couple of messaging-related objects, a URL lazy reverser, and four different types of view. We also import our Record model and RecordForm. As you can see, the HomeView class consists of only two lines since we only need to specify which template we want to use, the rest just reuses the code from TemplateView, as it is. It's so easy, it almost feels like cheating.
After the home view, we can write a view to list all the Record instances that we have in the database.
class RecordListView(TemplateView):
template_name = 'records/list.html'
def get(self, request, *args, **kwargs):
context = self.get_context_data(**kwargs)
records = Record.objects.all().order_by('title') #1
for record in records:
record.plaintext = record.decrypt(record.password) #2
context['records'] = records
return self.render_to_response(context)All we need to do is sub-class TemplateView again, and override the get method. We need to do a couple of things: we fetch all the records from the database and sort them by title (#1) and then parse all the records in order to add the attribute plaintext (#2) onto each of them, to show the original password on the page. Another way of doing this would be to add a read-only property to the Record model, to do the decryption on the fly. I'll leave it to you, as a fun exercise, to amend the code to do it.
After recovering and augmenting the records, we put them in the context dict and finish as usual by invoking render_to_response.
Here's the code for the creation view:
class EncryptionMixin:
def form_valid(self, form):
self.encrypt_password(form)
return super(EncryptionMixin, self).form_valid(form)
def encrypt_password(self, form):
self.object = form.save(commit=False)
self.object.encrypt_password()
self.object.save()
class RecordCreateView(
EncryptionMixin, SuccessMessageMixin, CreateView):
template_name = 'records/record_add_edit.html'
form_class = RecordForm
success_url = reverse_lazy('records:add')
success_message = 'Record was created successfully'A part of its logic has been factored out in order to be reused later on in the update view. Let's start with EncryptionMixin. All it does is override the form_valid method so that, prior to saving a new Record instance to the database, we make sure we call encrypt_password on the object that results from saving the form. In other words, when the user submits the form to create a new Record, if the form validates successfully, then the form_valid method is invoked. Within this method what usually happens is that an object is created out of the ModelForm instance, like this:
self.object = form.save()
We need to interfere with this behavior because running this code as it is would save the record with the original password, which isn't encrypted. So we change this to call save on the form passing commit=False, which creates the Record instance out of the form, but doesn't attempt to save it in the database. Immediately afterwards, we encrypt the password on that instance and then we can finally call save on it, actually committing it to the database.
Since we need this behavior both for creating and updating records, I have factored it out in a mixin.
Note
Perhaps, a better solution for this password encryption logic is to create a custom Field (inheriting from CharField is the easiest way to do it) and add the necessary logic to it, so that when we handle Record instances from and to the database, the encryption and decryption logic is performed automatically for us. Though more elegant, this solution needs me to digress and explain a lot more about Django internals, which is too much for the extent of this example. As usual, you can try to do it yourself, if you feel like a challenge.
After creating the EncryptionMixin class, we can use it in the RecordCreateView class. We also inherit from two other classes: SuccessMessageMixin and CreateView. The message mixin provides us with the logic to quickly set up a message when creation is successful, and the CreateView gives us the necessary logic to create an object from a form.
You can see that all we have to code is some customization: the template name, the form class, and the success message and URL. Everything else is gracefully handled for us by Django.
The code to update a Record instance is only a tiny bit more complicated. We just need to add some logic to decrypt the password before we populate the form with the record data.
class RecordUpdateView(
EncryptionMixin, SuccessMessageMixin, UpdateView):
template_name = 'records/record_add_edit.html'
form_class = RecordForm
model = Record
success_message = 'Record was updated successfully'
def get_context_data(self, **kwargs):
kwargs['update'] = True
return super(
RecordUpdateView, self).get_context_data(**kwargs)
def form_valid(self, form):
self.success_url = reverse_lazy(
'records:edit',
kwargs={'pk': self.object.pk}
)
return super(RecordUpdateView, self).form_valid(form)
def get_form_kwargs(self):
kwargs = super(RecordUpdateView, self).get_form_kwargs()
kwargs['instance'].decrypt_password()
return kwargsIn this view, we still inherit from both EncryptionMixin and SuccessMessageMixin, but the view class we use is UpdateView.
The first four lines are customization as before, we set the template name, the form class, the Record model, and the success message. We cannot set the success_url as a class attribute because we want to redirect a successful edit to the same edit page for that record and, in order to do this, we need the ID of the instance we're editing. No worries, we'll do it another way.
First, we override get_context_data in order to set 'update' to True in the kwargs argument, which means that a key 'update' will end up in the context dict that is passed to the template for rendering the page. We do this because we want to use the same template for creating and updating a record, therefore we will use this variable in the context to be able to understand in which situation we are. There are other ways to do this but this one is quick and easy and I like it because it's explicit.
After overriding get_context_data, we need to take care of the URL redirection. We do this in the form_valid method since we know that, if we get there, it means the Record instance has been successfully updated. We reverse the 'records:edit' view, which is exactly the view we're working on, passing the primary key of the object in question. We take that information from self.object.pk.
One of the reasons it's helpful to have the object saved on the view instance is that we can use it when needed without having to alter the signature of the many methods in the view in order to pass the object around. This design is very helpful and allows us to achieve a lot with very few lines of code.
The last thing we need to do is to decrypt the password on the instance before populating the form for the user. It's simple enough to do it in the get_form_kwargs method, where you can access the Record instance in the kwargs dict, and call decrypt_password on it.
This is all we need to do to update a record. If you think about it, the amount of code we had to write is really very little, thanks to Django class-based views.
Tip
A good way of understanding which is the best method to override, is to take a look at the Django official documentation or, even better in this case, check out the source code and look at the class-based views section. You'll be able to appreciate how much work has been done there by Django developers so that you only have to touch the smallest amounts of code to customize your views.
Of the three actions, deleting a record is definitely the easiest one. All we need is the following code:
class RecordDeleteView(SuccessMessageMixin, DeleteView):
model = Record
success_url = reverse_lazy('records:list')
def delete(self, request, *args, **kwargs):
messages.success(
request, 'Record was deleted successfully')
return super(RecordDeleteView, self).delete(
request, *args, **kwargs)We only need to inherit from SuccessMessageMixin and DeleteView, which gives us all we need. We set up the model and the success URL as class attributes, and then we override the delete method only to add a nice message that will be displayed in the list view (which is where we redirect to after deletion).
We don't need to specify the template name, since we'll use a name that Django infers by default: record_confirm_delete.html.
With this final view, we're all set to have a nice interface that we can use to handle Record instances.
Before we move on to the template layer, let's set up the URLs. This time, I want to show you the inclusion technique I talked about in Chapter 10, Web Development Done Right.
pwdweb/urls.py
from django.conf.urls import include, url
from django.contrib import admin
from records import urls as records_url
from records.views import HomeView
urlpatterns = [
url(r'^admin/', include(admin.site.urls)),
url(r'^records/', include(records_url, namespace='records')),
url(r'^$', HomeView.as_view(), name='home'),
]These are the URLs for the main project. We have the usual admin, a home page, and then for the records section, we include another urls.py file, which we define in the records application. This technique allows for apps to be reusable and self-contained. Note that, when including another urls.py file, you can pass namespace information, which you can then use in functions such as reverse, or the url template tag. For example, we've seen that the path to the RecordUpdateView was 'records:edit'. The first part of that string is the namespace, and the second is the name that we have given to the view, as you can see in the following code:
records/urls.py
from django.conf.urls import include, url
from django.contrib import admin
from .views import (RecordCreateView, RecordUpdateView,
RecordDeleteView, RecordListView)
urlpatterns = [
url(r'^add/$', RecordCreateView.as_view(), name='add'),
url(r'^edit/(?P<pk>[0-9]+)/$', RecordUpdateView.as_view(),
name='edit'),
url(r'^delete/(?P<pk>[0-9]+)/$', RecordDeleteView.as_view(),
name='delete'),
url(r'^$', RecordListView.as_view(), name='list'),
]We define four different url instances. There is one for adding a record, which doesn't need primary key information since the object doesn't exist yet. Then we have two url instances for updating and deleting a record, and for those we need to also specify primary key information to be passed to the view. Since Record instances have integer IDs, we can safely pass them on the URL, following good URL design practice. Finally, we define one url instance for the list of records.
All url instances have name information which is used in views and templates.
Let's start with the template we'll use as the basis for the rest:
records/templates/records/base.html
{% load static from staticfiles %}
<!DOCTYPE html>
<html lang="en">
<head>
<meta charset="utf-8">
<meta name="viewport"
content="width=device-width, initial-scale=1.0">
<link href="{% static "records/css/main.css" %}"
rel="stylesheet">
<title>{% block title %}Title{% endblock title %}</title>
</head>
<body>
<div id="page-content">
{% block page-content %}{% endblock page-content %}
</div>
<div id="footer">{% block footer %}{% endblock footer %}</div>
{% block scripts %}
<script
src="{% static "records/js/jquery-2.1.4.min.js" %}">
</script>
{% endblock scripts %}
</body>
</html>It's very similar to the one I used in Chapter 10, Web Development Done Right although it is a bit more compressed and with one major difference. We will import jQuery in every page.
Note
jQuery is the most popular JavaScript library out there. It allows you to write code that works on all the main browsers and it gives you many extra tools such as the ability to perform asynchronous calls (AJAX) from the browser itself. We'll use this library to perform the calls to the API, both to generate and validate our passwords. You can download it at https://jquery.com/, and put it in the pwdweb/records/static/records/js/ folder (you may have to amend the import in the template).
I highlighted the only interesting part of this template for you. Note that we load the JavaScript library at the end. This is common practice, as JavaScript is used to manipulate the page, so loading libraries at the end helps in avoiding situations such as JavaScript code failing because the element needed hadn't been rendered on the page yet.
The home template is very simple:
records/templates/records/home.html
{% extends "records/base.html" %}
{% block title %}Welcome to the Records website.{% endblock %}
{% block page-content %}
<h1>Welcome {{ user.first_name }}!</h1>
<div class="home-option">To create a record click
<a href="{% url "records:add" %}">here.</a>
</div>
<div class="home-option">To see all records click
<a href="{% url "records:list" %}">here.</a>
</div>
{% endblock page-content %}There is nothing new here when compared to the home.html template we saw in Chapter 10, Web Development Done Right. The footer template is actually exactly the same:
records/templates/records/footer.html
<div class="footer">
Go back <a href="{% url "home" %}">home</a>.
</div>This template to list all records is fairly simple:
records/templates/records/list.html
{% extends "records/base.html" %}
{% load record_extras %}
{% block title %}Records{% endblock title %}
{% block page-content %}
<h1>Records</h1><span name="top"></span>
{% include "records/messages.html" %}
{% for record in records %}
<div class="record {% cycle 'row-light-blue' 'row-white' %}"
id="record-{{ record.pk }}">
<div class="record-left">
<div class="record-list">
<span class="record-span">Title</span>{{ record.title }}
</div>
<div class="record-list">
<span class="record-span">Username</span>
{{ record.username }}
</div>
<div class="record-list">
<span class="record-span">Email</span>{{ record.email }}
</div>
<div class="record-list">
<span class="record-span">URL</span>
<a href="{{ record.url }}" target="_blank">
{{ record.url }}</a>
</div>
<div class="record-list">
<span class="record-span">Password</span>
{% hide_password record.plaintext %}
</div>
</div>
<div class="record-right">
<div class="record-list">
<span class="record-span">Notes</span>
<textarea rows="3" cols="40" class="record-notes"
readonly>{{ record.notes }}</textarea>
</div>
<div class="record-list">
<span class="record-span">Last modified</span>
{{ record.last_modified }}
</div>
<div class="record-list">
<span class="record-span">Created</span>
{{ record.created }}
</div>
</div>
<div class="record-list-actions">
<a href="{% url "records:edit" pk=record.pk %}">» edit</a>
<a href="{% url "records:delete" pk=record.pk %}">» delete
</a>
</div>
</div>
{% endfor %}
{% endblock page-content %}
{% block footer %}
<p><a href="#top">Go back to top</a></p>
{% include "records/footer.html" %}
{% endblock footer %}For this template as well, I have highlighted the parts I'd like you to focus on. Firstly, I load a custom tags module, record_extras, which we'll need later. I have also added an anchor at the top, so that we'll be able to put a link to it at the bottom of the page, to avoid having to scroll all the way up.
Then, I included a template to provide me with the HTML code to display Django messages. It's a very simple template which I'll show you shortly.
Then, we define a list of div elements. Each Record instance has a container div, in which there are two other main div elements: record-left and record-right. In order to display them side by side, I have set this class in the main.css file:
.record-left { float: left; width: 300px;}The outermost div container (the one with class record), has an id attribute, which I have used as an anchor. This allows us to click on cancel on the record delete page, so that if we change our minds and don't want to delete the record, we can get back to the list page, and at the right position.
Each attribute of the record is then displayed in div elements whose class is record-list. Most of these classes are just there to allow me to set a bit of padding and dimensions on the HTML elements.
The next interesting bit is the hide_password tag, which takes the plaintext, which is the unencrypted password. The purpose of this custom tag is to display a sequence of '*' characters, as long as the original password, so that if someone is passing by while you're on the page, they won't see your passwords. However, hovering on that sequence of '*' characters will show you the original password in the tooltip. Here's the code for the hide_password tag:
records/templatetags/record_extras.py
from django import template
from django.utils.html import escape
register = template.Library()
@register.simple_tag
def hide_password(password):
return '<span title="{0}">{1}</span>'.format(
escape(password), '*' * len(password))There is nothing fancy here. We just register this function as a simple tag and then we can use it wherever we want. It takes a password and puts it as a tooltip of a span element, whose main content is a sequence of '*' characters. Just note one thing: we need to escape the password, so that we're sure it won't break our HTML (think of what might happen if the password contained a double-quote `"`, for example).
As far as the list.html template is concerned, the next interesting bit is that we set the readonly attribute to the textarea element, so as not to give the impression to the user that they can modify notes on the fly.
Then, we set a couple of links for each Record instance, right at the bottom of the container div. There is one for the edit page, and another for the delete page. Note that we need to pass the url tag not only the namespace:name string, but also the primary key information, as required by the URL setup we made in the urls.py module for those views.
Finally, we import the footer and set the link to the anchor on top of the page.
Now, as promised, here is the code for the messages:
records/templates/records/messages.html
{% if messages %}
{% for message in messages %}
<p class="{{ message.tags }}">{{ message }}</p>
{% endfor %}
{% endif %}This code takes care of displaying messages only when there is at least one to display. We give the p tag class information to display success messages in green and error messages in red.
If you grab the main.css file from the source code for the book, you will now be able to visualize the list page (yours will be blank, you still need to insert data into it), and it should look something like this:
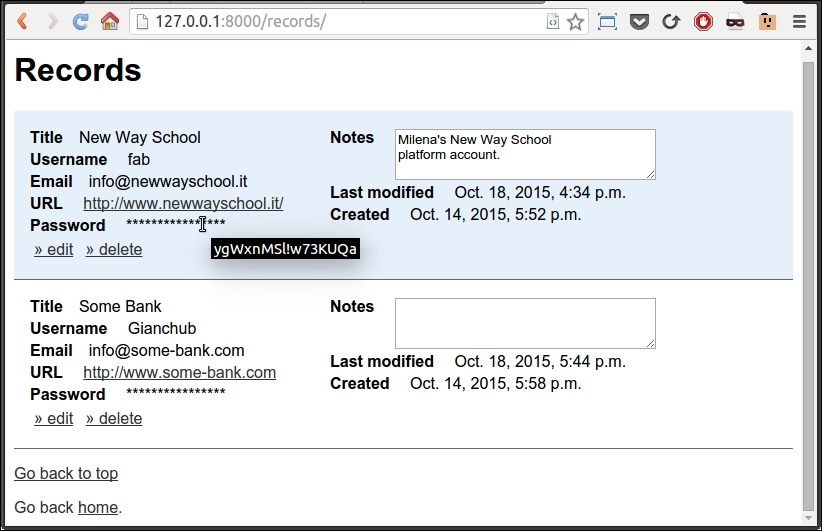
As you can see, I have two records in the database at the moment. I'm hovering on the password of the first one, which is my platform account at my sister's school, and the password is displayed in the tooltip. The division in two div elements, left and right, helps in making rows smaller so that the overall result is more pleasing to the eye. The important information is on the left and the ancillary information is on the right. The row color alternates between a very light shade of blue and white.
Each row has an edit and delete link, at its bottom left. We'll show the pages for those two links right after we see the code for the templates that create them.
The CSS code that holds all the information for this interface is the following:
records/static/records/css/main.css
html, body, * {
font-family: 'Trebuchet MS', Helvetica, sans-serif; }
a { color: #333; }
.record {
clear: both; padding: 1em; border-bottom: 1px solid #666;}
.record-left { float: left; width: 300px;}
.record-list { padding: 2px 0; }
.fieldWrapper { padding: 5px; }
.footer { margin-top: 1em; color: #333; }
.home-option { padding: .6em 0; }
.record-span { font-weight: bold; padding-right: 1em; }
.record-notes { vertical-align: top; }
.record-list-actions { padding: 4px 0; clear: both; }
.record-list-actions a { padding: 0 4px; }
#pwd-info { padding: 0 6px; font-size: 1.1em; font-weight: bold;}
#id_notes { vertical-align: top; }
/* Messages */
.success, .errorlist {font-size: 1.2em; font-weight: bold; }
.success {color: #25B725; }
.errorlist {color: #B12B2B; }
/* colors */
.row-light-blue { background-color: #E6F0FA; }
.row-white { background-color: #fff; }
.green { color: #060; }
.orange { color: #FF3300; }
.red { color: #900; }Please remember, I'm not a CSS guru so just take this file as it is, a fairly naive way to provide styling to our interface.
Now for the interesting part. Creating and updating a record. We'll use the same template for both, so we expect some decisional logic to be there that will tell us in which of the two situations we are. As it turns out, it will not be that much code. The most exciting part of this template, however, is its associated JavaScript file which we'll examine right afterwards.
records/templates/records/record_add_edit.html
{% extends "records/base.html" %}
{% load static from staticfiles %}
{% block title %}
{% if update %}Update{% else %}Create{% endif %} Record
{% endblock title %}
{% block page-content %}
<h1>{% if update %}Update a{% else %}Create a new{% endif %}
Record
</h1>
{% include "records/messages.html" %}
<form action="." method="post">{% csrf_token %}
{{ form.non_field_errors }}
<div class="fieldWrapper">{{ form.title.errors }}
{{ form.title.label_tag }} {{ form.title }}</div>
<div class="fieldWrapper">{{ form.username.errors }}
{{ form.username.label_tag }} {{ form.username }}</div>
<div class="fieldWrapper">{{ form.email.errors }}
{{ form.email.label_tag }} {{ form.email }}</div>
<div class="fieldWrapper">{{ form.url.errors }}
{{ form.url.label_tag }} {{ form.url }}</div>
<div class="fieldWrapper">{{ form.password.errors }}
{{ form.password.label_tag }} {{ form.password }}
<span id="pwd-info"></span></div>
<button type="button" id="validate-btn">
Validate Password</button>
<button type="button" id="generate-btn">
Generate Password</button>
<div class="fieldWrapper">{{ form.notes.errors }}
{{ form.notes.label_tag }} {{ form.notes }}</div>
<input type="submit"
value="{% if update %}Update{% else %}Insert{% endif %}">
</form>
{% endblock page-content %}
{% block footer %}
<br>{% include "records/footer.html" %}<br>
Go to <a href="{% url "records:list" %}">the records list</a>.
{% endblock footer %}
{% block scripts %}
{{ block.super }}
<script src="{% static "records/js/api.js" %}"></script>
{% endblock scripts %}As usual, I have highlighted the important parts, so let's go through this code together.
You can see the first bit of decision logic in the title block. Similar decision logic is also displayed later on, in the header of the page (the h1 HTML tag), and in the submit button at the end of the form.
Apart from this logic, what I'd like you to focus on is the form and what's inside it. We set the action attribute to a dot, which means this page, so that we don't need to customize it according to which view is serving the page. Also, we immediately take care of the cross-site request forgery token, as explained in Chapter 10, Web Development Done Right.
Note that, this time, we cannot leave the whole form rendering up to Django since we want to add in a couple of extra things, so we go down one level of granularity and ask Django to render each individual field for us, along with any errors, along with its label. This way we still save a lot of effort, and at the same time, we can also customize the form as we like. In situations like this, it's not uncommon to write a small template to render a field, in order to avoid repeating those three lines for each field. In this case though, the form is so small I decided to avoid raising the complexity level up any further.
The span element, pwd-info, contains the information about the password that we get from the API. The two buttons after that, validate-btn and generate-btn, are hooked up with the AJAX calls to the API.
At the end of the template, in the scripts block, we need to load the api.js JavaScript file which contains the code to work with the API. We also need to use block.super, which will load whatever code is in the same block in the parent template (for example, jQuery). block.super is basically the template equivalent of a call to super(ClassName, self) in Python. It's important to load jQuery before our library, since the latter is based on the former.
Let's now take a look at that JavaScript. I don't expect you to understand everything. Firstly, this is a Python book and secondly, you're supposed to be a beginner (though by now, ninja trained), so fear not. However, as JavaScript has, by now, become essential if you're dealing with a web environment, having a working knowledge of it is extremely important even for a Python developer, so try and get the most out of what I'm about to show you. We'll see the password generation first:
records/static/records/js/api.js
var baseURL = 'http://127.0.0.1:5555/password';
var getRandomPassword = function() {
var apiURL = '{url}/generate'.replace('{url}', baseURL);
$.ajax({
type: 'GET',
url: apiURL,
success: function(data, status, request) {
$('#id_password').val(data[1]);
},
error: function() { alert('Unexpected error'); }
});
}
$(function() {
$('#generate-btn').click(getRandomPassword);
});Firstly, we set a variable for the base API URL: baseURL. Then, we define the getRandomPassword function, which is very simple. At the beginning, it defines the apiURL extending baseURL with a replacement technique. Even if the syntax is different from that of Python, you shouldn't have any issues understanding this line.
After defining the apiURL, the interesting bit comes up. We call $.ajax, which is the jQuery function that performs the AJAX calls. That $ is a shortcut for jQuery. As you can see in the body of the call, it's a GET request to apiURL. If it succeeds (success: ...), an anonymous function is run, which sets the value of the id_password text field to the second element of the returned data. We'll see the structure of the data when we examine the API code, so don't worry about that now. If an error occurs, we simply alert the user that there was an unexpected error.
After the function definition, we run a couple of lines of code to bind the click event on the generate-btn button to the getRandomPassword function. This means that, after this code has been run by the browser engine, every time we click the generate-btn button, the getRandomPassword function is called.
That wasn't so scary, was it? So let's see what we need for the validation part.
Now there is a value in the password field and we want to validate it. We need to call the API and inspect its response. Since passwords can have weird characters, I don't want to pass them on the URL, therefore I will use a POST request, which allows me to put the password in its body. To do this, I need the following code:
var validatePassword = function() {
var apiURL = '{url}/validate'.replace('{url}', baseURL);
$.ajax({
type: 'POST',
url: apiURL,
data: JSON.stringify({'password': $('#id_password').val()}),
contentType: "text/plain", // Avoid CORS preflight
success: function(data, status, request) {
var valid = data['valid'], infoClass, grade;
var msg = (valid?'Valid':'Invalid') + ' password.';
if (valid) {
var score = data['score']['total'];
grade = (score<10?'Poor':(score<18?'Medium':'Strong'));
infoClass = (score<10?'red':(score<18?'orange':'green'));
msg += ' (Score: {score}, {grade})'
.replace('{score}', score).replace('{grade}', grade);
}
$('#pwd-info').html(msg);
$('#pwd-info').removeClass().addClass(infoClass);
},
error: function(data) { alert('Unexpected error'); }
});
}
$(function() {
$('#validate-btn').click(validatePassword);
});The concept is the same as before, only this time it's for the validate-btn button. The body of the AJAX call is similar. We use a POST instead of a GET request, and we define the data as a JSON object, which is the equivalent of using json.dumps({'password': 'some_pwd'}) in Python.
The contentType line is a quick hack to avoid problems with the CORS preflight behavior of the browser. Cross-origin resource sharing (CORS) is a mechanism that allows restricted resources on a web page to be requested from another domain outside of the domain from which the request originated. In a nutshell, since the API is located at 127.0.0.1:5555 and the interface is running at 127.0.0.1:8000, without this hack, the browser wouldn't allow us to perform the calls. In a production environment, you may want to check the documentation for JSONP, which is a much better (albeit more complex) solution to this issue.
The body of the anonymous function which is run if the call succeeds is apparently only a bit complicated. All we need to do is understand if the password is valid (from data['valid']), and assign it a grade and a CSS class based on its score. Validity and score information come from the API response.
The only tricky bit in this code is the JavaScript ternary operator, so let's see a comparative example for it:
# Python error = 'critical' if error_level > 50 else 'medium' // JavaScript equivalent error = (error_level > 50 ? 'critical' : 'medium');
With this example, you shouldn't have any issue reading the rest of the logic in the function. I know, I could have just used a regular if (...), but JavaScript coders use the ternary operator all the time, so you should get used to it. It's good training to scratch our heads a bit harder in order to understand code.
Lastly, I'd like you to take a look at the end of that function. We set the html of the pwd-info span element to the message we assembled (msg), and then we style it. In one line, we remove all the CSS classes from that element (removeClass() with no parameters does that), and we add the infoClass to it. infoClass is either 'red', 'orange', or 'green'. If you go back to the main.css file, you'll see them at the bottom.
Now that we've seen both the template code and the JavaScript to make the calls, let's see a screenshot of the page. We're going to edit the first record, the one about my sister's school.

In the picture, you can see that I updated the password by clicking on the Generate Password button. Then, I saved the record (so you could see the nice message on top), and, finally, I clicked on the Validate Password button.
The result is shown in green on the right-hand side of the Password field. It's strong (23 is actually the maximum score we can get) so the message is displayed in a nice shade of green.
To delete a record, go to the list and click on the delete link. You'll be redirected to a page that asks you for confirmation; you can then choose to proceed and delete the poor record, or to cancel the request and go back to the list page. The template code is the following:
records/templates/records/record_confirm_delete.html
{% extends "records/base.html" %}
{% block title %}Delete record{% endblock title %}
{% block page-content %}
<h1>Confirm Record Deletion</h1>
<form action="." method="post">{% csrf_token %}
<p>Are you sure you want to delete "{{ object }}"?</p>
<input type="submit" value="Confirm" />
<a href="{% url "records:list" %}#record-{{ object.pk }}">
» cancel</a>
</form>
{% endblock page-content %}Since this is a template for a standard Django view, we need to use the naming conventions adopted by Django. Therefore, the record in question is called object in the template. The {{ object }} tag displays a string representation for the object, which is not exactly beautiful at the moment, since the whole line will read: Are you sure you want to delete "Record object"?.
This is because we haven't added a __str__ method to our Model class yet, which means that Python has no idea of what to show us when we ask for a string representation of an instance. Let's change this by completing our model, adding the __str__ method at the bottom of the class body:
records/models.py
class Record(models.Model):
...
def __str__(self):
return '{}'.format(self.title)
Restart the server and now the page will read: Are you sure you want to delete "Some Bank"? where Some Bank is the title of the record whose delete link I clicked on.
We could have just used {{ object.title }}, but I prefer to fix the root of the problem, not just the effect. Adding a __str__ method is in fact something that you ought to do for all of your models.
The interesting bit in this last template is actually the link for canceling the operation. We use the url tag to go back to the list view (records:list), but we add anchor information to it so that it will eventually read something like this (this is for pk=2):
http://127.0.0.1:8000/records/#record-2
This will go back to the list page and scroll down to the container div that has ID record 2, which is nice.
This concludes the interface. Even though this section was similar to what we saw in Chapter 10, Web Development Done Right, we've been able to concentrate more on the code in this chapter. We've seen how useful Django class-based views are, and we even touched on some cool JavaScript. Run $ python manage.py runserver and your interface should be up and running at http://127.0.0.1:8000.
Now it's time to spice things up a bit with the second part of this project.
The setup
In your root folder (ch12, for me), which will contain the root for the interface and the root for the API, start by running this command:
$ django-admin startproject pwdweb
This will create the structure for a Django project, which we know well by now. I'll show you the final structure of the interface project here:
$ tree -A pwdweb pwdweb ├── db.sqlite3 ├── manage.py ├── pwdweb │ ├── __init__.py │ ├── settings.py │ ├── urls.py │ └── wsgi.py └── records ├── admin.py ├── forms.py ├── __init__.py ├── migrations │ ├── 0001_initial.py │ └── __init__.py ├── models.py ├── static │ └── records │ ├── css │ │ └── main.css │ └── js │ ├── api.js │ └── jquery-2.1.4.min.js ├── templates │ └── records │ ├── base.html │ ├── footer.html │ ├── home.html │ ├── list.html │ ├── messages.html │ ├── record_add_edit.html │ └── record_confirm_delete.html ├── templatetags │ └── record_extras.py ├── urls.py └── views.py
As usual, don't worry if you don't have all the files, we'll add them gradually. Change to the pwdweb folder, and make sure Django is correctly set up: $ python manage.py runserver (ignore the warning about unapplied migrations).
Shut down the server and create an app: $ python manage.py startapp records. That is excellent, now we can start coding. First things first, let's open pwdweb/settings.py and start by adding 'records', at the end of the INSTALLED_APP tuple (note that the comma is included in the code). Then, go ahead and fix the LANGUAGE_CODE and TIME_ZONE settings according to your preference and finally, add the following line at the bottom:
ENCRYPTION_KEY = b'qMhPGx-ROWUDr4veh0ybPRL6viIUNe0vcPDmy67x6CQ='
This is a custom encryption key that has nothing to do with Django settings, but we will need it later on, and this is the best place for it to be. Don't worry for now, we'll get back to it.
We need to add just one model for the records application: Record. This model will represent each record we want to store in the database:
records/models.py
from cryptography.fernet import Fernet
from django.conf import settings
from django.db import models
class Record(models.Model):
DEFAULT_ENCODING = 'utf-8'
title = models.CharField(max_length=64, unique=True)
username = models.CharField(max_length=64)
email = models.EmailField(null=True, blank=True)
url = models.URLField(max_length=255, null=True, blank=True)
password = models.CharField(max_length=2048)
notes = models.TextField(null=True, blank=True)
created = models.DateTimeField(auto_now_add=True)
last_modified = models.DateTimeField(auto_now=True)
def encrypt_password(self):
self.password = self.encrypt(self.password)
def decrypt_password(self):
self.password = self.decrypt(self.password)
def encrypt(self, plaintext):
return self.cypher('encrypt', plaintext)
def decrypt(self, cyphertext):
return self.cypher('decrypt', cyphertext)
def cypher(self, cypher_func, text):
fernet = Fernet(settings.ENCRYPTION_KEY)
result = getattr(fernet, cypher_func)(
self._to_bytes(text))
return self._to_str(result)
def _to_str(self, bytes_str):
return bytes_str.decode(self.DEFAULT_ENCODING)
def _to_bytes(self, s):
return s.encode(self.DEFAULT_ENCODING)Firstly, we set the DEFAULT_ENCODING class attribute to 'utf-8', which is the most popular type of encoding for the web (and not only the web). We set this attribute on the class to avoid hardcoding a string in more than one place.
Then, we proceed to set up all the model's fields. As you can see, Django allows you to specify very specific fields, such as EmailField and URLField. The reason why it's better to use these specific fields instead of a plain and simple CharField is we'll get e-mail and URL validation for free when we create a form for this model, which is brilliant.
All the options are quite standard, and we saw them in Chapter 10, Web Development Done Right but I want to point out a few things anyway. Firstly, title needs to be unique so that each Record object has a unique title and we don't want to risk having doubles. Each database treats strings a little bit differently, according to how it is set up, which engine it runs, and so on, so I haven't made the title field the primary key for this model, which would have been the natural thing to do. I prefer to avoid the pain of having to deal with weird string errors and I am happy with letting Django add a primary key to the model automatically.
Another option you should understand is the null=True, blank=True couple. The former allows the field to be NULL, which makes it non-mandatory, while the second allows it to be blank (that is to say, an empty string). Their use is quite peculiar in Django, so I suggest you to take a look at the official documentation to understand exactly how to use them.
Finally, the dates: created needs to have auto_add_now=True, which will set the current moment in time on the object when it's created. On the other hand, last_modified needs to be updated every time we save the model, hence we set auto_now=True.
After the field definitions, there are a few methods for encrypting and decrypting the password. It is always a very bad idea to save passwords as they are in a database, therefore you should always encrypt them before saving them.
Normally, when saving a password, you encrypt it using a one way encryption algorithm (also known as a one way hash function). This means that, once you have created the hash, there is no way for you to revert it back to the original password.
This kind of encryption is normally used for authentication: the user puts their username and password in a form and, on submission, the code fetches the hash from the user record in the database and compares it with the hash of the password the user has just put in the form. If the two hashes match, it means that they were produced by the same password, therefore authentication is granted.
In this case though, we need to be able to recover the passwords, otherwise this whole application wouldn't be very useful. Therefore, we will use a so-called symmetric encryption algorithm to encrypt them. The way this works is very simple: the password (called plaintext) is passed to an encrypt function, along with a secret key. The algorithm produces an encrypted string (called cyphertext) out of them, which is what you store in the database. When you want to recover the password, you will need the cyphertext and the secret key. You feed them to a decrypt function, and you get back your original password. This is exactly what we need.
In order to perform symmetric encryption, we need the cryptography package, which is why I instructed you to install it.
All the methods in the Record class are very simple. encrypt_password and decrypt_password are shortcuts to encrypt and decrypt the password field and reassign the result to itself.
The encrypt and decrypt methods are dispatchers for the cypher method, and _to_str and _to_bytes are just a couple of helpers. The cryptography library works with bytes objects, so we need those helpers to go back and forth between bytes and strings, using a common encoding.
The only interesting logic is in the cypher method. I could have coded it directly in the encrypt and decrypt ones, but that would have resulted in a bit of redundancy, and I wouldn't have had the chance to show you a different way of accessing an object's attribute, so let's analyze the body of cypher.
We start by creating an instance of the Fernet class, which provides us with the symmetric encryption functionality we need. We set the instance up by passing the secret key in the settings (ENCRYPTION_KEY). After creating fernet, we need to use it. We can use it to either encrypt or decrypt, according to what value is given to the cypher_func parameter. We use getattr to get an attribute from an object given the object itself and the name of the attribute. This technique allows us to fetch any attribute from an object dynamically.
The result of getattr(fernet, cypher_func), with cyper_func being 'encrypt', for example, is the same as fernet.encrypt. The getattr function returns a method, which we then call with the bytes representation of the text argument. We then return the result, in string format.
Here's what this function is equivalent to when it's called by the encrypt dispatcher:
def cypher_encrypt(self, text):
fernet = Fernet(settings.ENCRYPTION_KEY)
result = fernet.encrypt(
self._to_bytes(text))
return self._to_str(result)When you take the time to understand it properly, you'll see it's not as difficult as it sounds.
So, we have our model, hence it's time to migrate (I hope you remember that this will create the tables in the database for your application):
$ python manage.py makemigrations $ python manage.py migrate
Now you should have a nice database with all the tables you need to run the interface application. Go ahead and create a superuser ($ python manage.py createsuperuser).
By the way, if you want to generate your own encryption key, it is as easy as this:
>>> from cryptography.fernet import Fernet >>> Fernet.generate_key()
We need a form for the Record model, so we'll use the ModelForm technique we saw in Chapter 10, Web Development Done Right.
records/forms.py
from django.forms import ModelForm, Textarea
from .models import Record
class RecordForm(ModelForm):
class Meta:
model = Record
fields = ['title', 'username', 'email', 'url',
'password', 'notes']
widgets = {'notes': Textarea(
attrs={'cols': 40, 'rows': 4})}We create a RecordForm class that inherits from ModelForm, so that the form is created automatically thanks to the introspection capabilities of Django. We only specify which model to use, which fields to display (we exclude the dates, which are handled automatically) and we provide minimal styling for the dimensions of the notes field, which will be displayed using a Textarea (which is a multiline text field in HTML).
There are a total of five pages in the interface application: home, record list, record creation, record update, and record delete confirmation. Hence, there are five views that we have to write. As you'll see in a moment, Django helps us a lot by giving us views we can reuse with minimum customization. All the code that follows belongs to the records/views.py file.
Just to break the ice, here are the imports and the view for the home page:
from django.contrib import messages
from django.contrib.messages.views import SuccessMessageMixin
from django.core.urlresolvers import reverse_lazy
from django.views.generic import TemplateView
from django.views.generic.edit import (
CreateView, UpdateView, DeleteView)
from .forms import RecordForm
from .models import Record
class HomeView(TemplateView):
template_name = 'records/home.html'We import a few tools from Django. There are a couple of messaging-related objects, a URL lazy reverser, and four different types of view. We also import our Record model and RecordForm. As you can see, the HomeView class consists of only two lines since we only need to specify which template we want to use, the rest just reuses the code from TemplateView, as it is. It's so easy, it almost feels like cheating.
After the home view, we can write a view to list all the Record instances that we have in the database.
class RecordListView(TemplateView):
template_name = 'records/list.html'
def get(self, request, *args, **kwargs):
context = self.get_context_data(**kwargs)
records = Record.objects.all().order_by('title') #1
for record in records:
record.plaintext = record.decrypt(record.password) #2
context['records'] = records
return self.render_to_response(context)All we need to do is sub-class TemplateView again, and override the get method. We need to do a couple of things: we fetch all the records from the database and sort them by title (#1) and then parse all the records in order to add the attribute plaintext (#2) onto each of them, to show the original password on the page. Another way of doing this would be to add a read-only property to the Record model, to do the decryption on the fly. I'll leave it to you, as a fun exercise, to amend the code to do it.
After recovering and augmenting the records, we put them in the context dict and finish as usual by invoking render_to_response.
Here's the code for the creation view:
class EncryptionMixin:
def form_valid(self, form):
self.encrypt_password(form)
return super(EncryptionMixin, self).form_valid(form)
def encrypt_password(self, form):
self.object = form.save(commit=False)
self.object.encrypt_password()
self.object.save()
class RecordCreateView(
EncryptionMixin, SuccessMessageMixin, CreateView):
template_name = 'records/record_add_edit.html'
form_class = RecordForm
success_url = reverse_lazy('records:add')
success_message = 'Record was created successfully'A part of its logic has been factored out in order to be reused later on in the update view. Let's start with EncryptionMixin. All it does is override the form_valid method so that, prior to saving a new Record instance to the database, we make sure we call encrypt_password on the object that results from saving the form. In other words, when the user submits the form to create a new Record, if the form validates successfully, then the form_valid method is invoked. Within this method what usually happens is that an object is created out of the ModelForm instance, like this:
self.object = form.save()
We need to interfere with this behavior because running this code as it is would save the record with the original password, which isn't encrypted. So we change this to call save on the form passing commit=False, which creates the Record instance out of the form, but doesn't attempt to save it in the database. Immediately afterwards, we encrypt the password on that instance and then we can finally call save on it, actually committing it to the database.
Since we need this behavior both for creating and updating records, I have factored it out in a mixin.
Note
Perhaps, a better solution for this password encryption logic is to create a custom Field (inheriting from CharField is the easiest way to do it) and add the necessary logic to it, so that when we handle Record instances from and to the database, the encryption and decryption logic is performed automatically for us. Though more elegant, this solution needs me to digress and explain a lot more about Django internals, which is too much for the extent of this example. As usual, you can try to do it yourself, if you feel like a challenge.
After creating the EncryptionMixin class, we can use it in the RecordCreateView class. We also inherit from two other classes: SuccessMessageMixin and CreateView. The message mixin provides us with the logic to quickly set up a message when creation is successful, and the CreateView gives us the necessary logic to create an object from a form.
You can see that all we have to code is some customization: the template name, the form class, and the success message and URL. Everything else is gracefully handled for us by Django.
The code to update a Record instance is only a tiny bit more complicated. We just need to add some logic to decrypt the password before we populate the form with the record data.
class RecordUpdateView(
EncryptionMixin, SuccessMessageMixin, UpdateView):
template_name = 'records/record_add_edit.html'
form_class = RecordForm
model = Record
success_message = 'Record was updated successfully'
def get_context_data(self, **kwargs):
kwargs['update'] = True
return super(
RecordUpdateView, self).get_context_data(**kwargs)
def form_valid(self, form):
self.success_url = reverse_lazy(
'records:edit',
kwargs={'pk': self.object.pk}
)
return super(RecordUpdateView, self).form_valid(form)
def get_form_kwargs(self):
kwargs = super(RecordUpdateView, self).get_form_kwargs()
kwargs['instance'].decrypt_password()
return kwargsIn this view, we still inherit from both EncryptionMixin and SuccessMessageMixin, but the view class we use is UpdateView.
The first four lines are customization as before, we set the template name, the form class, the Record model, and the success message. We cannot set the success_url as a class attribute because we want to redirect a successful edit to the same edit page for that record and, in order to do this, we need the ID of the instance we're editing. No worries, we'll do it another way.
First, we override get_context_data in order to set 'update' to True in the kwargs argument, which means that a key 'update' will end up in the context dict that is passed to the template for rendering the page. We do this because we want to use the same template for creating and updating a record, therefore we will use this variable in the context to be able to understand in which situation we are. There are other ways to do this but this one is quick and easy and I like it because it's explicit.
After overriding get_context_data, we need to take care of the URL redirection. We do this in the form_valid method since we know that, if we get there, it means the Record instance has been successfully updated. We reverse the 'records:edit' view, which is exactly the view we're working on, passing the primary key of the object in question. We take that information from self.object.pk.
One of the reasons it's helpful to have the object saved on the view instance is that we can use it when needed without having to alter the signature of the many methods in the view in order to pass the object around. This design is very helpful and allows us to achieve a lot with very few lines of code.
The last thing we need to do is to decrypt the password on the instance before populating the form for the user. It's simple enough to do it in the get_form_kwargs method, where you can access the Record instance in the kwargs dict, and call decrypt_password on it.
This is all we need to do to update a record. If you think about it, the amount of code we had to write is really very little, thanks to Django class-based views.
Tip
A good way of understanding which is the best method to override, is to take a look at the Django official documentation or, even better in this case, check out the source code and look at the class-based views section. You'll be able to appreciate how much work has been done there by Django developers so that you only have to touch the smallest amounts of code to customize your views.
Of the three actions, deleting a record is definitely the easiest one. All we need is the following code:
class RecordDeleteView(SuccessMessageMixin, DeleteView):
model = Record
success_url = reverse_lazy('records:list')
def delete(self, request, *args, **kwargs):
messages.success(
request, 'Record was deleted successfully')
return super(RecordDeleteView, self).delete(
request, *args, **kwargs)We only need to inherit from SuccessMessageMixin and DeleteView, which gives us all we need. We set up the model and the success URL as class attributes, and then we override the delete method only to add a nice message that will be displayed in the list view (which is where we redirect to after deletion).
We don't need to specify the template name, since we'll use a name that Django infers by default: record_confirm_delete.html.
With this final view, we're all set to have a nice interface that we can use to handle Record instances.
Before we move on to the template layer, let's set up the URLs. This time, I want to show you the inclusion technique I talked about in Chapter 10, Web Development Done Right.
pwdweb/urls.py
from django.conf.urls import include, url
from django.contrib import admin
from records import urls as records_url
from records.views import HomeView
urlpatterns = [
url(r'^admin/', include(admin.site.urls)),
url(r'^records/', include(records_url, namespace='records')),
url(r'^$', HomeView.as_view(), name='home'),
]These are the URLs for the main project. We have the usual admin, a home page, and then for the records section, we include another urls.py file, which we define in the records application. This technique allows for apps to be reusable and self-contained. Note that, when including another urls.py file, you can pass namespace information, which you can then use in functions such as reverse, or the url template tag. For example, we've seen that the path to the RecordUpdateView was 'records:edit'. The first part of that string is the namespace, and the second is the name that we have given to the view, as you can see in the following code:
records/urls.py
from django.conf.urls import include, url
from django.contrib import admin
from .views import (RecordCreateView, RecordUpdateView,
RecordDeleteView, RecordListView)
urlpatterns = [
url(r'^add/$', RecordCreateView.as_view(), name='add'),
url(r'^edit/(?P<pk>[0-9]+)/$', RecordUpdateView.as_view(),
name='edit'),
url(r'^delete/(?P<pk>[0-9]+)/$', RecordDeleteView.as_view(),
name='delete'),
url(r'^$', RecordListView.as_view(), name='list'),
]We define four different url instances. There is one for adding a record, which doesn't need primary key information since the object doesn't exist yet. Then we have two url instances for updating and deleting a record, and for those we need to also specify primary key information to be passed to the view. Since Record instances have integer IDs, we can safely pass them on the URL, following good URL design practice. Finally, we define one url instance for the list of records.
All url instances have name information which is used in views and templates.
Let's start with the template we'll use as the basis for the rest:
records/templates/records/base.html
{% load static from staticfiles %}
<!DOCTYPE html>
<html lang="en">
<head>
<meta charset="utf-8">
<meta name="viewport"
content="width=device-width, initial-scale=1.0">
<link href="{% static "records/css/main.css" %}"
rel="stylesheet">
<title>{% block title %}Title{% endblock title %}</title>
</head>
<body>
<div id="page-content">
{% block page-content %}{% endblock page-content %}
</div>
<div id="footer">{% block footer %}{% endblock footer %}</div>
{% block scripts %}
<script
src="{% static "records/js/jquery-2.1.4.min.js" %}">
</script>
{% endblock scripts %}
</body>
</html>It's very similar to the one I used in Chapter 10, Web Development Done Right although it is a bit more compressed and with one major difference. We will import jQuery in every page.
Note
jQuery is the most popular JavaScript library out there. It allows you to write code that works on all the main browsers and it gives you many extra tools such as the ability to perform asynchronous calls (AJAX) from the browser itself. We'll use this library to perform the calls to the API, both to generate and validate our passwords. You can download it at https://jquery.com/, and put it in the pwdweb/records/static/records/js/ folder (you may have to amend the import in the template).
I highlighted the only interesting part of this template for you. Note that we load the JavaScript library at the end. This is common practice, as JavaScript is used to manipulate the page, so loading libraries at the end helps in avoiding situations such as JavaScript code failing because the element needed hadn't been rendered on the page yet.
The home template is very simple:
records/templates/records/home.html
{% extends "records/base.html" %}
{% block title %}Welcome to the Records website.{% endblock %}
{% block page-content %}
<h1>Welcome {{ user.first_name }}!</h1>
<div class="home-option">To create a record click
<a href="{% url "records:add" %}">here.</a>
</div>
<div class="home-option">To see all records click
<a href="{% url "records:list" %}">here.</a>
</div>
{% endblock page-content %}There is nothing new here when compared to the home.html template we saw in Chapter 10, Web Development Done Right. The footer template is actually exactly the same:
records/templates/records/footer.html
<div class="footer">
Go back <a href="{% url "home" %}">home</a>.
</div>This template to list all records is fairly simple:
records/templates/records/list.html
{% extends "records/base.html" %}
{% load record_extras %}
{% block title %}Records{% endblock title %}
{% block page-content %}
<h1>Records</h1><span name="top"></span>
{% include "records/messages.html" %}
{% for record in records %}
<div class="record {% cycle 'row-light-blue' 'row-white' %}"
id="record-{{ record.pk }}">
<div class="record-left">
<div class="record-list">
<span class="record-span">Title</span>{{ record.title }}
</div>
<div class="record-list">
<span class="record-span">Username</span>
{{ record.username }}
</div>
<div class="record-list">
<span class="record-span">Email</span>{{ record.email }}
</div>
<div class="record-list">
<span class="record-span">URL</span>
<a href="{{ record.url }}" target="_blank">
{{ record.url }}</a>
</div>
<div class="record-list">
<span class="record-span">Password</span>
{% hide_password record.plaintext %}
</div>
</div>
<div class="record-right">
<div class="record-list">
<span class="record-span">Notes</span>
<textarea rows="3" cols="40" class="record-notes"
readonly>{{ record.notes }}</textarea>
</div>
<div class="record-list">
<span class="record-span">Last modified</span>
{{ record.last_modified }}
</div>
<div class="record-list">
<span class="record-span">Created</span>
{{ record.created }}
</div>
</div>
<div class="record-list-actions">
<a href="{% url "records:edit" pk=record.pk %}">» edit</a>
<a href="{% url "records:delete" pk=record.pk %}">» delete
</a>
</div>
</div>
{% endfor %}
{% endblock page-content %}
{% block footer %}
<p><a href="#top">Go back to top</a></p>
{% include "records/footer.html" %}
{% endblock footer %}For this template as well, I have highlighted the parts I'd like you to focus on. Firstly, I load a custom tags module, record_extras, which we'll need later. I have also added an anchor at the top, so that we'll be able to put a link to it at the bottom of the page, to avoid having to scroll all the way up.
Then, I included a template to provide me with the HTML code to display Django messages. It's a very simple template which I'll show you shortly.
Then, we define a list of div elements. Each Record instance has a container div, in which there are two other main div elements: record-left and record-right. In order to display them side by side, I have set this class in the main.css file:
.record-left { float: left; width: 300px;}The outermost div container (the one with class record), has an id attribute, which I have used as an anchor. This allows us to click on cancel on the record delete page, so that if we change our minds and don't want to delete the record, we can get back to the list page, and at the right position.
Each attribute of the record is then displayed in div elements whose class is record-list. Most of these classes are just there to allow me to set a bit of padding and dimensions on the HTML elements.
The next interesting bit is the hide_password tag, which takes the plaintext, which is the unencrypted password. The purpose of this custom tag is to display a sequence of '*' characters, as long as the original password, so that if someone is passing by while you're on the page, they won't see your passwords. However, hovering on that sequence of '*' characters will show you the original password in the tooltip. Here's the code for the hide_password tag:
records/templatetags/record_extras.py
from django import template
from django.utils.html import escape
register = template.Library()
@register.simple_tag
def hide_password(password):
return '<span title="{0}">{1}</span>'.format(
escape(password), '*' * len(password))There is nothing fancy here. We just register this function as a simple tag and then we can use it wherever we want. It takes a password and puts it as a tooltip of a span element, whose main content is a sequence of '*' characters. Just note one thing: we need to escape the password, so that we're sure it won't break our HTML (think of what might happen if the password contained a double-quote `"`, for example).
As far as the list.html template is concerned, the next interesting bit is that we set the readonly attribute to the textarea element, so as not to give the impression to the user that they can modify notes on the fly.
Then, we set a couple of links for each Record instance, right at the bottom of the container div. There is one for the edit page, and another for the delete page. Note that we need to pass the url tag not only the namespace:name string, but also the primary key information, as required by the URL setup we made in the urls.py module for those views.
Finally, we import the footer and set the link to the anchor on top of the page.
Now, as promised, here is the code for the messages:
records/templates/records/messages.html
{% if messages %}
{% for message in messages %}
<p class="{{ message.tags }}">{{ message }}</p>
{% endfor %}
{% endif %}This code takes care of displaying messages only when there is at least one to display. We give the p tag class information to display success messages in green and error messages in red.
If you grab the main.css file from the source code for the book, you will now be able to visualize the list page (yours will be blank, you still need to insert data into it), and it should look something like this:
As you can see, I have two records in the database at the moment. I'm hovering on the password of the first one, which is my platform account at my sister's school, and the password is displayed in the tooltip. The division in two div elements, left and right, helps in making rows smaller so that the overall result is more pleasing to the eye. The important information is on the left and the ancillary information is on the right. The row color alternates between a very light shade of blue and white.
Each row has an edit and delete link, at its bottom left. We'll show the pages for those two links right after we see the code for the templates that create them.
The CSS code that holds all the information for this interface is the following:
records/static/records/css/main.css
html, body, * {
font-family: 'Trebuchet MS', Helvetica, sans-serif; }
a { color: #333; }
.record {
clear: both; padding: 1em; border-bottom: 1px solid #666;}
.record-left { float: left; width: 300px;}
.record-list { padding: 2px 0; }
.fieldWrapper { padding: 5px; }
.footer { margin-top: 1em; color: #333; }
.home-option { padding: .6em 0; }
.record-span { font-weight: bold; padding-right: 1em; }
.record-notes { vertical-align: top; }
.record-list-actions { padding: 4px 0; clear: both; }
.record-list-actions a { padding: 0 4px; }
#pwd-info { padding: 0 6px; font-size: 1.1em; font-weight: bold;}
#id_notes { vertical-align: top; }
/* Messages */
.success, .errorlist {font-size: 1.2em; font-weight: bold; }
.success {color: #25B725; }
.errorlist {color: #B12B2B; }
/* colors */
.row-light-blue { background-color: #E6F0FA; }
.row-white { background-color: #fff; }
.green { color: #060; }
.orange { color: #FF3300; }
.red { color: #900; }Please remember, I'm not a CSS guru so just take this file as it is, a fairly naive way to provide styling to our interface.
Now for the interesting part. Creating and updating a record. We'll use the same template for both, so we expect some decisional logic to be there that will tell us in which of the two situations we are. As it turns out, it will not be that much code. The most exciting part of this template, however, is its associated JavaScript file which we'll examine right afterwards.
records/templates/records/record_add_edit.html
{% extends "records/base.html" %}
{% load static from staticfiles %}
{% block title %}
{% if update %}Update{% else %}Create{% endif %} Record
{% endblock title %}
{% block page-content %}
<h1>{% if update %}Update a{% else %}Create a new{% endif %}
Record
</h1>
{% include "records/messages.html" %}
<form action="." method="post">{% csrf_token %}
{{ form.non_field_errors }}
<div class="fieldWrapper">{{ form.title.errors }}
{{ form.title.label_tag }} {{ form.title }}</div>
<div class="fieldWrapper">{{ form.username.errors }}
{{ form.username.label_tag }} {{ form.username }}</div>
<div class="fieldWrapper">{{ form.email.errors }}
{{ form.email.label_tag }} {{ form.email }}</div>
<div class="fieldWrapper">{{ form.url.errors }}
{{ form.url.label_tag }} {{ form.url }}</div>
<div class="fieldWrapper">{{ form.password.errors }}
{{ form.password.label_tag }} {{ form.password }}
<span id="pwd-info"></span></div>
<button type="button" id="validate-btn">
Validate Password</button>
<button type="button" id="generate-btn">
Generate Password</button>
<div class="fieldWrapper">{{ form.notes.errors }}
{{ form.notes.label_tag }} {{ form.notes }}</div>
<input type="submit"
value="{% if update %}Update{% else %}Insert{% endif %}">
</form>
{% endblock page-content %}
{% block footer %}
<br>{% include "records/footer.html" %}<br>
Go to <a href="{% url "records:list" %}">the records list</a>.
{% endblock footer %}
{% block scripts %}
{{ block.super }}
<script src="{% static "records/js/api.js" %}"></script>
{% endblock scripts %}As usual, I have highlighted the important parts, so let's go through this code together.
You can see the first bit of decision logic in the title block. Similar decision logic is also displayed later on, in the header of the page (the h1 HTML tag), and in the submit button at the end of the form.
Apart from this logic, what I'd like you to focus on is the form and what's inside it. We set the action attribute to a dot, which means this page, so that we don't need to customize it according to which view is serving the page. Also, we immediately take care of the cross-site request forgery token, as explained in Chapter 10, Web Development Done Right.
Note that, this time, we cannot leave the whole form rendering up to Django since we want to add in a couple of extra things, so we go down one level of granularity and ask Django to render each individual field for us, along with any errors, along with its label. This way we still save a lot of effort, and at the same time, we can also customize the form as we like. In situations like this, it's not uncommon to write a small template to render a field, in order to avoid repeating those three lines for each field. In this case though, the form is so small I decided to avoid raising the complexity level up any further.
The span element, pwd-info, contains the information about the password that we get from the API. The two buttons after that, validate-btn and generate-btn, are hooked up with the AJAX calls to the API.
At the end of the template, in the scripts block, we need to load the api.js JavaScript file which contains the code to work with the API. We also need to use block.super, which will load whatever code is in the same block in the parent template (for example, jQuery). block.super is basically the template equivalent of a call to super(ClassName, self) in Python. It's important to load jQuery before our library, since the latter is based on the former.
Let's now take a look at that JavaScript. I don't expect you to understand everything. Firstly, this is a Python book and secondly, you're supposed to be a beginner (though by now, ninja trained), so fear not. However, as JavaScript has, by now, become essential if you're dealing with a web environment, having a working knowledge of it is extremely important even for a Python developer, so try and get the most out of what I'm about to show you. We'll see the password generation first:
records/static/records/js/api.js
var baseURL = 'http://127.0.0.1:5555/password';
var getRandomPassword = function() {
var apiURL = '{url}/generate'.replace('{url}', baseURL);
$.ajax({
type: 'GET',
url: apiURL,
success: function(data, status, request) {
$('#id_password').val(data[1]);
},
error: function() { alert('Unexpected error'); }
});
}
$(function() {
$('#generate-btn').click(getRandomPassword);
});Firstly, we set a variable for the base API URL: baseURL. Then, we define the getRandomPassword function, which is very simple. At the beginning, it defines the apiURL extending baseURL with a replacement technique. Even if the syntax is different from that of Python, you shouldn't have any issues understanding this line.
After defining the apiURL, the interesting bit comes up. We call $.ajax, which is the jQuery function that performs the AJAX calls. That $ is a shortcut for jQuery. As you can see in the body of the call, it's a GET request to apiURL. If it succeeds (success: ...), an anonymous function is run, which sets the value of the id_password text field to the second element of the returned data. We'll see the structure of the data when we examine the API code, so don't worry about that now. If an error occurs, we simply alert the user that there was an unexpected error.
After the function definition, we run a couple of lines of code to bind the click event on the generate-btn button to the getRandomPassword function. This means that, after this code has been run by the browser engine, every time we click the generate-btn button, the getRandomPassword function is called.
That wasn't so scary, was it? So let's see what we need for the validation part.
Now there is a value in the password field and we want to validate it. We need to call the API and inspect its response. Since passwords can have weird characters, I don't want to pass them on the URL, therefore I will use a POST request, which allows me to put the password in its body. To do this, I need the following code:
var validatePassword = function() {
var apiURL = '{url}/validate'.replace('{url}', baseURL);
$.ajax({
type: 'POST',
url: apiURL,
data: JSON.stringify({'password': $('#id_password').val()}),
contentType: "text/plain", // Avoid CORS preflight
success: function(data, status, request) {
var valid = data['valid'], infoClass, grade;
var msg = (valid?'Valid':'Invalid') + ' password.';
if (valid) {
var score = data['score']['total'];
grade = (score<10?'Poor':(score<18?'Medium':'Strong'));
infoClass = (score<10?'red':(score<18?'orange':'green'));
msg += ' (Score: {score}, {grade})'
.replace('{score}', score).replace('{grade}', grade);
}
$('#pwd-info').html(msg);
$('#pwd-info').removeClass().addClass(infoClass);
},
error: function(data) { alert('Unexpected error'); }
});
}
$(function() {
$('#validate-btn').click(validatePassword);
});The concept is the same as before, only this time it's for the validate-btn button. The body of the AJAX call is similar. We use a POST instead of a GET request, and we define the data as a JSON object, which is the equivalent of using json.dumps({'password': 'some_pwd'}) in Python.
The contentType line is a quick hack to avoid problems with the CORS preflight behavior of the browser. Cross-origin resource sharing (CORS) is a mechanism that allows restricted resources on a web page to be requested from another domain outside of the domain from which the request originated. In a nutshell, since the API is located at 127.0.0.1:5555 and the interface is running at 127.0.0.1:8000, without this hack, the browser wouldn't allow us to perform the calls. In a production environment, you may want to check the documentation for JSONP, which is a much better (albeit more complex) solution to this issue.
The body of the anonymous function which is run if the call succeeds is apparently only a bit complicated. All we need to do is understand if the password is valid (from data['valid']), and assign it a grade and a CSS class based on its score. Validity and score information come from the API response.
The only tricky bit in this code is the JavaScript ternary operator, so let's see a comparative example for it:
# Python error = 'critical' if error_level > 50 else 'medium' // JavaScript equivalent error = (error_level > 50 ? 'critical' : 'medium');
With this example, you shouldn't have any issue reading the rest of the logic in the function. I know, I could have just used a regular if (...), but JavaScript coders use the ternary operator all the time, so you should get used to it. It's good training to scratch our heads a bit harder in order to understand code.
Lastly, I'd like you to take a look at the end of that function. We set the html of the pwd-info span element to the message we assembled (msg), and then we style it. In one line, we remove all the CSS classes from that element (removeClass() with no parameters does that), and we add the infoClass to it. infoClass is either 'red', 'orange', or 'green'. If you go back to the main.css file, you'll see them at the bottom.
Now that we've seen both the template code and the JavaScript to make the calls, let's see a screenshot of the page. We're going to edit the first record, the one about my sister's school.
In the picture, you can see that I updated the password by clicking on the Generate Password button. Then, I saved the record (so you could see the nice message on top), and, finally, I clicked on the Validate Password button.
The result is shown in green on the right-hand side of the Password field. It's strong (23 is actually the maximum score we can get) so the message is displayed in a nice shade of green.
To delete a record, go to the list and click on the delete link. You'll be redirected to a page that asks you for confirmation; you can then choose to proceed and delete the poor record, or to cancel the request and go back to the list page. The template code is the following:
records/templates/records/record_confirm_delete.html
{% extends "records/base.html" %}
{% block title %}Delete record{% endblock title %}
{% block page-content %}
<h1>Confirm Record Deletion</h1>
<form action="." method="post">{% csrf_token %}
<p>Are you sure you want to delete "{{ object }}"?</p>
<input type="submit" value="Confirm" />
<a href="{% url "records:list" %}#record-{{ object.pk }}">
» cancel</a>
</form>
{% endblock page-content %}Since this is a template for a standard Django view, we need to use the naming conventions adopted by Django. Therefore, the record in question is called object in the template. The {{ object }} tag displays a string representation for the object, which is not exactly beautiful at the moment, since the whole line will read: Are you sure you want to delete "Record object"?.
This is because we haven't added a __str__ method to our Model class yet, which means that Python has no idea of what to show us when we ask for a string representation of an instance. Let's change this by completing our model, adding the __str__ method at the bottom of the class body:
records/models.py
class Record(models.Model):
...
def __str__(self):
return '{}'.format(self.title)
Restart the server and now the page will read: Are you sure you want to delete "Some Bank"? where Some Bank is the title of the record whose delete link I clicked on.
We could have just used {{ object.title }}, but I prefer to fix the root of the problem, not just the effect. Adding a __str__ method is in fact something that you ought to do for all of your models.
The interesting bit in this last template is actually the link for canceling the operation. We use the url tag to go back to the list view (records:list), but we add anchor information to it so that it will eventually read something like this (this is for pk=2):
http://127.0.0.1:8000/records/#record-2
This will go back to the list page and scroll down to the container div that has ID record 2, which is nice.
This concludes the interface. Even though this section was similar to what we saw in Chapter 10, Web Development Done Right, we've been able to concentrate more on the code in this chapter. We've seen how useful Django class-based views are, and we even touched on some cool JavaScript. Run $ python manage.py runserver and your interface should be up and running at http://127.0.0.1:8000.
Now it's time to spice things up a bit with the second part of this project.
The model layer
We need to add just one model for the records application: Record. This model will represent each record we want to store in the database:
records/models.py
from cryptography.fernet import Fernet
from django.conf import settings
from django.db import models
class Record(models.Model):
DEFAULT_ENCODING = 'utf-8'
title = models.CharField(max_length=64, unique=True)
username = models.CharField(max_length=64)
email = models.EmailField(null=True, blank=True)
url = models.URLField(max_length=255, null=True, blank=True)
password = models.CharField(max_length=2048)
notes = models.TextField(null=True, blank=True)
created = models.DateTimeField(auto_now_add=True)
last_modified = models.DateTimeField(auto_now=True)
def encrypt_password(self):
self.password = self.encrypt(self.password)
def decrypt_password(self):
self.password = self.decrypt(self.password)
def encrypt(self, plaintext):
return self.cypher('encrypt', plaintext)
def decrypt(self, cyphertext):
return self.cypher('decrypt', cyphertext)
def cypher(self, cypher_func, text):
fernet = Fernet(settings.ENCRYPTION_KEY)
result = getattr(fernet, cypher_func)(
self._to_bytes(text))
return self._to_str(result)
def _to_str(self, bytes_str):
return bytes_str.decode(self.DEFAULT_ENCODING)
def _to_bytes(self, s):
return s.encode(self.DEFAULT_ENCODING)Firstly, we set the DEFAULT_ENCODING class attribute to 'utf-8', which is the most popular type of encoding for the web (and not only the web). We set this attribute on the class to avoid hardcoding a string in more than one place.
Then, we proceed to set up all the model's fields. As you can see, Django allows you to specify very specific fields, such as EmailField and URLField. The reason why it's better to use these specific fields instead of a plain and simple CharField is we'll get e-mail and URL validation for free when we create a form for this model, which is brilliant.
All the options are quite standard, and we saw them in Chapter 10, Web Development Done Right but I want to point out a few things anyway. Firstly, title needs to be unique so that each Record object has a unique title and we don't want to risk having doubles. Each database treats strings a little bit differently, according to how it is set up, which engine it runs, and so on, so I haven't made the title field the primary key for this model, which would have been the natural thing to do. I prefer to avoid the pain of having to deal with weird string errors and I am happy with letting Django add a primary key to the model automatically.
Another option you should understand is the null=True, blank=True couple. The former allows the field to be NULL, which makes it non-mandatory, while the second allows it to be blank (that is to say, an empty string). Their use is quite peculiar in Django, so I suggest you to take a look at the official documentation to understand exactly how to use them.
Finally, the dates: created needs to have auto_add_now=True, which will set the current moment in time on the object when it's created. On the other hand, last_modified needs to be updated every time we save the model, hence we set auto_now=True.
After the field definitions, there are a few methods for encrypting and decrypting the password. It is always a very bad idea to save passwords as they are in a database, therefore you should always encrypt them before saving them.
Normally, when saving a password, you encrypt it using a one way encryption algorithm (also known as a one way hash function). This means that, once you have created the hash, there is no way for you to revert it back to the original password.
This kind of encryption is normally used for authentication: the user puts their username and password in a form and, on submission, the code fetches the hash from the user record in the database and compares it with the hash of the password the user has just put in the form. If the two hashes match, it means that they were produced by the same password, therefore authentication is granted.
In this case though, we need to be able to recover the passwords, otherwise this whole application wouldn't be very useful. Therefore, we will use a so-called symmetric encryption algorithm to encrypt them. The way this works is very simple: the password (called plaintext) is passed to an encrypt function, along with a secret key. The algorithm produces an encrypted string (called cyphertext) out of them, which is what you store in the database. When you want to recover the password, you will need the cyphertext and the secret key. You feed them to a decrypt function, and you get back your original password. This is exactly what we need.
In order to perform symmetric encryption, we need the cryptography package, which is why I instructed you to install it.
All the methods in the Record class are very simple. encrypt_password and decrypt_password are shortcuts to encrypt and decrypt the password field and reassign the result to itself.
The encrypt and decrypt methods are dispatchers for the cypher method, and _to_str and _to_bytes are just a couple of helpers. The cryptography library works with bytes objects, so we need those helpers to go back and forth between bytes and strings, using a common encoding.
The only interesting logic is in the cypher method. I could have coded it directly in the encrypt and decrypt ones, but that would have resulted in a bit of redundancy, and I wouldn't have had the chance to show you a different way of accessing an object's attribute, so let's analyze the body of cypher.
We start by creating an instance of the Fernet class, which provides us with the symmetric encryption functionality we need. We set the instance up by passing the secret key in the settings (ENCRYPTION_KEY). After creating fernet, we need to use it. We can use it to either encrypt or decrypt, according to what value is given to the cypher_func parameter. We use getattr to get an attribute from an object given the object itself and the name of the attribute. This technique allows us to fetch any attribute from an object dynamically.
The result of getattr(fernet, cypher_func), with cyper_func being 'encrypt', for example, is the same as fernet.encrypt. The getattr function returns a method, which we then call with the bytes representation of the text argument. We then return the result, in string format.
Here's what this function is equivalent to when it's called by the encrypt dispatcher:
def cypher_encrypt(self, text):
fernet = Fernet(settings.ENCRYPTION_KEY)
result = fernet.encrypt(
self._to_bytes(text))
return self._to_str(result)When you take the time to understand it properly, you'll see it's not as difficult as it sounds.
So, we have our model, hence it's time to migrate (I hope you remember that this will create the tables in the database for your application):
$ python manage.py makemigrations $ python manage.py migrate
Now you should have a nice database with all the tables you need to run the interface application. Go ahead and create a superuser ($ python manage.py createsuperuser).
By the way, if you want to generate your own encryption key, it is as easy as this:
>>> from cryptography.fernet import Fernet >>> Fernet.generate_key()
We need a form for the Record model, so we'll use the ModelForm technique we saw in Chapter 10, Web Development Done Right.
records/forms.py
from django.forms import ModelForm, Textarea
from .models import Record
class RecordForm(ModelForm):
class Meta:
model = Record
fields = ['title', 'username', 'email', 'url',
'password', 'notes']
widgets = {'notes': Textarea(
attrs={'cols': 40, 'rows': 4})}We create a RecordForm class that inherits from ModelForm, so that the form is created automatically thanks to the introspection capabilities of Django. We only specify which model to use, which fields to display (we exclude the dates, which are handled automatically) and we provide minimal styling for the dimensions of the notes field, which will be displayed using a Textarea (which is a multiline text field in HTML).
There are a total of five pages in the interface application: home, record list, record creation, record update, and record delete confirmation. Hence, there are five views that we have to write. As you'll see in a moment, Django helps us a lot by giving us views we can reuse with minimum customization. All the code that follows belongs to the records/views.py file.
Just to break the ice, here are the imports and the view for the home page:
from django.contrib import messages
from django.contrib.messages.views import SuccessMessageMixin
from django.core.urlresolvers import reverse_lazy
from django.views.generic import TemplateView
from django.views.generic.edit import (
CreateView, UpdateView, DeleteView)
from .forms import RecordForm
from .models import Record
class HomeView(TemplateView):
template_name = 'records/home.html'We import a few tools from Django. There are a couple of messaging-related objects, a URL lazy reverser, and four different types of view. We also import our Record model and RecordForm. As you can see, the HomeView class consists of only two lines since we only need to specify which template we want to use, the rest just reuses the code from TemplateView, as it is. It's so easy, it almost feels like cheating.
After the home view, we can write a view to list all the Record instances that we have in the database.
class RecordListView(TemplateView):
template_name = 'records/list.html'
def get(self, request, *args, **kwargs):
context = self.get_context_data(**kwargs)
records = Record.objects.all().order_by('title') #1
for record in records:
record.plaintext = record.decrypt(record.password) #2
context['records'] = records
return self.render_to_response(context)All we need to do is sub-class TemplateView again, and override the get method. We need to do a couple of things: we fetch all the records from the database and sort them by title (#1) and then parse all the records in order to add the attribute plaintext (#2) onto each of them, to show the original password on the page. Another way of doing this would be to add a read-only property to the Record model, to do the decryption on the fly. I'll leave it to you, as a fun exercise, to amend the code to do it.
After recovering and augmenting the records, we put them in the context dict and finish as usual by invoking render_to_response.
Here's the code for the creation view:
class EncryptionMixin:
def form_valid(self, form):
self.encrypt_password(form)
return super(EncryptionMixin, self).form_valid(form)
def encrypt_password(self, form):
self.object = form.save(commit=False)
self.object.encrypt_password()
self.object.save()
class RecordCreateView(
EncryptionMixin, SuccessMessageMixin, CreateView):
template_name = 'records/record_add_edit.html'
form_class = RecordForm
success_url = reverse_lazy('records:add')
success_message = 'Record was created successfully'A part of its logic has been factored out in order to be reused later on in the update view. Let's start with EncryptionMixin. All it does is override the form_valid method so that, prior to saving a new Record instance to the database, we make sure we call encrypt_password on the object that results from saving the form. In other words, when the user submits the form to create a new Record, if the form validates successfully, then the form_valid method is invoked. Within this method what usually happens is that an object is created out of the ModelForm instance, like this:
self.object = form.save()
We need to interfere with this behavior because running this code as it is would save the record with the original password, which isn't encrypted. So we change this to call save on the form passing commit=False, which creates the Record instance out of the form, but doesn't attempt to save it in the database. Immediately afterwards, we encrypt the password on that instance and then we can finally call save on it, actually committing it to the database.
Since we need this behavior both for creating and updating records, I have factored it out in a mixin.
Note
Perhaps, a better solution for this password encryption logic is to create a custom Field (inheriting from CharField is the easiest way to do it) and add the necessary logic to it, so that when we handle Record instances from and to the database, the encryption and decryption logic is performed automatically for us. Though more elegant, this solution needs me to digress and explain a lot more about Django internals, which is too much for the extent of this example. As usual, you can try to do it yourself, if you feel like a challenge.
After creating the EncryptionMixin class, we can use it in the RecordCreateView class. We also inherit from two other classes: SuccessMessageMixin and CreateView. The message mixin provides us with the logic to quickly set up a message when creation is successful, and the CreateView gives us the necessary logic to create an object from a form.
You can see that all we have to code is some customization: the template name, the form class, and the success message and URL. Everything else is gracefully handled for us by Django.
The code to update a Record instance is only a tiny bit more complicated. We just need to add some logic to decrypt the password before we populate the form with the record data.
class RecordUpdateView(
EncryptionMixin, SuccessMessageMixin, UpdateView):
template_name = 'records/record_add_edit.html'
form_class = RecordForm
model = Record
success_message = 'Record was updated successfully'
def get_context_data(self, **kwargs):
kwargs['update'] = True
return super(
RecordUpdateView, self).get_context_data(**kwargs)
def form_valid(self, form):
self.success_url = reverse_lazy(
'records:edit',
kwargs={'pk': self.object.pk}
)
return super(RecordUpdateView, self).form_valid(form)
def get_form_kwargs(self):
kwargs = super(RecordUpdateView, self).get_form_kwargs()
kwargs['instance'].decrypt_password()
return kwargsIn this view, we still inherit from both EncryptionMixin and SuccessMessageMixin, but the view class we use is UpdateView.
The first four lines are customization as before, we set the template name, the form class, the Record model, and the success message. We cannot set the success_url as a class attribute because we want to redirect a successful edit to the same edit page for that record and, in order to do this, we need the ID of the instance we're editing. No worries, we'll do it another way.
First, we override get_context_data in order to set 'update' to True in the kwargs argument, which means that a key 'update' will end up in the context dict that is passed to the template for rendering the page. We do this because we want to use the same template for creating and updating a record, therefore we will use this variable in the context to be able to understand in which situation we are. There are other ways to do this but this one is quick and easy and I like it because it's explicit.
After overriding get_context_data, we need to take care of the URL redirection. We do this in the form_valid method since we know that, if we get there, it means the Record instance has been successfully updated. We reverse the 'records:edit' view, which is exactly the view we're working on, passing the primary key of the object in question. We take that information from self.object.pk.
One of the reasons it's helpful to have the object saved on the view instance is that we can use it when needed without having to alter the signature of the many methods in the view in order to pass the object around. This design is very helpful and allows us to achieve a lot with very few lines of code.
The last thing we need to do is to decrypt the password on the instance before populating the form for the user. It's simple enough to do it in the get_form_kwargs method, where you can access the Record instance in the kwargs dict, and call decrypt_password on it.
This is all we need to do to update a record. If you think about it, the amount of code we had to write is really very little, thanks to Django class-based views.
Tip
A good way of understanding which is the best method to override, is to take a look at the Django official documentation or, even better in this case, check out the source code and look at the class-based views section. You'll be able to appreciate how much work has been done there by Django developers so that you only have to touch the smallest amounts of code to customize your views.
Of the three actions, deleting a record is definitely the easiest one. All we need is the following code:
class RecordDeleteView(SuccessMessageMixin, DeleteView):
model = Record
success_url = reverse_lazy('records:list')
def delete(self, request, *args, **kwargs):
messages.success(
request, 'Record was deleted successfully')
return super(RecordDeleteView, self).delete(
request, *args, **kwargs)We only need to inherit from SuccessMessageMixin and DeleteView, which gives us all we need. We set up the model and the success URL as class attributes, and then we override the delete method only to add a nice message that will be displayed in the list view (which is where we redirect to after deletion).
We don't need to specify the template name, since we'll use a name that Django infers by default: record_confirm_delete.html.
With this final view, we're all set to have a nice interface that we can use to handle Record instances.
Before we move on to the template layer, let's set up the URLs. This time, I want to show you the inclusion technique I talked about in Chapter 10, Web Development Done Right.
pwdweb/urls.py
from django.conf.urls import include, url
from django.contrib import admin
from records import urls as records_url
from records.views import HomeView
urlpatterns = [
url(r'^admin/', include(admin.site.urls)),
url(r'^records/', include(records_url, namespace='records')),
url(r'^$', HomeView.as_view(), name='home'),
]These are the URLs for the main project. We have the usual admin, a home page, and then for the records section, we include another urls.py file, which we define in the records application. This technique allows for apps to be reusable and self-contained. Note that, when including another urls.py file, you can pass namespace information, which you can then use in functions such as reverse, or the url template tag. For example, we've seen that the path to the RecordUpdateView was 'records:edit'. The first part of that string is the namespace, and the second is the name that we have given to the view, as you can see in the following code:
records/urls.py
from django.conf.urls import include, url
from django.contrib import admin
from .views import (RecordCreateView, RecordUpdateView,
RecordDeleteView, RecordListView)
urlpatterns = [
url(r'^add/$', RecordCreateView.as_view(), name='add'),
url(r'^edit/(?P<pk>[0-9]+)/$', RecordUpdateView.as_view(),
name='edit'),
url(r'^delete/(?P<pk>[0-9]+)/$', RecordDeleteView.as_view(),
name='delete'),
url(r'^$', RecordListView.as_view(), name='list'),
]We define four different url instances. There is one for adding a record, which doesn't need primary key information since the object doesn't exist yet. Then we have two url instances for updating and deleting a record, and for those we need to also specify primary key information to be passed to the view. Since Record instances have integer IDs, we can safely pass them on the URL, following good URL design practice. Finally, we define one url instance for the list of records.
All url instances have name information which is used in views and templates.
Let's start with the template we'll use as the basis for the rest:
records/templates/records/base.html
{% load static from staticfiles %}
<!DOCTYPE html>
<html lang="en">
<head>
<meta charset="utf-8">
<meta name="viewport"
content="width=device-width, initial-scale=1.0">
<link href="{% static "records/css/main.css" %}"
rel="stylesheet">
<title>{% block title %}Title{% endblock title %}</title>
</head>
<body>
<div id="page-content">
{% block page-content %}{% endblock page-content %}
</div>
<div id="footer">{% block footer %}{% endblock footer %}</div>
{% block scripts %}
<script
src="{% static "records/js/jquery-2.1.4.min.js" %}">
</script>
{% endblock scripts %}
</body>
</html>It's very similar to the one I used in Chapter 10, Web Development Done Right although it is a bit more compressed and with one major difference. We will import jQuery in every page.
Note
jQuery is the most popular JavaScript library out there. It allows you to write code that works on all the main browsers and it gives you many extra tools such as the ability to perform asynchronous calls (AJAX) from the browser itself. We'll use this library to perform the calls to the API, both to generate and validate our passwords. You can download it at https://jquery.com/, and put it in the pwdweb/records/static/records/js/ folder (you may have to amend the import in the template).
I highlighted the only interesting part of this template for you. Note that we load the JavaScript library at the end. This is common practice, as JavaScript is used to manipulate the page, so loading libraries at the end helps in avoiding situations such as JavaScript code failing because the element needed hadn't been rendered on the page yet.
The home template is very simple:
records/templates/records/home.html
{% extends "records/base.html" %}
{% block title %}Welcome to the Records website.{% endblock %}
{% block page-content %}
<h1>Welcome {{ user.first_name }}!</h1>
<div class="home-option">To create a record click
<a href="{% url "records:add" %}">here.</a>
</div>
<div class="home-option">To see all records click
<a href="{% url "records:list" %}">here.</a>
</div>
{% endblock page-content %}There is nothing new here when compared to the home.html template we saw in Chapter 10, Web Development Done Right. The footer template is actually exactly the same:
records/templates/records/footer.html
<div class="footer">
Go back <a href="{% url "home" %}">home</a>.
</div>This template to list all records is fairly simple:
records/templates/records/list.html
{% extends "records/base.html" %}
{% load record_extras %}
{% block title %}Records{% endblock title %}
{% block page-content %}
<h1>Records</h1><span name="top"></span>
{% include "records/messages.html" %}
{% for record in records %}
<div class="record {% cycle 'row-light-blue' 'row-white' %}"
id="record-{{ record.pk }}">
<div class="record-left">
<div class="record-list">
<span class="record-span">Title</span>{{ record.title }}
</div>
<div class="record-list">
<span class="record-span">Username</span>
{{ record.username }}
</div>
<div class="record-list">
<span class="record-span">Email</span>{{ record.email }}
</div>
<div class="record-list">
<span class="record-span">URL</span>
<a href="{{ record.url }}" target="_blank">
{{ record.url }}</a>
</div>
<div class="record-list">
<span class="record-span">Password</span>
{% hide_password record.plaintext %}
</div>
</div>
<div class="record-right">
<div class="record-list">
<span class="record-span">Notes</span>
<textarea rows="3" cols="40" class="record-notes"
readonly>{{ record.notes }}</textarea>
</div>
<div class="record-list">
<span class="record-span">Last modified</span>
{{ record.last_modified }}
</div>
<div class="record-list">
<span class="record-span">Created</span>
{{ record.created }}
</div>
</div>
<div class="record-list-actions">
<a href="{% url "records:edit" pk=record.pk %}">» edit</a>
<a href="{% url "records:delete" pk=record.pk %}">» delete
</a>
</div>
</div>
{% endfor %}
{% endblock page-content %}
{% block footer %}
<p><a href="#top">Go back to top</a></p>
{% include "records/footer.html" %}
{% endblock footer %}For this template as well, I have highlighted the parts I'd like you to focus on. Firstly, I load a custom tags module, record_extras, which we'll need later. I have also added an anchor at the top, so that we'll be able to put a link to it at the bottom of the page, to avoid having to scroll all the way up.
Then, I included a template to provide me with the HTML code to display Django messages. It's a very simple template which I'll show you shortly.
Then, we define a list of div elements. Each Record instance has a container div, in which there are two other main div elements: record-left and record-right. In order to display them side by side, I have set this class in the main.css file:
.record-left { float: left; width: 300px;}The outermost div container (the one with class record), has an id attribute, which I have used as an anchor. This allows us to click on cancel on the record delete page, so that if we change our minds and don't want to delete the record, we can get back to the list page, and at the right position.
Each attribute of the record is then displayed in div elements whose class is record-list. Most of these classes are just there to allow me to set a bit of padding and dimensions on the HTML elements.
The next interesting bit is the hide_password tag, which takes the plaintext, which is the unencrypted password. The purpose of this custom tag is to display a sequence of '*' characters, as long as the original password, so that if someone is passing by while you're on the page, they won't see your passwords. However, hovering on that sequence of '*' characters will show you the original password in the tooltip. Here's the code for the hide_password tag:
records/templatetags/record_extras.py
from django import template
from django.utils.html import escape
register = template.Library()
@register.simple_tag
def hide_password(password):
return '<span title="{0}">{1}</span>'.format(
escape(password), '*' * len(password))There is nothing fancy here. We just register this function as a simple tag and then we can use it wherever we want. It takes a password and puts it as a tooltip of a span element, whose main content is a sequence of '*' characters. Just note one thing: we need to escape the password, so that we're sure it won't break our HTML (think of what might happen if the password contained a double-quote `"`, for example).
As far as the list.html template is concerned, the next interesting bit is that we set the readonly attribute to the textarea element, so as not to give the impression to the user that they can modify notes on the fly.
Then, we set a couple of links for each Record instance, right at the bottom of the container div. There is one for the edit page, and another for the delete page. Note that we need to pass the url tag not only the namespace:name string, but also the primary key information, as required by the URL setup we made in the urls.py module for those views.
Finally, we import the footer and set the link to the anchor on top of the page.
Now, as promised, here is the code for the messages:
records/templates/records/messages.html
{% if messages %}
{% for message in messages %}
<p class="{{ message.tags }}">{{ message }}</p>
{% endfor %}
{% endif %}This code takes care of displaying messages only when there is at least one to display. We give the p tag class information to display success messages in green and error messages in red.
If you grab the main.css file from the source code for the book, you will now be able to visualize the list page (yours will be blank, you still need to insert data into it), and it should look something like this:
As you can see, I have two records in the database at the moment. I'm hovering on the password of the first one, which is my platform account at my sister's school, and the password is displayed in the tooltip. The division in two div elements, left and right, helps in making rows smaller so that the overall result is more pleasing to the eye. The important information is on the left and the ancillary information is on the right. The row color alternates between a very light shade of blue and white.
Each row has an edit and delete link, at its bottom left. We'll show the pages for those two links right after we see the code for the templates that create them.
The CSS code that holds all the information for this interface is the following:
records/static/records/css/main.css
html, body, * {
font-family: 'Trebuchet MS', Helvetica, sans-serif; }
a { color: #333; }
.record {
clear: both; padding: 1em; border-bottom: 1px solid #666;}
.record-left { float: left; width: 300px;}
.record-list { padding: 2px 0; }
.fieldWrapper { padding: 5px; }
.footer { margin-top: 1em; color: #333; }
.home-option { padding: .6em 0; }
.record-span { font-weight: bold; padding-right: 1em; }
.record-notes { vertical-align: top; }
.record-list-actions { padding: 4px 0; clear: both; }
.record-list-actions a { padding: 0 4px; }
#pwd-info { padding: 0 6px; font-size: 1.1em; font-weight: bold;}
#id_notes { vertical-align: top; }
/* Messages */
.success, .errorlist {font-size: 1.2em; font-weight: bold; }
.success {color: #25B725; }
.errorlist {color: #B12B2B; }
/* colors */
.row-light-blue { background-color: #E6F0FA; }
.row-white { background-color: #fff; }
.green { color: #060; }
.orange { color: #FF3300; }
.red { color: #900; }Please remember, I'm not a CSS guru so just take this file as it is, a fairly naive way to provide styling to our interface.
Now for the interesting part. Creating and updating a record. We'll use the same template for both, so we expect some decisional logic to be there that will tell us in which of the two situations we are. As it turns out, it will not be that much code. The most exciting part of this template, however, is its associated JavaScript file which we'll examine right afterwards.
records/templates/records/record_add_edit.html
{% extends "records/base.html" %}
{% load static from staticfiles %}
{% block title %}
{% if update %}Update{% else %}Create{% endif %} Record
{% endblock title %}
{% block page-content %}
<h1>{% if update %}Update a{% else %}Create a new{% endif %}
Record
</h1>
{% include "records/messages.html" %}
<form action="." method="post">{% csrf_token %}
{{ form.non_field_errors }}
<div class="fieldWrapper">{{ form.title.errors }}
{{ form.title.label_tag }} {{ form.title }}</div>
<div class="fieldWrapper">{{ form.username.errors }}
{{ form.username.label_tag }} {{ form.username }}</div>
<div class="fieldWrapper">{{ form.email.errors }}
{{ form.email.label_tag }} {{ form.email }}</div>
<div class="fieldWrapper">{{ form.url.errors }}
{{ form.url.label_tag }} {{ form.url }}</div>
<div class="fieldWrapper">{{ form.password.errors }}
{{ form.password.label_tag }} {{ form.password }}
<span id="pwd-info"></span></div>
<button type="button" id="validate-btn">
Validate Password</button>
<button type="button" id="generate-btn">
Generate Password</button>
<div class="fieldWrapper">{{ form.notes.errors }}
{{ form.notes.label_tag }} {{ form.notes }}</div>
<input type="submit"
value="{% if update %}Update{% else %}Insert{% endif %}">
</form>
{% endblock page-content %}
{% block footer %}
<br>{% include "records/footer.html" %}<br>
Go to <a href="{% url "records:list" %}">the records list</a>.
{% endblock footer %}
{% block scripts %}
{{ block.super }}
<script src="{% static "records/js/api.js" %}"></script>
{% endblock scripts %}As usual, I have highlighted the important parts, so let's go through this code together.
You can see the first bit of decision logic in the title block. Similar decision logic is also displayed later on, in the header of the page (the h1 HTML tag), and in the submit button at the end of the form.
Apart from this logic, what I'd like you to focus on is the form and what's inside it. We set the action attribute to a dot, which means this page, so that we don't need to customize it according to which view is serving the page. Also, we immediately take care of the cross-site request forgery token, as explained in Chapter 10, Web Development Done Right.
Note that, this time, we cannot leave the whole form rendering up to Django since we want to add in a couple of extra things, so we go down one level of granularity and ask Django to render each individual field for us, along with any errors, along with its label. This way we still save a lot of effort, and at the same time, we can also customize the form as we like. In situations like this, it's not uncommon to write a small template to render a field, in order to avoid repeating those three lines for each field. In this case though, the form is so small I decided to avoid raising the complexity level up any further.
The span element, pwd-info, contains the information about the password that we get from the API. The two buttons after that, validate-btn and generate-btn, are hooked up with the AJAX calls to the API.
At the end of the template, in the scripts block, we need to load the api.js JavaScript file which contains the code to work with the API. We also need to use block.super, which will load whatever code is in the same block in the parent template (for example, jQuery). block.super is basically the template equivalent of a call to super(ClassName, self) in Python. It's important to load jQuery before our library, since the latter is based on the former.
Let's now take a look at that JavaScript. I don't expect you to understand everything. Firstly, this is a Python book and secondly, you're supposed to be a beginner (though by now, ninja trained), so fear not. However, as JavaScript has, by now, become essential if you're dealing with a web environment, having a working knowledge of it is extremely important even for a Python developer, so try and get the most out of what I'm about to show you. We'll see the password generation first:
records/static/records/js/api.js
var baseURL = 'http://127.0.0.1:5555/password';
var getRandomPassword = function() {
var apiURL = '{url}/generate'.replace('{url}', baseURL);
$.ajax({
type: 'GET',
url: apiURL,
success: function(data, status, request) {
$('#id_password').val(data[1]);
},
error: function() { alert('Unexpected error'); }
});
}
$(function() {
$('#generate-btn').click(getRandomPassword);
});Firstly, we set a variable for the base API URL: baseURL. Then, we define the getRandomPassword function, which is very simple. At the beginning, it defines the apiURL extending baseURL with a replacement technique. Even if the syntax is different from that of Python, you shouldn't have any issues understanding this line.
After defining the apiURL, the interesting bit comes up. We call $.ajax, which is the jQuery function that performs the AJAX calls. That $ is a shortcut for jQuery. As you can see in the body of the call, it's a GET request to apiURL. If it succeeds (success: ...), an anonymous function is run, which sets the value of the id_password text field to the second element of the returned data. We'll see the structure of the data when we examine the API code, so don't worry about that now. If an error occurs, we simply alert the user that there was an unexpected error.
After the function definition, we run a couple of lines of code to bind the click event on the generate-btn button to the getRandomPassword function. This means that, after this code has been run by the browser engine, every time we click the generate-btn button, the getRandomPassword function is called.
That wasn't so scary, was it? So let's see what we need for the validation part.
Now there is a value in the password field and we want to validate it. We need to call the API and inspect its response. Since passwords can have weird characters, I don't want to pass them on the URL, therefore I will use a POST request, which allows me to put the password in its body. To do this, I need the following code:
var validatePassword = function() {
var apiURL = '{url}/validate'.replace('{url}', baseURL);
$.ajax({
type: 'POST',
url: apiURL,
data: JSON.stringify({'password': $('#id_password').val()}),
contentType: "text/plain", // Avoid CORS preflight
success: function(data, status, request) {
var valid = data['valid'], infoClass, grade;
var msg = (valid?'Valid':'Invalid') + ' password.';
if (valid) {
var score = data['score']['total'];
grade = (score<10?'Poor':(score<18?'Medium':'Strong'));
infoClass = (score<10?'red':(score<18?'orange':'green'));
msg += ' (Score: {score}, {grade})'
.replace('{score}', score).replace('{grade}', grade);
}
$('#pwd-info').html(msg);
$('#pwd-info').removeClass().addClass(infoClass);
},
error: function(data) { alert('Unexpected error'); }
});
}
$(function() {
$('#validate-btn').click(validatePassword);
});The concept is the same as before, only this time it's for the validate-btn button. The body of the AJAX call is similar. We use a POST instead of a GET request, and we define the data as a JSON object, which is the equivalent of using json.dumps({'password': 'some_pwd'}) in Python.
The contentType line is a quick hack to avoid problems with the CORS preflight behavior of the browser. Cross-origin resource sharing (CORS) is a mechanism that allows restricted resources on a web page to be requested from another domain outside of the domain from which the request originated. In a nutshell, since the API is located at 127.0.0.1:5555 and the interface is running at 127.0.0.1:8000, without this hack, the browser wouldn't allow us to perform the calls. In a production environment, you may want to check the documentation for JSONP, which is a much better (albeit more complex) solution to this issue.
The body of the anonymous function which is run if the call succeeds is apparently only a bit complicated. All we need to do is understand if the password is valid (from data['valid']), and assign it a grade and a CSS class based on its score. Validity and score information come from the API response.
The only tricky bit in this code is the JavaScript ternary operator, so let's see a comparative example for it:
# Python error = 'critical' if error_level > 50 else 'medium' // JavaScript equivalent error = (error_level > 50 ? 'critical' : 'medium');
With this example, you shouldn't have any issue reading the rest of the logic in the function. I know, I could have just used a regular if (...), but JavaScript coders use the ternary operator all the time, so you should get used to it. It's good training to scratch our heads a bit harder in order to understand code.
Lastly, I'd like you to take a look at the end of that function. We set the html of the pwd-info span element to the message we assembled (msg), and then we style it. In one line, we remove all the CSS classes from that element (removeClass() with no parameters does that), and we add the infoClass to it. infoClass is either 'red', 'orange', or 'green'. If you go back to the main.css file, you'll see them at the bottom.
Now that we've seen both the template code and the JavaScript to make the calls, let's see a screenshot of the page. We're going to edit the first record, the one about my sister's school.
In the picture, you can see that I updated the password by clicking on the Generate Password button. Then, I saved the record (so you could see the nice message on top), and, finally, I clicked on the Validate Password button.
The result is shown in green on the right-hand side of the Password field. It's strong (23 is actually the maximum score we can get) so the message is displayed in a nice shade of green.
To delete a record, go to the list and click on the delete link. You'll be redirected to a page that asks you for confirmation; you can then choose to proceed and delete the poor record, or to cancel the request and go back to the list page. The template code is the following:
records/templates/records/record_confirm_delete.html
{% extends "records/base.html" %}
{% block title %}Delete record{% endblock title %}
{% block page-content %}
<h1>Confirm Record Deletion</h1>
<form action="." method="post">{% csrf_token %}
<p>Are you sure you want to delete "{{ object }}"?</p>
<input type="submit" value="Confirm" />
<a href="{% url "records:list" %}#record-{{ object.pk }}">
» cancel</a>
</form>
{% endblock page-content %}Since this is a template for a standard Django view, we need to use the naming conventions adopted by Django. Therefore, the record in question is called object in the template. The {{ object }} tag displays a string representation for the object, which is not exactly beautiful at the moment, since the whole line will read: Are you sure you want to delete "Record object"?.
This is because we haven't added a __str__ method to our Model class yet, which means that Python has no idea of what to show us when we ask for a string representation of an instance. Let's change this by completing our model, adding the __str__ method at the bottom of the class body:
records/models.py
class Record(models.Model):
...
def __str__(self):
return '{}'.format(self.title)
Restart the server and now the page will read: Are you sure you want to delete "Some Bank"? where Some Bank is the title of the record whose delete link I clicked on.
We could have just used {{ object.title }}, but I prefer to fix the root of the problem, not just the effect. Adding a __str__ method is in fact something that you ought to do for all of your models.
The interesting bit in this last template is actually the link for canceling the operation. We use the url tag to go back to the list view (records:list), but we add anchor information to it so that it will eventually read something like this (this is for pk=2):
http://127.0.0.1:8000/records/#record-2
This will go back to the list page and scroll down to the container div that has ID record 2, which is nice.
This concludes the interface. Even though this section was similar to what we saw in Chapter 10, Web Development Done Right, we've been able to concentrate more on the code in this chapter. We've seen how useful Django class-based views are, and we even touched on some cool JavaScript. Run $ python manage.py runserver and your interface should be up and running at http://127.0.0.1:8000.
Now it's time to spice things up a bit with the second part of this project.
A simple form
We need a form for the Record model, so we'll use the ModelForm technique we saw in Chapter 10, Web Development Done Right.
records/forms.py
from django.forms import ModelForm, Textarea
from .models import Record
class RecordForm(ModelForm):
class Meta:
model = Record
fields = ['title', 'username', 'email', 'url',
'password', 'notes']
widgets = {'notes': Textarea(
attrs={'cols': 40, 'rows': 4})}We create a RecordForm class that inherits from ModelForm, so that the form is created automatically thanks to the introspection capabilities of Django. We only specify which model to use, which fields to display (we exclude the dates, which are handled automatically) and we provide minimal styling for the dimensions of the notes field, which will be displayed using a Textarea (which is a multiline text field in HTML).
There are a total of five pages in the interface application: home, record list, record creation, record update, and record delete confirmation. Hence, there are five views that we have to write. As you'll see in a moment, Django helps us a lot by giving us views we can reuse with minimum customization. All the code that follows belongs to the records/views.py file.
Just to break the ice, here are the imports and the view for the home page:
from django.contrib import messages
from django.contrib.messages.views import SuccessMessageMixin
from django.core.urlresolvers import reverse_lazy
from django.views.generic import TemplateView
from django.views.generic.edit import (
CreateView, UpdateView, DeleteView)
from .forms import RecordForm
from .models import Record
class HomeView(TemplateView):
template_name = 'records/home.html'We import a few tools from Django. There are a couple of messaging-related objects, a URL lazy reverser, and four different types of view. We also import our Record model and RecordForm. As you can see, the HomeView class consists of only two lines since we only need to specify which template we want to use, the rest just reuses the code from TemplateView, as it is. It's so easy, it almost feels like cheating.
After the home view, we can write a view to list all the Record instances that we have in the database.
class RecordListView(TemplateView):
template_name = 'records/list.html'
def get(self, request, *args, **kwargs):
context = self.get_context_data(**kwargs)
records = Record.objects.all().order_by('title') #1
for record in records:
record.plaintext = record.decrypt(record.password) #2
context['records'] = records
return self.render_to_response(context)All we need to do is sub-class TemplateView again, and override the get method. We need to do a couple of things: we fetch all the records from the database and sort them by title (#1) and then parse all the records in order to add the attribute plaintext (#2) onto each of them, to show the original password on the page. Another way of doing this would be to add a read-only property to the Record model, to do the decryption on the fly. I'll leave it to you, as a fun exercise, to amend the code to do it.
After recovering and augmenting the records, we put them in the context dict and finish as usual by invoking render_to_response.
Here's the code for the creation view:
class EncryptionMixin:
def form_valid(self, form):
self.encrypt_password(form)
return super(EncryptionMixin, self).form_valid(form)
def encrypt_password(self, form):
self.object = form.save(commit=False)
self.object.encrypt_password()
self.object.save()
class RecordCreateView(
EncryptionMixin, SuccessMessageMixin, CreateView):
template_name = 'records/record_add_edit.html'
form_class = RecordForm
success_url = reverse_lazy('records:add')
success_message = 'Record was created successfully'A part of its logic has been factored out in order to be reused later on in the update view. Let's start with EncryptionMixin. All it does is override the form_valid method so that, prior to saving a new Record instance to the database, we make sure we call encrypt_password on the object that results from saving the form. In other words, when the user submits the form to create a new Record, if the form validates successfully, then the form_valid method is invoked. Within this method what usually happens is that an object is created out of the ModelForm instance, like this:
self.object = form.save()
We need to interfere with this behavior because running this code as it is would save the record with the original password, which isn't encrypted. So we change this to call save on the form passing commit=False, which creates the Record instance out of the form, but doesn't attempt to save it in the database. Immediately afterwards, we encrypt the password on that instance and then we can finally call save on it, actually committing it to the database.
Since we need this behavior both for creating and updating records, I have factored it out in a mixin.
Note
Perhaps, a better solution for this password encryption logic is to create a custom Field (inheriting from CharField is the easiest way to do it) and add the necessary logic to it, so that when we handle Record instances from and to the database, the encryption and decryption logic is performed automatically for us. Though more elegant, this solution needs me to digress and explain a lot more about Django internals, which is too much for the extent of this example. As usual, you can try to do it yourself, if you feel like a challenge.
After creating the EncryptionMixin class, we can use it in the RecordCreateView class. We also inherit from two other classes: SuccessMessageMixin and CreateView. The message mixin provides us with the logic to quickly set up a message when creation is successful, and the CreateView gives us the necessary logic to create an object from a form.
You can see that all we have to code is some customization: the template name, the form class, and the success message and URL. Everything else is gracefully handled for us by Django.
The code to update a Record instance is only a tiny bit more complicated. We just need to add some logic to decrypt the password before we populate the form with the record data.
class RecordUpdateView(
EncryptionMixin, SuccessMessageMixin, UpdateView):
template_name = 'records/record_add_edit.html'
form_class = RecordForm
model = Record
success_message = 'Record was updated successfully'
def get_context_data(self, **kwargs):
kwargs['update'] = True
return super(
RecordUpdateView, self).get_context_data(**kwargs)
def form_valid(self, form):
self.success_url = reverse_lazy(
'records:edit',
kwargs={'pk': self.object.pk}
)
return super(RecordUpdateView, self).form_valid(form)
def get_form_kwargs(self):
kwargs = super(RecordUpdateView, self).get_form_kwargs()
kwargs['instance'].decrypt_password()
return kwargsIn this view, we still inherit from both EncryptionMixin and SuccessMessageMixin, but the view class we use is UpdateView.
The first four lines are customization as before, we set the template name, the form class, the Record model, and the success message. We cannot set the success_url as a class attribute because we want to redirect a successful edit to the same edit page for that record and, in order to do this, we need the ID of the instance we're editing. No worries, we'll do it another way.
First, we override get_context_data in order to set 'update' to True in the kwargs argument, which means that a key 'update' will end up in the context dict that is passed to the template for rendering the page. We do this because we want to use the same template for creating and updating a record, therefore we will use this variable in the context to be able to understand in which situation we are. There are other ways to do this but this one is quick and easy and I like it because it's explicit.
After overriding get_context_data, we need to take care of the URL redirection. We do this in the form_valid method since we know that, if we get there, it means the Record instance has been successfully updated. We reverse the 'records:edit' view, which is exactly the view we're working on, passing the primary key of the object in question. We take that information from self.object.pk.
One of the reasons it's helpful to have the object saved on the view instance is that we can use it when needed without having to alter the signature of the many methods in the view in order to pass the object around. This design is very helpful and allows us to achieve a lot with very few lines of code.
The last thing we need to do is to decrypt the password on the instance before populating the form for the user. It's simple enough to do it in the get_form_kwargs method, where you can access the Record instance in the kwargs dict, and call decrypt_password on it.
This is all we need to do to update a record. If you think about it, the amount of code we had to write is really very little, thanks to Django class-based views.
Tip
A good way of understanding which is the best method to override, is to take a look at the Django official documentation or, even better in this case, check out the source code and look at the class-based views section. You'll be able to appreciate how much work has been done there by Django developers so that you only have to touch the smallest amounts of code to customize your views.
Of the three actions, deleting a record is definitely the easiest one. All we need is the following code:
class RecordDeleteView(SuccessMessageMixin, DeleteView):
model = Record
success_url = reverse_lazy('records:list')
def delete(self, request, *args, **kwargs):
messages.success(
request, 'Record was deleted successfully')
return super(RecordDeleteView, self).delete(
request, *args, **kwargs)We only need to inherit from SuccessMessageMixin and DeleteView, which gives us all we need. We set up the model and the success URL as class attributes, and then we override the delete method only to add a nice message that will be displayed in the list view (which is where we redirect to after deletion).
We don't need to specify the template name, since we'll use a name that Django infers by default: record_confirm_delete.html.
With this final view, we're all set to have a nice interface that we can use to handle Record instances.
Before we move on to the template layer, let's set up the URLs. This time, I want to show you the inclusion technique I talked about in Chapter 10, Web Development Done Right.
pwdweb/urls.py
from django.conf.urls import include, url
from django.contrib import admin
from records import urls as records_url
from records.views import HomeView
urlpatterns = [
url(r'^admin/', include(admin.site.urls)),
url(r'^records/', include(records_url, namespace='records')),
url(r'^$', HomeView.as_view(), name='home'),
]These are the URLs for the main project. We have the usual admin, a home page, and then for the records section, we include another urls.py file, which we define in the records application. This technique allows for apps to be reusable and self-contained. Note that, when including another urls.py file, you can pass namespace information, which you can then use in functions such as reverse, or the url template tag. For example, we've seen that the path to the RecordUpdateView was 'records:edit'. The first part of that string is the namespace, and the second is the name that we have given to the view, as you can see in the following code:
records/urls.py
from django.conf.urls import include, url
from django.contrib import admin
from .views import (RecordCreateView, RecordUpdateView,
RecordDeleteView, RecordListView)
urlpatterns = [
url(r'^add/$', RecordCreateView.as_view(), name='add'),
url(r'^edit/(?P<pk>[0-9]+)/$', RecordUpdateView.as_view(),
name='edit'),
url(r'^delete/(?P<pk>[0-9]+)/$', RecordDeleteView.as_view(),
name='delete'),
url(r'^$', RecordListView.as_view(), name='list'),
]We define four different url instances. There is one for adding a record, which doesn't need primary key information since the object doesn't exist yet. Then we have two url instances for updating and deleting a record, and for those we need to also specify primary key information to be passed to the view. Since Record instances have integer IDs, we can safely pass them on the URL, following good URL design practice. Finally, we define one url instance for the list of records.
All url instances have name information which is used in views and templates.
Let's start with the template we'll use as the basis for the rest:
records/templates/records/base.html
{% load static from staticfiles %}
<!DOCTYPE html>
<html lang="en">
<head>
<meta charset="utf-8">
<meta name="viewport"
content="width=device-width, initial-scale=1.0">
<link href="{% static "records/css/main.css" %}"
rel="stylesheet">
<title>{% block title %}Title{% endblock title %}</title>
</head>
<body>
<div id="page-content">
{% block page-content %}{% endblock page-content %}
</div>
<div id="footer">{% block footer %}{% endblock footer %}</div>
{% block scripts %}
<script
src="{% static "records/js/jquery-2.1.4.min.js" %}">
</script>
{% endblock scripts %}
</body>
</html>It's very similar to the one I used in Chapter 10, Web Development Done Right although it is a bit more compressed and with one major difference. We will import jQuery in every page.
Note
jQuery is the most popular JavaScript library out there. It allows you to write code that works on all the main browsers and it gives you many extra tools such as the ability to perform asynchronous calls (AJAX) from the browser itself. We'll use this library to perform the calls to the API, both to generate and validate our passwords. You can download it at https://jquery.com/, and put it in the pwdweb/records/static/records/js/ folder (you may have to amend the import in the template).
I highlighted the only interesting part of this template for you. Note that we load the JavaScript library at the end. This is common practice, as JavaScript is used to manipulate the page, so loading libraries at the end helps in avoiding situations such as JavaScript code failing because the element needed hadn't been rendered on the page yet.
The home template is very simple:
records/templates/records/home.html
{% extends "records/base.html" %}
{% block title %}Welcome to the Records website.{% endblock %}
{% block page-content %}
<h1>Welcome {{ user.first_name }}!</h1>
<div class="home-option">To create a record click
<a href="{% url "records:add" %}">here.</a>
</div>
<div class="home-option">To see all records click
<a href="{% url "records:list" %}">here.</a>
</div>
{% endblock page-content %}There is nothing new here when compared to the home.html template we saw in Chapter 10, Web Development Done Right. The footer template is actually exactly the same:
records/templates/records/footer.html
<div class="footer">
Go back <a href="{% url "home" %}">home</a>.
</div>This template to list all records is fairly simple:
records/templates/records/list.html
{% extends "records/base.html" %}
{% load record_extras %}
{% block title %}Records{% endblock title %}
{% block page-content %}
<h1>Records</h1><span name="top"></span>
{% include "records/messages.html" %}
{% for record in records %}
<div class="record {% cycle 'row-light-blue' 'row-white' %}"
id="record-{{ record.pk }}">
<div class="record-left">
<div class="record-list">
<span class="record-span">Title</span>{{ record.title }}
</div>
<div class="record-list">
<span class="record-span">Username</span>
{{ record.username }}
</div>
<div class="record-list">
<span class="record-span">Email</span>{{ record.email }}
</div>
<div class="record-list">
<span class="record-span">URL</span>
<a href="{{ record.url }}" target="_blank">
{{ record.url }}</a>
</div>
<div class="record-list">
<span class="record-span">Password</span>
{% hide_password record.plaintext %}
</div>
</div>
<div class="record-right">
<div class="record-list">
<span class="record-span">Notes</span>
<textarea rows="3" cols="40" class="record-notes"
readonly>{{ record.notes }}</textarea>
</div>
<div class="record-list">
<span class="record-span">Last modified</span>
{{ record.last_modified }}
</div>
<div class="record-list">
<span class="record-span">Created</span>
{{ record.created }}
</div>
</div>
<div class="record-list-actions">
<a href="{% url "records:edit" pk=record.pk %}">» edit</a>
<a href="{% url "records:delete" pk=record.pk %}">» delete
</a>
</div>
</div>
{% endfor %}
{% endblock page-content %}
{% block footer %}
<p><a href="#top">Go back to top</a></p>
{% include "records/footer.html" %}
{% endblock footer %}For this template as well, I have highlighted the parts I'd like you to focus on. Firstly, I load a custom tags module, record_extras, which we'll need later. I have also added an anchor at the top, so that we'll be able to put a link to it at the bottom of the page, to avoid having to scroll all the way up.
Then, I included a template to provide me with the HTML code to display Django messages. It's a very simple template which I'll show you shortly.
Then, we define a list of div elements. Each Record instance has a container div, in which there are two other main div elements: record-left and record-right. In order to display them side by side, I have set this class in the main.css file:
.record-left { float: left; width: 300px;}The outermost div container (the one with class record), has an id attribute, which I have used as an anchor. This allows us to click on cancel on the record delete page, so that if we change our minds and don't want to delete the record, we can get back to the list page, and at the right position.
Each attribute of the record is then displayed in div elements whose class is record-list. Most of these classes are just there to allow me to set a bit of padding and dimensions on the HTML elements.
The next interesting bit is the hide_password tag, which takes the plaintext, which is the unencrypted password. The purpose of this custom tag is to display a sequence of '*' characters, as long as the original password, so that if someone is passing by while you're on the page, they won't see your passwords. However, hovering on that sequence of '*' characters will show you the original password in the tooltip. Here's the code for the hide_password tag:
records/templatetags/record_extras.py
from django import template
from django.utils.html import escape
register = template.Library()
@register.simple_tag
def hide_password(password):
return '<span title="{0}">{1}</span>'.format(
escape(password), '*' * len(password))There is nothing fancy here. We just register this function as a simple tag and then we can use it wherever we want. It takes a password and puts it as a tooltip of a span element, whose main content is a sequence of '*' characters. Just note one thing: we need to escape the password, so that we're sure it won't break our HTML (think of what might happen if the password contained a double-quote `"`, for example).
As far as the list.html template is concerned, the next interesting bit is that we set the readonly attribute to the textarea element, so as not to give the impression to the user that they can modify notes on the fly.
Then, we set a couple of links for each Record instance, right at the bottom of the container div. There is one for the edit page, and another for the delete page. Note that we need to pass the url tag not only the namespace:name string, but also the primary key information, as required by the URL setup we made in the urls.py module for those views.
Finally, we import the footer and set the link to the anchor on top of the page.
Now, as promised, here is the code for the messages:
records/templates/records/messages.html
{% if messages %}
{% for message in messages %}
<p class="{{ message.tags }}">{{ message }}</p>
{% endfor %}
{% endif %}This code takes care of displaying messages only when there is at least one to display. We give the p tag class information to display success messages in green and error messages in red.
If you grab the main.css file from the source code for the book, you will now be able to visualize the list page (yours will be blank, you still need to insert data into it), and it should look something like this:
As you can see, I have two records in the database at the moment. I'm hovering on the password of the first one, which is my platform account at my sister's school, and the password is displayed in the tooltip. The division in two div elements, left and right, helps in making rows smaller so that the overall result is more pleasing to the eye. The important information is on the left and the ancillary information is on the right. The row color alternates between a very light shade of blue and white.
Each row has an edit and delete link, at its bottom left. We'll show the pages for those two links right after we see the code for the templates that create them.
The CSS code that holds all the information for this interface is the following:
records/static/records/css/main.css
html, body, * {
font-family: 'Trebuchet MS', Helvetica, sans-serif; }
a { color: #333; }
.record {
clear: both; padding: 1em; border-bottom: 1px solid #666;}
.record-left { float: left; width: 300px;}
.record-list { padding: 2px 0; }
.fieldWrapper { padding: 5px; }
.footer { margin-top: 1em; color: #333; }
.home-option { padding: .6em 0; }
.record-span { font-weight: bold; padding-right: 1em; }
.record-notes { vertical-align: top; }
.record-list-actions { padding: 4px 0; clear: both; }
.record-list-actions a { padding: 0 4px; }
#pwd-info { padding: 0 6px; font-size: 1.1em; font-weight: bold;}
#id_notes { vertical-align: top; }
/* Messages */
.success, .errorlist {font-size: 1.2em; font-weight: bold; }
.success {color: #25B725; }
.errorlist {color: #B12B2B; }
/* colors */
.row-light-blue { background-color: #E6F0FA; }
.row-white { background-color: #fff; }
.green { color: #060; }
.orange { color: #FF3300; }
.red { color: #900; }Please remember, I'm not a CSS guru so just take this file as it is, a fairly naive way to provide styling to our interface.
Now for the interesting part. Creating and updating a record. We'll use the same template for both, so we expect some decisional logic to be there that will tell us in which of the two situations we are. As it turns out, it will not be that much code. The most exciting part of this template, however, is its associated JavaScript file which we'll examine right afterwards.
records/templates/records/record_add_edit.html
{% extends "records/base.html" %}
{% load static from staticfiles %}
{% block title %}
{% if update %}Update{% else %}Create{% endif %} Record
{% endblock title %}
{% block page-content %}
<h1>{% if update %}Update a{% else %}Create a new{% endif %}
Record
</h1>
{% include "records/messages.html" %}
<form action="." method="post">{% csrf_token %}
{{ form.non_field_errors }}
<div class="fieldWrapper">{{ form.title.errors }}
{{ form.title.label_tag }} {{ form.title }}</div>
<div class="fieldWrapper">{{ form.username.errors }}
{{ form.username.label_tag }} {{ form.username }}</div>
<div class="fieldWrapper">{{ form.email.errors }}
{{ form.email.label_tag }} {{ form.email }}</div>
<div class="fieldWrapper">{{ form.url.errors }}
{{ form.url.label_tag }} {{ form.url }}</div>
<div class="fieldWrapper">{{ form.password.errors }}
{{ form.password.label_tag }} {{ form.password }}
<span id="pwd-info"></span></div>
<button type="button" id="validate-btn">
Validate Password</button>
<button type="button" id="generate-btn">
Generate Password</button>
<div class="fieldWrapper">{{ form.notes.errors }}
{{ form.notes.label_tag }} {{ form.notes }}</div>
<input type="submit"
value="{% if update %}Update{% else %}Insert{% endif %}">
</form>
{% endblock page-content %}
{% block footer %}
<br>{% include "records/footer.html" %}<br>
Go to <a href="{% url "records:list" %}">the records list</a>.
{% endblock footer %}
{% block scripts %}
{{ block.super }}
<script src="{% static "records/js/api.js" %}"></script>
{% endblock scripts %}As usual, I have highlighted the important parts, so let's go through this code together.
You can see the first bit of decision logic in the title block. Similar decision logic is also displayed later on, in the header of the page (the h1 HTML tag), and in the submit button at the end of the form.
Apart from this logic, what I'd like you to focus on is the form and what's inside it. We set the action attribute to a dot, which means this page, so that we don't need to customize it according to which view is serving the page. Also, we immediately take care of the cross-site request forgery token, as explained in Chapter 10, Web Development Done Right.
Note that, this time, we cannot leave the whole form rendering up to Django since we want to add in a couple of extra things, so we go down one level of granularity and ask Django to render each individual field for us, along with any errors, along with its label. This way we still save a lot of effort, and at the same time, we can also customize the form as we like. In situations like this, it's not uncommon to write a small template to render a field, in order to avoid repeating those three lines for each field. In this case though, the form is so small I decided to avoid raising the complexity level up any further.
The span element, pwd-info, contains the information about the password that we get from the API. The two buttons after that, validate-btn and generate-btn, are hooked up with the AJAX calls to the API.
At the end of the template, in the scripts block, we need to load the api.js JavaScript file which contains the code to work with the API. We also need to use block.super, which will load whatever code is in the same block in the parent template (for example, jQuery). block.super is basically the template equivalent of a call to super(ClassName, self) in Python. It's important to load jQuery before our library, since the latter is based on the former.
Let's now take a look at that JavaScript. I don't expect you to understand everything. Firstly, this is a Python book and secondly, you're supposed to be a beginner (though by now, ninja trained), so fear not. However, as JavaScript has, by now, become essential if you're dealing with a web environment, having a working knowledge of it is extremely important even for a Python developer, so try and get the most out of what I'm about to show you. We'll see the password generation first:
records/static/records/js/api.js
var baseURL = 'http://127.0.0.1:5555/password';
var getRandomPassword = function() {
var apiURL = '{url}/generate'.replace('{url}', baseURL);
$.ajax({
type: 'GET',
url: apiURL,
success: function(data, status, request) {
$('#id_password').val(data[1]);
},
error: function() { alert('Unexpected error'); }
});
}
$(function() {
$('#generate-btn').click(getRandomPassword);
});Firstly, we set a variable for the base API URL: baseURL. Then, we define the getRandomPassword function, which is very simple. At the beginning, it defines the apiURL extending baseURL with a replacement technique. Even if the syntax is different from that of Python, you shouldn't have any issues understanding this line.
After defining the apiURL, the interesting bit comes up. We call $.ajax, which is the jQuery function that performs the AJAX calls. That $ is a shortcut for jQuery. As you can see in the body of the call, it's a GET request to apiURL. If it succeeds (success: ...), an anonymous function is run, which sets the value of the id_password text field to the second element of the returned data. We'll see the structure of the data when we examine the API code, so don't worry about that now. If an error occurs, we simply alert the user that there was an unexpected error.
After the function definition, we run a couple of lines of code to bind the click event on the generate-btn button to the getRandomPassword function. This means that, after this code has been run by the browser engine, every time we click the generate-btn button, the getRandomPassword function is called.
That wasn't so scary, was it? So let's see what we need for the validation part.
Now there is a value in the password field and we want to validate it. We need to call the API and inspect its response. Since passwords can have weird characters, I don't want to pass them on the URL, therefore I will use a POST request, which allows me to put the password in its body. To do this, I need the following code:
var validatePassword = function() {
var apiURL = '{url}/validate'.replace('{url}', baseURL);
$.ajax({
type: 'POST',
url: apiURL,
data: JSON.stringify({'password': $('#id_password').val()}),
contentType: "text/plain", // Avoid CORS preflight
success: function(data, status, request) {
var valid = data['valid'], infoClass, grade;
var msg = (valid?'Valid':'Invalid') + ' password.';
if (valid) {
var score = data['score']['total'];
grade = (score<10?'Poor':(score<18?'Medium':'Strong'));
infoClass = (score<10?'red':(score<18?'orange':'green'));
msg += ' (Score: {score}, {grade})'
.replace('{score}', score).replace('{grade}', grade);
}
$('#pwd-info').html(msg);
$('#pwd-info').removeClass().addClass(infoClass);
},
error: function(data) { alert('Unexpected error'); }
});
}
$(function() {
$('#validate-btn').click(validatePassword);
});The concept is the same as before, only this time it's for the validate-btn button. The body of the AJAX call is similar. We use a POST instead of a GET request, and we define the data as a JSON object, which is the equivalent of using json.dumps({'password': 'some_pwd'}) in Python.
The contentType line is a quick hack to avoid problems with the CORS preflight behavior of the browser. Cross-origin resource sharing (CORS) is a mechanism that allows restricted resources on a web page to be requested from another domain outside of the domain from which the request originated. In a nutshell, since the API is located at 127.0.0.1:5555 and the interface is running at 127.0.0.1:8000, without this hack, the browser wouldn't allow us to perform the calls. In a production environment, you may want to check the documentation for JSONP, which is a much better (albeit more complex) solution to this issue.
The body of the anonymous function which is run if the call succeeds is apparently only a bit complicated. All we need to do is understand if the password is valid (from data['valid']), and assign it a grade and a CSS class based on its score. Validity and score information come from the API response.
The only tricky bit in this code is the JavaScript ternary operator, so let's see a comparative example for it:
# Python error = 'critical' if error_level > 50 else 'medium' // JavaScript equivalent error = (error_level > 50 ? 'critical' : 'medium');
With this example, you shouldn't have any issue reading the rest of the logic in the function. I know, I could have just used a regular if (...), but JavaScript coders use the ternary operator all the time, so you should get used to it. It's good training to scratch our heads a bit harder in order to understand code.
Lastly, I'd like you to take a look at the end of that function. We set the html of the pwd-info span element to the message we assembled (msg), and then we style it. In one line, we remove all the CSS classes from that element (removeClass() with no parameters does that), and we add the infoClass to it. infoClass is either 'red', 'orange', or 'green'. If you go back to the main.css file, you'll see them at the bottom.
Now that we've seen both the template code and the JavaScript to make the calls, let's see a screenshot of the page. We're going to edit the first record, the one about my sister's school.
In the picture, you can see that I updated the password by clicking on the Generate Password button. Then, I saved the record (so you could see the nice message on top), and, finally, I clicked on the Validate Password button.
The result is shown in green on the right-hand side of the Password field. It's strong (23 is actually the maximum score we can get) so the message is displayed in a nice shade of green.
To delete a record, go to the list and click on the delete link. You'll be redirected to a page that asks you for confirmation; you can then choose to proceed and delete the poor record, or to cancel the request and go back to the list page. The template code is the following:
records/templates/records/record_confirm_delete.html
{% extends "records/base.html" %}
{% block title %}Delete record{% endblock title %}
{% block page-content %}
<h1>Confirm Record Deletion</h1>
<form action="." method="post">{% csrf_token %}
<p>Are you sure you want to delete "{{ object }}"?</p>
<input type="submit" value="Confirm" />
<a href="{% url "records:list" %}#record-{{ object.pk }}">
» cancel</a>
</form>
{% endblock page-content %}Since this is a template for a standard Django view, we need to use the naming conventions adopted by Django. Therefore, the record in question is called object in the template. The {{ object }} tag displays a string representation for the object, which is not exactly beautiful at the moment, since the whole line will read: Are you sure you want to delete "Record object"?.
This is because we haven't added a __str__ method to our Model class yet, which means that Python has no idea of what to show us when we ask for a string representation of an instance. Let's change this by completing our model, adding the __str__ method at the bottom of the class body:
records/models.py
class Record(models.Model):
...
def __str__(self):
return '{}'.format(self.title)
Restart the server and now the page will read: Are you sure you want to delete "Some Bank"? where Some Bank is the title of the record whose delete link I clicked on.
We could have just used {{ object.title }}, but I prefer to fix the root of the problem, not just the effect. Adding a __str__ method is in fact something that you ought to do for all of your models.
The interesting bit in this last template is actually the link for canceling the operation. We use the url tag to go back to the list view (records:list), but we add anchor information to it so that it will eventually read something like this (this is for pk=2):
http://127.0.0.1:8000/records/#record-2
This will go back to the list page and scroll down to the container div that has ID record 2, which is nice.
This concludes the interface. Even though this section was similar to what we saw in Chapter 10, Web Development Done Right, we've been able to concentrate more on the code in this chapter. We've seen how useful Django class-based views are, and we even touched on some cool JavaScript. Run $ python manage.py runserver and your interface should be up and running at http://127.0.0.1:8000.
Now it's time to spice things up a bit with the second part of this project.
The view layer
There are a total of five pages in the interface application: home, record list, record creation, record update, and record delete confirmation. Hence, there are five views that we have to write. As you'll see in a moment, Django helps us a lot by giving us views we can reuse with minimum customization. All the code that follows belongs to the records/views.py file.
Just to break the ice, here are the imports and the view for the home page:
from django.contrib import messages
from django.contrib.messages.views import SuccessMessageMixin
from django.core.urlresolvers import reverse_lazy
from django.views.generic import TemplateView
from django.views.generic.edit import (
CreateView, UpdateView, DeleteView)
from .forms import RecordForm
from .models import Record
class HomeView(TemplateView):
template_name = 'records/home.html'We import a few tools from Django. There are a couple of messaging-related objects, a URL lazy reverser, and four different types of view. We also import our Record model and RecordForm. As you can see, the HomeView class consists of only two lines since we only need to specify which template we want to use, the rest just reuses the code from TemplateView, as it is. It's so easy, it almost feels like cheating.
After the home view, we can write a view to list all the Record instances that we have in the database.
class RecordListView(TemplateView):
template_name = 'records/list.html'
def get(self, request, *args, **kwargs):
context = self.get_context_data(**kwargs)
records = Record.objects.all().order_by('title') #1
for record in records:
record.plaintext = record.decrypt(record.password) #2
context['records'] = records
return self.render_to_response(context)All we need to do is sub-class TemplateView again, and override the get method. We need to do a couple of things: we fetch all the records from the database and sort them by title (#1) and then parse all the records in order to add the attribute plaintext (#2) onto each of them, to show the original password on the page. Another way of doing this would be to add a read-only property to the Record model, to do the decryption on the fly. I'll leave it to you, as a fun exercise, to amend the code to do it.
After recovering and augmenting the records, we put them in the context dict and finish as usual by invoking render_to_response.
Here's the code for the creation view:
class EncryptionMixin:
def form_valid(self, form):
self.encrypt_password(form)
return super(EncryptionMixin, self).form_valid(form)
def encrypt_password(self, form):
self.object = form.save(commit=False)
self.object.encrypt_password()
self.object.save()
class RecordCreateView(
EncryptionMixin, SuccessMessageMixin, CreateView):
template_name = 'records/record_add_edit.html'
form_class = RecordForm
success_url = reverse_lazy('records:add')
success_message = 'Record was created successfully'A part of its logic has been factored out in order to be reused later on in the update view. Let's start with EncryptionMixin. All it does is override the form_valid method so that, prior to saving a new Record instance to the database, we make sure we call encrypt_password on the object that results from saving the form. In other words, when the user submits the form to create a new Record, if the form validates successfully, then the form_valid method is invoked. Within this method what usually happens is that an object is created out of the ModelForm instance, like this:
self.object = form.save()
We need to interfere with this behavior because running this code as it is would save the record with the original password, which isn't encrypted. So we change this to call save on the form passing commit=False, which creates the Record instance out of the form, but doesn't attempt to save it in the database. Immediately afterwards, we encrypt the password on that instance and then we can finally call save on it, actually committing it to the database.
Since we need this behavior both for creating and updating records, I have factored it out in a mixin.
Note
Perhaps, a better solution for this password encryption logic is to create a custom Field (inheriting from CharField is the easiest way to do it) and add the necessary logic to it, so that when we handle Record instances from and to the database, the encryption and decryption logic is performed automatically for us. Though more elegant, this solution needs me to digress and explain a lot more about Django internals, which is too much for the extent of this example. As usual, you can try to do it yourself, if you feel like a challenge.
After creating the EncryptionMixin class, we can use it in the RecordCreateView class. We also inherit from two other classes: SuccessMessageMixin and CreateView. The message mixin provides us with the logic to quickly set up a message when creation is successful, and the CreateView gives us the necessary logic to create an object from a form.
You can see that all we have to code is some customization: the template name, the form class, and the success message and URL. Everything else is gracefully handled for us by Django.
The code to update a Record instance is only a tiny bit more complicated. We just need to add some logic to decrypt the password before we populate the form with the record data.
class RecordUpdateView(
EncryptionMixin, SuccessMessageMixin, UpdateView):
template_name = 'records/record_add_edit.html'
form_class = RecordForm
model = Record
success_message = 'Record was updated successfully'
def get_context_data(self, **kwargs):
kwargs['update'] = True
return super(
RecordUpdateView, self).get_context_data(**kwargs)
def form_valid(self, form):
self.success_url = reverse_lazy(
'records:edit',
kwargs={'pk': self.object.pk}
)
return super(RecordUpdateView, self).form_valid(form)
def get_form_kwargs(self):
kwargs = super(RecordUpdateView, self).get_form_kwargs()
kwargs['instance'].decrypt_password()
return kwargsIn this view, we still inherit from both EncryptionMixin and SuccessMessageMixin, but the view class we use is UpdateView.
The first four lines are customization as before, we set the template name, the form class, the Record model, and the success message. We cannot set the success_url as a class attribute because we want to redirect a successful edit to the same edit page for that record and, in order to do this, we need the ID of the instance we're editing. No worries, we'll do it another way.
First, we override get_context_data in order to set 'update' to True in the kwargs argument, which means that a key 'update' will end up in the context dict that is passed to the template for rendering the page. We do this because we want to use the same template for creating and updating a record, therefore we will use this variable in the context to be able to understand in which situation we are. There are other ways to do this but this one is quick and easy and I like it because it's explicit.
After overriding get_context_data, we need to take care of the URL redirection. We do this in the form_valid method since we know that, if we get there, it means the Record instance has been successfully updated. We reverse the 'records:edit' view, which is exactly the view we're working on, passing the primary key of the object in question. We take that information from self.object.pk.
One of the reasons it's helpful to have the object saved on the view instance is that we can use it when needed without having to alter the signature of the many methods in the view in order to pass the object around. This design is very helpful and allows us to achieve a lot with very few lines of code.
The last thing we need to do is to decrypt the password on the instance before populating the form for the user. It's simple enough to do it in the get_form_kwargs method, where you can access the Record instance in the kwargs dict, and call decrypt_password on it.
This is all we need to do to update a record. If you think about it, the amount of code we had to write is really very little, thanks to Django class-based views.
Tip
A good way of understanding which is the best method to override, is to take a look at the Django official documentation or, even better in this case, check out the source code and look at the class-based views section. You'll be able to appreciate how much work has been done there by Django developers so that you only have to touch the smallest amounts of code to customize your views.
Of the three actions, deleting a record is definitely the easiest one. All we need is the following code:
class RecordDeleteView(SuccessMessageMixin, DeleteView):
model = Record
success_url = reverse_lazy('records:list')
def delete(self, request, *args, **kwargs):
messages.success(
request, 'Record was deleted successfully')
return super(RecordDeleteView, self).delete(
request, *args, **kwargs)We only need to inherit from SuccessMessageMixin and DeleteView, which gives us all we need. We set up the model and the success URL as class attributes, and then we override the delete method only to add a nice message that will be displayed in the list view (which is where we redirect to after deletion).
We don't need to specify the template name, since we'll use a name that Django infers by default: record_confirm_delete.html.
With this final view, we're all set to have a nice interface that we can use to handle Record instances.
Before we move on to the template layer, let's set up the URLs. This time, I want to show you the inclusion technique I talked about in Chapter 10, Web Development Done Right.
pwdweb/urls.py
from django.conf.urls import include, url
from django.contrib import admin
from records import urls as records_url
from records.views import HomeView
urlpatterns = [
url(r'^admin/', include(admin.site.urls)),
url(r'^records/', include(records_url, namespace='records')),
url(r'^$', HomeView.as_view(), name='home'),
]These are the URLs for the main project. We have the usual admin, a home page, and then for the records section, we include another urls.py file, which we define in the records application. This technique allows for apps to be reusable and self-contained. Note that, when including another urls.py file, you can pass namespace information, which you can then use in functions such as reverse, or the url template tag. For example, we've seen that the path to the RecordUpdateView was 'records:edit'. The first part of that string is the namespace, and the second is the name that we have given to the view, as you can see in the following code:
records/urls.py
from django.conf.urls import include, url
from django.contrib import admin
from .views import (RecordCreateView, RecordUpdateView,
RecordDeleteView, RecordListView)
urlpatterns = [
url(r'^add/$', RecordCreateView.as_view(), name='add'),
url(r'^edit/(?P<pk>[0-9]+)/$', RecordUpdateView.as_view(),
name='edit'),
url(r'^delete/(?P<pk>[0-9]+)/$', RecordDeleteView.as_view(),
name='delete'),
url(r'^$', RecordListView.as_view(), name='list'),
]We define four different url instances. There is one for adding a record, which doesn't need primary key information since the object doesn't exist yet. Then we have two url instances for updating and deleting a record, and for those we need to also specify primary key information to be passed to the view. Since Record instances have integer IDs, we can safely pass them on the URL, following good URL design practice. Finally, we define one url instance for the list of records.
All url instances have name information which is used in views and templates.
Let's start with the template we'll use as the basis for the rest:
records/templates/records/base.html
{% load static from staticfiles %}
<!DOCTYPE html>
<html lang="en">
<head>
<meta charset="utf-8">
<meta name="viewport"
content="width=device-width, initial-scale=1.0">
<link href="{% static "records/css/main.css" %}"
rel="stylesheet">
<title>{% block title %}Title{% endblock title %}</title>
</head>
<body>
<div id="page-content">
{% block page-content %}{% endblock page-content %}
</div>
<div id="footer">{% block footer %}{% endblock footer %}</div>
{% block scripts %}
<script
src="{% static "records/js/jquery-2.1.4.min.js" %}">
</script>
{% endblock scripts %}
</body>
</html>It's very similar to the one I used in Chapter 10, Web Development Done Right although it is a bit more compressed and with one major difference. We will import jQuery in every page.
Note
jQuery is the most popular JavaScript library out there. It allows you to write code that works on all the main browsers and it gives you many extra tools such as the ability to perform asynchronous calls (AJAX) from the browser itself. We'll use this library to perform the calls to the API, both to generate and validate our passwords. You can download it at https://jquery.com/, and put it in the pwdweb/records/static/records/js/ folder (you may have to amend the import in the template).
I highlighted the only interesting part of this template for you. Note that we load the JavaScript library at the end. This is common practice, as JavaScript is used to manipulate the page, so loading libraries at the end helps in avoiding situations such as JavaScript code failing because the element needed hadn't been rendered on the page yet.
The home template is very simple:
records/templates/records/home.html
{% extends "records/base.html" %}
{% block title %}Welcome to the Records website.{% endblock %}
{% block page-content %}
<h1>Welcome {{ user.first_name }}!</h1>
<div class="home-option">To create a record click
<a href="{% url "records:add" %}">here.</a>
</div>
<div class="home-option">To see all records click
<a href="{% url "records:list" %}">here.</a>
</div>
{% endblock page-content %}There is nothing new here when compared to the home.html template we saw in Chapter 10, Web Development Done Right. The footer template is actually exactly the same:
records/templates/records/footer.html
<div class="footer">
Go back <a href="{% url "home" %}">home</a>.
</div>This template to list all records is fairly simple:
records/templates/records/list.html
{% extends "records/base.html" %}
{% load record_extras %}
{% block title %}Records{% endblock title %}
{% block page-content %}
<h1>Records</h1><span name="top"></span>
{% include "records/messages.html" %}
{% for record in records %}
<div class="record {% cycle 'row-light-blue' 'row-white' %}"
id="record-{{ record.pk }}">
<div class="record-left">
<div class="record-list">
<span class="record-span">Title</span>{{ record.title }}
</div>
<div class="record-list">
<span class="record-span">Username</span>
{{ record.username }}
</div>
<div class="record-list">
<span class="record-span">Email</span>{{ record.email }}
</div>
<div class="record-list">
<span class="record-span">URL</span>
<a href="{{ record.url }}" target="_blank">
{{ record.url }}</a>
</div>
<div class="record-list">
<span class="record-span">Password</span>
{% hide_password record.plaintext %}
</div>
</div>
<div class="record-right">
<div class="record-list">
<span class="record-span">Notes</span>
<textarea rows="3" cols="40" class="record-notes"
readonly>{{ record.notes }}</textarea>
</div>
<div class="record-list">
<span class="record-span">Last modified</span>
{{ record.last_modified }}
</div>
<div class="record-list">
<span class="record-span">Created</span>
{{ record.created }}
</div>
</div>
<div class="record-list-actions">
<a href="{% url "records:edit" pk=record.pk %}">» edit</a>
<a href="{% url "records:delete" pk=record.pk %}">» delete
</a>
</div>
</div>
{% endfor %}
{% endblock page-content %}
{% block footer %}
<p><a href="#top">Go back to top</a></p>
{% include "records/footer.html" %}
{% endblock footer %}For this template as well, I have highlighted the parts I'd like you to focus on. Firstly, I load a custom tags module, record_extras, which we'll need later. I have also added an anchor at the top, so that we'll be able to put a link to it at the bottom of the page, to avoid having to scroll all the way up.
Then, I included a template to provide me with the HTML code to display Django messages. It's a very simple template which I'll show you shortly.
Then, we define a list of div elements. Each Record instance has a container div, in which there are two other main div elements: record-left and record-right. In order to display them side by side, I have set this class in the main.css file:
.record-left { float: left; width: 300px;}The outermost div container (the one with class record), has an id attribute, which I have used as an anchor. This allows us to click on cancel on the record delete page, so that if we change our minds and don't want to delete the record, we can get back to the list page, and at the right position.
Each attribute of the record is then displayed in div elements whose class is record-list. Most of these classes are just there to allow me to set a bit of padding and dimensions on the HTML elements.
The next interesting bit is the hide_password tag, which takes the plaintext, which is the unencrypted password. The purpose of this custom tag is to display a sequence of '*' characters, as long as the original password, so that if someone is passing by while you're on the page, they won't see your passwords. However, hovering on that sequence of '*' characters will show you the original password in the tooltip. Here's the code for the hide_password tag:
records/templatetags/record_extras.py
from django import template
from django.utils.html import escape
register = template.Library()
@register.simple_tag
def hide_password(password):
return '<span title="{0}">{1}</span>'.format(
escape(password), '*' * len(password))There is nothing fancy here. We just register this function as a simple tag and then we can use it wherever we want. It takes a password and puts it as a tooltip of a span element, whose main content is a sequence of '*' characters. Just note one thing: we need to escape the password, so that we're sure it won't break our HTML (think of what might happen if the password contained a double-quote `"`, for example).
As far as the list.html template is concerned, the next interesting bit is that we set the readonly attribute to the textarea element, so as not to give the impression to the user that they can modify notes on the fly.
Then, we set a couple of links for each Record instance, right at the bottom of the container div. There is one for the edit page, and another for the delete page. Note that we need to pass the url tag not only the namespace:name string, but also the primary key information, as required by the URL setup we made in the urls.py module for those views.
Finally, we import the footer and set the link to the anchor on top of the page.
Now, as promised, here is the code for the messages:
records/templates/records/messages.html
{% if messages %}
{% for message in messages %}
<p class="{{ message.tags }}">{{ message }}</p>
{% endfor %}
{% endif %}This code takes care of displaying messages only when there is at least one to display. We give the p tag class information to display success messages in green and error messages in red.
If you grab the main.css file from the source code for the book, you will now be able to visualize the list page (yours will be blank, you still need to insert data into it), and it should look something like this:
As you can see, I have two records in the database at the moment. I'm hovering on the password of the first one, which is my platform account at my sister's school, and the password is displayed in the tooltip. The division in two div elements, left and right, helps in making rows smaller so that the overall result is more pleasing to the eye. The important information is on the left and the ancillary information is on the right. The row color alternates between a very light shade of blue and white.
Each row has an edit and delete link, at its bottom left. We'll show the pages for those two links right after we see the code for the templates that create them.
The CSS code that holds all the information for this interface is the following:
records/static/records/css/main.css
html, body, * {
font-family: 'Trebuchet MS', Helvetica, sans-serif; }
a { color: #333; }
.record {
clear: both; padding: 1em; border-bottom: 1px solid #666;}
.record-left { float: left; width: 300px;}
.record-list { padding: 2px 0; }
.fieldWrapper { padding: 5px; }
.footer { margin-top: 1em; color: #333; }
.home-option { padding: .6em 0; }
.record-span { font-weight: bold; padding-right: 1em; }
.record-notes { vertical-align: top; }
.record-list-actions { padding: 4px 0; clear: both; }
.record-list-actions a { padding: 0 4px; }
#pwd-info { padding: 0 6px; font-size: 1.1em; font-weight: bold;}
#id_notes { vertical-align: top; }
/* Messages */
.success, .errorlist {font-size: 1.2em; font-weight: bold; }
.success {color: #25B725; }
.errorlist {color: #B12B2B; }
/* colors */
.row-light-blue { background-color: #E6F0FA; }
.row-white { background-color: #fff; }
.green { color: #060; }
.orange { color: #FF3300; }
.red { color: #900; }Please remember, I'm not a CSS guru so just take this file as it is, a fairly naive way to provide styling to our interface.
Now for the interesting part. Creating and updating a record. We'll use the same template for both, so we expect some decisional logic to be there that will tell us in which of the two situations we are. As it turns out, it will not be that much code. The most exciting part of this template, however, is its associated JavaScript file which we'll examine right afterwards.
records/templates/records/record_add_edit.html
{% extends "records/base.html" %}
{% load static from staticfiles %}
{% block title %}
{% if update %}Update{% else %}Create{% endif %} Record
{% endblock title %}
{% block page-content %}
<h1>{% if update %}Update a{% else %}Create a new{% endif %}
Record
</h1>
{% include "records/messages.html" %}
<form action="." method="post">{% csrf_token %}
{{ form.non_field_errors }}
<div class="fieldWrapper">{{ form.title.errors }}
{{ form.title.label_tag }} {{ form.title }}</div>
<div class="fieldWrapper">{{ form.username.errors }}
{{ form.username.label_tag }} {{ form.username }}</div>
<div class="fieldWrapper">{{ form.email.errors }}
{{ form.email.label_tag }} {{ form.email }}</div>
<div class="fieldWrapper">{{ form.url.errors }}
{{ form.url.label_tag }} {{ form.url }}</div>
<div class="fieldWrapper">{{ form.password.errors }}
{{ form.password.label_tag }} {{ form.password }}
<span id="pwd-info"></span></div>
<button type="button" id="validate-btn">
Validate Password</button>
<button type="button" id="generate-btn">
Generate Password</button>
<div class="fieldWrapper">{{ form.notes.errors }}
{{ form.notes.label_tag }} {{ form.notes }}</div>
<input type="submit"
value="{% if update %}Update{% else %}Insert{% endif %}">
</form>
{% endblock page-content %}
{% block footer %}
<br>{% include "records/footer.html" %}<br>
Go to <a href="{% url "records:list" %}">the records list</a>.
{% endblock footer %}
{% block scripts %}
{{ block.super }}
<script src="{% static "records/js/api.js" %}"></script>
{% endblock scripts %}As usual, I have highlighted the important parts, so let's go through this code together.
You can see the first bit of decision logic in the title block. Similar decision logic is also displayed later on, in the header of the page (the h1 HTML tag), and in the submit button at the end of the form.
Apart from this logic, what I'd like you to focus on is the form and what's inside it. We set the action attribute to a dot, which means this page, so that we don't need to customize it according to which view is serving the page. Also, we immediately take care of the cross-site request forgery token, as explained in Chapter 10, Web Development Done Right.
Note that, this time, we cannot leave the whole form rendering up to Django since we want to add in a couple of extra things, so we go down one level of granularity and ask Django to render each individual field for us, along with any errors, along with its label. This way we still save a lot of effort, and at the same time, we can also customize the form as we like. In situations like this, it's not uncommon to write a small template to render a field, in order to avoid repeating those three lines for each field. In this case though, the form is so small I decided to avoid raising the complexity level up any further.
The span element, pwd-info, contains the information about the password that we get from the API. The two buttons after that, validate-btn and generate-btn, are hooked up with the AJAX calls to the API.
At the end of the template, in the scripts block, we need to load the api.js JavaScript file which contains the code to work with the API. We also need to use block.super, which will load whatever code is in the same block in the parent template (for example, jQuery). block.super is basically the template equivalent of a call to super(ClassName, self) in Python. It's important to load jQuery before our library, since the latter is based on the former.
Let's now take a look at that JavaScript. I don't expect you to understand everything. Firstly, this is a Python book and secondly, you're supposed to be a beginner (though by now, ninja trained), so fear not. However, as JavaScript has, by now, become essential if you're dealing with a web environment, having a working knowledge of it is extremely important even for a Python developer, so try and get the most out of what I'm about to show you. We'll see the password generation first:
records/static/records/js/api.js
var baseURL = 'http://127.0.0.1:5555/password';
var getRandomPassword = function() {
var apiURL = '{url}/generate'.replace('{url}', baseURL);
$.ajax({
type: 'GET',
url: apiURL,
success: function(data, status, request) {
$('#id_password').val(data[1]);
},
error: function() { alert('Unexpected error'); }
});
}
$(function() {
$('#generate-btn').click(getRandomPassword);
});Firstly, we set a variable for the base API URL: baseURL. Then, we define the getRandomPassword function, which is very simple. At the beginning, it defines the apiURL extending baseURL with a replacement technique. Even if the syntax is different from that of Python, you shouldn't have any issues understanding this line.
After defining the apiURL, the interesting bit comes up. We call $.ajax, which is the jQuery function that performs the AJAX calls. That $ is a shortcut for jQuery. As you can see in the body of the call, it's a GET request to apiURL. If it succeeds (success: ...), an anonymous function is run, which sets the value of the id_password text field to the second element of the returned data. We'll see the structure of the data when we examine the API code, so don't worry about that now. If an error occurs, we simply alert the user that there was an unexpected error.
After the function definition, we run a couple of lines of code to bind the click event on the generate-btn button to the getRandomPassword function. This means that, after this code has been run by the browser engine, every time we click the generate-btn button, the getRandomPassword function is called.
That wasn't so scary, was it? So let's see what we need for the validation part.
Now there is a value in the password field and we want to validate it. We need to call the API and inspect its response. Since passwords can have weird characters, I don't want to pass them on the URL, therefore I will use a POST request, which allows me to put the password in its body. To do this, I need the following code:
var validatePassword = function() {
var apiURL = '{url}/validate'.replace('{url}', baseURL);
$.ajax({
type: 'POST',
url: apiURL,
data: JSON.stringify({'password': $('#id_password').val()}),
contentType: "text/plain", // Avoid CORS preflight
success: function(data, status, request) {
var valid = data['valid'], infoClass, grade;
var msg = (valid?'Valid':'Invalid') + ' password.';
if (valid) {
var score = data['score']['total'];
grade = (score<10?'Poor':(score<18?'Medium':'Strong'));
infoClass = (score<10?'red':(score<18?'orange':'green'));
msg += ' (Score: {score}, {grade})'
.replace('{score}', score).replace('{grade}', grade);
}
$('#pwd-info').html(msg);
$('#pwd-info').removeClass().addClass(infoClass);
},
error: function(data) { alert('Unexpected error'); }
});
}
$(function() {
$('#validate-btn').click(validatePassword);
});The concept is the same as before, only this time it's for the validate-btn button. The body of the AJAX call is similar. We use a POST instead of a GET request, and we define the data as a JSON object, which is the equivalent of using json.dumps({'password': 'some_pwd'}) in Python.
The contentType line is a quick hack to avoid problems with the CORS preflight behavior of the browser. Cross-origin resource sharing (CORS) is a mechanism that allows restricted resources on a web page to be requested from another domain outside of the domain from which the request originated. In a nutshell, since the API is located at 127.0.0.1:5555 and the interface is running at 127.0.0.1:8000, without this hack, the browser wouldn't allow us to perform the calls. In a production environment, you may want to check the documentation for JSONP, which is a much better (albeit more complex) solution to this issue.
The body of the anonymous function which is run if the call succeeds is apparently only a bit complicated. All we need to do is understand if the password is valid (from data['valid']), and assign it a grade and a CSS class based on its score. Validity and score information come from the API response.
The only tricky bit in this code is the JavaScript ternary operator, so let's see a comparative example for it:
# Python error = 'critical' if error_level > 50 else 'medium' // JavaScript equivalent error = (error_level > 50 ? 'critical' : 'medium');
With this example, you shouldn't have any issue reading the rest of the logic in the function. I know, I could have just used a regular if (...), but JavaScript coders use the ternary operator all the time, so you should get used to it. It's good training to scratch our heads a bit harder in order to understand code.
Lastly, I'd like you to take a look at the end of that function. We set the html of the pwd-info span element to the message we assembled (msg), and then we style it. In one line, we remove all the CSS classes from that element (removeClass() with no parameters does that), and we add the infoClass to it. infoClass is either 'red', 'orange', or 'green'. If you go back to the main.css file, you'll see them at the bottom.
Now that we've seen both the template code and the JavaScript to make the calls, let's see a screenshot of the page. We're going to edit the first record, the one about my sister's school.
In the picture, you can see that I updated the password by clicking on the Generate Password button. Then, I saved the record (so you could see the nice message on top), and, finally, I clicked on the Validate Password button.
The result is shown in green on the right-hand side of the Password field. It's strong (23 is actually the maximum score we can get) so the message is displayed in a nice shade of green.
To delete a record, go to the list and click on the delete link. You'll be redirected to a page that asks you for confirmation; you can then choose to proceed and delete the poor record, or to cancel the request and go back to the list page. The template code is the following:
records/templates/records/record_confirm_delete.html
{% extends "records/base.html" %}
{% block title %}Delete record{% endblock title %}
{% block page-content %}
<h1>Confirm Record Deletion</h1>
<form action="." method="post">{% csrf_token %}
<p>Are you sure you want to delete "{{ object }}"?</p>
<input type="submit" value="Confirm" />
<a href="{% url "records:list" %}#record-{{ object.pk }}">
» cancel</a>
</form>
{% endblock page-content %}Since this is a template for a standard Django view, we need to use the naming conventions adopted by Django. Therefore, the record in question is called object in the template. The {{ object }} tag displays a string representation for the object, which is not exactly beautiful at the moment, since the whole line will read: Are you sure you want to delete "Record object"?.
This is because we haven't added a __str__ method to our Model class yet, which means that Python has no idea of what to show us when we ask for a string representation of an instance. Let's change this by completing our model, adding the __str__ method at the bottom of the class body:
records/models.py
class Record(models.Model):
...
def __str__(self):
return '{}'.format(self.title)
Restart the server and now the page will read: Are you sure you want to delete "Some Bank"? where Some Bank is the title of the record whose delete link I clicked on.
We could have just used {{ object.title }}, but I prefer to fix the root of the problem, not just the effect. Adding a __str__ method is in fact something that you ought to do for all of your models.
The interesting bit in this last template is actually the link for canceling the operation. We use the url tag to go back to the list view (records:list), but we add anchor information to it so that it will eventually read something like this (this is for pk=2):
http://127.0.0.1:8000/records/#record-2
This will go back to the list page and scroll down to the container div that has ID record 2, which is nice.
This concludes the interface. Even though this section was similar to what we saw in Chapter 10, Web Development Done Right, we've been able to concentrate more on the code in this chapter. We've seen how useful Django class-based views are, and we even touched on some cool JavaScript. Run $ python manage.py runserver and your interface should be up and running at http://127.0.0.1:8000.
Now it's time to spice things up a bit with the second part of this project.
Imports and home view
Just to break the ice, here are the imports and the view for the home page:
from django.contrib import messages
from django.contrib.messages.views import SuccessMessageMixin
from django.core.urlresolvers import reverse_lazy
from django.views.generic import TemplateView
from django.views.generic.edit import (
CreateView, UpdateView, DeleteView)
from .forms import RecordForm
from .models import Record
class HomeView(TemplateView):
template_name = 'records/home.html'We import a few tools from Django. There are a couple of messaging-related objects, a URL lazy reverser, and four different types of view. We also import our Record model and RecordForm. As you can see, the HomeView class consists of only two lines since we only need to specify which template we want to use, the rest just reuses the code from TemplateView, as it is. It's so easy, it almost feels like cheating.
After the home view, we can write a view to list all the Record instances that we have in the database.
class RecordListView(TemplateView):
template_name = 'records/list.html'
def get(self, request, *args, **kwargs):
context = self.get_context_data(**kwargs)
records = Record.objects.all().order_by('title') #1
for record in records:
record.plaintext = record.decrypt(record.password) #2
context['records'] = records
return self.render_to_response(context)All we need to do is sub-class TemplateView again, and override the get method. We need to do a couple of things: we fetch all the records from the database and sort them by title (#1) and then parse all the records in order to add the attribute plaintext (#2) onto each of them, to show the original password on the page. Another way of doing this would be to add a read-only property to the Record model, to do the decryption on the fly. I'll leave it to you, as a fun exercise, to amend the code to do it.
After recovering and augmenting the records, we put them in the context dict and finish as usual by invoking render_to_response.
Here's the code for the creation view:
class EncryptionMixin:
def form_valid(self, form):
self.encrypt_password(form)
return super(EncryptionMixin, self).form_valid(form)
def encrypt_password(self, form):
self.object = form.save(commit=False)
self.object.encrypt_password()
self.object.save()
class RecordCreateView(
EncryptionMixin, SuccessMessageMixin, CreateView):
template_name = 'records/record_add_edit.html'
form_class = RecordForm
success_url = reverse_lazy('records:add')
success_message = 'Record was created successfully'A part of its logic has been factored out in order to be reused later on in the update view. Let's start with EncryptionMixin. All it does is override the form_valid method so that, prior to saving a new Record instance to the database, we make sure we call encrypt_password on the object that results from saving the form. In other words, when the user submits the form to create a new Record, if the form validates successfully, then the form_valid method is invoked. Within this method what usually happens is that an object is created out of the ModelForm instance, like this:
self.object = form.save()
We need to interfere with this behavior because running this code as it is would save the record with the original password, which isn't encrypted. So we change this to call save on the form passing commit=False, which creates the Record instance out of the form, but doesn't attempt to save it in the database. Immediately afterwards, we encrypt the password on that instance and then we can finally call save on it, actually committing it to the database.
Since we need this behavior both for creating and updating records, I have factored it out in a mixin.
Note
Perhaps, a better solution for this password encryption logic is to create a custom Field (inheriting from CharField is the easiest way to do it) and add the necessary logic to it, so that when we handle Record instances from and to the database, the encryption and decryption logic is performed automatically for us. Though more elegant, this solution needs me to digress and explain a lot more about Django internals, which is too much for the extent of this example. As usual, you can try to do it yourself, if you feel like a challenge.
After creating the EncryptionMixin class, we can use it in the RecordCreateView class. We also inherit from two other classes: SuccessMessageMixin and CreateView. The message mixin provides us with the logic to quickly set up a message when creation is successful, and the CreateView gives us the necessary logic to create an object from a form.
You can see that all we have to code is some customization: the template name, the form class, and the success message and URL. Everything else is gracefully handled for us by Django.
The code to update a Record instance is only a tiny bit more complicated. We just need to add some logic to decrypt the password before we populate the form with the record data.
class RecordUpdateView(
EncryptionMixin, SuccessMessageMixin, UpdateView):
template_name = 'records/record_add_edit.html'
form_class = RecordForm
model = Record
success_message = 'Record was updated successfully'
def get_context_data(self, **kwargs):
kwargs['update'] = True
return super(
RecordUpdateView, self).get_context_data(**kwargs)
def form_valid(self, form):
self.success_url = reverse_lazy(
'records:edit',
kwargs={'pk': self.object.pk}
)
return super(RecordUpdateView, self).form_valid(form)
def get_form_kwargs(self):
kwargs = super(RecordUpdateView, self).get_form_kwargs()
kwargs['instance'].decrypt_password()
return kwargsIn this view, we still inherit from both EncryptionMixin and SuccessMessageMixin, but the view class we use is UpdateView.
The first four lines are customization as before, we set the template name, the form class, the Record model, and the success message. We cannot set the success_url as a class attribute because we want to redirect a successful edit to the same edit page for that record and, in order to do this, we need the ID of the instance we're editing. No worries, we'll do it another way.
First, we override get_context_data in order to set 'update' to True in the kwargs argument, which means that a key 'update' will end up in the context dict that is passed to the template for rendering the page. We do this because we want to use the same template for creating and updating a record, therefore we will use this variable in the context to be able to understand in which situation we are. There are other ways to do this but this one is quick and easy and I like it because it's explicit.
After overriding get_context_data, we need to take care of the URL redirection. We do this in the form_valid method since we know that, if we get there, it means the Record instance has been successfully updated. We reverse the 'records:edit' view, which is exactly the view we're working on, passing the primary key of the object in question. We take that information from self.object.pk.
One of the reasons it's helpful to have the object saved on the view instance is that we can use it when needed without having to alter the signature of the many methods in the view in order to pass the object around. This design is very helpful and allows us to achieve a lot with very few lines of code.
The last thing we need to do is to decrypt the password on the instance before populating the form for the user. It's simple enough to do it in the get_form_kwargs method, where you can access the Record instance in the kwargs dict, and call decrypt_password on it.
This is all we need to do to update a record. If you think about it, the amount of code we had to write is really very little, thanks to Django class-based views.
Tip
A good way of understanding which is the best method to override, is to take a look at the Django official documentation or, even better in this case, check out the source code and look at the class-based views section. You'll be able to appreciate how much work has been done there by Django developers so that you only have to touch the smallest amounts of code to customize your views.
Of the three actions, deleting a record is definitely the easiest one. All we need is the following code:
class RecordDeleteView(SuccessMessageMixin, DeleteView):
model = Record
success_url = reverse_lazy('records:list')
def delete(self, request, *args, **kwargs):
messages.success(
request, 'Record was deleted successfully')
return super(RecordDeleteView, self).delete(
request, *args, **kwargs)We only need to inherit from SuccessMessageMixin and DeleteView, which gives us all we need. We set up the model and the success URL as class attributes, and then we override the delete method only to add a nice message that will be displayed in the list view (which is where we redirect to after deletion).
We don't need to specify the template name, since we'll use a name that Django infers by default: record_confirm_delete.html.
With this final view, we're all set to have a nice interface that we can use to handle Record instances.
Before we move on to the template layer, let's set up the URLs. This time, I want to show you the inclusion technique I talked about in Chapter 10, Web Development Done Right.
pwdweb/urls.py
from django.conf.urls import include, url
from django.contrib import admin
from records import urls as records_url
from records.views import HomeView
urlpatterns = [
url(r'^admin/', include(admin.site.urls)),
url(r'^records/', include(records_url, namespace='records')),
url(r'^$', HomeView.as_view(), name='home'),
]These are the URLs for the main project. We have the usual admin, a home page, and then for the records section, we include another urls.py file, which we define in the records application. This technique allows for apps to be reusable and self-contained. Note that, when including another urls.py file, you can pass namespace information, which you can then use in functions such as reverse, or the url template tag. For example, we've seen that the path to the RecordUpdateView was 'records:edit'. The first part of that string is the namespace, and the second is the name that we have given to the view, as you can see in the following code:
records/urls.py
from django.conf.urls import include, url
from django.contrib import admin
from .views import (RecordCreateView, RecordUpdateView,
RecordDeleteView, RecordListView)
urlpatterns = [
url(r'^add/$', RecordCreateView.as_view(), name='add'),
url(r'^edit/(?P<pk>[0-9]+)/$', RecordUpdateView.as_view(),
name='edit'),
url(r'^delete/(?P<pk>[0-9]+)/$', RecordDeleteView.as_view(),
name='delete'),
url(r'^$', RecordListView.as_view(), name='list'),
]We define four different url instances. There is one for adding a record, which doesn't need primary key information since the object doesn't exist yet. Then we have two url instances for updating and deleting a record, and for those we need to also specify primary key information to be passed to the view. Since Record instances have integer IDs, we can safely pass them on the URL, following good URL design practice. Finally, we define one url instance for the list of records.
All url instances have name information which is used in views and templates.
Let's start with the template we'll use as the basis for the rest:
records/templates/records/base.html
{% load static from staticfiles %}
<!DOCTYPE html>
<html lang="en">
<head>
<meta charset="utf-8">
<meta name="viewport"
content="width=device-width, initial-scale=1.0">
<link href="{% static "records/css/main.css" %}"
rel="stylesheet">
<title>{% block title %}Title{% endblock title %}</title>
</head>
<body>
<div id="page-content">
{% block page-content %}{% endblock page-content %}
</div>
<div id="footer">{% block footer %}{% endblock footer %}</div>
{% block scripts %}
<script
src="{% static "records/js/jquery-2.1.4.min.js" %}">
</script>
{% endblock scripts %}
</body>
</html>It's very similar to the one I used in Chapter 10, Web Development Done Right although it is a bit more compressed and with one major difference. We will import jQuery in every page.
Note
jQuery is the most popular JavaScript library out there. It allows you to write code that works on all the main browsers and it gives you many extra tools such as the ability to perform asynchronous calls (AJAX) from the browser itself. We'll use this library to perform the calls to the API, both to generate and validate our passwords. You can download it at https://jquery.com/, and put it in the pwdweb/records/static/records/js/ folder (you may have to amend the import in the template).
I highlighted the only interesting part of this template for you. Note that we load the JavaScript library at the end. This is common practice, as JavaScript is used to manipulate the page, so loading libraries at the end helps in avoiding situations such as JavaScript code failing because the element needed hadn't been rendered on the page yet.
The home template is very simple:
records/templates/records/home.html
{% extends "records/base.html" %}
{% block title %}Welcome to the Records website.{% endblock %}
{% block page-content %}
<h1>Welcome {{ user.first_name }}!</h1>
<div class="home-option">To create a record click
<a href="{% url "records:add" %}">here.</a>
</div>
<div class="home-option">To see all records click
<a href="{% url "records:list" %}">here.</a>
</div>
{% endblock page-content %}There is nothing new here when compared to the home.html template we saw in Chapter 10, Web Development Done Right. The footer template is actually exactly the same:
records/templates/records/footer.html
<div class="footer">
Go back <a href="{% url "home" %}">home</a>.
</div>This template to list all records is fairly simple:
records/templates/records/list.html
{% extends "records/base.html" %}
{% load record_extras %}
{% block title %}Records{% endblock title %}
{% block page-content %}
<h1>Records</h1><span name="top"></span>
{% include "records/messages.html" %}
{% for record in records %}
<div class="record {% cycle 'row-light-blue' 'row-white' %}"
id="record-{{ record.pk }}">
<div class="record-left">
<div class="record-list">
<span class="record-span">Title</span>{{ record.title }}
</div>
<div class="record-list">
<span class="record-span">Username</span>
{{ record.username }}
</div>
<div class="record-list">
<span class="record-span">Email</span>{{ record.email }}
</div>
<div class="record-list">
<span class="record-span">URL</span>
<a href="{{ record.url }}" target="_blank">
{{ record.url }}</a>
</div>
<div class="record-list">
<span class="record-span">Password</span>
{% hide_password record.plaintext %}
</div>
</div>
<div class="record-right">
<div class="record-list">
<span class="record-span">Notes</span>
<textarea rows="3" cols="40" class="record-notes"
readonly>{{ record.notes }}</textarea>
</div>
<div class="record-list">
<span class="record-span">Last modified</span>
{{ record.last_modified }}
</div>
<div class="record-list">
<span class="record-span">Created</span>
{{ record.created }}
</div>
</div>
<div class="record-list-actions">
<a href="{% url "records:edit" pk=record.pk %}">» edit</a>
<a href="{% url "records:delete" pk=record.pk %}">» delete
</a>
</div>
</div>
{% endfor %}
{% endblock page-content %}
{% block footer %}
<p><a href="#top">Go back to top</a></p>
{% include "records/footer.html" %}
{% endblock footer %}For this template as well, I have highlighted the parts I'd like you to focus on. Firstly, I load a custom tags module, record_extras, which we'll need later. I have also added an anchor at the top, so that we'll be able to put a link to it at the bottom of the page, to avoid having to scroll all the way up.
Then, I included a template to provide me with the HTML code to display Django messages. It's a very simple template which I'll show you shortly.
Then, we define a list of div elements. Each Record instance has a container div, in which there are two other main div elements: record-left and record-right. In order to display them side by side, I have set this class in the main.css file:
.record-left { float: left; width: 300px;}The outermost div container (the one with class record), has an id attribute, which I have used as an anchor. This allows us to click on cancel on the record delete page, so that if we change our minds and don't want to delete the record, we can get back to the list page, and at the right position.
Each attribute of the record is then displayed in div elements whose class is record-list. Most of these classes are just there to allow me to set a bit of padding and dimensions on the HTML elements.
The next interesting bit is the hide_password tag, which takes the plaintext, which is the unencrypted password. The purpose of this custom tag is to display a sequence of '*' characters, as long as the original password, so that if someone is passing by while you're on the page, they won't see your passwords. However, hovering on that sequence of '*' characters will show you the original password in the tooltip. Here's the code for the hide_password tag:
records/templatetags/record_extras.py
from django import template
from django.utils.html import escape
register = template.Library()
@register.simple_tag
def hide_password(password):
return '<span title="{0}">{1}</span>'.format(
escape(password), '*' * len(password))There is nothing fancy here. We just register this function as a simple tag and then we can use it wherever we want. It takes a password and puts it as a tooltip of a span element, whose main content is a sequence of '*' characters. Just note one thing: we need to escape the password, so that we're sure it won't break our HTML (think of what might happen if the password contained a double-quote `"`, for example).
As far as the list.html template is concerned, the next interesting bit is that we set the readonly attribute to the textarea element, so as not to give the impression to the user that they can modify notes on the fly.
Then, we set a couple of links for each Record instance, right at the bottom of the container div. There is one for the edit page, and another for the delete page. Note that we need to pass the url tag not only the namespace:name string, but also the primary key information, as required by the URL setup we made in the urls.py module for those views.
Finally, we import the footer and set the link to the anchor on top of the page.
Now, as promised, here is the code for the messages:
records/templates/records/messages.html
{% if messages %}
{% for message in messages %}
<p class="{{ message.tags }}">{{ message }}</p>
{% endfor %}
{% endif %}This code takes care of displaying messages only when there is at least one to display. We give the p tag class information to display success messages in green and error messages in red.
If you grab the main.css file from the source code for the book, you will now be able to visualize the list page (yours will be blank, you still need to insert data into it), and it should look something like this:
As you can see, I have two records in the database at the moment. I'm hovering on the password of the first one, which is my platform account at my sister's school, and the password is displayed in the tooltip. The division in two div elements, left and right, helps in making rows smaller so that the overall result is more pleasing to the eye. The important information is on the left and the ancillary information is on the right. The row color alternates between a very light shade of blue and white.
Each row has an edit and delete link, at its bottom left. We'll show the pages for those two links right after we see the code for the templates that create them.
The CSS code that holds all the information for this interface is the following:
records/static/records/css/main.css
html, body, * {
font-family: 'Trebuchet MS', Helvetica, sans-serif; }
a { color: #333; }
.record {
clear: both; padding: 1em; border-bottom: 1px solid #666;}
.record-left { float: left; width: 300px;}
.record-list { padding: 2px 0; }
.fieldWrapper { padding: 5px; }
.footer { margin-top: 1em; color: #333; }
.home-option { padding: .6em 0; }
.record-span { font-weight: bold; padding-right: 1em; }
.record-notes { vertical-align: top; }
.record-list-actions { padding: 4px 0; clear: both; }
.record-list-actions a { padding: 0 4px; }
#pwd-info { padding: 0 6px; font-size: 1.1em; font-weight: bold;}
#id_notes { vertical-align: top; }
/* Messages */
.success, .errorlist {font-size: 1.2em; font-weight: bold; }
.success {color: #25B725; }
.errorlist {color: #B12B2B; }
/* colors */
.row-light-blue { background-color: #E6F0FA; }
.row-white { background-color: #fff; }
.green { color: #060; }
.orange { color: #FF3300; }
.red { color: #900; }Please remember, I'm not a CSS guru so just take this file as it is, a fairly naive way to provide styling to our interface.
Now for the interesting part. Creating and updating a record. We'll use the same template for both, so we expect some decisional logic to be there that will tell us in which of the two situations we are. As it turns out, it will not be that much code. The most exciting part of this template, however, is its associated JavaScript file which we'll examine right afterwards.
records/templates/records/record_add_edit.html
{% extends "records/base.html" %}
{% load static from staticfiles %}
{% block title %}
{% if update %}Update{% else %}Create{% endif %} Record
{% endblock title %}
{% block page-content %}
<h1>{% if update %}Update a{% else %}Create a new{% endif %}
Record
</h1>
{% include "records/messages.html" %}
<form action="." method="post">{% csrf_token %}
{{ form.non_field_errors }}
<div class="fieldWrapper">{{ form.title.errors }}
{{ form.title.label_tag }} {{ form.title }}</div>
<div class="fieldWrapper">{{ form.username.errors }}
{{ form.username.label_tag }} {{ form.username }}</div>
<div class="fieldWrapper">{{ form.email.errors }}
{{ form.email.label_tag }} {{ form.email }}</div>
<div class="fieldWrapper">{{ form.url.errors }}
{{ form.url.label_tag }} {{ form.url }}</div>
<div class="fieldWrapper">{{ form.password.errors }}
{{ form.password.label_tag }} {{ form.password }}
<span id="pwd-info"></span></div>
<button type="button" id="validate-btn">
Validate Password</button>
<button type="button" id="generate-btn">
Generate Password</button>
<div class="fieldWrapper">{{ form.notes.errors }}
{{ form.notes.label_tag }} {{ form.notes }}</div>
<input type="submit"
value="{% if update %}Update{% else %}Insert{% endif %}">
</form>
{% endblock page-content %}
{% block footer %}
<br>{% include "records/footer.html" %}<br>
Go to <a href="{% url "records:list" %}">the records list</a>.
{% endblock footer %}
{% block scripts %}
{{ block.super }}
<script src="{% static "records/js/api.js" %}"></script>
{% endblock scripts %}As usual, I have highlighted the important parts, so let's go through this code together.
You can see the first bit of decision logic in the title block. Similar decision logic is also displayed later on, in the header of the page (the h1 HTML tag), and in the submit button at the end of the form.
Apart from this logic, what I'd like you to focus on is the form and what's inside it. We set the action attribute to a dot, which means this page, so that we don't need to customize it according to which view is serving the page. Also, we immediately take care of the cross-site request forgery token, as explained in Chapter 10, Web Development Done Right.
Note that, this time, we cannot leave the whole form rendering up to Django since we want to add in a couple of extra things, so we go down one level of granularity and ask Django to render each individual field for us, along with any errors, along with its label. This way we still save a lot of effort, and at the same time, we can also customize the form as we like. In situations like this, it's not uncommon to write a small template to render a field, in order to avoid repeating those three lines for each field. In this case though, the form is so small I decided to avoid raising the complexity level up any further.
The span element, pwd-info, contains the information about the password that we get from the API. The two buttons after that, validate-btn and generate-btn, are hooked up with the AJAX calls to the API.
At the end of the template, in the scripts block, we need to load the api.js JavaScript file which contains the code to work with the API. We also need to use block.super, which will load whatever code is in the same block in the parent template (for example, jQuery). block.super is basically the template equivalent of a call to super(ClassName, self) in Python. It's important to load jQuery before our library, since the latter is based on the former.
Let's now take a look at that JavaScript. I don't expect you to understand everything. Firstly, this is a Python book and secondly, you're supposed to be a beginner (though by now, ninja trained), so fear not. However, as JavaScript has, by now, become essential if you're dealing with a web environment, having a working knowledge of it is extremely important even for a Python developer, so try and get the most out of what I'm about to show you. We'll see the password generation first:
records/static/records/js/api.js
var baseURL = 'http://127.0.0.1:5555/password';
var getRandomPassword = function() {
var apiURL = '{url}/generate'.replace('{url}', baseURL);
$.ajax({
type: 'GET',
url: apiURL,
success: function(data, status, request) {
$('#id_password').val(data[1]);
},
error: function() { alert('Unexpected error'); }
});
}
$(function() {
$('#generate-btn').click(getRandomPassword);
});Firstly, we set a variable for the base API URL: baseURL. Then, we define the getRandomPassword function, which is very simple. At the beginning, it defines the apiURL extending baseURL with a replacement technique. Even if the syntax is different from that of Python, you shouldn't have any issues understanding this line.
After defining the apiURL, the interesting bit comes up. We call $.ajax, which is the jQuery function that performs the AJAX calls. That $ is a shortcut for jQuery. As you can see in the body of the call, it's a GET request to apiURL. If it succeeds (success: ...), an anonymous function is run, which sets the value of the id_password text field to the second element of the returned data. We'll see the structure of the data when we examine the API code, so don't worry about that now. If an error occurs, we simply alert the user that there was an unexpected error.
After the function definition, we run a couple of lines of code to bind the click event on the generate-btn button to the getRandomPassword function. This means that, after this code has been run by the browser engine, every time we click the generate-btn button, the getRandomPassword function is called.
That wasn't so scary, was it? So let's see what we need for the validation part.
Now there is a value in the password field and we want to validate it. We need to call the API and inspect its response. Since passwords can have weird characters, I don't want to pass them on the URL, therefore I will use a POST request, which allows me to put the password in its body. To do this, I need the following code:
var validatePassword = function() {
var apiURL = '{url}/validate'.replace('{url}', baseURL);
$.ajax({
type: 'POST',
url: apiURL,
data: JSON.stringify({'password': $('#id_password').val()}),
contentType: "text/plain", // Avoid CORS preflight
success: function(data, status, request) {
var valid = data['valid'], infoClass, grade;
var msg = (valid?'Valid':'Invalid') + ' password.';
if (valid) {
var score = data['score']['total'];
grade = (score<10?'Poor':(score<18?'Medium':'Strong'));
infoClass = (score<10?'red':(score<18?'orange':'green'));
msg += ' (Score: {score}, {grade})'
.replace('{score}', score).replace('{grade}', grade);
}
$('#pwd-info').html(msg);
$('#pwd-info').removeClass().addClass(infoClass);
},
error: function(data) { alert('Unexpected error'); }
});
}
$(function() {
$('#validate-btn').click(validatePassword);
});The concept is the same as before, only this time it's for the validate-btn button. The body of the AJAX call is similar. We use a POST instead of a GET request, and we define the data as a JSON object, which is the equivalent of using json.dumps({'password': 'some_pwd'}) in Python.
The contentType line is a quick hack to avoid problems with the CORS preflight behavior of the browser. Cross-origin resource sharing (CORS) is a mechanism that allows restricted resources on a web page to be requested from another domain outside of the domain from which the request originated. In a nutshell, since the API is located at 127.0.0.1:5555 and the interface is running at 127.0.0.1:8000, without this hack, the browser wouldn't allow us to perform the calls. In a production environment, you may want to check the documentation for JSONP, which is a much better (albeit more complex) solution to this issue.
The body of the anonymous function which is run if the call succeeds is apparently only a bit complicated. All we need to do is understand if the password is valid (from data['valid']), and assign it a grade and a CSS class based on its score. Validity and score information come from the API response.
The only tricky bit in this code is the JavaScript ternary operator, so let's see a comparative example for it:
# Python error = 'critical' if error_level > 50 else 'medium' // JavaScript equivalent error = (error_level > 50 ? 'critical' : 'medium');
With this example, you shouldn't have any issue reading the rest of the logic in the function. I know, I could have just used a regular if (...), but JavaScript coders use the ternary operator all the time, so you should get used to it. It's good training to scratch our heads a bit harder in order to understand code.
Lastly, I'd like you to take a look at the end of that function. We set the html of the pwd-info span element to the message we assembled (msg), and then we style it. In one line, we remove all the CSS classes from that element (removeClass() with no parameters does that), and we add the infoClass to it. infoClass is either 'red', 'orange', or 'green'. If you go back to the main.css file, you'll see them at the bottom.
Now that we've seen both the template code and the JavaScript to make the calls, let's see a screenshot of the page. We're going to edit the first record, the one about my sister's school.
In the picture, you can see that I updated the password by clicking on the Generate Password button. Then, I saved the record (so you could see the nice message on top), and, finally, I clicked on the Validate Password button.
The result is shown in green on the right-hand side of the Password field. It's strong (23 is actually the maximum score we can get) so the message is displayed in a nice shade of green.
To delete a record, go to the list and click on the delete link. You'll be redirected to a page that asks you for confirmation; you can then choose to proceed and delete the poor record, or to cancel the request and go back to the list page. The template code is the following:
records/templates/records/record_confirm_delete.html
{% extends "records/base.html" %}
{% block title %}Delete record{% endblock title %}
{% block page-content %}
<h1>Confirm Record Deletion</h1>
<form action="." method="post">{% csrf_token %}
<p>Are you sure you want to delete "{{ object }}"?</p>
<input type="submit" value="Confirm" />
<a href="{% url "records:list" %}#record-{{ object.pk }}">
» cancel</a>
</form>
{% endblock page-content %}Since this is a template for a standard Django view, we need to use the naming conventions adopted by Django. Therefore, the record in question is called object in the template. The {{ object }} tag displays a string representation for the object, which is not exactly beautiful at the moment, since the whole line will read: Are you sure you want to delete "Record object"?.
This is because we haven't added a __str__ method to our Model class yet, which means that Python has no idea of what to show us when we ask for a string representation of an instance. Let's change this by completing our model, adding the __str__ method at the bottom of the class body:
records/models.py
class Record(models.Model):
...
def __str__(self):
return '{}'.format(self.title)
Restart the server and now the page will read: Are you sure you want to delete "Some Bank"? where Some Bank is the title of the record whose delete link I clicked on.
We could have just used {{ object.title }}, but I prefer to fix the root of the problem, not just the effect. Adding a __str__ method is in fact something that you ought to do for all of your models.
The interesting bit in this last template is actually the link for canceling the operation. We use the url tag to go back to the list view (records:list), but we add anchor information to it so that it will eventually read something like this (this is for pk=2):
http://127.0.0.1:8000/records/#record-2
This will go back to the list page and scroll down to the container div that has ID record 2, which is nice.
This concludes the interface. Even though this section was similar to what we saw in Chapter 10, Web Development Done Right, we've been able to concentrate more on the code in this chapter. We've seen how useful Django class-based views are, and we even touched on some cool JavaScript. Run $ python manage.py runserver and your interface should be up and running at http://127.0.0.1:8000.
Now it's time to spice things up a bit with the second part of this project.
Listing all records
After the home view, we can write a view to list all the Record instances that we have in the database.
class RecordListView(TemplateView):
template_name = 'records/list.html'
def get(self, request, *args, **kwargs):
context = self.get_context_data(**kwargs)
records = Record.objects.all().order_by('title') #1
for record in records:
record.plaintext = record.decrypt(record.password) #2
context['records'] = records
return self.render_to_response(context)All we need to do is sub-class TemplateView again, and override the get method. We need to do a couple of things: we fetch all the records from the database and sort them by title (#1) and then parse all the records in order to add the attribute plaintext (#2) onto each of them, to show the original password on the page. Another way of doing this would be to add a read-only property to the Record model, to do the decryption on the fly. I'll leave it to you, as a fun exercise, to amend the code to do it.
After recovering and augmenting the records, we put them in the context dict and finish as usual by invoking render_to_response.
Here's the code for the creation view:
class EncryptionMixin:
def form_valid(self, form):
self.encrypt_password(form)
return super(EncryptionMixin, self).form_valid(form)
def encrypt_password(self, form):
self.object = form.save(commit=False)
self.object.encrypt_password()
self.object.save()
class RecordCreateView(
EncryptionMixin, SuccessMessageMixin, CreateView):
template_name = 'records/record_add_edit.html'
form_class = RecordForm
success_url = reverse_lazy('records:add')
success_message = 'Record was created successfully'A part of its logic has been factored out in order to be reused later on in the update view. Let's start with EncryptionMixin. All it does is override the form_valid method so that, prior to saving a new Record instance to the database, we make sure we call encrypt_password on the object that results from saving the form. In other words, when the user submits the form to create a new Record, if the form validates successfully, then the form_valid method is invoked. Within this method what usually happens is that an object is created out of the ModelForm instance, like this:
self.object = form.save()
We need to interfere with this behavior because running this code as it is would save the record with the original password, which isn't encrypted. So we change this to call save on the form passing commit=False, which creates the Record instance out of the form, but doesn't attempt to save it in the database. Immediately afterwards, we encrypt the password on that instance and then we can finally call save on it, actually committing it to the database.
Since we need this behavior both for creating and updating records, I have factored it out in a mixin.
Note
Perhaps, a better solution for this password encryption logic is to create a custom Field (inheriting from CharField is the easiest way to do it) and add the necessary logic to it, so that when we handle Record instances from and to the database, the encryption and decryption logic is performed automatically for us. Though more elegant, this solution needs me to digress and explain a lot more about Django internals, which is too much for the extent of this example. As usual, you can try to do it yourself, if you feel like a challenge.
After creating the EncryptionMixin class, we can use it in the RecordCreateView class. We also inherit from two other classes: SuccessMessageMixin and CreateView. The message mixin provides us with the logic to quickly set up a message when creation is successful, and the CreateView gives us the necessary logic to create an object from a form.
You can see that all we have to code is some customization: the template name, the form class, and the success message and URL. Everything else is gracefully handled for us by Django.
The code to update a Record instance is only a tiny bit more complicated. We just need to add some logic to decrypt the password before we populate the form with the record data.
class RecordUpdateView(
EncryptionMixin, SuccessMessageMixin, UpdateView):
template_name = 'records/record_add_edit.html'
form_class = RecordForm
model = Record
success_message = 'Record was updated successfully'
def get_context_data(self, **kwargs):
kwargs['update'] = True
return super(
RecordUpdateView, self).get_context_data(**kwargs)
def form_valid(self, form):
self.success_url = reverse_lazy(
'records:edit',
kwargs={'pk': self.object.pk}
)
return super(RecordUpdateView, self).form_valid(form)
def get_form_kwargs(self):
kwargs = super(RecordUpdateView, self).get_form_kwargs()
kwargs['instance'].decrypt_password()
return kwargsIn this view, we still inherit from both EncryptionMixin and SuccessMessageMixin, but the view class we use is UpdateView.
The first four lines are customization as before, we set the template name, the form class, the Record model, and the success message. We cannot set the success_url as a class attribute because we want to redirect a successful edit to the same edit page for that record and, in order to do this, we need the ID of the instance we're editing. No worries, we'll do it another way.
First, we override get_context_data in order to set 'update' to True in the kwargs argument, which means that a key 'update' will end up in the context dict that is passed to the template for rendering the page. We do this because we want to use the same template for creating and updating a record, therefore we will use this variable in the context to be able to understand in which situation we are. There are other ways to do this but this one is quick and easy and I like it because it's explicit.
After overriding get_context_data, we need to take care of the URL redirection. We do this in the form_valid method since we know that, if we get there, it means the Record instance has been successfully updated. We reverse the 'records:edit' view, which is exactly the view we're working on, passing the primary key of the object in question. We take that information from self.object.pk.
One of the reasons it's helpful to have the object saved on the view instance is that we can use it when needed without having to alter the signature of the many methods in the view in order to pass the object around. This design is very helpful and allows us to achieve a lot with very few lines of code.
The last thing we need to do is to decrypt the password on the instance before populating the form for the user. It's simple enough to do it in the get_form_kwargs method, where you can access the Record instance in the kwargs dict, and call decrypt_password on it.
This is all we need to do to update a record. If you think about it, the amount of code we had to write is really very little, thanks to Django class-based views.
Tip
A good way of understanding which is the best method to override, is to take a look at the Django official documentation or, even better in this case, check out the source code and look at the class-based views section. You'll be able to appreciate how much work has been done there by Django developers so that you only have to touch the smallest amounts of code to customize your views.
Of the three actions, deleting a record is definitely the easiest one. All we need is the following code:
class RecordDeleteView(SuccessMessageMixin, DeleteView):
model = Record
success_url = reverse_lazy('records:list')
def delete(self, request, *args, **kwargs):
messages.success(
request, 'Record was deleted successfully')
return super(RecordDeleteView, self).delete(
request, *args, **kwargs)We only need to inherit from SuccessMessageMixin and DeleteView, which gives us all we need. We set up the model and the success URL as class attributes, and then we override the delete method only to add a nice message that will be displayed in the list view (which is where we redirect to after deletion).
We don't need to specify the template name, since we'll use a name that Django infers by default: record_confirm_delete.html.
With this final view, we're all set to have a nice interface that we can use to handle Record instances.
Before we move on to the template layer, let's set up the URLs. This time, I want to show you the inclusion technique I talked about in Chapter 10, Web Development Done Right.
pwdweb/urls.py
from django.conf.urls import include, url
from django.contrib import admin
from records import urls as records_url
from records.views import HomeView
urlpatterns = [
url(r'^admin/', include(admin.site.urls)),
url(r'^records/', include(records_url, namespace='records')),
url(r'^$', HomeView.as_view(), name='home'),
]These are the URLs for the main project. We have the usual admin, a home page, and then for the records section, we include another urls.py file, which we define in the records application. This technique allows for apps to be reusable and self-contained. Note that, when including another urls.py file, you can pass namespace information, which you can then use in functions such as reverse, or the url template tag. For example, we've seen that the path to the RecordUpdateView was 'records:edit'. The first part of that string is the namespace, and the second is the name that we have given to the view, as you can see in the following code:
records/urls.py
from django.conf.urls import include, url
from django.contrib import admin
from .views import (RecordCreateView, RecordUpdateView,
RecordDeleteView, RecordListView)
urlpatterns = [
url(r'^add/$', RecordCreateView.as_view(), name='add'),
url(r'^edit/(?P<pk>[0-9]+)/$', RecordUpdateView.as_view(),
name='edit'),
url(r'^delete/(?P<pk>[0-9]+)/$', RecordDeleteView.as_view(),
name='delete'),
url(r'^$', RecordListView.as_view(), name='list'),
]We define four different url instances. There is one for adding a record, which doesn't need primary key information since the object doesn't exist yet. Then we have two url instances for updating and deleting a record, and for those we need to also specify primary key information to be passed to the view. Since Record instances have integer IDs, we can safely pass them on the URL, following good URL design practice. Finally, we define one url instance for the list of records.
All url instances have name information which is used in views and templates.
Let's start with the template we'll use as the basis for the rest:
records/templates/records/base.html
{% load static from staticfiles %}
<!DOCTYPE html>
<html lang="en">
<head>
<meta charset="utf-8">
<meta name="viewport"
content="width=device-width, initial-scale=1.0">
<link href="{% static "records/css/main.css" %}"
rel="stylesheet">
<title>{% block title %}Title{% endblock title %}</title>
</head>
<body>
<div id="page-content">
{% block page-content %}{% endblock page-content %}
</div>
<div id="footer">{% block footer %}{% endblock footer %}</div>
{% block scripts %}
<script
src="{% static "records/js/jquery-2.1.4.min.js" %}">
</script>
{% endblock scripts %}
</body>
</html>It's very similar to the one I used in Chapter 10, Web Development Done Right although it is a bit more compressed and with one major difference. We will import jQuery in every page.
Note
jQuery is the most popular JavaScript library out there. It allows you to write code that works on all the main browsers and it gives you many extra tools such as the ability to perform asynchronous calls (AJAX) from the browser itself. We'll use this library to perform the calls to the API, both to generate and validate our passwords. You can download it at https://jquery.com/, and put it in the pwdweb/records/static/records/js/ folder (you may have to amend the import in the template).
I highlighted the only interesting part of this template for you. Note that we load the JavaScript library at the end. This is common practice, as JavaScript is used to manipulate the page, so loading libraries at the end helps in avoiding situations such as JavaScript code failing because the element needed hadn't been rendered on the page yet.
The home template is very simple:
records/templates/records/home.html
{% extends "records/base.html" %}
{% block title %}Welcome to the Records website.{% endblock %}
{% block page-content %}
<h1>Welcome {{ user.first_name }}!</h1>
<div class="home-option">To create a record click
<a href="{% url "records:add" %}">here.</a>
</div>
<div class="home-option">To see all records click
<a href="{% url "records:list" %}">here.</a>
</div>
{% endblock page-content %}There is nothing new here when compared to the home.html template we saw in Chapter 10, Web Development Done Right. The footer template is actually exactly the same:
records/templates/records/footer.html
<div class="footer">
Go back <a href="{% url "home" %}">home</a>.
</div>This template to list all records is fairly simple:
records/templates/records/list.html
{% extends "records/base.html" %}
{% load record_extras %}
{% block title %}Records{% endblock title %}
{% block page-content %}
<h1>Records</h1><span name="top"></span>
{% include "records/messages.html" %}
{% for record in records %}
<div class="record {% cycle 'row-light-blue' 'row-white' %}"
id="record-{{ record.pk }}">
<div class="record-left">
<div class="record-list">
<span class="record-span">Title</span>{{ record.title }}
</div>
<div class="record-list">
<span class="record-span">Username</span>
{{ record.username }}
</div>
<div class="record-list">
<span class="record-span">Email</span>{{ record.email }}
</div>
<div class="record-list">
<span class="record-span">URL</span>
<a href="{{ record.url }}" target="_blank">
{{ record.url }}</a>
</div>
<div class="record-list">
<span class="record-span">Password</span>
{% hide_password record.plaintext %}
</div>
</div>
<div class="record-right">
<div class="record-list">
<span class="record-span">Notes</span>
<textarea rows="3" cols="40" class="record-notes"
readonly>{{ record.notes }}</textarea>
</div>
<div class="record-list">
<span class="record-span">Last modified</span>
{{ record.last_modified }}
</div>
<div class="record-list">
<span class="record-span">Created</span>
{{ record.created }}
</div>
</div>
<div class="record-list-actions">
<a href="{% url "records:edit" pk=record.pk %}">» edit</a>
<a href="{% url "records:delete" pk=record.pk %}">» delete
</a>
</div>
</div>
{% endfor %}
{% endblock page-content %}
{% block footer %}
<p><a href="#top">Go back to top</a></p>
{% include "records/footer.html" %}
{% endblock footer %}For this template as well, I have highlighted the parts I'd like you to focus on. Firstly, I load a custom tags module, record_extras, which we'll need later. I have also added an anchor at the top, so that we'll be able to put a link to it at the bottom of the page, to avoid having to scroll all the way up.
Then, I included a template to provide me with the HTML code to display Django messages. It's a very simple template which I'll show you shortly.
Then, we define a list of div elements. Each Record instance has a container div, in which there are two other main div elements: record-left and record-right. In order to display them side by side, I have set this class in the main.css file:
.record-left { float: left; width: 300px;}The outermost div container (the one with class record), has an id attribute, which I have used as an anchor. This allows us to click on cancel on the record delete page, so that if we change our minds and don't want to delete the record, we can get back to the list page, and at the right position.
Each attribute of the record is then displayed in div elements whose class is record-list. Most of these classes are just there to allow me to set a bit of padding and dimensions on the HTML elements.
The next interesting bit is the hide_password tag, which takes the plaintext, which is the unencrypted password. The purpose of this custom tag is to display a sequence of '*' characters, as long as the original password, so that if someone is passing by while you're on the page, they won't see your passwords. However, hovering on that sequence of '*' characters will show you the original password in the tooltip. Here's the code for the hide_password tag:
records/templatetags/record_extras.py
from django import template
from django.utils.html import escape
register = template.Library()
@register.simple_tag
def hide_password(password):
return '<span title="{0}">{1}</span>'.format(
escape(password), '*' * len(password))There is nothing fancy here. We just register this function as a simple tag and then we can use it wherever we want. It takes a password and puts it as a tooltip of a span element, whose main content is a sequence of '*' characters. Just note one thing: we need to escape the password, so that we're sure it won't break our HTML (think of what might happen if the password contained a double-quote `"`, for example).
As far as the list.html template is concerned, the next interesting bit is that we set the readonly attribute to the textarea element, so as not to give the impression to the user that they can modify notes on the fly.
Then, we set a couple of links for each Record instance, right at the bottom of the container div. There is one for the edit page, and another for the delete page. Note that we need to pass the url tag not only the namespace:name string, but also the primary key information, as required by the URL setup we made in the urls.py module for those views.
Finally, we import the footer and set the link to the anchor on top of the page.
Now, as promised, here is the code for the messages:
records/templates/records/messages.html
{% if messages %}
{% for message in messages %}
<p class="{{ message.tags }}">{{ message }}</p>
{% endfor %}
{% endif %}This code takes care of displaying messages only when there is at least one to display. We give the p tag class information to display success messages in green and error messages in red.
If you grab the main.css file from the source code for the book, you will now be able to visualize the list page (yours will be blank, you still need to insert data into it), and it should look something like this:
As you can see, I have two records in the database at the moment. I'm hovering on the password of the first one, which is my platform account at my sister's school, and the password is displayed in the tooltip. The division in two div elements, left and right, helps in making rows smaller so that the overall result is more pleasing to the eye. The important information is on the left and the ancillary information is on the right. The row color alternates between a very light shade of blue and white.
Each row has an edit and delete link, at its bottom left. We'll show the pages for those two links right after we see the code for the templates that create them.
The CSS code that holds all the information for this interface is the following:
records/static/records/css/main.css
html, body, * {
font-family: 'Trebuchet MS', Helvetica, sans-serif; }
a { color: #333; }
.record {
clear: both; padding: 1em; border-bottom: 1px solid #666;}
.record-left { float: left; width: 300px;}
.record-list { padding: 2px 0; }
.fieldWrapper { padding: 5px; }
.footer { margin-top: 1em; color: #333; }
.home-option { padding: .6em 0; }
.record-span { font-weight: bold; padding-right: 1em; }
.record-notes { vertical-align: top; }
.record-list-actions { padding: 4px 0; clear: both; }
.record-list-actions a { padding: 0 4px; }
#pwd-info { padding: 0 6px; font-size: 1.1em; font-weight: bold;}
#id_notes { vertical-align: top; }
/* Messages */
.success, .errorlist {font-size: 1.2em; font-weight: bold; }
.success {color: #25B725; }
.errorlist {color: #B12B2B; }
/* colors */
.row-light-blue { background-color: #E6F0FA; }
.row-white { background-color: #fff; }
.green { color: #060; }
.orange { color: #FF3300; }
.red { color: #900; }Please remember, I'm not a CSS guru so just take this file as it is, a fairly naive way to provide styling to our interface.
Now for the interesting part. Creating and updating a record. We'll use the same template for both, so we expect some decisional logic to be there that will tell us in which of the two situations we are. As it turns out, it will not be that much code. The most exciting part of this template, however, is its associated JavaScript file which we'll examine right afterwards.
records/templates/records/record_add_edit.html
{% extends "records/base.html" %}
{% load static from staticfiles %}
{% block title %}
{% if update %}Update{% else %}Create{% endif %} Record
{% endblock title %}
{% block page-content %}
<h1>{% if update %}Update a{% else %}Create a new{% endif %}
Record
</h1>
{% include "records/messages.html" %}
<form action="." method="post">{% csrf_token %}
{{ form.non_field_errors }}
<div class="fieldWrapper">{{ form.title.errors }}
{{ form.title.label_tag }} {{ form.title }}</div>
<div class="fieldWrapper">{{ form.username.errors }}
{{ form.username.label_tag }} {{ form.username }}</div>
<div class="fieldWrapper">{{ form.email.errors }}
{{ form.email.label_tag }} {{ form.email }}</div>
<div class="fieldWrapper">{{ form.url.errors }}
{{ form.url.label_tag }} {{ form.url }}</div>
<div class="fieldWrapper">{{ form.password.errors }}
{{ form.password.label_tag }} {{ form.password }}
<span id="pwd-info"></span></div>
<button type="button" id="validate-btn">
Validate Password</button>
<button type="button" id="generate-btn">
Generate Password</button>
<div class="fieldWrapper">{{ form.notes.errors }}
{{ form.notes.label_tag }} {{ form.notes }}</div>
<input type="submit"
value="{% if update %}Update{% else %}Insert{% endif %}">
</form>
{% endblock page-content %}
{% block footer %}
<br>{% include "records/footer.html" %}<br>
Go to <a href="{% url "records:list" %}">the records list</a>.
{% endblock footer %}
{% block scripts %}
{{ block.super }}
<script src="{% static "records/js/api.js" %}"></script>
{% endblock scripts %}As usual, I have highlighted the important parts, so let's go through this code together.
You can see the first bit of decision logic in the title block. Similar decision logic is also displayed later on, in the header of the page (the h1 HTML tag), and in the submit button at the end of the form.
Apart from this logic, what I'd like you to focus on is the form and what's inside it. We set the action attribute to a dot, which means this page, so that we don't need to customize it according to which view is serving the page. Also, we immediately take care of the cross-site request forgery token, as explained in Chapter 10, Web Development Done Right.
Note that, this time, we cannot leave the whole form rendering up to Django since we want to add in a couple of extra things, so we go down one level of granularity and ask Django to render each individual field for us, along with any errors, along with its label. This way we still save a lot of effort, and at the same time, we can also customize the form as we like. In situations like this, it's not uncommon to write a small template to render a field, in order to avoid repeating those three lines for each field. In this case though, the form is so small I decided to avoid raising the complexity level up any further.
The span element, pwd-info, contains the information about the password that we get from the API. The two buttons after that, validate-btn and generate-btn, are hooked up with the AJAX calls to the API.
At the end of the template, in the scripts block, we need to load the api.js JavaScript file which contains the code to work with the API. We also need to use block.super, which will load whatever code is in the same block in the parent template (for example, jQuery). block.super is basically the template equivalent of a call to super(ClassName, self) in Python. It's important to load jQuery before our library, since the latter is based on the former.
Let's now take a look at that JavaScript. I don't expect you to understand everything. Firstly, this is a Python book and secondly, you're supposed to be a beginner (though by now, ninja trained), so fear not. However, as JavaScript has, by now, become essential if you're dealing with a web environment, having a working knowledge of it is extremely important even for a Python developer, so try and get the most out of what I'm about to show you. We'll see the password generation first:
records/static/records/js/api.js
var baseURL = 'http://127.0.0.1:5555/password';
var getRandomPassword = function() {
var apiURL = '{url}/generate'.replace('{url}', baseURL);
$.ajax({
type: 'GET',
url: apiURL,
success: function(data, status, request) {
$('#id_password').val(data[1]);
},
error: function() { alert('Unexpected error'); }
});
}
$(function() {
$('#generate-btn').click(getRandomPassword);
});Firstly, we set a variable for the base API URL: baseURL. Then, we define the getRandomPassword function, which is very simple. At the beginning, it defines the apiURL extending baseURL with a replacement technique. Even if the syntax is different from that of Python, you shouldn't have any issues understanding this line.
After defining the apiURL, the interesting bit comes up. We call $.ajax, which is the jQuery function that performs the AJAX calls. That $ is a shortcut for jQuery. As you can see in the body of the call, it's a GET request to apiURL. If it succeeds (success: ...), an anonymous function is run, which sets the value of the id_password text field to the second element of the returned data. We'll see the structure of the data when we examine the API code, so don't worry about that now. If an error occurs, we simply alert the user that there was an unexpected error.
After the function definition, we run a couple of lines of code to bind the click event on the generate-btn button to the getRandomPassword function. This means that, after this code has been run by the browser engine, every time we click the generate-btn button, the getRandomPassword function is called.
That wasn't so scary, was it? So let's see what we need for the validation part.
Now there is a value in the password field and we want to validate it. We need to call the API and inspect its response. Since passwords can have weird characters, I don't want to pass them on the URL, therefore I will use a POST request, which allows me to put the password in its body. To do this, I need the following code:
var validatePassword = function() {
var apiURL = '{url}/validate'.replace('{url}', baseURL);
$.ajax({
type: 'POST',
url: apiURL,
data: JSON.stringify({'password': $('#id_password').val()}),
contentType: "text/plain", // Avoid CORS preflight
success: function(data, status, request) {
var valid = data['valid'], infoClass, grade;
var msg = (valid?'Valid':'Invalid') + ' password.';
if (valid) {
var score = data['score']['total'];
grade = (score<10?'Poor':(score<18?'Medium':'Strong'));
infoClass = (score<10?'red':(score<18?'orange':'green'));
msg += ' (Score: {score}, {grade})'
.replace('{score}', score).replace('{grade}', grade);
}
$('#pwd-info').html(msg);
$('#pwd-info').removeClass().addClass(infoClass);
},
error: function(data) { alert('Unexpected error'); }
});
}
$(function() {
$('#validate-btn').click(validatePassword);
});The concept is the same as before, only this time it's for the validate-btn button. The body of the AJAX call is similar. We use a POST instead of a GET request, and we define the data as a JSON object, which is the equivalent of using json.dumps({'password': 'some_pwd'}) in Python.
The contentType line is a quick hack to avoid problems with the CORS preflight behavior of the browser. Cross-origin resource sharing (CORS) is a mechanism that allows restricted resources on a web page to be requested from another domain outside of the domain from which the request originated. In a nutshell, since the API is located at 127.0.0.1:5555 and the interface is running at 127.0.0.1:8000, without this hack, the browser wouldn't allow us to perform the calls. In a production environment, you may want to check the documentation for JSONP, which is a much better (albeit more complex) solution to this issue.
The body of the anonymous function which is run if the call succeeds is apparently only a bit complicated. All we need to do is understand if the password is valid (from data['valid']), and assign it a grade and a CSS class based on its score. Validity and score information come from the API response.
The only tricky bit in this code is the JavaScript ternary operator, so let's see a comparative example for it:
# Python error = 'critical' if error_level > 50 else 'medium' // JavaScript equivalent error = (error_level > 50 ? 'critical' : 'medium');
With this example, you shouldn't have any issue reading the rest of the logic in the function. I know, I could have just used a regular if (...), but JavaScript coders use the ternary operator all the time, so you should get used to it. It's good training to scratch our heads a bit harder in order to understand code.
Lastly, I'd like you to take a look at the end of that function. We set the html of the pwd-info span element to the message we assembled (msg), and then we style it. In one line, we remove all the CSS classes from that element (removeClass() with no parameters does that), and we add the infoClass to it. infoClass is either 'red', 'orange', or 'green'. If you go back to the main.css file, you'll see them at the bottom.
Now that we've seen both the template code and the JavaScript to make the calls, let's see a screenshot of the page. We're going to edit the first record, the one about my sister's school.
In the picture, you can see that I updated the password by clicking on the Generate Password button. Then, I saved the record (so you could see the nice message on top), and, finally, I clicked on the Validate Password button.
The result is shown in green on the right-hand side of the Password field. It's strong (23 is actually the maximum score we can get) so the message is displayed in a nice shade of green.
To delete a record, go to the list and click on the delete link. You'll be redirected to a page that asks you for confirmation; you can then choose to proceed and delete the poor record, or to cancel the request and go back to the list page. The template code is the following:
records/templates/records/record_confirm_delete.html
{% extends "records/base.html" %}
{% block title %}Delete record{% endblock title %}
{% block page-content %}
<h1>Confirm Record Deletion</h1>
<form action="." method="post">{% csrf_token %}
<p>Are you sure you want to delete "{{ object }}"?</p>
<input type="submit" value="Confirm" />
<a href="{% url "records:list" %}#record-{{ object.pk }}">
» cancel</a>
</form>
{% endblock page-content %}Since this is a template for a standard Django view, we need to use the naming conventions adopted by Django. Therefore, the record in question is called object in the template. The {{ object }} tag displays a string representation for the object, which is not exactly beautiful at the moment, since the whole line will read: Are you sure you want to delete "Record object"?.
This is because we haven't added a __str__ method to our Model class yet, which means that Python has no idea of what to show us when we ask for a string representation of an instance. Let's change this by completing our model, adding the __str__ method at the bottom of the class body:
records/models.py
class Record(models.Model):
...
def __str__(self):
return '{}'.format(self.title)
Restart the server and now the page will read: Are you sure you want to delete "Some Bank"? where Some Bank is the title of the record whose delete link I clicked on.
We could have just used {{ object.title }}, but I prefer to fix the root of the problem, not just the effect. Adding a __str__ method is in fact something that you ought to do for all of your models.
The interesting bit in this last template is actually the link for canceling the operation. We use the url tag to go back to the list view (records:list), but we add anchor information to it so that it will eventually read something like this (this is for pk=2):
http://127.0.0.1:8000/records/#record-2
This will go back to the list page and scroll down to the container div that has ID record 2, which is nice.
This concludes the interface. Even though this section was similar to what we saw in Chapter 10, Web Development Done Right, we've been able to concentrate more on the code in this chapter. We've seen how useful Django class-based views are, and we even touched on some cool JavaScript. Run $ python manage.py runserver and your interface should be up and running at http://127.0.0.1:8000.
Now it's time to spice things up a bit with the second part of this project.
Creating records
Here's the code for the creation view:
class EncryptionMixin:
def form_valid(self, form):
self.encrypt_password(form)
return super(EncryptionMixin, self).form_valid(form)
def encrypt_password(self, form):
self.object = form.save(commit=False)
self.object.encrypt_password()
self.object.save()
class RecordCreateView(
EncryptionMixin, SuccessMessageMixin, CreateView):
template_name = 'records/record_add_edit.html'
form_class = RecordForm
success_url = reverse_lazy('records:add')
success_message = 'Record was created successfully'A part of its logic has been factored out in order to be reused later on in the update view. Let's start with EncryptionMixin. All it does is override the form_valid method so that, prior to saving a new Record instance to the database, we make sure we call encrypt_password on the object that results from saving the form. In other words, when the user submits the form to create a new Record, if the form validates successfully, then the form_valid method is invoked. Within this method what usually happens is that an object is created out of the ModelForm instance, like this:
self.object = form.save()
We need to interfere with this behavior because running this code as it is would save the record with the original password, which isn't encrypted. So we change this to call save on the form passing commit=False, which creates the Record instance out of the form, but doesn't attempt to save it in the database. Immediately afterwards, we encrypt the password on that instance and then we can finally call save on it, actually committing it to the database.
Since we need this behavior both for creating and updating records, I have factored it out in a mixin.
Note
Perhaps, a better solution for this password encryption logic is to create a custom Field (inheriting from CharField is the easiest way to do it) and add the necessary logic to it, so that when we handle Record instances from and to the database, the encryption and decryption logic is performed automatically for us. Though more elegant, this solution needs me to digress and explain a lot more about Django internals, which is too much for the extent of this example. As usual, you can try to do it yourself, if you feel like a challenge.
After creating the EncryptionMixin class, we can use it in the RecordCreateView class. We also inherit from two other classes: SuccessMessageMixin and CreateView. The message mixin provides us with the logic to quickly set up a message when creation is successful, and the CreateView gives us the necessary logic to create an object from a form.
You can see that all we have to code is some customization: the template name, the form class, and the success message and URL. Everything else is gracefully handled for us by Django.
The code to update a Record instance is only a tiny bit more complicated. We just need to add some logic to decrypt the password before we populate the form with the record data.
class RecordUpdateView(
EncryptionMixin, SuccessMessageMixin, UpdateView):
template_name = 'records/record_add_edit.html'
form_class = RecordForm
model = Record
success_message = 'Record was updated successfully'
def get_context_data(self, **kwargs):
kwargs['update'] = True
return super(
RecordUpdateView, self).get_context_data(**kwargs)
def form_valid(self, form):
self.success_url = reverse_lazy(
'records:edit',
kwargs={'pk': self.object.pk}
)
return super(RecordUpdateView, self).form_valid(form)
def get_form_kwargs(self):
kwargs = super(RecordUpdateView, self).get_form_kwargs()
kwargs['instance'].decrypt_password()
return kwargsIn this view, we still inherit from both EncryptionMixin and SuccessMessageMixin, but the view class we use is UpdateView.
The first four lines are customization as before, we set the template name, the form class, the Record model, and the success message. We cannot set the success_url as a class attribute because we want to redirect a successful edit to the same edit page for that record and, in order to do this, we need the ID of the instance we're editing. No worries, we'll do it another way.
First, we override get_context_data in order to set 'update' to True in the kwargs argument, which means that a key 'update' will end up in the context dict that is passed to the template for rendering the page. We do this because we want to use the same template for creating and updating a record, therefore we will use this variable in the context to be able to understand in which situation we are. There are other ways to do this but this one is quick and easy and I like it because it's explicit.
After overriding get_context_data, we need to take care of the URL redirection. We do this in the form_valid method since we know that, if we get there, it means the Record instance has been successfully updated. We reverse the 'records:edit' view, which is exactly the view we're working on, passing the primary key of the object in question. We take that information from self.object.pk.
One of the reasons it's helpful to have the object saved on the view instance is that we can use it when needed without having to alter the signature of the many methods in the view in order to pass the object around. This design is very helpful and allows us to achieve a lot with very few lines of code.
The last thing we need to do is to decrypt the password on the instance before populating the form for the user. It's simple enough to do it in the get_form_kwargs method, where you can access the Record instance in the kwargs dict, and call decrypt_password on it.
This is all we need to do to update a record. If you think about it, the amount of code we had to write is really very little, thanks to Django class-based views.
Tip
A good way of understanding which is the best method to override, is to take a look at the Django official documentation or, even better in this case, check out the source code and look at the class-based views section. You'll be able to appreciate how much work has been done there by Django developers so that you only have to touch the smallest amounts of code to customize your views.
Of the three actions, deleting a record is definitely the easiest one. All we need is the following code:
class RecordDeleteView(SuccessMessageMixin, DeleteView):
model = Record
success_url = reverse_lazy('records:list')
def delete(self, request, *args, **kwargs):
messages.success(
request, 'Record was deleted successfully')
return super(RecordDeleteView, self).delete(
request, *args, **kwargs)We only need to inherit from SuccessMessageMixin and DeleteView, which gives us all we need. We set up the model and the success URL as class attributes, and then we override the delete method only to add a nice message that will be displayed in the list view (which is where we redirect to after deletion).
We don't need to specify the template name, since we'll use a name that Django infers by default: record_confirm_delete.html.
With this final view, we're all set to have a nice interface that we can use to handle Record instances.
Before we move on to the template layer, let's set up the URLs. This time, I want to show you the inclusion technique I talked about in Chapter 10, Web Development Done Right.
pwdweb/urls.py
from django.conf.urls import include, url
from django.contrib import admin
from records import urls as records_url
from records.views import HomeView
urlpatterns = [
url(r'^admin/', include(admin.site.urls)),
url(r'^records/', include(records_url, namespace='records')),
url(r'^$', HomeView.as_view(), name='home'),
]These are the URLs for the main project. We have the usual admin, a home page, and then for the records section, we include another urls.py file, which we define in the records application. This technique allows for apps to be reusable and self-contained. Note that, when including another urls.py file, you can pass namespace information, which you can then use in functions such as reverse, or the url template tag. For example, we've seen that the path to the RecordUpdateView was 'records:edit'. The first part of that string is the namespace, and the second is the name that we have given to the view, as you can see in the following code:
records/urls.py
from django.conf.urls import include, url
from django.contrib import admin
from .views import (RecordCreateView, RecordUpdateView,
RecordDeleteView, RecordListView)
urlpatterns = [
url(r'^add/$', RecordCreateView.as_view(), name='add'),
url(r'^edit/(?P<pk>[0-9]+)/$', RecordUpdateView.as_view(),
name='edit'),
url(r'^delete/(?P<pk>[0-9]+)/$', RecordDeleteView.as_view(),
name='delete'),
url(r'^$', RecordListView.as_view(), name='list'),
]We define four different url instances. There is one for adding a record, which doesn't need primary key information since the object doesn't exist yet. Then we have two url instances for updating and deleting a record, and for those we need to also specify primary key information to be passed to the view. Since Record instances have integer IDs, we can safely pass them on the URL, following good URL design practice. Finally, we define one url instance for the list of records.
All url instances have name information which is used in views and templates.
Let's start with the template we'll use as the basis for the rest:
records/templates/records/base.html
{% load static from staticfiles %}
<!DOCTYPE html>
<html lang="en">
<head>
<meta charset="utf-8">
<meta name="viewport"
content="width=device-width, initial-scale=1.0">
<link href="{% static "records/css/main.css" %}"
rel="stylesheet">
<title>{% block title %}Title{% endblock title %}</title>
</head>
<body>
<div id="page-content">
{% block page-content %}{% endblock page-content %}
</div>
<div id="footer">{% block footer %}{% endblock footer %}</div>
{% block scripts %}
<script
src="{% static "records/js/jquery-2.1.4.min.js" %}">
</script>
{% endblock scripts %}
</body>
</html>It's very similar to the one I used in Chapter 10, Web Development Done Right although it is a bit more compressed and with one major difference. We will import jQuery in every page.
Note
jQuery is the most popular JavaScript library out there. It allows you to write code that works on all the main browsers and it gives you many extra tools such as the ability to perform asynchronous calls (AJAX) from the browser itself. We'll use this library to perform the calls to the API, both to generate and validate our passwords. You can download it at https://jquery.com/, and put it in the pwdweb/records/static/records/js/ folder (you may have to amend the import in the template).
I highlighted the only interesting part of this template for you. Note that we load the JavaScript library at the end. This is common practice, as JavaScript is used to manipulate the page, so loading libraries at the end helps in avoiding situations such as JavaScript code failing because the element needed hadn't been rendered on the page yet.
The home template is very simple:
records/templates/records/home.html
{% extends "records/base.html" %}
{% block title %}Welcome to the Records website.{% endblock %}
{% block page-content %}
<h1>Welcome {{ user.first_name }}!</h1>
<div class="home-option">To create a record click
<a href="{% url "records:add" %}">here.</a>
</div>
<div class="home-option">To see all records click
<a href="{% url "records:list" %}">here.</a>
</div>
{% endblock page-content %}There is nothing new here when compared to the home.html template we saw in Chapter 10, Web Development Done Right. The footer template is actually exactly the same:
records/templates/records/footer.html
<div class="footer">
Go back <a href="{% url "home" %}">home</a>.
</div>This template to list all records is fairly simple:
records/templates/records/list.html
{% extends "records/base.html" %}
{% load record_extras %}
{% block title %}Records{% endblock title %}
{% block page-content %}
<h1>Records</h1><span name="top"></span>
{% include "records/messages.html" %}
{% for record in records %}
<div class="record {% cycle 'row-light-blue' 'row-white' %}"
id="record-{{ record.pk }}">
<div class="record-left">
<div class="record-list">
<span class="record-span">Title</span>{{ record.title }}
</div>
<div class="record-list">
<span class="record-span">Username</span>
{{ record.username }}
</div>
<div class="record-list">
<span class="record-span">Email</span>{{ record.email }}
</div>
<div class="record-list">
<span class="record-span">URL</span>
<a href="{{ record.url }}" target="_blank">
{{ record.url }}</a>
</div>
<div class="record-list">
<span class="record-span">Password</span>
{% hide_password record.plaintext %}
</div>
</div>
<div class="record-right">
<div class="record-list">
<span class="record-span">Notes</span>
<textarea rows="3" cols="40" class="record-notes"
readonly>{{ record.notes }}</textarea>
</div>
<div class="record-list">
<span class="record-span">Last modified</span>
{{ record.last_modified }}
</div>
<div class="record-list">
<span class="record-span">Created</span>
{{ record.created }}
</div>
</div>
<div class="record-list-actions">
<a href="{% url "records:edit" pk=record.pk %}">» edit</a>
<a href="{% url "records:delete" pk=record.pk %}">» delete
</a>
</div>
</div>
{% endfor %}
{% endblock page-content %}
{% block footer %}
<p><a href="#top">Go back to top</a></p>
{% include "records/footer.html" %}
{% endblock footer %}For this template as well, I have highlighted the parts I'd like you to focus on. Firstly, I load a custom tags module, record_extras, which we'll need later. I have also added an anchor at the top, so that we'll be able to put a link to it at the bottom of the page, to avoid having to scroll all the way up.
Then, I included a template to provide me with the HTML code to display Django messages. It's a very simple template which I'll show you shortly.
Then, we define a list of div elements. Each Record instance has a container div, in which there are two other main div elements: record-left and record-right. In order to display them side by side, I have set this class in the main.css file:
.record-left { float: left; width: 300px;}The outermost div container (the one with class record), has an id attribute, which I have used as an anchor. This allows us to click on cancel on the record delete page, so that if we change our minds and don't want to delete the record, we can get back to the list page, and at the right position.
Each attribute of the record is then displayed in div elements whose class is record-list. Most of these classes are just there to allow me to set a bit of padding and dimensions on the HTML elements.
The next interesting bit is the hide_password tag, which takes the plaintext, which is the unencrypted password. The purpose of this custom tag is to display a sequence of '*' characters, as long as the original password, so that if someone is passing by while you're on the page, they won't see your passwords. However, hovering on that sequence of '*' characters will show you the original password in the tooltip. Here's the code for the hide_password tag:
records/templatetags/record_extras.py
from django import template
from django.utils.html import escape
register = template.Library()
@register.simple_tag
def hide_password(password):
return '<span title="{0}">{1}</span>'.format(
escape(password), '*' * len(password))There is nothing fancy here. We just register this function as a simple tag and then we can use it wherever we want. It takes a password and puts it as a tooltip of a span element, whose main content is a sequence of '*' characters. Just note one thing: we need to escape the password, so that we're sure it won't break our HTML (think of what might happen if the password contained a double-quote `"`, for example).
As far as the list.html template is concerned, the next interesting bit is that we set the readonly attribute to the textarea element, so as not to give the impression to the user that they can modify notes on the fly.
Then, we set a couple of links for each Record instance, right at the bottom of the container div. There is one for the edit page, and another for the delete page. Note that we need to pass the url tag not only the namespace:name string, but also the primary key information, as required by the URL setup we made in the urls.py module for those views.
Finally, we import the footer and set the link to the anchor on top of the page.
Now, as promised, here is the code for the messages:
records/templates/records/messages.html
{% if messages %}
{% for message in messages %}
<p class="{{ message.tags }}">{{ message }}</p>
{% endfor %}
{% endif %}This code takes care of displaying messages only when there is at least one to display. We give the p tag class information to display success messages in green and error messages in red.
If you grab the main.css file from the source code for the book, you will now be able to visualize the list page (yours will be blank, you still need to insert data into it), and it should look something like this:
As you can see, I have two records in the database at the moment. I'm hovering on the password of the first one, which is my platform account at my sister's school, and the password is displayed in the tooltip. The division in two div elements, left and right, helps in making rows smaller so that the overall result is more pleasing to the eye. The important information is on the left and the ancillary information is on the right. The row color alternates between a very light shade of blue and white.
Each row has an edit and delete link, at its bottom left. We'll show the pages for those two links right after we see the code for the templates that create them.
The CSS code that holds all the information for this interface is the following:
records/static/records/css/main.css
html, body, * {
font-family: 'Trebuchet MS', Helvetica, sans-serif; }
a { color: #333; }
.record {
clear: both; padding: 1em; border-bottom: 1px solid #666;}
.record-left { float: left; width: 300px;}
.record-list { padding: 2px 0; }
.fieldWrapper { padding: 5px; }
.footer { margin-top: 1em; color: #333; }
.home-option { padding: .6em 0; }
.record-span { font-weight: bold; padding-right: 1em; }
.record-notes { vertical-align: top; }
.record-list-actions { padding: 4px 0; clear: both; }
.record-list-actions a { padding: 0 4px; }
#pwd-info { padding: 0 6px; font-size: 1.1em; font-weight: bold;}
#id_notes { vertical-align: top; }
/* Messages */
.success, .errorlist {font-size: 1.2em; font-weight: bold; }
.success {color: #25B725; }
.errorlist {color: #B12B2B; }
/* colors */
.row-light-blue { background-color: #E6F0FA; }
.row-white { background-color: #fff; }
.green { color: #060; }
.orange { color: #FF3300; }
.red { color: #900; }Please remember, I'm not a CSS guru so just take this file as it is, a fairly naive way to provide styling to our interface.
Now for the interesting part. Creating and updating a record. We'll use the same template for both, so we expect some decisional logic to be there that will tell us in which of the two situations we are. As it turns out, it will not be that much code. The most exciting part of this template, however, is its associated JavaScript file which we'll examine right afterwards.
records/templates/records/record_add_edit.html
{% extends "records/base.html" %}
{% load static from staticfiles %}
{% block title %}
{% if update %}Update{% else %}Create{% endif %} Record
{% endblock title %}
{% block page-content %}
<h1>{% if update %}Update a{% else %}Create a new{% endif %}
Record
</h1>
{% include "records/messages.html" %}
<form action="." method="post">{% csrf_token %}
{{ form.non_field_errors }}
<div class="fieldWrapper">{{ form.title.errors }}
{{ form.title.label_tag }} {{ form.title }}</div>
<div class="fieldWrapper">{{ form.username.errors }}
{{ form.username.label_tag }} {{ form.username }}</div>
<div class="fieldWrapper">{{ form.email.errors }}
{{ form.email.label_tag }} {{ form.email }}</div>
<div class="fieldWrapper">{{ form.url.errors }}
{{ form.url.label_tag }} {{ form.url }}</div>
<div class="fieldWrapper">{{ form.password.errors }}
{{ form.password.label_tag }} {{ form.password }}
<span id="pwd-info"></span></div>
<button type="button" id="validate-btn">
Validate Password</button>
<button type="button" id="generate-btn">
Generate Password</button>
<div class="fieldWrapper">{{ form.notes.errors }}
{{ form.notes.label_tag }} {{ form.notes }}</div>
<input type="submit"
value="{% if update %}Update{% else %}Insert{% endif %}">
</form>
{% endblock page-content %}
{% block footer %}
<br>{% include "records/footer.html" %}<br>
Go to <a href="{% url "records:list" %}">the records list</a>.
{% endblock footer %}
{% block scripts %}
{{ block.super }}
<script src="{% static "records/js/api.js" %}"></script>
{% endblock scripts %}As usual, I have highlighted the important parts, so let's go through this code together.
You can see the first bit of decision logic in the title block. Similar decision logic is also displayed later on, in the header of the page (the h1 HTML tag), and in the submit button at the end of the form.
Apart from this logic, what I'd like you to focus on is the form and what's inside it. We set the action attribute to a dot, which means this page, so that we don't need to customize it according to which view is serving the page. Also, we immediately take care of the cross-site request forgery token, as explained in Chapter 10, Web Development Done Right.
Note that, this time, we cannot leave the whole form rendering up to Django since we want to add in a couple of extra things, so we go down one level of granularity and ask Django to render each individual field for us, along with any errors, along with its label. This way we still save a lot of effort, and at the same time, we can also customize the form as we like. In situations like this, it's not uncommon to write a small template to render a field, in order to avoid repeating those three lines for each field. In this case though, the form is so small I decided to avoid raising the complexity level up any further.
The span element, pwd-info, contains the information about the password that we get from the API. The two buttons after that, validate-btn and generate-btn, are hooked up with the AJAX calls to the API.
At the end of the template, in the scripts block, we need to load the api.js JavaScript file which contains the code to work with the API. We also need to use block.super, which will load whatever code is in the same block in the parent template (for example, jQuery). block.super is basically the template equivalent of a call to super(ClassName, self) in Python. It's important to load jQuery before our library, since the latter is based on the former.
Let's now take a look at that JavaScript. I don't expect you to understand everything. Firstly, this is a Python book and secondly, you're supposed to be a beginner (though by now, ninja trained), so fear not. However, as JavaScript has, by now, become essential if you're dealing with a web environment, having a working knowledge of it is extremely important even for a Python developer, so try and get the most out of what I'm about to show you. We'll see the password generation first:
records/static/records/js/api.js
var baseURL = 'http://127.0.0.1:5555/password';
var getRandomPassword = function() {
var apiURL = '{url}/generate'.replace('{url}', baseURL);
$.ajax({
type: 'GET',
url: apiURL,
success: function(data, status, request) {
$('#id_password').val(data[1]);
},
error: function() { alert('Unexpected error'); }
});
}
$(function() {
$('#generate-btn').click(getRandomPassword);
});Firstly, we set a variable for the base API URL: baseURL. Then, we define the getRandomPassword function, which is very simple. At the beginning, it defines the apiURL extending baseURL with a replacement technique. Even if the syntax is different from that of Python, you shouldn't have any issues understanding this line.
After defining the apiURL, the interesting bit comes up. We call $.ajax, which is the jQuery function that performs the AJAX calls. That $ is a shortcut for jQuery. As you can see in the body of the call, it's a GET request to apiURL. If it succeeds (success: ...), an anonymous function is run, which sets the value of the id_password text field to the second element of the returned data. We'll see the structure of the data when we examine the API code, so don't worry about that now. If an error occurs, we simply alert the user that there was an unexpected error.
After the function definition, we run a couple of lines of code to bind the click event on the generate-btn button to the getRandomPassword function. This means that, after this code has been run by the browser engine, every time we click the generate-btn button, the getRandomPassword function is called.
That wasn't so scary, was it? So let's see what we need for the validation part.
Now there is a value in the password field and we want to validate it. We need to call the API and inspect its response. Since passwords can have weird characters, I don't want to pass them on the URL, therefore I will use a POST request, which allows me to put the password in its body. To do this, I need the following code:
var validatePassword = function() {
var apiURL = '{url}/validate'.replace('{url}', baseURL);
$.ajax({
type: 'POST',
url: apiURL,
data: JSON.stringify({'password': $('#id_password').val()}),
contentType: "text/plain", // Avoid CORS preflight
success: function(data, status, request) {
var valid = data['valid'], infoClass, grade;
var msg = (valid?'Valid':'Invalid') + ' password.';
if (valid) {
var score = data['score']['total'];
grade = (score<10?'Poor':(score<18?'Medium':'Strong'));
infoClass = (score<10?'red':(score<18?'orange':'green'));
msg += ' (Score: {score}, {grade})'
.replace('{score}', score).replace('{grade}', grade);
}
$('#pwd-info').html(msg);
$('#pwd-info').removeClass().addClass(infoClass);
},
error: function(data) { alert('Unexpected error'); }
});
}
$(function() {
$('#validate-btn').click(validatePassword);
});The concept is the same as before, only this time it's for the validate-btn button. The body of the AJAX call is similar. We use a POST instead of a GET request, and we define the data as a JSON object, which is the equivalent of using json.dumps({'password': 'some_pwd'}) in Python.
The contentType line is a quick hack to avoid problems with the CORS preflight behavior of the browser. Cross-origin resource sharing (CORS) is a mechanism that allows restricted resources on a web page to be requested from another domain outside of the domain from which the request originated. In a nutshell, since the API is located at 127.0.0.1:5555 and the interface is running at 127.0.0.1:8000, without this hack, the browser wouldn't allow us to perform the calls. In a production environment, you may want to check the documentation for JSONP, which is a much better (albeit more complex) solution to this issue.
The body of the anonymous function which is run if the call succeeds is apparently only a bit complicated. All we need to do is understand if the password is valid (from data['valid']), and assign it a grade and a CSS class based on its score. Validity and score information come from the API response.
The only tricky bit in this code is the JavaScript ternary operator, so let's see a comparative example for it:
# Python error = 'critical' if error_level > 50 else 'medium' // JavaScript equivalent error = (error_level > 50 ? 'critical' : 'medium');
With this example, you shouldn't have any issue reading the rest of the logic in the function. I know, I could have just used a regular if (...), but JavaScript coders use the ternary operator all the time, so you should get used to it. It's good training to scratch our heads a bit harder in order to understand code.
Lastly, I'd like you to take a look at the end of that function. We set the html of the pwd-info span element to the message we assembled (msg), and then we style it. In one line, we remove all the CSS classes from that element (removeClass() with no parameters does that), and we add the infoClass to it. infoClass is either 'red', 'orange', or 'green'. If you go back to the main.css file, you'll see them at the bottom.
Now that we've seen both the template code and the JavaScript to make the calls, let's see a screenshot of the page. We're going to edit the first record, the one about my sister's school.
In the picture, you can see that I updated the password by clicking on the Generate Password button. Then, I saved the record (so you could see the nice message on top), and, finally, I clicked on the Validate Password button.
The result is shown in green on the right-hand side of the Password field. It's strong (23 is actually the maximum score we can get) so the message is displayed in a nice shade of green.
To delete a record, go to the list and click on the delete link. You'll be redirected to a page that asks you for confirmation; you can then choose to proceed and delete the poor record, or to cancel the request and go back to the list page. The template code is the following:
records/templates/records/record_confirm_delete.html
{% extends "records/base.html" %}
{% block title %}Delete record{% endblock title %}
{% block page-content %}
<h1>Confirm Record Deletion</h1>
<form action="." method="post">{% csrf_token %}
<p>Are you sure you want to delete "{{ object }}"?</p>
<input type="submit" value="Confirm" />
<a href="{% url "records:list" %}#record-{{ object.pk }}">
» cancel</a>
</form>
{% endblock page-content %}Since this is a template for a standard Django view, we need to use the naming conventions adopted by Django. Therefore, the record in question is called object in the template. The {{ object }} tag displays a string representation for the object, which is not exactly beautiful at the moment, since the whole line will read: Are you sure you want to delete "Record object"?.
This is because we haven't added a __str__ method to our Model class yet, which means that Python has no idea of what to show us when we ask for a string representation of an instance. Let's change this by completing our model, adding the __str__ method at the bottom of the class body:
records/models.py
class Record(models.Model):
...
def __str__(self):
return '{}'.format(self.title)
Restart the server and now the page will read: Are you sure you want to delete "Some Bank"? where Some Bank is the title of the record whose delete link I clicked on.
We could have just used {{ object.title }}, but I prefer to fix the root of the problem, not just the effect. Adding a __str__ method is in fact something that you ought to do for all of your models.
The interesting bit in this last template is actually the link for canceling the operation. We use the url tag to go back to the list view (records:list), but we add anchor information to it so that it will eventually read something like this (this is for pk=2):
http://127.0.0.1:8000/records/#record-2
This will go back to the list page and scroll down to the container div that has ID record 2, which is nice.
This concludes the interface. Even though this section was similar to what we saw in Chapter 10, Web Development Done Right, we've been able to concentrate more on the code in this chapter. We've seen how useful Django class-based views are, and we even touched on some cool JavaScript. Run $ python manage.py runserver and your interface should be up and running at http://127.0.0.1:8000.
Now it's time to spice things up a bit with the second part of this project.
Updating records
The code to update a Record instance is only a tiny bit more complicated. We just need to add some logic to decrypt the password before we populate the form with the record data.
class RecordUpdateView(
EncryptionMixin, SuccessMessageMixin, UpdateView):
template_name = 'records/record_add_edit.html'
form_class = RecordForm
model = Record
success_message = 'Record was updated successfully'
def get_context_data(self, **kwargs):
kwargs['update'] = True
return super(
RecordUpdateView, self).get_context_data(**kwargs)
def form_valid(self, form):
self.success_url = reverse_lazy(
'records:edit',
kwargs={'pk': self.object.pk}
)
return super(RecordUpdateView, self).form_valid(form)
def get_form_kwargs(self):
kwargs = super(RecordUpdateView, self).get_form_kwargs()
kwargs['instance'].decrypt_password()
return kwargsIn this view, we still inherit from both EncryptionMixin and SuccessMessageMixin, but the view class we use is UpdateView.
The first four lines are customization as before, we set the template name, the form class, the Record model, and the success message. We cannot set the success_url as a class attribute because we want to redirect a successful edit to the same edit page for that record and, in order to do this, we need the ID of the instance we're editing. No worries, we'll do it another way.
First, we override get_context_data in order to set 'update' to True in the kwargs argument, which means that a key 'update' will end up in the context dict that is passed to the template for rendering the page. We do this because we want to use the same template for creating and updating a record, therefore we will use this variable in the context to be able to understand in which situation we are. There are other ways to do this but this one is quick and easy and I like it because it's explicit.
After overriding get_context_data, we need to take care of the URL redirection. We do this in the form_valid method since we know that, if we get there, it means the Record instance has been successfully updated. We reverse the 'records:edit' view, which is exactly the view we're working on, passing the primary key of the object in question. We take that information from self.object.pk.
One of the reasons it's helpful to have the object saved on the view instance is that we can use it when needed without having to alter the signature of the many methods in the view in order to pass the object around. This design is very helpful and allows us to achieve a lot with very few lines of code.
The last thing we need to do is to decrypt the password on the instance before populating the form for the user. It's simple enough to do it in the get_form_kwargs method, where you can access the Record instance in the kwargs dict, and call decrypt_password on it.
This is all we need to do to update a record. If you think about it, the amount of code we had to write is really very little, thanks to Django class-based views.
Tip
A good way of understanding which is the best method to override, is to take a look at the Django official documentation or, even better in this case, check out the source code and look at the class-based views section. You'll be able to appreciate how much work has been done there by Django developers so that you only have to touch the smallest amounts of code to customize your views.
Of the three actions, deleting a record is definitely the easiest one. All we need is the following code:
class RecordDeleteView(SuccessMessageMixin, DeleteView):
model = Record
success_url = reverse_lazy('records:list')
def delete(self, request, *args, **kwargs):
messages.success(
request, 'Record was deleted successfully')
return super(RecordDeleteView, self).delete(
request, *args, **kwargs)We only need to inherit from SuccessMessageMixin and DeleteView, which gives us all we need. We set up the model and the success URL as class attributes, and then we override the delete method only to add a nice message that will be displayed in the list view (which is where we redirect to after deletion).
We don't need to specify the template name, since we'll use a name that Django infers by default: record_confirm_delete.html.
With this final view, we're all set to have a nice interface that we can use to handle Record instances.
Before we move on to the template layer, let's set up the URLs. This time, I want to show you the inclusion technique I talked about in Chapter 10, Web Development Done Right.
pwdweb/urls.py
from django.conf.urls import include, url
from django.contrib import admin
from records import urls as records_url
from records.views import HomeView
urlpatterns = [
url(r'^admin/', include(admin.site.urls)),
url(r'^records/', include(records_url, namespace='records')),
url(r'^$', HomeView.as_view(), name='home'),
]These are the URLs for the main project. We have the usual admin, a home page, and then for the records section, we include another urls.py file, which we define in the records application. This technique allows for apps to be reusable and self-contained. Note that, when including another urls.py file, you can pass namespace information, which you can then use in functions such as reverse, or the url template tag. For example, we've seen that the path to the RecordUpdateView was 'records:edit'. The first part of that string is the namespace, and the second is the name that we have given to the view, as you can see in the following code:
records/urls.py
from django.conf.urls import include, url
from django.contrib import admin
from .views import (RecordCreateView, RecordUpdateView,
RecordDeleteView, RecordListView)
urlpatterns = [
url(r'^add/$', RecordCreateView.as_view(), name='add'),
url(r'^edit/(?P<pk>[0-9]+)/$', RecordUpdateView.as_view(),
name='edit'),
url(r'^delete/(?P<pk>[0-9]+)/$', RecordDeleteView.as_view(),
name='delete'),
url(r'^$', RecordListView.as_view(), name='list'),
]We define four different url instances. There is one for adding a record, which doesn't need primary key information since the object doesn't exist yet. Then we have two url instances for updating and deleting a record, and for those we need to also specify primary key information to be passed to the view. Since Record instances have integer IDs, we can safely pass them on the URL, following good URL design practice. Finally, we define one url instance for the list of records.
All url instances have name information which is used in views and templates.
Let's start with the template we'll use as the basis for the rest:
records/templates/records/base.html
{% load static from staticfiles %}
<!DOCTYPE html>
<html lang="en">
<head>
<meta charset="utf-8">
<meta name="viewport"
content="width=device-width, initial-scale=1.0">
<link href="{% static "records/css/main.css" %}"
rel="stylesheet">
<title>{% block title %}Title{% endblock title %}</title>
</head>
<body>
<div id="page-content">
{% block page-content %}{% endblock page-content %}
</div>
<div id="footer">{% block footer %}{% endblock footer %}</div>
{% block scripts %}
<script
src="{% static "records/js/jquery-2.1.4.min.js" %}">
</script>
{% endblock scripts %}
</body>
</html>It's very similar to the one I used in Chapter 10, Web Development Done Right although it is a bit more compressed and with one major difference. We will import jQuery in every page.
Note
jQuery is the most popular JavaScript library out there. It allows you to write code that works on all the main browsers and it gives you many extra tools such as the ability to perform asynchronous calls (AJAX) from the browser itself. We'll use this library to perform the calls to the API, both to generate and validate our passwords. You can download it at https://jquery.com/, and put it in the pwdweb/records/static/records/js/ folder (you may have to amend the import in the template).
I highlighted the only interesting part of this template for you. Note that we load the JavaScript library at the end. This is common practice, as JavaScript is used to manipulate the page, so loading libraries at the end helps in avoiding situations such as JavaScript code failing because the element needed hadn't been rendered on the page yet.
The home template is very simple:
records/templates/records/home.html
{% extends "records/base.html" %}
{% block title %}Welcome to the Records website.{% endblock %}
{% block page-content %}
<h1>Welcome {{ user.first_name }}!</h1>
<div class="home-option">To create a record click
<a href="{% url "records:add" %}">here.</a>
</div>
<div class="home-option">To see all records click
<a href="{% url "records:list" %}">here.</a>
</div>
{% endblock page-content %}There is nothing new here when compared to the home.html template we saw in Chapter 10, Web Development Done Right. The footer template is actually exactly the same:
records/templates/records/footer.html
<div class="footer">
Go back <a href="{% url "home" %}">home</a>.
</div>This template to list all records is fairly simple:
records/templates/records/list.html
{% extends "records/base.html" %}
{% load record_extras %}
{% block title %}Records{% endblock title %}
{% block page-content %}
<h1>Records</h1><span name="top"></span>
{% include "records/messages.html" %}
{% for record in records %}
<div class="record {% cycle 'row-light-blue' 'row-white' %}"
id="record-{{ record.pk }}">
<div class="record-left">
<div class="record-list">
<span class="record-span">Title</span>{{ record.title }}
</div>
<div class="record-list">
<span class="record-span">Username</span>
{{ record.username }}
</div>
<div class="record-list">
<span class="record-span">Email</span>{{ record.email }}
</div>
<div class="record-list">
<span class="record-span">URL</span>
<a href="{{ record.url }}" target="_blank">
{{ record.url }}</a>
</div>
<div class="record-list">
<span class="record-span">Password</span>
{% hide_password record.plaintext %}
</div>
</div>
<div class="record-right">
<div class="record-list">
<span class="record-span">Notes</span>
<textarea rows="3" cols="40" class="record-notes"
readonly>{{ record.notes }}</textarea>
</div>
<div class="record-list">
<span class="record-span">Last modified</span>
{{ record.last_modified }}
</div>
<div class="record-list">
<span class="record-span">Created</span>
{{ record.created }}
</div>
</div>
<div class="record-list-actions">
<a href="{% url "records:edit" pk=record.pk %}">» edit</a>
<a href="{% url "records:delete" pk=record.pk %}">» delete
</a>
</div>
</div>
{% endfor %}
{% endblock page-content %}
{% block footer %}
<p><a href="#top">Go back to top</a></p>
{% include "records/footer.html" %}
{% endblock footer %}For this template as well, I have highlighted the parts I'd like you to focus on. Firstly, I load a custom tags module, record_extras, which we'll need later. I have also added an anchor at the top, so that we'll be able to put a link to it at the bottom of the page, to avoid having to scroll all the way up.
Then, I included a template to provide me with the HTML code to display Django messages. It's a very simple template which I'll show you shortly.
Then, we define a list of div elements. Each Record instance has a container div, in which there are two other main div elements: record-left and record-right. In order to display them side by side, I have set this class in the main.css file:
.record-left { float: left; width: 300px;}The outermost div container (the one with class record), has an id attribute, which I have used as an anchor. This allows us to click on cancel on the record delete page, so that if we change our minds and don't want to delete the record, we can get back to the list page, and at the right position.
Each attribute of the record is then displayed in div elements whose class is record-list. Most of these classes are just there to allow me to set a bit of padding and dimensions on the HTML elements.
The next interesting bit is the hide_password tag, which takes the plaintext, which is the unencrypted password. The purpose of this custom tag is to display a sequence of '*' characters, as long as the original password, so that if someone is passing by while you're on the page, they won't see your passwords. However, hovering on that sequence of '*' characters will show you the original password in the tooltip. Here's the code for the hide_password tag:
records/templatetags/record_extras.py
from django import template
from django.utils.html import escape
register = template.Library()
@register.simple_tag
def hide_password(password):
return '<span title="{0}">{1}</span>'.format(
escape(password), '*' * len(password))There is nothing fancy here. We just register this function as a simple tag and then we can use it wherever we want. It takes a password and puts it as a tooltip of a span element, whose main content is a sequence of '*' characters. Just note one thing: we need to escape the password, so that we're sure it won't break our HTML (think of what might happen if the password contained a double-quote `"`, for example).
As far as the list.html template is concerned, the next interesting bit is that we set the readonly attribute to the textarea element, so as not to give the impression to the user that they can modify notes on the fly.
Then, we set a couple of links for each Record instance, right at the bottom of the container div. There is one for the edit page, and another for the delete page. Note that we need to pass the url tag not only the namespace:name string, but also the primary key information, as required by the URL setup we made in the urls.py module for those views.
Finally, we import the footer and set the link to the anchor on top of the page.
Now, as promised, here is the code for the messages:
records/templates/records/messages.html
{% if messages %}
{% for message in messages %}
<p class="{{ message.tags }}">{{ message }}</p>
{% endfor %}
{% endif %}This code takes care of displaying messages only when there is at least one to display. We give the p tag class information to display success messages in green and error messages in red.
If you grab the main.css file from the source code for the book, you will now be able to visualize the list page (yours will be blank, you still need to insert data into it), and it should look something like this:
As you can see, I have two records in the database at the moment. I'm hovering on the password of the first one, which is my platform account at my sister's school, and the password is displayed in the tooltip. The division in two div elements, left and right, helps in making rows smaller so that the overall result is more pleasing to the eye. The important information is on the left and the ancillary information is on the right. The row color alternates between a very light shade of blue and white.
Each row has an edit and delete link, at its bottom left. We'll show the pages for those two links right after we see the code for the templates that create them.
The CSS code that holds all the information for this interface is the following:
records/static/records/css/main.css
html, body, * {
font-family: 'Trebuchet MS', Helvetica, sans-serif; }
a { color: #333; }
.record {
clear: both; padding: 1em; border-bottom: 1px solid #666;}
.record-left { float: left; width: 300px;}
.record-list { padding: 2px 0; }
.fieldWrapper { padding: 5px; }
.footer { margin-top: 1em; color: #333; }
.home-option { padding: .6em 0; }
.record-span { font-weight: bold; padding-right: 1em; }
.record-notes { vertical-align: top; }
.record-list-actions { padding: 4px 0; clear: both; }
.record-list-actions a { padding: 0 4px; }
#pwd-info { padding: 0 6px; font-size: 1.1em; font-weight: bold;}
#id_notes { vertical-align: top; }
/* Messages */
.success, .errorlist {font-size: 1.2em; font-weight: bold; }
.success {color: #25B725; }
.errorlist {color: #B12B2B; }
/* colors */
.row-light-blue { background-color: #E6F0FA; }
.row-white { background-color: #fff; }
.green { color: #060; }
.orange { color: #FF3300; }
.red { color: #900; }Please remember, I'm not a CSS guru so just take this file as it is, a fairly naive way to provide styling to our interface.
Now for the interesting part. Creating and updating a record. We'll use the same template for both, so we expect some decisional logic to be there that will tell us in which of the two situations we are. As it turns out, it will not be that much code. The most exciting part of this template, however, is its associated JavaScript file which we'll examine right afterwards.
records/templates/records/record_add_edit.html
{% extends "records/base.html" %}
{% load static from staticfiles %}
{% block title %}
{% if update %}Update{% else %}Create{% endif %} Record
{% endblock title %}
{% block page-content %}
<h1>{% if update %}Update a{% else %}Create a new{% endif %}
Record
</h1>
{% include "records/messages.html" %}
<form action="." method="post">{% csrf_token %}
{{ form.non_field_errors }}
<div class="fieldWrapper">{{ form.title.errors }}
{{ form.title.label_tag }} {{ form.title }}</div>
<div class="fieldWrapper">{{ form.username.errors }}
{{ form.username.label_tag }} {{ form.username }}</div>
<div class="fieldWrapper">{{ form.email.errors }}
{{ form.email.label_tag }} {{ form.email }}</div>
<div class="fieldWrapper">{{ form.url.errors }}
{{ form.url.label_tag }} {{ form.url }}</div>
<div class="fieldWrapper">{{ form.password.errors }}
{{ form.password.label_tag }} {{ form.password }}
<span id="pwd-info"></span></div>
<button type="button" id="validate-btn">
Validate Password</button>
<button type="button" id="generate-btn">
Generate Password</button>
<div class="fieldWrapper">{{ form.notes.errors }}
{{ form.notes.label_tag }} {{ form.notes }}</div>
<input type="submit"
value="{% if update %}Update{% else %}Insert{% endif %}">
</form>
{% endblock page-content %}
{% block footer %}
<br>{% include "records/footer.html" %}<br>
Go to <a href="{% url "records:list" %}">the records list</a>.
{% endblock footer %}
{% block scripts %}
{{ block.super }}
<script src="{% static "records/js/api.js" %}"></script>
{% endblock scripts %}As usual, I have highlighted the important parts, so let's go through this code together.
You can see the first bit of decision logic in the title block. Similar decision logic is also displayed later on, in the header of the page (the h1 HTML tag), and in the submit button at the end of the form.
Apart from this logic, what I'd like you to focus on is the form and what's inside it. We set the action attribute to a dot, which means this page, so that we don't need to customize it according to which view is serving the page. Also, we immediately take care of the cross-site request forgery token, as explained in Chapter 10, Web Development Done Right.
Note that, this time, we cannot leave the whole form rendering up to Django since we want to add in a couple of extra things, so we go down one level of granularity and ask Django to render each individual field for us, along with any errors, along with its label. This way we still save a lot of effort, and at the same time, we can also customize the form as we like. In situations like this, it's not uncommon to write a small template to render a field, in order to avoid repeating those three lines for each field. In this case though, the form is so small I decided to avoid raising the complexity level up any further.
The span element, pwd-info, contains the information about the password that we get from the API. The two buttons after that, validate-btn and generate-btn, are hooked up with the AJAX calls to the API.
At the end of the template, in the scripts block, we need to load the api.js JavaScript file which contains the code to work with the API. We also need to use block.super, which will load whatever code is in the same block in the parent template (for example, jQuery). block.super is basically the template equivalent of a call to super(ClassName, self) in Python. It's important to load jQuery before our library, since the latter is based on the former.
Let's now take a look at that JavaScript. I don't expect you to understand everything. Firstly, this is a Python book and secondly, you're supposed to be a beginner (though by now, ninja trained), so fear not. However, as JavaScript has, by now, become essential if you're dealing with a web environment, having a working knowledge of it is extremely important even for a Python developer, so try and get the most out of what I'm about to show you. We'll see the password generation first:
records/static/records/js/api.js
var baseURL = 'http://127.0.0.1:5555/password';
var getRandomPassword = function() {
var apiURL = '{url}/generate'.replace('{url}', baseURL);
$.ajax({
type: 'GET',
url: apiURL,
success: function(data, status, request) {
$('#id_password').val(data[1]);
},
error: function() { alert('Unexpected error'); }
});
}
$(function() {
$('#generate-btn').click(getRandomPassword);
});Firstly, we set a variable for the base API URL: baseURL. Then, we define the getRandomPassword function, which is very simple. At the beginning, it defines the apiURL extending baseURL with a replacement technique. Even if the syntax is different from that of Python, you shouldn't have any issues understanding this line.
After defining the apiURL, the interesting bit comes up. We call $.ajax, which is the jQuery function that performs the AJAX calls. That $ is a shortcut for jQuery. As you can see in the body of the call, it's a GET request to apiURL. If it succeeds (success: ...), an anonymous function is run, which sets the value of the id_password text field to the second element of the returned data. We'll see the structure of the data when we examine the API code, so don't worry about that now. If an error occurs, we simply alert the user that there was an unexpected error.
After the function definition, we run a couple of lines of code to bind the click event on the generate-btn button to the getRandomPassword function. This means that, after this code has been run by the browser engine, every time we click the generate-btn button, the getRandomPassword function is called.
That wasn't so scary, was it? So let's see what we need for the validation part.
Now there is a value in the password field and we want to validate it. We need to call the API and inspect its response. Since passwords can have weird characters, I don't want to pass them on the URL, therefore I will use a POST request, which allows me to put the password in its body. To do this, I need the following code:
var validatePassword = function() {
var apiURL = '{url}/validate'.replace('{url}', baseURL);
$.ajax({
type: 'POST',
url: apiURL,
data: JSON.stringify({'password': $('#id_password').val()}),
contentType: "text/plain", // Avoid CORS preflight
success: function(data, status, request) {
var valid = data['valid'], infoClass, grade;
var msg = (valid?'Valid':'Invalid') + ' password.';
if (valid) {
var score = data['score']['total'];
grade = (score<10?'Poor':(score<18?'Medium':'Strong'));
infoClass = (score<10?'red':(score<18?'orange':'green'));
msg += ' (Score: {score}, {grade})'
.replace('{score}', score).replace('{grade}', grade);
}
$('#pwd-info').html(msg);
$('#pwd-info').removeClass().addClass(infoClass);
},
error: function(data) { alert('Unexpected error'); }
});
}
$(function() {
$('#validate-btn').click(validatePassword);
});The concept is the same as before, only this time it's for the validate-btn button. The body of the AJAX call is similar. We use a POST instead of a GET request, and we define the data as a JSON object, which is the equivalent of using json.dumps({'password': 'some_pwd'}) in Python.
The contentType line is a quick hack to avoid problems with the CORS preflight behavior of the browser. Cross-origin resource sharing (CORS) is a mechanism that allows restricted resources on a web page to be requested from another domain outside of the domain from which the request originated. In a nutshell, since the API is located at 127.0.0.1:5555 and the interface is running at 127.0.0.1:8000, without this hack, the browser wouldn't allow us to perform the calls. In a production environment, you may want to check the documentation for JSONP, which is a much better (albeit more complex) solution to this issue.
The body of the anonymous function which is run if the call succeeds is apparently only a bit complicated. All we need to do is understand if the password is valid (from data['valid']), and assign it a grade and a CSS class based on its score. Validity and score information come from the API response.
The only tricky bit in this code is the JavaScript ternary operator, so let's see a comparative example for it:
# Python error = 'critical' if error_level > 50 else 'medium' // JavaScript equivalent error = (error_level > 50 ? 'critical' : 'medium');
With this example, you shouldn't have any issue reading the rest of the logic in the function. I know, I could have just used a regular if (...), but JavaScript coders use the ternary operator all the time, so you should get used to it. It's good training to scratch our heads a bit harder in order to understand code.
Lastly, I'd like you to take a look at the end of that function. We set the html of the pwd-info span element to the message we assembled (msg), and then we style it. In one line, we remove all the CSS classes from that element (removeClass() with no parameters does that), and we add the infoClass to it. infoClass is either 'red', 'orange', or 'green'. If you go back to the main.css file, you'll see them at the bottom.
Now that we've seen both the template code and the JavaScript to make the calls, let's see a screenshot of the page. We're going to edit the first record, the one about my sister's school.
In the picture, you can see that I updated the password by clicking on the Generate Password button. Then, I saved the record (so you could see the nice message on top), and, finally, I clicked on the Validate Password button.
The result is shown in green on the right-hand side of the Password field. It's strong (23 is actually the maximum score we can get) so the message is displayed in a nice shade of green.
To delete a record, go to the list and click on the delete link. You'll be redirected to a page that asks you for confirmation; you can then choose to proceed and delete the poor record, or to cancel the request and go back to the list page. The template code is the following:
records/templates/records/record_confirm_delete.html
{% extends "records/base.html" %}
{% block title %}Delete record{% endblock title %}
{% block page-content %}
<h1>Confirm Record Deletion</h1>
<form action="." method="post">{% csrf_token %}
<p>Are you sure you want to delete "{{ object }}"?</p>
<input type="submit" value="Confirm" />
<a href="{% url "records:list" %}#record-{{ object.pk }}">
» cancel</a>
</form>
{% endblock page-content %}Since this is a template for a standard Django view, we need to use the naming conventions adopted by Django. Therefore, the record in question is called object in the template. The {{ object }} tag displays a string representation for the object, which is not exactly beautiful at the moment, since the whole line will read: Are you sure you want to delete "Record object"?.
This is because we haven't added a __str__ method to our Model class yet, which means that Python has no idea of what to show us when we ask for a string representation of an instance. Let's change this by completing our model, adding the __str__ method at the bottom of the class body:
records/models.py
class Record(models.Model):
...
def __str__(self):
return '{}'.format(self.title)
Restart the server and now the page will read: Are you sure you want to delete "Some Bank"? where Some Bank is the title of the record whose delete link I clicked on.
We could have just used {{ object.title }}, but I prefer to fix the root of the problem, not just the effect. Adding a __str__ method is in fact something that you ought to do for all of your models.
The interesting bit in this last template is actually the link for canceling the operation. We use the url tag to go back to the list view (records:list), but we add anchor information to it so that it will eventually read something like this (this is for pk=2):
http://127.0.0.1:8000/records/#record-2
This will go back to the list page and scroll down to the container div that has ID record 2, which is nice.
This concludes the interface. Even though this section was similar to what we saw in Chapter 10, Web Development Done Right, we've been able to concentrate more on the code in this chapter. We've seen how useful Django class-based views are, and we even touched on some cool JavaScript. Run $ python manage.py runserver and your interface should be up and running at http://127.0.0.1:8000.
Now it's time to spice things up a bit with the second part of this project.
Deleting records
Of the three actions, deleting a record is definitely the easiest one. All we need is the following code:
class RecordDeleteView(SuccessMessageMixin, DeleteView):
model = Record
success_url = reverse_lazy('records:list')
def delete(self, request, *args, **kwargs):
messages.success(
request, 'Record was deleted successfully')
return super(RecordDeleteView, self).delete(
request, *args, **kwargs)We only need to inherit from SuccessMessageMixin and DeleteView, which gives us all we need. We set up the model and the success URL as class attributes, and then we override the delete method only to add a nice message that will be displayed in the list view (which is where we redirect to after deletion).
We don't need to specify the template name, since we'll use a name that Django infers by default: record_confirm_delete.html.
With this final view, we're all set to have a nice interface that we can use to handle Record instances.
Before we move on to the template layer, let's set up the URLs. This time, I want to show you the inclusion technique I talked about in Chapter 10, Web Development Done Right.
pwdweb/urls.py
from django.conf.urls import include, url
from django.contrib import admin
from records import urls as records_url
from records.views import HomeView
urlpatterns = [
url(r'^admin/', include(admin.site.urls)),
url(r'^records/', include(records_url, namespace='records')),
url(r'^$', HomeView.as_view(), name='home'),
]These are the URLs for the main project. We have the usual admin, a home page, and then for the records section, we include another urls.py file, which we define in the records application. This technique allows for apps to be reusable and self-contained. Note that, when including another urls.py file, you can pass namespace information, which you can then use in functions such as reverse, or the url template tag. For example, we've seen that the path to the RecordUpdateView was 'records:edit'. The first part of that string is the namespace, and the second is the name that we have given to the view, as you can see in the following code:
records/urls.py
from django.conf.urls import include, url
from django.contrib import admin
from .views import (RecordCreateView, RecordUpdateView,
RecordDeleteView, RecordListView)
urlpatterns = [
url(r'^add/$', RecordCreateView.as_view(), name='add'),
url(r'^edit/(?P<pk>[0-9]+)/$', RecordUpdateView.as_view(),
name='edit'),
url(r'^delete/(?P<pk>[0-9]+)/$', RecordDeleteView.as_view(),
name='delete'),
url(r'^$', RecordListView.as_view(), name='list'),
]We define four different url instances. There is one for adding a record, which doesn't need primary key information since the object doesn't exist yet. Then we have two url instances for updating and deleting a record, and for those we need to also specify primary key information to be passed to the view. Since Record instances have integer IDs, we can safely pass them on the URL, following good URL design practice. Finally, we define one url instance for the list of records.
All url instances have name information which is used in views and templates.
Let's start with the template we'll use as the basis for the rest:
records/templates/records/base.html
{% load static from staticfiles %}
<!DOCTYPE html>
<html lang="en">
<head>
<meta charset="utf-8">
<meta name="viewport"
content="width=device-width, initial-scale=1.0">
<link href="{% static "records/css/main.css" %}"
rel="stylesheet">
<title>{% block title %}Title{% endblock title %}</title>
</head>
<body>
<div id="page-content">
{% block page-content %}{% endblock page-content %}
</div>
<div id="footer">{% block footer %}{% endblock footer %}</div>
{% block scripts %}
<script
src="{% static "records/js/jquery-2.1.4.min.js" %}">
</script>
{% endblock scripts %}
</body>
</html>It's very similar to the one I used in Chapter 10, Web Development Done Right although it is a bit more compressed and with one major difference. We will import jQuery in every page.
Note
jQuery is the most popular JavaScript library out there. It allows you to write code that works on all the main browsers and it gives you many extra tools such as the ability to perform asynchronous calls (AJAX) from the browser itself. We'll use this library to perform the calls to the API, both to generate and validate our passwords. You can download it at https://jquery.com/, and put it in the pwdweb/records/static/records/js/ folder (you may have to amend the import in the template).
I highlighted the only interesting part of this template for you. Note that we load the JavaScript library at the end. This is common practice, as JavaScript is used to manipulate the page, so loading libraries at the end helps in avoiding situations such as JavaScript code failing because the element needed hadn't been rendered on the page yet.
The home template is very simple:
records/templates/records/home.html
{% extends "records/base.html" %}
{% block title %}Welcome to the Records website.{% endblock %}
{% block page-content %}
<h1>Welcome {{ user.first_name }}!</h1>
<div class="home-option">To create a record click
<a href="{% url "records:add" %}">here.</a>
</div>
<div class="home-option">To see all records click
<a href="{% url "records:list" %}">here.</a>
</div>
{% endblock page-content %}There is nothing new here when compared to the home.html template we saw in Chapter 10, Web Development Done Right. The footer template is actually exactly the same:
records/templates/records/footer.html
<div class="footer">
Go back <a href="{% url "home" %}">home</a>.
</div>This template to list all records is fairly simple:
records/templates/records/list.html
{% extends "records/base.html" %}
{% load record_extras %}
{% block title %}Records{% endblock title %}
{% block page-content %}
<h1>Records</h1><span name="top"></span>
{% include "records/messages.html" %}
{% for record in records %}
<div class="record {% cycle 'row-light-blue' 'row-white' %}"
id="record-{{ record.pk }}">
<div class="record-left">
<div class="record-list">
<span class="record-span">Title</span>{{ record.title }}
</div>
<div class="record-list">
<span class="record-span">Username</span>
{{ record.username }}
</div>
<div class="record-list">
<span class="record-span">Email</span>{{ record.email }}
</div>
<div class="record-list">
<span class="record-span">URL</span>
<a href="{{ record.url }}" target="_blank">
{{ record.url }}</a>
</div>
<div class="record-list">
<span class="record-span">Password</span>
{% hide_password record.plaintext %}
</div>
</div>
<div class="record-right">
<div class="record-list">
<span class="record-span">Notes</span>
<textarea rows="3" cols="40" class="record-notes"
readonly>{{ record.notes }}</textarea>
</div>
<div class="record-list">
<span class="record-span">Last modified</span>
{{ record.last_modified }}
</div>
<div class="record-list">
<span class="record-span">Created</span>
{{ record.created }}
</div>
</div>
<div class="record-list-actions">
<a href="{% url "records:edit" pk=record.pk %}">» edit</a>
<a href="{% url "records:delete" pk=record.pk %}">» delete
</a>
</div>
</div>
{% endfor %}
{% endblock page-content %}
{% block footer %}
<p><a href="#top">Go back to top</a></p>
{% include "records/footer.html" %}
{% endblock footer %}For this template as well, I have highlighted the parts I'd like you to focus on. Firstly, I load a custom tags module, record_extras, which we'll need later. I have also added an anchor at the top, so that we'll be able to put a link to it at the bottom of the page, to avoid having to scroll all the way up.
Then, I included a template to provide me with the HTML code to display Django messages. It's a very simple template which I'll show you shortly.
Then, we define a list of div elements. Each Record instance has a container div, in which there are two other main div elements: record-left and record-right. In order to display them side by side, I have set this class in the main.css file:
.record-left { float: left; width: 300px;}The outermost div container (the one with class record), has an id attribute, which I have used as an anchor. This allows us to click on cancel on the record delete page, so that if we change our minds and don't want to delete the record, we can get back to the list page, and at the right position.
Each attribute of the record is then displayed in div elements whose class is record-list. Most of these classes are just there to allow me to set a bit of padding and dimensions on the HTML elements.
The next interesting bit is the hide_password tag, which takes the plaintext, which is the unencrypted password. The purpose of this custom tag is to display a sequence of '*' characters, as long as the original password, so that if someone is passing by while you're on the page, they won't see your passwords. However, hovering on that sequence of '*' characters will show you the original password in the tooltip. Here's the code for the hide_password tag:
records/templatetags/record_extras.py
from django import template
from django.utils.html import escape
register = template.Library()
@register.simple_tag
def hide_password(password):
return '<span title="{0}">{1}</span>'.format(
escape(password), '*' * len(password))There is nothing fancy here. We just register this function as a simple tag and then we can use it wherever we want. It takes a password and puts it as a tooltip of a span element, whose main content is a sequence of '*' characters. Just note one thing: we need to escape the password, so that we're sure it won't break our HTML (think of what might happen if the password contained a double-quote `"`, for example).
As far as the list.html template is concerned, the next interesting bit is that we set the readonly attribute to the textarea element, so as not to give the impression to the user that they can modify notes on the fly.
Then, we set a couple of links for each Record instance, right at the bottom of the container div. There is one for the edit page, and another for the delete page. Note that we need to pass the url tag not only the namespace:name string, but also the primary key information, as required by the URL setup we made in the urls.py module for those views.
Finally, we import the footer and set the link to the anchor on top of the page.
Now, as promised, here is the code for the messages:
records/templates/records/messages.html
{% if messages %}
{% for message in messages %}
<p class="{{ message.tags }}">{{ message }}</p>
{% endfor %}
{% endif %}This code takes care of displaying messages only when there is at least one to display. We give the p tag class information to display success messages in green and error messages in red.
If you grab the main.css file from the source code for the book, you will now be able to visualize the list page (yours will be blank, you still need to insert data into it), and it should look something like this:
As you can see, I have two records in the database at the moment. I'm hovering on the password of the first one, which is my platform account at my sister's school, and the password is displayed in the tooltip. The division in two div elements, left and right, helps in making rows smaller so that the overall result is more pleasing to the eye. The important information is on the left and the ancillary information is on the right. The row color alternates between a very light shade of blue and white.
Each row has an edit and delete link, at its bottom left. We'll show the pages for those two links right after we see the code for the templates that create them.
The CSS code that holds all the information for this interface is the following:
records/static/records/css/main.css
html, body, * {
font-family: 'Trebuchet MS', Helvetica, sans-serif; }
a { color: #333; }
.record {
clear: both; padding: 1em; border-bottom: 1px solid #666;}
.record-left { float: left; width: 300px;}
.record-list { padding: 2px 0; }
.fieldWrapper { padding: 5px; }
.footer { margin-top: 1em; color: #333; }
.home-option { padding: .6em 0; }
.record-span { font-weight: bold; padding-right: 1em; }
.record-notes { vertical-align: top; }
.record-list-actions { padding: 4px 0; clear: both; }
.record-list-actions a { padding: 0 4px; }
#pwd-info { padding: 0 6px; font-size: 1.1em; font-weight: bold;}
#id_notes { vertical-align: top; }
/* Messages */
.success, .errorlist {font-size: 1.2em; font-weight: bold; }
.success {color: #25B725; }
.errorlist {color: #B12B2B; }
/* colors */
.row-light-blue { background-color: #E6F0FA; }
.row-white { background-color: #fff; }
.green { color: #060; }
.orange { color: #FF3300; }
.red { color: #900; }Please remember, I'm not a CSS guru so just take this file as it is, a fairly naive way to provide styling to our interface.
Now for the interesting part. Creating and updating a record. We'll use the same template for both, so we expect some decisional logic to be there that will tell us in which of the two situations we are. As it turns out, it will not be that much code. The most exciting part of this template, however, is its associated JavaScript file which we'll examine right afterwards.
records/templates/records/record_add_edit.html
{% extends "records/base.html" %}
{% load static from staticfiles %}
{% block title %}
{% if update %}Update{% else %}Create{% endif %} Record
{% endblock title %}
{% block page-content %}
<h1>{% if update %}Update a{% else %}Create a new{% endif %}
Record
</h1>
{% include "records/messages.html" %}
<form action="." method="post">{% csrf_token %}
{{ form.non_field_errors }}
<div class="fieldWrapper">{{ form.title.errors }}
{{ form.title.label_tag }} {{ form.title }}</div>
<div class="fieldWrapper">{{ form.username.errors }}
{{ form.username.label_tag }} {{ form.username }}</div>
<div class="fieldWrapper">{{ form.email.errors }}
{{ form.email.label_tag }} {{ form.email }}</div>
<div class="fieldWrapper">{{ form.url.errors }}
{{ form.url.label_tag }} {{ form.url }}</div>
<div class="fieldWrapper">{{ form.password.errors }}
{{ form.password.label_tag }} {{ form.password }}
<span id="pwd-info"></span></div>
<button type="button" id="validate-btn">
Validate Password</button>
<button type="button" id="generate-btn">
Generate Password</button>
<div class="fieldWrapper">{{ form.notes.errors }}
{{ form.notes.label_tag }} {{ form.notes }}</div>
<input type="submit"
value="{% if update %}Update{% else %}Insert{% endif %}">
</form>
{% endblock page-content %}
{% block footer %}
<br>{% include "records/footer.html" %}<br>
Go to <a href="{% url "records:list" %}">the records list</a>.
{% endblock footer %}
{% block scripts %}
{{ block.super }}
<script src="{% static "records/js/api.js" %}"></script>
{% endblock scripts %}As usual, I have highlighted the important parts, so let's go through this code together.
You can see the first bit of decision logic in the title block. Similar decision logic is also displayed later on, in the header of the page (the h1 HTML tag), and in the submit button at the end of the form.
Apart from this logic, what I'd like you to focus on is the form and what's inside it. We set the action attribute to a dot, which means this page, so that we don't need to customize it according to which view is serving the page. Also, we immediately take care of the cross-site request forgery token, as explained in Chapter 10, Web Development Done Right.
Note that, this time, we cannot leave the whole form rendering up to Django since we want to add in a couple of extra things, so we go down one level of granularity and ask Django to render each individual field for us, along with any errors, along with its label. This way we still save a lot of effort, and at the same time, we can also customize the form as we like. In situations like this, it's not uncommon to write a small template to render a field, in order to avoid repeating those three lines for each field. In this case though, the form is so small I decided to avoid raising the complexity level up any further.
The span element, pwd-info, contains the information about the password that we get from the API. The two buttons after that, validate-btn and generate-btn, are hooked up with the AJAX calls to the API.
At the end of the template, in the scripts block, we need to load the api.js JavaScript file which contains the code to work with the API. We also need to use block.super, which will load whatever code is in the same block in the parent template (for example, jQuery). block.super is basically the template equivalent of a call to super(ClassName, self) in Python. It's important to load jQuery before our library, since the latter is based on the former.
Let's now take a look at that JavaScript. I don't expect you to understand everything. Firstly, this is a Python book and secondly, you're supposed to be a beginner (though by now, ninja trained), so fear not. However, as JavaScript has, by now, become essential if you're dealing with a web environment, having a working knowledge of it is extremely important even for a Python developer, so try and get the most out of what I'm about to show you. We'll see the password generation first:
records/static/records/js/api.js
var baseURL = 'http://127.0.0.1:5555/password';
var getRandomPassword = function() {
var apiURL = '{url}/generate'.replace('{url}', baseURL);
$.ajax({
type: 'GET',
url: apiURL,
success: function(data, status, request) {
$('#id_password').val(data[1]);
},
error: function() { alert('Unexpected error'); }
});
}
$(function() {
$('#generate-btn').click(getRandomPassword);
});Firstly, we set a variable for the base API URL: baseURL. Then, we define the getRandomPassword function, which is very simple. At the beginning, it defines the apiURL extending baseURL with a replacement technique. Even if the syntax is different from that of Python, you shouldn't have any issues understanding this line.
After defining the apiURL, the interesting bit comes up. We call $.ajax, which is the jQuery function that performs the AJAX calls. That $ is a shortcut for jQuery. As you can see in the body of the call, it's a GET request to apiURL. If it succeeds (success: ...), an anonymous function is run, which sets the value of the id_password text field to the second element of the returned data. We'll see the structure of the data when we examine the API code, so don't worry about that now. If an error occurs, we simply alert the user that there was an unexpected error.
After the function definition, we run a couple of lines of code to bind the click event on the generate-btn button to the getRandomPassword function. This means that, after this code has been run by the browser engine, every time we click the generate-btn button, the getRandomPassword function is called.
That wasn't so scary, was it? So let's see what we need for the validation part.
Now there is a value in the password field and we want to validate it. We need to call the API and inspect its response. Since passwords can have weird characters, I don't want to pass them on the URL, therefore I will use a POST request, which allows me to put the password in its body. To do this, I need the following code:
var validatePassword = function() {
var apiURL = '{url}/validate'.replace('{url}', baseURL);
$.ajax({
type: 'POST',
url: apiURL,
data: JSON.stringify({'password': $('#id_password').val()}),
contentType: "text/plain", // Avoid CORS preflight
success: function(data, status, request) {
var valid = data['valid'], infoClass, grade;
var msg = (valid?'Valid':'Invalid') + ' password.';
if (valid) {
var score = data['score']['total'];
grade = (score<10?'Poor':(score<18?'Medium':'Strong'));
infoClass = (score<10?'red':(score<18?'orange':'green'));
msg += ' (Score: {score}, {grade})'
.replace('{score}', score).replace('{grade}', grade);
}
$('#pwd-info').html(msg);
$('#pwd-info').removeClass().addClass(infoClass);
},
error: function(data) { alert('Unexpected error'); }
});
}
$(function() {
$('#validate-btn').click(validatePassword);
});The concept is the same as before, only this time it's for the validate-btn button. The body of the AJAX call is similar. We use a POST instead of a GET request, and we define the data as a JSON object, which is the equivalent of using json.dumps({'password': 'some_pwd'}) in Python.
The contentType line is a quick hack to avoid problems with the CORS preflight behavior of the browser. Cross-origin resource sharing (CORS) is a mechanism that allows restricted resources on a web page to be requested from another domain outside of the domain from which the request originated. In a nutshell, since the API is located at 127.0.0.1:5555 and the interface is running at 127.0.0.1:8000, without this hack, the browser wouldn't allow us to perform the calls. In a production environment, you may want to check the documentation for JSONP, which is a much better (albeit more complex) solution to this issue.
The body of the anonymous function which is run if the call succeeds is apparently only a bit complicated. All we need to do is understand if the password is valid (from data['valid']), and assign it a grade and a CSS class based on its score. Validity and score information come from the API response.
The only tricky bit in this code is the JavaScript ternary operator, so let's see a comparative example for it:
# Python error = 'critical' if error_level > 50 else 'medium' // JavaScript equivalent error = (error_level > 50 ? 'critical' : 'medium');
With this example, you shouldn't have any issue reading the rest of the logic in the function. I know, I could have just used a regular if (...), but JavaScript coders use the ternary operator all the time, so you should get used to it. It's good training to scratch our heads a bit harder in order to understand code.
Lastly, I'd like you to take a look at the end of that function. We set the html of the pwd-info span element to the message we assembled (msg), and then we style it. In one line, we remove all the CSS classes from that element (removeClass() with no parameters does that), and we add the infoClass to it. infoClass is either 'red', 'orange', or 'green'. If you go back to the main.css file, you'll see them at the bottom.
Now that we've seen both the template code and the JavaScript to make the calls, let's see a screenshot of the page. We're going to edit the first record, the one about my sister's school.
In the picture, you can see that I updated the password by clicking on the Generate Password button. Then, I saved the record (so you could see the nice message on top), and, finally, I clicked on the Validate Password button.
The result is shown in green on the right-hand side of the Password field. It's strong (23 is actually the maximum score we can get) so the message is displayed in a nice shade of green.
To delete a record, go to the list and click on the delete link. You'll be redirected to a page that asks you for confirmation; you can then choose to proceed and delete the poor record, or to cancel the request and go back to the list page. The template code is the following:
records/templates/records/record_confirm_delete.html
{% extends "records/base.html" %}
{% block title %}Delete record{% endblock title %}
{% block page-content %}
<h1>Confirm Record Deletion</h1>
<form action="." method="post">{% csrf_token %}
<p>Are you sure you want to delete "{{ object }}"?</p>
<input type="submit" value="Confirm" />
<a href="{% url "records:list" %}#record-{{ object.pk }}">
» cancel</a>
</form>
{% endblock page-content %}Since this is a template for a standard Django view, we need to use the naming conventions adopted by Django. Therefore, the record in question is called object in the template. The {{ object }} tag displays a string representation for the object, which is not exactly beautiful at the moment, since the whole line will read: Are you sure you want to delete "Record object"?.
This is because we haven't added a __str__ method to our Model class yet, which means that Python has no idea of what to show us when we ask for a string representation of an instance. Let's change this by completing our model, adding the __str__ method at the bottom of the class body:
records/models.py
class Record(models.Model):
...
def __str__(self):
return '{}'.format(self.title)
Restart the server and now the page will read: Are you sure you want to delete "Some Bank"? where Some Bank is the title of the record whose delete link I clicked on.
We could have just used {{ object.title }}, but I prefer to fix the root of the problem, not just the effect. Adding a __str__ method is in fact something that you ought to do for all of your models.
The interesting bit in this last template is actually the link for canceling the operation. We use the url tag to go back to the list view (records:list), but we add anchor information to it so that it will eventually read something like this (this is for pk=2):
http://127.0.0.1:8000/records/#record-2
This will go back to the list page and scroll down to the container div that has ID record 2, which is nice.
This concludes the interface. Even though this section was similar to what we saw in Chapter 10, Web Development Done Right, we've been able to concentrate more on the code in this chapter. We've seen how useful Django class-based views are, and we even touched on some cool JavaScript. Run $ python manage.py runserver and your interface should be up and running at http://127.0.0.1:8000.
Now it's time to spice things up a bit with the second part of this project.
Setting up the URLs
Before we move on to the template layer, let's set up the URLs. This time, I want to show you the inclusion technique I talked about in Chapter 10, Web Development Done Right.
pwdweb/urls.py
from django.conf.urls import include, url
from django.contrib import admin
from records import urls as records_url
from records.views import HomeView
urlpatterns = [
url(r'^admin/', include(admin.site.urls)),
url(r'^records/', include(records_url, namespace='records')),
url(r'^$', HomeView.as_view(), name='home'),
]These are the URLs for the main project. We have the usual admin, a home page, and then for the records section, we include another urls.py file, which we define in the records application. This technique allows for apps to be reusable and self-contained. Note that, when including another urls.py file, you can pass namespace information, which you can then use in functions such as reverse, or the url template tag. For example, we've seen that the path to the RecordUpdateView was 'records:edit'. The first part of that string is the namespace, and the second is the name that we have given to the view, as you can see in the following code:
records/urls.py
from django.conf.urls import include, url
from django.contrib import admin
from .views import (RecordCreateView, RecordUpdateView,
RecordDeleteView, RecordListView)
urlpatterns = [
url(r'^add/$', RecordCreateView.as_view(), name='add'),
url(r'^edit/(?P<pk>[0-9]+)/$', RecordUpdateView.as_view(),
name='edit'),
url(r'^delete/(?P<pk>[0-9]+)/$', RecordDeleteView.as_view(),
name='delete'),
url(r'^$', RecordListView.as_view(), name='list'),
]We define four different url instances. There is one for adding a record, which doesn't need primary key information since the object doesn't exist yet. Then we have two url instances for updating and deleting a record, and for those we need to also specify primary key information to be passed to the view. Since Record instances have integer IDs, we can safely pass them on the URL, following good URL design practice. Finally, we define one url instance for the list of records.
All url instances have name information which is used in views and templates.
Let's start with the template we'll use as the basis for the rest:
records/templates/records/base.html
{% load static from staticfiles %}
<!DOCTYPE html>
<html lang="en">
<head>
<meta charset="utf-8">
<meta name="viewport"
content="width=device-width, initial-scale=1.0">
<link href="{% static "records/css/main.css" %}"
rel="stylesheet">
<title>{% block title %}Title{% endblock title %}</title>
</head>
<body>
<div id="page-content">
{% block page-content %}{% endblock page-content %}
</div>
<div id="footer">{% block footer %}{% endblock footer %}</div>
{% block scripts %}
<script
src="{% static "records/js/jquery-2.1.4.min.js" %}">
</script>
{% endblock scripts %}
</body>
</html>It's very similar to the one I used in Chapter 10, Web Development Done Right although it is a bit more compressed and with one major difference. We will import jQuery in every page.
Note
jQuery is the most popular JavaScript library out there. It allows you to write code that works on all the main browsers and it gives you many extra tools such as the ability to perform asynchronous calls (AJAX) from the browser itself. We'll use this library to perform the calls to the API, both to generate and validate our passwords. You can download it at https://jquery.com/, and put it in the pwdweb/records/static/records/js/ folder (you may have to amend the import in the template).
I highlighted the only interesting part of this template for you. Note that we load the JavaScript library at the end. This is common practice, as JavaScript is used to manipulate the page, so loading libraries at the end helps in avoiding situations such as JavaScript code failing because the element needed hadn't been rendered on the page yet.
The home template is very simple:
records/templates/records/home.html
{% extends "records/base.html" %}
{% block title %}Welcome to the Records website.{% endblock %}
{% block page-content %}
<h1>Welcome {{ user.first_name }}!</h1>
<div class="home-option">To create a record click
<a href="{% url "records:add" %}">here.</a>
</div>
<div class="home-option">To see all records click
<a href="{% url "records:list" %}">here.</a>
</div>
{% endblock page-content %}There is nothing new here when compared to the home.html template we saw in Chapter 10, Web Development Done Right. The footer template is actually exactly the same:
records/templates/records/footer.html
<div class="footer">
Go back <a href="{% url "home" %}">home</a>.
</div>This template to list all records is fairly simple:
records/templates/records/list.html
{% extends "records/base.html" %}
{% load record_extras %}
{% block title %}Records{% endblock title %}
{% block page-content %}
<h1>Records</h1><span name="top"></span>
{% include "records/messages.html" %}
{% for record in records %}
<div class="record {% cycle 'row-light-blue' 'row-white' %}"
id="record-{{ record.pk }}">
<div class="record-left">
<div class="record-list">
<span class="record-span">Title</span>{{ record.title }}
</div>
<div class="record-list">
<span class="record-span">Username</span>
{{ record.username }}
</div>
<div class="record-list">
<span class="record-span">Email</span>{{ record.email }}
</div>
<div class="record-list">
<span class="record-span">URL</span>
<a href="{{ record.url }}" target="_blank">
{{ record.url }}</a>
</div>
<div class="record-list">
<span class="record-span">Password</span>
{% hide_password record.plaintext %}
</div>
</div>
<div class="record-right">
<div class="record-list">
<span class="record-span">Notes</span>
<textarea rows="3" cols="40" class="record-notes"
readonly>{{ record.notes }}</textarea>
</div>
<div class="record-list">
<span class="record-span">Last modified</span>
{{ record.last_modified }}
</div>
<div class="record-list">
<span class="record-span">Created</span>
{{ record.created }}
</div>
</div>
<div class="record-list-actions">
<a href="{% url "records:edit" pk=record.pk %}">» edit</a>
<a href="{% url "records:delete" pk=record.pk %}">» delete
</a>
</div>
</div>
{% endfor %}
{% endblock page-content %}
{% block footer %}
<p><a href="#top">Go back to top</a></p>
{% include "records/footer.html" %}
{% endblock footer %}For this template as well, I have highlighted the parts I'd like you to focus on. Firstly, I load a custom tags module, record_extras, which we'll need later. I have also added an anchor at the top, so that we'll be able to put a link to it at the bottom of the page, to avoid having to scroll all the way up.
Then, I included a template to provide me with the HTML code to display Django messages. It's a very simple template which I'll show you shortly.
Then, we define a list of div elements. Each Record instance has a container div, in which there are two other main div elements: record-left and record-right. In order to display them side by side, I have set this class in the main.css file:
.record-left { float: left; width: 300px;}The outermost div container (the one with class record), has an id attribute, which I have used as an anchor. This allows us to click on cancel on the record delete page, so that if we change our minds and don't want to delete the record, we can get back to the list page, and at the right position.
Each attribute of the record is then displayed in div elements whose class is record-list. Most of these classes are just there to allow me to set a bit of padding and dimensions on the HTML elements.
The next interesting bit is the hide_password tag, which takes the plaintext, which is the unencrypted password. The purpose of this custom tag is to display a sequence of '*' characters, as long as the original password, so that if someone is passing by while you're on the page, they won't see your passwords. However, hovering on that sequence of '*' characters will show you the original password in the tooltip. Here's the code for the hide_password tag:
records/templatetags/record_extras.py
from django import template
from django.utils.html import escape
register = template.Library()
@register.simple_tag
def hide_password(password):
return '<span title="{0}">{1}</span>'.format(
escape(password), '*' * len(password))There is nothing fancy here. We just register this function as a simple tag and then we can use it wherever we want. It takes a password and puts it as a tooltip of a span element, whose main content is a sequence of '*' characters. Just note one thing: we need to escape the password, so that we're sure it won't break our HTML (think of what might happen if the password contained a double-quote `"`, for example).
As far as the list.html template is concerned, the next interesting bit is that we set the readonly attribute to the textarea element, so as not to give the impression to the user that they can modify notes on the fly.
Then, we set a couple of links for each Record instance, right at the bottom of the container div. There is one for the edit page, and another for the delete page. Note that we need to pass the url tag not only the namespace:name string, but also the primary key information, as required by the URL setup we made in the urls.py module for those views.
Finally, we import the footer and set the link to the anchor on top of the page.
Now, as promised, here is the code for the messages:
records/templates/records/messages.html
{% if messages %}
{% for message in messages %}
<p class="{{ message.tags }}">{{ message }}</p>
{% endfor %}
{% endif %}This code takes care of displaying messages only when there is at least one to display. We give the p tag class information to display success messages in green and error messages in red.
If you grab the main.css file from the source code for the book, you will now be able to visualize the list page (yours will be blank, you still need to insert data into it), and it should look something like this:
As you can see, I have two records in the database at the moment. I'm hovering on the password of the first one, which is my platform account at my sister's school, and the password is displayed in the tooltip. The division in two div elements, left and right, helps in making rows smaller so that the overall result is more pleasing to the eye. The important information is on the left and the ancillary information is on the right. The row color alternates between a very light shade of blue and white.
Each row has an edit and delete link, at its bottom left. We'll show the pages for those two links right after we see the code for the templates that create them.
The CSS code that holds all the information for this interface is the following:
records/static/records/css/main.css
html, body, * {
font-family: 'Trebuchet MS', Helvetica, sans-serif; }
a { color: #333; }
.record {
clear: both; padding: 1em; border-bottom: 1px solid #666;}
.record-left { float: left; width: 300px;}
.record-list { padding: 2px 0; }
.fieldWrapper { padding: 5px; }
.footer { margin-top: 1em; color: #333; }
.home-option { padding: .6em 0; }
.record-span { font-weight: bold; padding-right: 1em; }
.record-notes { vertical-align: top; }
.record-list-actions { padding: 4px 0; clear: both; }
.record-list-actions a { padding: 0 4px; }
#pwd-info { padding: 0 6px; font-size: 1.1em; font-weight: bold;}
#id_notes { vertical-align: top; }
/* Messages */
.success, .errorlist {font-size: 1.2em; font-weight: bold; }
.success {color: #25B725; }
.errorlist {color: #B12B2B; }
/* colors */
.row-light-blue { background-color: #E6F0FA; }
.row-white { background-color: #fff; }
.green { color: #060; }
.orange { color: #FF3300; }
.red { color: #900; }Please remember, I'm not a CSS guru so just take this file as it is, a fairly naive way to provide styling to our interface.
Now for the interesting part. Creating and updating a record. We'll use the same template for both, so we expect some decisional logic to be there that will tell us in which of the two situations we are. As it turns out, it will not be that much code. The most exciting part of this template, however, is its associated JavaScript file which we'll examine right afterwards.
records/templates/records/record_add_edit.html
{% extends "records/base.html" %}
{% load static from staticfiles %}
{% block title %}
{% if update %}Update{% else %}Create{% endif %} Record
{% endblock title %}
{% block page-content %}
<h1>{% if update %}Update a{% else %}Create a new{% endif %}
Record
</h1>
{% include "records/messages.html" %}
<form action="." method="post">{% csrf_token %}
{{ form.non_field_errors }}
<div class="fieldWrapper">{{ form.title.errors }}
{{ form.title.label_tag }} {{ form.title }}</div>
<div class="fieldWrapper">{{ form.username.errors }}
{{ form.username.label_tag }} {{ form.username }}</div>
<div class="fieldWrapper">{{ form.email.errors }}
{{ form.email.label_tag }} {{ form.email }}</div>
<div class="fieldWrapper">{{ form.url.errors }}
{{ form.url.label_tag }} {{ form.url }}</div>
<div class="fieldWrapper">{{ form.password.errors }}
{{ form.password.label_tag }} {{ form.password }}
<span id="pwd-info"></span></div>
<button type="button" id="validate-btn">
Validate Password</button>
<button type="button" id="generate-btn">
Generate Password</button>
<div class="fieldWrapper">{{ form.notes.errors }}
{{ form.notes.label_tag }} {{ form.notes }}</div>
<input type="submit"
value="{% if update %}Update{% else %}Insert{% endif %}">
</form>
{% endblock page-content %}
{% block footer %}
<br>{% include "records/footer.html" %}<br>
Go to <a href="{% url "records:list" %}">the records list</a>.
{% endblock footer %}
{% block scripts %}
{{ block.super }}
<script src="{% static "records/js/api.js" %}"></script>
{% endblock scripts %}As usual, I have highlighted the important parts, so let's go through this code together.
You can see the first bit of decision logic in the title block. Similar decision logic is also displayed later on, in the header of the page (the h1 HTML tag), and in the submit button at the end of the form.
Apart from this logic, what I'd like you to focus on is the form and what's inside it. We set the action attribute to a dot, which means this page, so that we don't need to customize it according to which view is serving the page. Also, we immediately take care of the cross-site request forgery token, as explained in Chapter 10, Web Development Done Right.
Note that, this time, we cannot leave the whole form rendering up to Django since we want to add in a couple of extra things, so we go down one level of granularity and ask Django to render each individual field for us, along with any errors, along with its label. This way we still save a lot of effort, and at the same time, we can also customize the form as we like. In situations like this, it's not uncommon to write a small template to render a field, in order to avoid repeating those three lines for each field. In this case though, the form is so small I decided to avoid raising the complexity level up any further.
The span element, pwd-info, contains the information about the password that we get from the API. The two buttons after that, validate-btn and generate-btn, are hooked up with the AJAX calls to the API.
At the end of the template, in the scripts block, we need to load the api.js JavaScript file which contains the code to work with the API. We also need to use block.super, which will load whatever code is in the same block in the parent template (for example, jQuery). block.super is basically the template equivalent of a call to super(ClassName, self) in Python. It's important to load jQuery before our library, since the latter is based on the former.
Let's now take a look at that JavaScript. I don't expect you to understand everything. Firstly, this is a Python book and secondly, you're supposed to be a beginner (though by now, ninja trained), so fear not. However, as JavaScript has, by now, become essential if you're dealing with a web environment, having a working knowledge of it is extremely important even for a Python developer, so try and get the most out of what I'm about to show you. We'll see the password generation first:
records/static/records/js/api.js
var baseURL = 'http://127.0.0.1:5555/password';
var getRandomPassword = function() {
var apiURL = '{url}/generate'.replace('{url}', baseURL);
$.ajax({
type: 'GET',
url: apiURL,
success: function(data, status, request) {
$('#id_password').val(data[1]);
},
error: function() { alert('Unexpected error'); }
});
}
$(function() {
$('#generate-btn').click(getRandomPassword);
});Firstly, we set a variable for the base API URL: baseURL. Then, we define the getRandomPassword function, which is very simple. At the beginning, it defines the apiURL extending baseURL with a replacement technique. Even if the syntax is different from that of Python, you shouldn't have any issues understanding this line.
After defining the apiURL, the interesting bit comes up. We call $.ajax, which is the jQuery function that performs the AJAX calls. That $ is a shortcut for jQuery. As you can see in the body of the call, it's a GET request to apiURL. If it succeeds (success: ...), an anonymous function is run, which sets the value of the id_password text field to the second element of the returned data. We'll see the structure of the data when we examine the API code, so don't worry about that now. If an error occurs, we simply alert the user that there was an unexpected error.
After the function definition, we run a couple of lines of code to bind the click event on the generate-btn button to the getRandomPassword function. This means that, after this code has been run by the browser engine, every time we click the generate-btn button, the getRandomPassword function is called.
That wasn't so scary, was it? So let's see what we need for the validation part.
Now there is a value in the password field and we want to validate it. We need to call the API and inspect its response. Since passwords can have weird characters, I don't want to pass them on the URL, therefore I will use a POST request, which allows me to put the password in its body. To do this, I need the following code:
var validatePassword = function() {
var apiURL = '{url}/validate'.replace('{url}', baseURL);
$.ajax({
type: 'POST',
url: apiURL,
data: JSON.stringify({'password': $('#id_password').val()}),
contentType: "text/plain", // Avoid CORS preflight
success: function(data, status, request) {
var valid = data['valid'], infoClass, grade;
var msg = (valid?'Valid':'Invalid') + ' password.';
if (valid) {
var score = data['score']['total'];
grade = (score<10?'Poor':(score<18?'Medium':'Strong'));
infoClass = (score<10?'red':(score<18?'orange':'green'));
msg += ' (Score: {score}, {grade})'
.replace('{score}', score).replace('{grade}', grade);
}
$('#pwd-info').html(msg);
$('#pwd-info').removeClass().addClass(infoClass);
},
error: function(data) { alert('Unexpected error'); }
});
}
$(function() {
$('#validate-btn').click(validatePassword);
});The concept is the same as before, only this time it's for the validate-btn button. The body of the AJAX call is similar. We use a POST instead of a GET request, and we define the data as a JSON object, which is the equivalent of using json.dumps({'password': 'some_pwd'}) in Python.
The contentType line is a quick hack to avoid problems with the CORS preflight behavior of the browser. Cross-origin resource sharing (CORS) is a mechanism that allows restricted resources on a web page to be requested from another domain outside of the domain from which the request originated. In a nutshell, since the API is located at 127.0.0.1:5555 and the interface is running at 127.0.0.1:8000, without this hack, the browser wouldn't allow us to perform the calls. In a production environment, you may want to check the documentation for JSONP, which is a much better (albeit more complex) solution to this issue.
The body of the anonymous function which is run if the call succeeds is apparently only a bit complicated. All we need to do is understand if the password is valid (from data['valid']), and assign it a grade and a CSS class based on its score. Validity and score information come from the API response.
The only tricky bit in this code is the JavaScript ternary operator, so let's see a comparative example for it:
# Python error = 'critical' if error_level > 50 else 'medium' // JavaScript equivalent error = (error_level > 50 ? 'critical' : 'medium');
With this example, you shouldn't have any issue reading the rest of the logic in the function. I know, I could have just used a regular if (...), but JavaScript coders use the ternary operator all the time, so you should get used to it. It's good training to scratch our heads a bit harder in order to understand code.
Lastly, I'd like you to take a look at the end of that function. We set the html of the pwd-info span element to the message we assembled (msg), and then we style it. In one line, we remove all the CSS classes from that element (removeClass() with no parameters does that), and we add the infoClass to it. infoClass is either 'red', 'orange', or 'green'. If you go back to the main.css file, you'll see them at the bottom.
Now that we've seen both the template code and the JavaScript to make the calls, let's see a screenshot of the page. We're going to edit the first record, the one about my sister's school.
In the picture, you can see that I updated the password by clicking on the Generate Password button. Then, I saved the record (so you could see the nice message on top), and, finally, I clicked on the Validate Password button.
The result is shown in green on the right-hand side of the Password field. It's strong (23 is actually the maximum score we can get) so the message is displayed in a nice shade of green.
To delete a record, go to the list and click on the delete link. You'll be redirected to a page that asks you for confirmation; you can then choose to proceed and delete the poor record, or to cancel the request and go back to the list page. The template code is the following:
records/templates/records/record_confirm_delete.html
{% extends "records/base.html" %}
{% block title %}Delete record{% endblock title %}
{% block page-content %}
<h1>Confirm Record Deletion</h1>
<form action="." method="post">{% csrf_token %}
<p>Are you sure you want to delete "{{ object }}"?</p>
<input type="submit" value="Confirm" />
<a href="{% url "records:list" %}#record-{{ object.pk }}">
» cancel</a>
</form>
{% endblock page-content %}Since this is a template for a standard Django view, we need to use the naming conventions adopted by Django. Therefore, the record in question is called object in the template. The {{ object }} tag displays a string representation for the object, which is not exactly beautiful at the moment, since the whole line will read: Are you sure you want to delete "Record object"?.
This is because we haven't added a __str__ method to our Model class yet, which means that Python has no idea of what to show us when we ask for a string representation of an instance. Let's change this by completing our model, adding the __str__ method at the bottom of the class body:
records/models.py
class Record(models.Model):
...
def __str__(self):
return '{}'.format(self.title)
Restart the server and now the page will read: Are you sure you want to delete "Some Bank"? where Some Bank is the title of the record whose delete link I clicked on.
We could have just used {{ object.title }}, but I prefer to fix the root of the problem, not just the effect. Adding a __str__ method is in fact something that you ought to do for all of your models.
The interesting bit in this last template is actually the link for canceling the operation. We use the url tag to go back to the list view (records:list), but we add anchor information to it so that it will eventually read something like this (this is for pk=2):
http://127.0.0.1:8000/records/#record-2
This will go back to the list page and scroll down to the container div that has ID record 2, which is nice.
This concludes the interface. Even though this section was similar to what we saw in Chapter 10, Web Development Done Right, we've been able to concentrate more on the code in this chapter. We've seen how useful Django class-based views are, and we even touched on some cool JavaScript. Run $ python manage.py runserver and your interface should be up and running at http://127.0.0.1:8000.
Now it's time to spice things up a bit with the second part of this project.
The template layer
Let's start with the template we'll use as the basis for the rest:
records/templates/records/base.html
{% load static from staticfiles %}
<!DOCTYPE html>
<html lang="en">
<head>
<meta charset="utf-8">
<meta name="viewport"
content="width=device-width, initial-scale=1.0">
<link href="{% static "records/css/main.css" %}"
rel="stylesheet">
<title>{% block title %}Title{% endblock title %}</title>
</head>
<body>
<div id="page-content">
{% block page-content %}{% endblock page-content %}
</div>
<div id="footer">{% block footer %}{% endblock footer %}</div>
{% block scripts %}
<script
src="{% static "records/js/jquery-2.1.4.min.js" %}">
</script>
{% endblock scripts %}
</body>
</html>It's very similar to the one I used in Chapter 10, Web Development Done Right although it is a bit more compressed and with one major difference. We will import jQuery in every page.
Note
jQuery is the most popular JavaScript library out there. It allows you to write code that works on all the main browsers and it gives you many extra tools such as the ability to perform asynchronous calls (AJAX) from the browser itself. We'll use this library to perform the calls to the API, both to generate and validate our passwords. You can download it at https://jquery.com/, and put it in the pwdweb/records/static/records/js/ folder (you may have to amend the import in the template).
I highlighted the only interesting part of this template for you. Note that we load the JavaScript library at the end. This is common practice, as JavaScript is used to manipulate the page, so loading libraries at the end helps in avoiding situations such as JavaScript code failing because the element needed hadn't been rendered on the page yet.
The home template is very simple:
records/templates/records/home.html
{% extends "records/base.html" %}
{% block title %}Welcome to the Records website.{% endblock %}
{% block page-content %}
<h1>Welcome {{ user.first_name }}!</h1>
<div class="home-option">To create a record click
<a href="{% url "records:add" %}">here.</a>
</div>
<div class="home-option">To see all records click
<a href="{% url "records:list" %}">here.</a>
</div>
{% endblock page-content %}There is nothing new here when compared to the home.html template we saw in Chapter 10, Web Development Done Right. The footer template is actually exactly the same:
records/templates/records/footer.html
<div class="footer">
Go back <a href="{% url "home" %}">home</a>.
</div>This template to list all records is fairly simple:
records/templates/records/list.html
{% extends "records/base.html" %}
{% load record_extras %}
{% block title %}Records{% endblock title %}
{% block page-content %}
<h1>Records</h1><span name="top"></span>
{% include "records/messages.html" %}
{% for record in records %}
<div class="record {% cycle 'row-light-blue' 'row-white' %}"
id="record-{{ record.pk }}">
<div class="record-left">
<div class="record-list">
<span class="record-span">Title</span>{{ record.title }}
</div>
<div class="record-list">
<span class="record-span">Username</span>
{{ record.username }}
</div>
<div class="record-list">
<span class="record-span">Email</span>{{ record.email }}
</div>
<div class="record-list">
<span class="record-span">URL</span>
<a href="{{ record.url }}" target="_blank">
{{ record.url }}</a>
</div>
<div class="record-list">
<span class="record-span">Password</span>
{% hide_password record.plaintext %}
</div>
</div>
<div class="record-right">
<div class="record-list">
<span class="record-span">Notes</span>
<textarea rows="3" cols="40" class="record-notes"
readonly>{{ record.notes }}</textarea>
</div>
<div class="record-list">
<span class="record-span">Last modified</span>
{{ record.last_modified }}
</div>
<div class="record-list">
<span class="record-span">Created</span>
{{ record.created }}
</div>
</div>
<div class="record-list-actions">
<a href="{% url "records:edit" pk=record.pk %}">» edit</a>
<a href="{% url "records:delete" pk=record.pk %}">» delete
</a>
</div>
</div>
{% endfor %}
{% endblock page-content %}
{% block footer %}
<p><a href="#top">Go back to top</a></p>
{% include "records/footer.html" %}
{% endblock footer %}For this template as well, I have highlighted the parts I'd like you to focus on. Firstly, I load a custom tags module, record_extras, which we'll need later. I have also added an anchor at the top, so that we'll be able to put a link to it at the bottom of the page, to avoid having to scroll all the way up.
Then, I included a template to provide me with the HTML code to display Django messages. It's a very simple template which I'll show you shortly.
Then, we define a list of div elements. Each Record instance has a container div, in which there are two other main div elements: record-left and record-right. In order to display them side by side, I have set this class in the main.css file:
.record-left { float: left; width: 300px;}The outermost div container (the one with class record), has an id attribute, which I have used as an anchor. This allows us to click on cancel on the record delete page, so that if we change our minds and don't want to delete the record, we can get back to the list page, and at the right position.
Each attribute of the record is then displayed in div elements whose class is record-list. Most of these classes are just there to allow me to set a bit of padding and dimensions on the HTML elements.
The next interesting bit is the hide_password tag, which takes the plaintext, which is the unencrypted password. The purpose of this custom tag is to display a sequence of '*' characters, as long as the original password, so that if someone is passing by while you're on the page, they won't see your passwords. However, hovering on that sequence of '*' characters will show you the original password in the tooltip. Here's the code for the hide_password tag:
records/templatetags/record_extras.py
from django import template
from django.utils.html import escape
register = template.Library()
@register.simple_tag
def hide_password(password):
return '<span title="{0}">{1}</span>'.format(
escape(password), '*' * len(password))There is nothing fancy here. We just register this function as a simple tag and then we can use it wherever we want. It takes a password and puts it as a tooltip of a span element, whose main content is a sequence of '*' characters. Just note one thing: we need to escape the password, so that we're sure it won't break our HTML (think of what might happen if the password contained a double-quote `"`, for example).
As far as the list.html template is concerned, the next interesting bit is that we set the readonly attribute to the textarea element, so as not to give the impression to the user that they can modify notes on the fly.
Then, we set a couple of links for each Record instance, right at the bottom of the container div. There is one for the edit page, and another for the delete page. Note that we need to pass the url tag not only the namespace:name string, but also the primary key information, as required by the URL setup we made in the urls.py module for those views.
Finally, we import the footer and set the link to the anchor on top of the page.
Now, as promised, here is the code for the messages:
records/templates/records/messages.html
{% if messages %}
{% for message in messages %}
<p class="{{ message.tags }}">{{ message }}</p>
{% endfor %}
{% endif %}This code takes care of displaying messages only when there is at least one to display. We give the p tag class information to display success messages in green and error messages in red.
If you grab the main.css file from the source code for the book, you will now be able to visualize the list page (yours will be blank, you still need to insert data into it), and it should look something like this:
As you can see, I have two records in the database at the moment. I'm hovering on the password of the first one, which is my platform account at my sister's school, and the password is displayed in the tooltip. The division in two div elements, left and right, helps in making rows smaller so that the overall result is more pleasing to the eye. The important information is on the left and the ancillary information is on the right. The row color alternates between a very light shade of blue and white.
Each row has an edit and delete link, at its bottom left. We'll show the pages for those two links right after we see the code for the templates that create them.
The CSS code that holds all the information for this interface is the following:
records/static/records/css/main.css
html, body, * {
font-family: 'Trebuchet MS', Helvetica, sans-serif; }
a { color: #333; }
.record {
clear: both; padding: 1em; border-bottom: 1px solid #666;}
.record-left { float: left; width: 300px;}
.record-list { padding: 2px 0; }
.fieldWrapper { padding: 5px; }
.footer { margin-top: 1em; color: #333; }
.home-option { padding: .6em 0; }
.record-span { font-weight: bold; padding-right: 1em; }
.record-notes { vertical-align: top; }
.record-list-actions { padding: 4px 0; clear: both; }
.record-list-actions a { padding: 0 4px; }
#pwd-info { padding: 0 6px; font-size: 1.1em; font-weight: bold;}
#id_notes { vertical-align: top; }
/* Messages */
.success, .errorlist {font-size: 1.2em; font-weight: bold; }
.success {color: #25B725; }
.errorlist {color: #B12B2B; }
/* colors */
.row-light-blue { background-color: #E6F0FA; }
.row-white { background-color: #fff; }
.green { color: #060; }
.orange { color: #FF3300; }
.red { color: #900; }Please remember, I'm not a CSS guru so just take this file as it is, a fairly naive way to provide styling to our interface.
Now for the interesting part. Creating and updating a record. We'll use the same template for both, so we expect some decisional logic to be there that will tell us in which of the two situations we are. As it turns out, it will not be that much code. The most exciting part of this template, however, is its associated JavaScript file which we'll examine right afterwards.
records/templates/records/record_add_edit.html
{% extends "records/base.html" %}
{% load static from staticfiles %}
{% block title %}
{% if update %}Update{% else %}Create{% endif %} Record
{% endblock title %}
{% block page-content %}
<h1>{% if update %}Update a{% else %}Create a new{% endif %}
Record
</h1>
{% include "records/messages.html" %}
<form action="." method="post">{% csrf_token %}
{{ form.non_field_errors }}
<div class="fieldWrapper">{{ form.title.errors }}
{{ form.title.label_tag }} {{ form.title }}</div>
<div class="fieldWrapper">{{ form.username.errors }}
{{ form.username.label_tag }} {{ form.username }}</div>
<div class="fieldWrapper">{{ form.email.errors }}
{{ form.email.label_tag }} {{ form.email }}</div>
<div class="fieldWrapper">{{ form.url.errors }}
{{ form.url.label_tag }} {{ form.url }}</div>
<div class="fieldWrapper">{{ form.password.errors }}
{{ form.password.label_tag }} {{ form.password }}
<span id="pwd-info"></span></div>
<button type="button" id="validate-btn">
Validate Password</button>
<button type="button" id="generate-btn">
Generate Password</button>
<div class="fieldWrapper">{{ form.notes.errors }}
{{ form.notes.label_tag }} {{ form.notes }}</div>
<input type="submit"
value="{% if update %}Update{% else %}Insert{% endif %}">
</form>
{% endblock page-content %}
{% block footer %}
<br>{% include "records/footer.html" %}<br>
Go to <a href="{% url "records:list" %}">the records list</a>.
{% endblock footer %}
{% block scripts %}
{{ block.super }}
<script src="{% static "records/js/api.js" %}"></script>
{% endblock scripts %}As usual, I have highlighted the important parts, so let's go through this code together.
You can see the first bit of decision logic in the title block. Similar decision logic is also displayed later on, in the header of the page (the h1 HTML tag), and in the submit button at the end of the form.
Apart from this logic, what I'd like you to focus on is the form and what's inside it. We set the action attribute to a dot, which means this page, so that we don't need to customize it according to which view is serving the page. Also, we immediately take care of the cross-site request forgery token, as explained in Chapter 10, Web Development Done Right.
Note that, this time, we cannot leave the whole form rendering up to Django since we want to add in a couple of extra things, so we go down one level of granularity and ask Django to render each individual field for us, along with any errors, along with its label. This way we still save a lot of effort, and at the same time, we can also customize the form as we like. In situations like this, it's not uncommon to write a small template to render a field, in order to avoid repeating those three lines for each field. In this case though, the form is so small I decided to avoid raising the complexity level up any further.
The span element, pwd-info, contains the information about the password that we get from the API. The two buttons after that, validate-btn and generate-btn, are hooked up with the AJAX calls to the API.
At the end of the template, in the scripts block, we need to load the api.js JavaScript file which contains the code to work with the API. We also need to use block.super, which will load whatever code is in the same block in the parent template (for example, jQuery). block.super is basically the template equivalent of a call to super(ClassName, self) in Python. It's important to load jQuery before our library, since the latter is based on the former.
Let's now take a look at that JavaScript. I don't expect you to understand everything. Firstly, this is a Python book and secondly, you're supposed to be a beginner (though by now, ninja trained), so fear not. However, as JavaScript has, by now, become essential if you're dealing with a web environment, having a working knowledge of it is extremely important even for a Python developer, so try and get the most out of what I'm about to show you. We'll see the password generation first:
records/static/records/js/api.js
var baseURL = 'http://127.0.0.1:5555/password';
var getRandomPassword = function() {
var apiURL = '{url}/generate'.replace('{url}', baseURL);
$.ajax({
type: 'GET',
url: apiURL,
success: function(data, status, request) {
$('#id_password').val(data[1]);
},
error: function() { alert('Unexpected error'); }
});
}
$(function() {
$('#generate-btn').click(getRandomPassword);
});Firstly, we set a variable for the base API URL: baseURL. Then, we define the getRandomPassword function, which is very simple. At the beginning, it defines the apiURL extending baseURL with a replacement technique. Even if the syntax is different from that of Python, you shouldn't have any issues understanding this line.
After defining the apiURL, the interesting bit comes up. We call $.ajax, which is the jQuery function that performs the AJAX calls. That $ is a shortcut for jQuery. As you can see in the body of the call, it's a GET request to apiURL. If it succeeds (success: ...), an anonymous function is run, which sets the value of the id_password text field to the second element of the returned data. We'll see the structure of the data when we examine the API code, so don't worry about that now. If an error occurs, we simply alert the user that there was an unexpected error.
After the function definition, we run a couple of lines of code to bind the click event on the generate-btn button to the getRandomPassword function. This means that, after this code has been run by the browser engine, every time we click the generate-btn button, the getRandomPassword function is called.
That wasn't so scary, was it? So let's see what we need for the validation part.
Now there is a value in the password field and we want to validate it. We need to call the API and inspect its response. Since passwords can have weird characters, I don't want to pass them on the URL, therefore I will use a POST request, which allows me to put the password in its body. To do this, I need the following code:
var validatePassword = function() {
var apiURL = '{url}/validate'.replace('{url}', baseURL);
$.ajax({
type: 'POST',
url: apiURL,
data: JSON.stringify({'password': $('#id_password').val()}),
contentType: "text/plain", // Avoid CORS preflight
success: function(data, status, request) {
var valid = data['valid'], infoClass, grade;
var msg = (valid?'Valid':'Invalid') + ' password.';
if (valid) {
var score = data['score']['total'];
grade = (score<10?'Poor':(score<18?'Medium':'Strong'));
infoClass = (score<10?'red':(score<18?'orange':'green'));
msg += ' (Score: {score}, {grade})'
.replace('{score}', score).replace('{grade}', grade);
}
$('#pwd-info').html(msg);
$('#pwd-info').removeClass().addClass(infoClass);
},
error: function(data) { alert('Unexpected error'); }
});
}
$(function() {
$('#validate-btn').click(validatePassword);
});The concept is the same as before, only this time it's for the validate-btn button. The body of the AJAX call is similar. We use a POST instead of a GET request, and we define the data as a JSON object, which is the equivalent of using json.dumps({'password': 'some_pwd'}) in Python.
The contentType line is a quick hack to avoid problems with the CORS preflight behavior of the browser. Cross-origin resource sharing (CORS) is a mechanism that allows restricted resources on a web page to be requested from another domain outside of the domain from which the request originated. In a nutshell, since the API is located at 127.0.0.1:5555 and the interface is running at 127.0.0.1:8000, without this hack, the browser wouldn't allow us to perform the calls. In a production environment, you may want to check the documentation for JSONP, which is a much better (albeit more complex) solution to this issue.
The body of the anonymous function which is run if the call succeeds is apparently only a bit complicated. All we need to do is understand if the password is valid (from data['valid']), and assign it a grade and a CSS class based on its score. Validity and score information come from the API response.
The only tricky bit in this code is the JavaScript ternary operator, so let's see a comparative example for it:
# Python error = 'critical' if error_level > 50 else 'medium' // JavaScript equivalent error = (error_level > 50 ? 'critical' : 'medium');
With this example, you shouldn't have any issue reading the rest of the logic in the function. I know, I could have just used a regular if (...), but JavaScript coders use the ternary operator all the time, so you should get used to it. It's good training to scratch our heads a bit harder in order to understand code.
Lastly, I'd like you to take a look at the end of that function. We set the html of the pwd-info span element to the message we assembled (msg), and then we style it. In one line, we remove all the CSS classes from that element (removeClass() with no parameters does that), and we add the infoClass to it. infoClass is either 'red', 'orange', or 'green'. If you go back to the main.css file, you'll see them at the bottom.
Now that we've seen both the template code and the JavaScript to make the calls, let's see a screenshot of the page. We're going to edit the first record, the one about my sister's school.
In the picture, you can see that I updated the password by clicking on the Generate Password button. Then, I saved the record (so you could see the nice message on top), and, finally, I clicked on the Validate Password button.
The result is shown in green on the right-hand side of the Password field. It's strong (23 is actually the maximum score we can get) so the message is displayed in a nice shade of green.
To delete a record, go to the list and click on the delete link. You'll be redirected to a page that asks you for confirmation; you can then choose to proceed and delete the poor record, or to cancel the request and go back to the list page. The template code is the following:
records/templates/records/record_confirm_delete.html
{% extends "records/base.html" %}
{% block title %}Delete record{% endblock title %}
{% block page-content %}
<h1>Confirm Record Deletion</h1>
<form action="." method="post">{% csrf_token %}
<p>Are you sure you want to delete "{{ object }}"?</p>
<input type="submit" value="Confirm" />
<a href="{% url "records:list" %}#record-{{ object.pk }}">
» cancel</a>
</form>
{% endblock page-content %}Since this is a template for a standard Django view, we need to use the naming conventions adopted by Django. Therefore, the record in question is called object in the template. The {{ object }} tag displays a string representation for the object, which is not exactly beautiful at the moment, since the whole line will read: Are you sure you want to delete "Record object"?.
This is because we haven't added a __str__ method to our Model class yet, which means that Python has no idea of what to show us when we ask for a string representation of an instance. Let's change this by completing our model, adding the __str__ method at the bottom of the class body:
records/models.py
class Record(models.Model):
...
def __str__(self):
return '{}'.format(self.title)
Restart the server and now the page will read: Are you sure you want to delete "Some Bank"? where Some Bank is the title of the record whose delete link I clicked on.
We could have just used {{ object.title }}, but I prefer to fix the root of the problem, not just the effect. Adding a __str__ method is in fact something that you ought to do for all of your models.
The interesting bit in this last template is actually the link for canceling the operation. We use the url tag to go back to the list view (records:list), but we add anchor information to it so that it will eventually read something like this (this is for pk=2):
http://127.0.0.1:8000/records/#record-2
This will go back to the list page and scroll down to the container div that has ID record 2, which is nice.
This concludes the interface. Even though this section was similar to what we saw in Chapter 10, Web Development Done Right, we've been able to concentrate more on the code in this chapter. We've seen how useful Django class-based views are, and we even touched on some cool JavaScript. Run $ python manage.py runserver and your interface should be up and running at http://127.0.0.1:8000.
Now it's time to spice things up a bit with the second part of this project.
Home and footer templates
The home template is very simple:
records/templates/records/home.html
{% extends "records/base.html" %}
{% block title %}Welcome to the Records website.{% endblock %}
{% block page-content %}
<h1>Welcome {{ user.first_name }}!</h1>
<div class="home-option">To create a record click
<a href="{% url "records:add" %}">here.</a>
</div>
<div class="home-option">To see all records click
<a href="{% url "records:list" %}">here.</a>
</div>
{% endblock page-content %}There is nothing new here when compared to the home.html template we saw in Chapter 10, Web Development Done Right. The footer template is actually exactly the same:
records/templates/records/footer.html
<div class="footer">
Go back <a href="{% url "home" %}">home</a>.
</div>This template to list all records is fairly simple:
records/templates/records/list.html
{% extends "records/base.html" %}
{% load record_extras %}
{% block title %}Records{% endblock title %}
{% block page-content %}
<h1>Records</h1><span name="top"></span>
{% include "records/messages.html" %}
{% for record in records %}
<div class="record {% cycle 'row-light-blue' 'row-white' %}"
id="record-{{ record.pk }}">
<div class="record-left">
<div class="record-list">
<span class="record-span">Title</span>{{ record.title }}
</div>
<div class="record-list">
<span class="record-span">Username</span>
{{ record.username }}
</div>
<div class="record-list">
<span class="record-span">Email</span>{{ record.email }}
</div>
<div class="record-list">
<span class="record-span">URL</span>
<a href="{{ record.url }}" target="_blank">
{{ record.url }}</a>
</div>
<div class="record-list">
<span class="record-span">Password</span>
{% hide_password record.plaintext %}
</div>
</div>
<div class="record-right">
<div class="record-list">
<span class="record-span">Notes</span>
<textarea rows="3" cols="40" class="record-notes"
readonly>{{ record.notes }}</textarea>
</div>
<div class="record-list">
<span class="record-span">Last modified</span>
{{ record.last_modified }}
</div>
<div class="record-list">
<span class="record-span">Created</span>
{{ record.created }}
</div>
</div>
<div class="record-list-actions">
<a href="{% url "records:edit" pk=record.pk %}">» edit</a>
<a href="{% url "records:delete" pk=record.pk %}">» delete
</a>
</div>
</div>
{% endfor %}
{% endblock page-content %}
{% block footer %}
<p><a href="#top">Go back to top</a></p>
{% include "records/footer.html" %}
{% endblock footer %}For this template as well, I have highlighted the parts I'd like you to focus on. Firstly, I load a custom tags module, record_extras, which we'll need later. I have also added an anchor at the top, so that we'll be able to put a link to it at the bottom of the page, to avoid having to scroll all the way up.
Then, I included a template to provide me with the HTML code to display Django messages. It's a very simple template which I'll show you shortly.
Then, we define a list of div elements. Each Record instance has a container div, in which there are two other main div elements: record-left and record-right. In order to display them side by side, I have set this class in the main.css file:
.record-left { float: left; width: 300px;}The outermost div container (the one with class record), has an id attribute, which I have used as an anchor. This allows us to click on cancel on the record delete page, so that if we change our minds and don't want to delete the record, we can get back to the list page, and at the right position.
Each attribute of the record is then displayed in div elements whose class is record-list. Most of these classes are just there to allow me to set a bit of padding and dimensions on the HTML elements.
The next interesting bit is the hide_password tag, which takes the plaintext, which is the unencrypted password. The purpose of this custom tag is to display a sequence of '*' characters, as long as the original password, so that if someone is passing by while you're on the page, they won't see your passwords. However, hovering on that sequence of '*' characters will show you the original password in the tooltip. Here's the code for the hide_password tag:
records/templatetags/record_extras.py
from django import template
from django.utils.html import escape
register = template.Library()
@register.simple_tag
def hide_password(password):
return '<span title="{0}">{1}</span>'.format(
escape(password), '*' * len(password))There is nothing fancy here. We just register this function as a simple tag and then we can use it wherever we want. It takes a password and puts it as a tooltip of a span element, whose main content is a sequence of '*' characters. Just note one thing: we need to escape the password, so that we're sure it won't break our HTML (think of what might happen if the password contained a double-quote `"`, for example).
As far as the list.html template is concerned, the next interesting bit is that we set the readonly attribute to the textarea element, so as not to give the impression to the user that they can modify notes on the fly.
Then, we set a couple of links for each Record instance, right at the bottom of the container div. There is one for the edit page, and another for the delete page. Note that we need to pass the url tag not only the namespace:name string, but also the primary key information, as required by the URL setup we made in the urls.py module for those views.
Finally, we import the footer and set the link to the anchor on top of the page.
Now, as promised, here is the code for the messages:
records/templates/records/messages.html
{% if messages %}
{% for message in messages %}
<p class="{{ message.tags }}">{{ message }}</p>
{% endfor %}
{% endif %}This code takes care of displaying messages only when there is at least one to display. We give the p tag class information to display success messages in green and error messages in red.
If you grab the main.css file from the source code for the book, you will now be able to visualize the list page (yours will be blank, you still need to insert data into it), and it should look something like this:
As you can see, I have two records in the database at the moment. I'm hovering on the password of the first one, which is my platform account at my sister's school, and the password is displayed in the tooltip. The division in two div elements, left and right, helps in making rows smaller so that the overall result is more pleasing to the eye. The important information is on the left and the ancillary information is on the right. The row color alternates between a very light shade of blue and white.
Each row has an edit and delete link, at its bottom left. We'll show the pages for those two links right after we see the code for the templates that create them.
The CSS code that holds all the information for this interface is the following:
records/static/records/css/main.css
html, body, * {
font-family: 'Trebuchet MS', Helvetica, sans-serif; }
a { color: #333; }
.record {
clear: both; padding: 1em; border-bottom: 1px solid #666;}
.record-left { float: left; width: 300px;}
.record-list { padding: 2px 0; }
.fieldWrapper { padding: 5px; }
.footer { margin-top: 1em; color: #333; }
.home-option { padding: .6em 0; }
.record-span { font-weight: bold; padding-right: 1em; }
.record-notes { vertical-align: top; }
.record-list-actions { padding: 4px 0; clear: both; }
.record-list-actions a { padding: 0 4px; }
#pwd-info { padding: 0 6px; font-size: 1.1em; font-weight: bold;}
#id_notes { vertical-align: top; }
/* Messages */
.success, .errorlist {font-size: 1.2em; font-weight: bold; }
.success {color: #25B725; }
.errorlist {color: #B12B2B; }
/* colors */
.row-light-blue { background-color: #E6F0FA; }
.row-white { background-color: #fff; }
.green { color: #060; }
.orange { color: #FF3300; }
.red { color: #900; }Please remember, I'm not a CSS guru so just take this file as it is, a fairly naive way to provide styling to our interface.
Now for the interesting part. Creating and updating a record. We'll use the same template for both, so we expect some decisional logic to be there that will tell us in which of the two situations we are. As it turns out, it will not be that much code. The most exciting part of this template, however, is its associated JavaScript file which we'll examine right afterwards.
records/templates/records/record_add_edit.html
{% extends "records/base.html" %}
{% load static from staticfiles %}
{% block title %}
{% if update %}Update{% else %}Create{% endif %} Record
{% endblock title %}
{% block page-content %}
<h1>{% if update %}Update a{% else %}Create a new{% endif %}
Record
</h1>
{% include "records/messages.html" %}
<form action="." method="post">{% csrf_token %}
{{ form.non_field_errors }}
<div class="fieldWrapper">{{ form.title.errors }}
{{ form.title.label_tag }} {{ form.title }}</div>
<div class="fieldWrapper">{{ form.username.errors }}
{{ form.username.label_tag }} {{ form.username }}</div>
<div class="fieldWrapper">{{ form.email.errors }}
{{ form.email.label_tag }} {{ form.email }}</div>
<div class="fieldWrapper">{{ form.url.errors }}
{{ form.url.label_tag }} {{ form.url }}</div>
<div class="fieldWrapper">{{ form.password.errors }}
{{ form.password.label_tag }} {{ form.password }}
<span id="pwd-info"></span></div>
<button type="button" id="validate-btn">
Validate Password</button>
<button type="button" id="generate-btn">
Generate Password</button>
<div class="fieldWrapper">{{ form.notes.errors }}
{{ form.notes.label_tag }} {{ form.notes }}</div>
<input type="submit"
value="{% if update %}Update{% else %}Insert{% endif %}">
</form>
{% endblock page-content %}
{% block footer %}
<br>{% include "records/footer.html" %}<br>
Go to <a href="{% url "records:list" %}">the records list</a>.
{% endblock footer %}
{% block scripts %}
{{ block.super }}
<script src="{% static "records/js/api.js" %}"></script>
{% endblock scripts %}As usual, I have highlighted the important parts, so let's go through this code together.
You can see the first bit of decision logic in the title block. Similar decision logic is also displayed later on, in the header of the page (the h1 HTML tag), and in the submit button at the end of the form.
Apart from this logic, what I'd like you to focus on is the form and what's inside it. We set the action attribute to a dot, which means this page, so that we don't need to customize it according to which view is serving the page. Also, we immediately take care of the cross-site request forgery token, as explained in Chapter 10, Web Development Done Right.
Note that, this time, we cannot leave the whole form rendering up to Django since we want to add in a couple of extra things, so we go down one level of granularity and ask Django to render each individual field for us, along with any errors, along with its label. This way we still save a lot of effort, and at the same time, we can also customize the form as we like. In situations like this, it's not uncommon to write a small template to render a field, in order to avoid repeating those three lines for each field. In this case though, the form is so small I decided to avoid raising the complexity level up any further.
The span element, pwd-info, contains the information about the password that we get from the API. The two buttons after that, validate-btn and generate-btn, are hooked up with the AJAX calls to the API.
At the end of the template, in the scripts block, we need to load the api.js JavaScript file which contains the code to work with the API. We also need to use block.super, which will load whatever code is in the same block in the parent template (for example, jQuery). block.super is basically the template equivalent of a call to super(ClassName, self) in Python. It's important to load jQuery before our library, since the latter is based on the former.
Let's now take a look at that JavaScript. I don't expect you to understand everything. Firstly, this is a Python book and secondly, you're supposed to be a beginner (though by now, ninja trained), so fear not. However, as JavaScript has, by now, become essential if you're dealing with a web environment, having a working knowledge of it is extremely important even for a Python developer, so try and get the most out of what I'm about to show you. We'll see the password generation first:
records/static/records/js/api.js
var baseURL = 'http://127.0.0.1:5555/password';
var getRandomPassword = function() {
var apiURL = '{url}/generate'.replace('{url}', baseURL);
$.ajax({
type: 'GET',
url: apiURL,
success: function(data, status, request) {
$('#id_password').val(data[1]);
},
error: function() { alert('Unexpected error'); }
});
}
$(function() {
$('#generate-btn').click(getRandomPassword);
});Firstly, we set a variable for the base API URL: baseURL. Then, we define the getRandomPassword function, which is very simple. At the beginning, it defines the apiURL extending baseURL with a replacement technique. Even if the syntax is different from that of Python, you shouldn't have any issues understanding this line.
After defining the apiURL, the interesting bit comes up. We call $.ajax, which is the jQuery function that performs the AJAX calls. That $ is a shortcut for jQuery. As you can see in the body of the call, it's a GET request to apiURL. If it succeeds (success: ...), an anonymous function is run, which sets the value of the id_password text field to the second element of the returned data. We'll see the structure of the data when we examine the API code, so don't worry about that now. If an error occurs, we simply alert the user that there was an unexpected error.
After the function definition, we run a couple of lines of code to bind the click event on the generate-btn button to the getRandomPassword function. This means that, after this code has been run by the browser engine, every time we click the generate-btn button, the getRandomPassword function is called.
That wasn't so scary, was it? So let's see what we need for the validation part.
Now there is a value in the password field and we want to validate it. We need to call the API and inspect its response. Since passwords can have weird characters, I don't want to pass them on the URL, therefore I will use a POST request, which allows me to put the password in its body. To do this, I need the following code:
var validatePassword = function() {
var apiURL = '{url}/validate'.replace('{url}', baseURL);
$.ajax({
type: 'POST',
url: apiURL,
data: JSON.stringify({'password': $('#id_password').val()}),
contentType: "text/plain", // Avoid CORS preflight
success: function(data, status, request) {
var valid = data['valid'], infoClass, grade;
var msg = (valid?'Valid':'Invalid') + ' password.';
if (valid) {
var score = data['score']['total'];
grade = (score<10?'Poor':(score<18?'Medium':'Strong'));
infoClass = (score<10?'red':(score<18?'orange':'green'));
msg += ' (Score: {score}, {grade})'
.replace('{score}', score).replace('{grade}', grade);
}
$('#pwd-info').html(msg);
$('#pwd-info').removeClass().addClass(infoClass);
},
error: function(data) { alert('Unexpected error'); }
});
}
$(function() {
$('#validate-btn').click(validatePassword);
});The concept is the same as before, only this time it's for the validate-btn button. The body of the AJAX call is similar. We use a POST instead of a GET request, and we define the data as a JSON object, which is the equivalent of using json.dumps({'password': 'some_pwd'}) in Python.
The contentType line is a quick hack to avoid problems with the CORS preflight behavior of the browser. Cross-origin resource sharing (CORS) is a mechanism that allows restricted resources on a web page to be requested from another domain outside of the domain from which the request originated. In a nutshell, since the API is located at 127.0.0.1:5555 and the interface is running at 127.0.0.1:8000, without this hack, the browser wouldn't allow us to perform the calls. In a production environment, you may want to check the documentation for JSONP, which is a much better (albeit more complex) solution to this issue.
The body of the anonymous function which is run if the call succeeds is apparently only a bit complicated. All we need to do is understand if the password is valid (from data['valid']), and assign it a grade and a CSS class based on its score. Validity and score information come from the API response.
The only tricky bit in this code is the JavaScript ternary operator, so let's see a comparative example for it:
# Python error = 'critical' if error_level > 50 else 'medium' // JavaScript equivalent error = (error_level > 50 ? 'critical' : 'medium');
With this example, you shouldn't have any issue reading the rest of the logic in the function. I know, I could have just used a regular if (...), but JavaScript coders use the ternary operator all the time, so you should get used to it. It's good training to scratch our heads a bit harder in order to understand code.
Lastly, I'd like you to take a look at the end of that function. We set the html of the pwd-info span element to the message we assembled (msg), and then we style it. In one line, we remove all the CSS classes from that element (removeClass() with no parameters does that), and we add the infoClass to it. infoClass is either 'red', 'orange', or 'green'. If you go back to the main.css file, you'll see them at the bottom.
Now that we've seen both the template code and the JavaScript to make the calls, let's see a screenshot of the page. We're going to edit the first record, the one about my sister's school.
In the picture, you can see that I updated the password by clicking on the Generate Password button. Then, I saved the record (so you could see the nice message on top), and, finally, I clicked on the Validate Password button.
The result is shown in green on the right-hand side of the Password field. It's strong (23 is actually the maximum score we can get) so the message is displayed in a nice shade of green.
To delete a record, go to the list and click on the delete link. You'll be redirected to a page that asks you for confirmation; you can then choose to proceed and delete the poor record, or to cancel the request and go back to the list page. The template code is the following:
records/templates/records/record_confirm_delete.html
{% extends "records/base.html" %}
{% block title %}Delete record{% endblock title %}
{% block page-content %}
<h1>Confirm Record Deletion</h1>
<form action="." method="post">{% csrf_token %}
<p>Are you sure you want to delete "{{ object }}"?</p>
<input type="submit" value="Confirm" />
<a href="{% url "records:list" %}#record-{{ object.pk }}">
» cancel</a>
</form>
{% endblock page-content %}Since this is a template for a standard Django view, we need to use the naming conventions adopted by Django. Therefore, the record in question is called object in the template. The {{ object }} tag displays a string representation for the object, which is not exactly beautiful at the moment, since the whole line will read: Are you sure you want to delete "Record object"?.
This is because we haven't added a __str__ method to our Model class yet, which means that Python has no idea of what to show us when we ask for a string representation of an instance. Let's change this by completing our model, adding the __str__ method at the bottom of the class body:
records/models.py
class Record(models.Model):
...
def __str__(self):
return '{}'.format(self.title)
Restart the server and now the page will read: Are you sure you want to delete "Some Bank"? where Some Bank is the title of the record whose delete link I clicked on.
We could have just used {{ object.title }}, but I prefer to fix the root of the problem, not just the effect. Adding a __str__ method is in fact something that you ought to do for all of your models.
The interesting bit in this last template is actually the link for canceling the operation. We use the url tag to go back to the list view (records:list), but we add anchor information to it so that it will eventually read something like this (this is for pk=2):
http://127.0.0.1:8000/records/#record-2
This will go back to the list page and scroll down to the container div that has ID record 2, which is nice.
This concludes the interface. Even though this section was similar to what we saw in Chapter 10, Web Development Done Right, we've been able to concentrate more on the code in this chapter. We've seen how useful Django class-based views are, and we even touched on some cool JavaScript. Run $ python manage.py runserver and your interface should be up and running at http://127.0.0.1:8000.
Now it's time to spice things up a bit with the second part of this project.
Listing all records
This template to list all records is fairly simple:
records/templates/records/list.html
{% extends "records/base.html" %}
{% load record_extras %}
{% block title %}Records{% endblock title %}
{% block page-content %}
<h1>Records</h1><span name="top"></span>
{% include "records/messages.html" %}
{% for record in records %}
<div class="record {% cycle 'row-light-blue' 'row-white' %}"
id="record-{{ record.pk }}">
<div class="record-left">
<div class="record-list">
<span class="record-span">Title</span>{{ record.title }}
</div>
<div class="record-list">
<span class="record-span">Username</span>
{{ record.username }}
</div>
<div class="record-list">
<span class="record-span">Email</span>{{ record.email }}
</div>
<div class="record-list">
<span class="record-span">URL</span>
<a href="{{ record.url }}" target="_blank">
{{ record.url }}</a>
</div>
<div class="record-list">
<span class="record-span">Password</span>
{% hide_password record.plaintext %}
</div>
</div>
<div class="record-right">
<div class="record-list">
<span class="record-span">Notes</span>
<textarea rows="3" cols="40" class="record-notes"
readonly>{{ record.notes }}</textarea>
</div>
<div class="record-list">
<span class="record-span">Last modified</span>
{{ record.last_modified }}
</div>
<div class="record-list">
<span class="record-span">Created</span>
{{ record.created }}
</div>
</div>
<div class="record-list-actions">
<a href="{% url "records:edit" pk=record.pk %}">» edit</a>
<a href="{% url "records:delete" pk=record.pk %}">» delete
</a>
</div>
</div>
{% endfor %}
{% endblock page-content %}
{% block footer %}
<p><a href="#top">Go back to top</a></p>
{% include "records/footer.html" %}
{% endblock footer %}For this template as well, I have highlighted the parts I'd like you to focus on. Firstly, I load a custom tags module, record_extras, which we'll need later. I have also added an anchor at the top, so that we'll be able to put a link to it at the bottom of the page, to avoid having to scroll all the way up.
Then, I included a template to provide me with the HTML code to display Django messages. It's a very simple template which I'll show you shortly.
Then, we define a list of div elements. Each Record instance has a container div, in which there are two other main div elements: record-left and record-right. In order to display them side by side, I have set this class in the main.css file:
.record-left { float: left; width: 300px;}The outermost div container (the one with class record), has an id attribute, which I have used as an anchor. This allows us to click on cancel on the record delete page, so that if we change our minds and don't want to delete the record, we can get back to the list page, and at the right position.
Each attribute of the record is then displayed in div elements whose class is record-list. Most of these classes are just there to allow me to set a bit of padding and dimensions on the HTML elements.
The next interesting bit is the hide_password tag, which takes the plaintext, which is the unencrypted password. The purpose of this custom tag is to display a sequence of '*' characters, as long as the original password, so that if someone is passing by while you're on the page, they won't see your passwords. However, hovering on that sequence of '*' characters will show you the original password in the tooltip. Here's the code for the hide_password tag:
records/templatetags/record_extras.py
from django import template
from django.utils.html import escape
register = template.Library()
@register.simple_tag
def hide_password(password):
return '<span title="{0}">{1}</span>'.format(
escape(password), '*' * len(password))There is nothing fancy here. We just register this function as a simple tag and then we can use it wherever we want. It takes a password and puts it as a tooltip of a span element, whose main content is a sequence of '*' characters. Just note one thing: we need to escape the password, so that we're sure it won't break our HTML (think of what might happen if the password contained a double-quote `"`, for example).
As far as the list.html template is concerned, the next interesting bit is that we set the readonly attribute to the textarea element, so as not to give the impression to the user that they can modify notes on the fly.
Then, we set a couple of links for each Record instance, right at the bottom of the container div. There is one for the edit page, and another for the delete page. Note that we need to pass the url tag not only the namespace:name string, but also the primary key information, as required by the URL setup we made in the urls.py module for those views.
Finally, we import the footer and set the link to the anchor on top of the page.
Now, as promised, here is the code for the messages:
records/templates/records/messages.html
{% if messages %}
{% for message in messages %}
<p class="{{ message.tags }}">{{ message }}</p>
{% endfor %}
{% endif %}This code takes care of displaying messages only when there is at least one to display. We give the p tag class information to display success messages in green and error messages in red.
If you grab the main.css file from the source code for the book, you will now be able to visualize the list page (yours will be blank, you still need to insert data into it), and it should look something like this:
As you can see, I have two records in the database at the moment. I'm hovering on the password of the first one, which is my platform account at my sister's school, and the password is displayed in the tooltip. The division in two div elements, left and right, helps in making rows smaller so that the overall result is more pleasing to the eye. The important information is on the left and the ancillary information is on the right. The row color alternates between a very light shade of blue and white.
Each row has an edit and delete link, at its bottom left. We'll show the pages for those two links right after we see the code for the templates that create them.
The CSS code that holds all the information for this interface is the following:
records/static/records/css/main.css
html, body, * {
font-family: 'Trebuchet MS', Helvetica, sans-serif; }
a { color: #333; }
.record {
clear: both; padding: 1em; border-bottom: 1px solid #666;}
.record-left { float: left; width: 300px;}
.record-list { padding: 2px 0; }
.fieldWrapper { padding: 5px; }
.footer { margin-top: 1em; color: #333; }
.home-option { padding: .6em 0; }
.record-span { font-weight: bold; padding-right: 1em; }
.record-notes { vertical-align: top; }
.record-list-actions { padding: 4px 0; clear: both; }
.record-list-actions a { padding: 0 4px; }
#pwd-info { padding: 0 6px; font-size: 1.1em; font-weight: bold;}
#id_notes { vertical-align: top; }
/* Messages */
.success, .errorlist {font-size: 1.2em; font-weight: bold; }
.success {color: #25B725; }
.errorlist {color: #B12B2B; }
/* colors */
.row-light-blue { background-color: #E6F0FA; }
.row-white { background-color: #fff; }
.green { color: #060; }
.orange { color: #FF3300; }
.red { color: #900; }Please remember, I'm not a CSS guru so just take this file as it is, a fairly naive way to provide styling to our interface.
Now for the interesting part. Creating and updating a record. We'll use the same template for both, so we expect some decisional logic to be there that will tell us in which of the two situations we are. As it turns out, it will not be that much code. The most exciting part of this template, however, is its associated JavaScript file which we'll examine right afterwards.
records/templates/records/record_add_edit.html
{% extends "records/base.html" %}
{% load static from staticfiles %}
{% block title %}
{% if update %}Update{% else %}Create{% endif %} Record
{% endblock title %}
{% block page-content %}
<h1>{% if update %}Update a{% else %}Create a new{% endif %}
Record
</h1>
{% include "records/messages.html" %}
<form action="." method="post">{% csrf_token %}
{{ form.non_field_errors }}
<div class="fieldWrapper">{{ form.title.errors }}
{{ form.title.label_tag }} {{ form.title }}</div>
<div class="fieldWrapper">{{ form.username.errors }}
{{ form.username.label_tag }} {{ form.username }}</div>
<div class="fieldWrapper">{{ form.email.errors }}
{{ form.email.label_tag }} {{ form.email }}</div>
<div class="fieldWrapper">{{ form.url.errors }}
{{ form.url.label_tag }} {{ form.url }}</div>
<div class="fieldWrapper">{{ form.password.errors }}
{{ form.password.label_tag }} {{ form.password }}
<span id="pwd-info"></span></div>
<button type="button" id="validate-btn">
Validate Password</button>
<button type="button" id="generate-btn">
Generate Password</button>
<div class="fieldWrapper">{{ form.notes.errors }}
{{ form.notes.label_tag }} {{ form.notes }}</div>
<input type="submit"
value="{% if update %}Update{% else %}Insert{% endif %}">
</form>
{% endblock page-content %}
{% block footer %}
<br>{% include "records/footer.html" %}<br>
Go to <a href="{% url "records:list" %}">the records list</a>.
{% endblock footer %}
{% block scripts %}
{{ block.super }}
<script src="{% static "records/js/api.js" %}"></script>
{% endblock scripts %}As usual, I have highlighted the important parts, so let's go through this code together.
You can see the first bit of decision logic in the title block. Similar decision logic is also displayed later on, in the header of the page (the h1 HTML tag), and in the submit button at the end of the form.
Apart from this logic, what I'd like you to focus on is the form and what's inside it. We set the action attribute to a dot, which means this page, so that we don't need to customize it according to which view is serving the page. Also, we immediately take care of the cross-site request forgery token, as explained in Chapter 10, Web Development Done Right.
Note that, this time, we cannot leave the whole form rendering up to Django since we want to add in a couple of extra things, so we go down one level of granularity and ask Django to render each individual field for us, along with any errors, along with its label. This way we still save a lot of effort, and at the same time, we can also customize the form as we like. In situations like this, it's not uncommon to write a small template to render a field, in order to avoid repeating those three lines for each field. In this case though, the form is so small I decided to avoid raising the complexity level up any further.
The span element, pwd-info, contains the information about the password that we get from the API. The two buttons after that, validate-btn and generate-btn, are hooked up with the AJAX calls to the API.
At the end of the template, in the scripts block, we need to load the api.js JavaScript file which contains the code to work with the API. We also need to use block.super, which will load whatever code is in the same block in the parent template (for example, jQuery). block.super is basically the template equivalent of a call to super(ClassName, self) in Python. It's important to load jQuery before our library, since the latter is based on the former.
Let's now take a look at that JavaScript. I don't expect you to understand everything. Firstly, this is a Python book and secondly, you're supposed to be a beginner (though by now, ninja trained), so fear not. However, as JavaScript has, by now, become essential if you're dealing with a web environment, having a working knowledge of it is extremely important even for a Python developer, so try and get the most out of what I'm about to show you. We'll see the password generation first:
records/static/records/js/api.js
var baseURL = 'http://127.0.0.1:5555/password';
var getRandomPassword = function() {
var apiURL = '{url}/generate'.replace('{url}', baseURL);
$.ajax({
type: 'GET',
url: apiURL,
success: function(data, status, request) {
$('#id_password').val(data[1]);
},
error: function() { alert('Unexpected error'); }
});
}
$(function() {
$('#generate-btn').click(getRandomPassword);
});Firstly, we set a variable for the base API URL: baseURL. Then, we define the getRandomPassword function, which is very simple. At the beginning, it defines the apiURL extending baseURL with a replacement technique. Even if the syntax is different from that of Python, you shouldn't have any issues understanding this line.
After defining the apiURL, the interesting bit comes up. We call $.ajax, which is the jQuery function that performs the AJAX calls. That $ is a shortcut for jQuery. As you can see in the body of the call, it's a GET request to apiURL. If it succeeds (success: ...), an anonymous function is run, which sets the value of the id_password text field to the second element of the returned data. We'll see the structure of the data when we examine the API code, so don't worry about that now. If an error occurs, we simply alert the user that there was an unexpected error.
After the function definition, we run a couple of lines of code to bind the click event on the generate-btn button to the getRandomPassword function. This means that, after this code has been run by the browser engine, every time we click the generate-btn button, the getRandomPassword function is called.
That wasn't so scary, was it? So let's see what we need for the validation part.
Now there is a value in the password field and we want to validate it. We need to call the API and inspect its response. Since passwords can have weird characters, I don't want to pass them on the URL, therefore I will use a POST request, which allows me to put the password in its body. To do this, I need the following code:
var validatePassword = function() {
var apiURL = '{url}/validate'.replace('{url}', baseURL);
$.ajax({
type: 'POST',
url: apiURL,
data: JSON.stringify({'password': $('#id_password').val()}),
contentType: "text/plain", // Avoid CORS preflight
success: function(data, status, request) {
var valid = data['valid'], infoClass, grade;
var msg = (valid?'Valid':'Invalid') + ' password.';
if (valid) {
var score = data['score']['total'];
grade = (score<10?'Poor':(score<18?'Medium':'Strong'));
infoClass = (score<10?'red':(score<18?'orange':'green'));
msg += ' (Score: {score}, {grade})'
.replace('{score}', score).replace('{grade}', grade);
}
$('#pwd-info').html(msg);
$('#pwd-info').removeClass().addClass(infoClass);
},
error: function(data) { alert('Unexpected error'); }
});
}
$(function() {
$('#validate-btn').click(validatePassword);
});The concept is the same as before, only this time it's for the validate-btn button. The body of the AJAX call is similar. We use a POST instead of a GET request, and we define the data as a JSON object, which is the equivalent of using json.dumps({'password': 'some_pwd'}) in Python.
The contentType line is a quick hack to avoid problems with the CORS preflight behavior of the browser. Cross-origin resource sharing (CORS) is a mechanism that allows restricted resources on a web page to be requested from another domain outside of the domain from which the request originated. In a nutshell, since the API is located at 127.0.0.1:5555 and the interface is running at 127.0.0.1:8000, without this hack, the browser wouldn't allow us to perform the calls. In a production environment, you may want to check the documentation for JSONP, which is a much better (albeit more complex) solution to this issue.
The body of the anonymous function which is run if the call succeeds is apparently only a bit complicated. All we need to do is understand if the password is valid (from data['valid']), and assign it a grade and a CSS class based on its score. Validity and score information come from the API response.
The only tricky bit in this code is the JavaScript ternary operator, so let's see a comparative example for it:
# Python error = 'critical' if error_level > 50 else 'medium' // JavaScript equivalent error = (error_level > 50 ? 'critical' : 'medium');
With this example, you shouldn't have any issue reading the rest of the logic in the function. I know, I could have just used a regular if (...), but JavaScript coders use the ternary operator all the time, so you should get used to it. It's good training to scratch our heads a bit harder in order to understand code.
Lastly, I'd like you to take a look at the end of that function. We set the html of the pwd-info span element to the message we assembled (msg), and then we style it. In one line, we remove all the CSS classes from that element (removeClass() with no parameters does that), and we add the infoClass to it. infoClass is either 'red', 'orange', or 'green'. If you go back to the main.css file, you'll see them at the bottom.
Now that we've seen both the template code and the JavaScript to make the calls, let's see a screenshot of the page. We're going to edit the first record, the one about my sister's school.
In the picture, you can see that I updated the password by clicking on the Generate Password button. Then, I saved the record (so you could see the nice message on top), and, finally, I clicked on the Validate Password button.
The result is shown in green on the right-hand side of the Password field. It's strong (23 is actually the maximum score we can get) so the message is displayed in a nice shade of green.
To delete a record, go to the list and click on the delete link. You'll be redirected to a page that asks you for confirmation; you can then choose to proceed and delete the poor record, or to cancel the request and go back to the list page. The template code is the following:
records/templates/records/record_confirm_delete.html
{% extends "records/base.html" %}
{% block title %}Delete record{% endblock title %}
{% block page-content %}
<h1>Confirm Record Deletion</h1>
<form action="." method="post">{% csrf_token %}
<p>Are you sure you want to delete "{{ object }}"?</p>
<input type="submit" value="Confirm" />
<a href="{% url "records:list" %}#record-{{ object.pk }}">
» cancel</a>
</form>
{% endblock page-content %}Since this is a template for a standard Django view, we need to use the naming conventions adopted by Django. Therefore, the record in question is called object in the template. The {{ object }} tag displays a string representation for the object, which is not exactly beautiful at the moment, since the whole line will read: Are you sure you want to delete "Record object"?.
This is because we haven't added a __str__ method to our Model class yet, which means that Python has no idea of what to show us when we ask for a string representation of an instance. Let's change this by completing our model, adding the __str__ method at the bottom of the class body:
records/models.py
class Record(models.Model):
...
def __str__(self):
return '{}'.format(self.title)
Restart the server and now the page will read: Are you sure you want to delete "Some Bank"? where Some Bank is the title of the record whose delete link I clicked on.
We could have just used {{ object.title }}, but I prefer to fix the root of the problem, not just the effect. Adding a __str__ method is in fact something that you ought to do for all of your models.
The interesting bit in this last template is actually the link for canceling the operation. We use the url tag to go back to the list view (records:list), but we add anchor information to it so that it will eventually read something like this (this is for pk=2):
http://127.0.0.1:8000/records/#record-2
This will go back to the list page and scroll down to the container div that has ID record 2, which is nice.
This concludes the interface. Even though this section was similar to what we saw in Chapter 10, Web Development Done Right, we've been able to concentrate more on the code in this chapter. We've seen how useful Django class-based views are, and we even touched on some cool JavaScript. Run $ python manage.py runserver and your interface should be up and running at http://127.0.0.1:8000.
Now it's time to spice things up a bit with the second part of this project.
Creating and editing records
Now for the interesting part. Creating and updating a record. We'll use the same template for both, so we expect some decisional logic to be there that will tell us in which of the two situations we are. As it turns out, it will not be that much code. The most exciting part of this template, however, is its associated JavaScript file which we'll examine right afterwards.
records/templates/records/record_add_edit.html
{% extends "records/base.html" %}
{% load static from staticfiles %}
{% block title %}
{% if update %}Update{% else %}Create{% endif %} Record
{% endblock title %}
{% block page-content %}
<h1>{% if update %}Update a{% else %}Create a new{% endif %}
Record
</h1>
{% include "records/messages.html" %}
<form action="." method="post">{% csrf_token %}
{{ form.non_field_errors }}
<div class="fieldWrapper">{{ form.title.errors }}
{{ form.title.label_tag }} {{ form.title }}</div>
<div class="fieldWrapper">{{ form.username.errors }}
{{ form.username.label_tag }} {{ form.username }}</div>
<div class="fieldWrapper">{{ form.email.errors }}
{{ form.email.label_tag }} {{ form.email }}</div>
<div class="fieldWrapper">{{ form.url.errors }}
{{ form.url.label_tag }} {{ form.url }}</div>
<div class="fieldWrapper">{{ form.password.errors }}
{{ form.password.label_tag }} {{ form.password }}
<span id="pwd-info"></span></div>
<button type="button" id="validate-btn">
Validate Password</button>
<button type="button" id="generate-btn">
Generate Password</button>
<div class="fieldWrapper">{{ form.notes.errors }}
{{ form.notes.label_tag }} {{ form.notes }}</div>
<input type="submit"
value="{% if update %}Update{% else %}Insert{% endif %}">
</form>
{% endblock page-content %}
{% block footer %}
<br>{% include "records/footer.html" %}<br>
Go to <a href="{% url "records:list" %}">the records list</a>.
{% endblock footer %}
{% block scripts %}
{{ block.super }}
<script src="{% static "records/js/api.js" %}"></script>
{% endblock scripts %}As usual, I have highlighted the important parts, so let's go through this code together.
You can see the first bit of decision logic in the title block. Similar decision logic is also displayed later on, in the header of the page (the h1 HTML tag), and in the submit button at the end of the form.
Apart from this logic, what I'd like you to focus on is the form and what's inside it. We set the action attribute to a dot, which means this page, so that we don't need to customize it according to which view is serving the page. Also, we immediately take care of the cross-site request forgery token, as explained in Chapter 10, Web Development Done Right.
Note that, this time, we cannot leave the whole form rendering up to Django since we want to add in a couple of extra things, so we go down one level of granularity and ask Django to render each individual field for us, along with any errors, along with its label. This way we still save a lot of effort, and at the same time, we can also customize the form as we like. In situations like this, it's not uncommon to write a small template to render a field, in order to avoid repeating those three lines for each field. In this case though, the form is so small I decided to avoid raising the complexity level up any further.
The span element, pwd-info, contains the information about the password that we get from the API. The two buttons after that, validate-btn and generate-btn, are hooked up with the AJAX calls to the API.
At the end of the template, in the scripts block, we need to load the api.js JavaScript file which contains the code to work with the API. We also need to use block.super, which will load whatever code is in the same block in the parent template (for example, jQuery). block.super is basically the template equivalent of a call to super(ClassName, self) in Python. It's important to load jQuery before our library, since the latter is based on the former.
Let's now take a look at that JavaScript. I don't expect you to understand everything. Firstly, this is a Python book and secondly, you're supposed to be a beginner (though by now, ninja trained), so fear not. However, as JavaScript has, by now, become essential if you're dealing with a web environment, having a working knowledge of it is extremely important even for a Python developer, so try and get the most out of what I'm about to show you. We'll see the password generation first:
records/static/records/js/api.js
var baseURL = 'http://127.0.0.1:5555/password';
var getRandomPassword = function() {
var apiURL = '{url}/generate'.replace('{url}', baseURL);
$.ajax({
type: 'GET',
url: apiURL,
success: function(data, status, request) {
$('#id_password').val(data[1]);
},
error: function() { alert('Unexpected error'); }
});
}
$(function() {
$('#generate-btn').click(getRandomPassword);
});Firstly, we set a variable for the base API URL: baseURL. Then, we define the getRandomPassword function, which is very simple. At the beginning, it defines the apiURL extending baseURL with a replacement technique. Even if the syntax is different from that of Python, you shouldn't have any issues understanding this line.
After defining the apiURL, the interesting bit comes up. We call $.ajax, which is the jQuery function that performs the AJAX calls. That $ is a shortcut for jQuery. As you can see in the body of the call, it's a GET request to apiURL. If it succeeds (success: ...), an anonymous function is run, which sets the value of the id_password text field to the second element of the returned data. We'll see the structure of the data when we examine the API code, so don't worry about that now. If an error occurs, we simply alert the user that there was an unexpected error.
After the function definition, we run a couple of lines of code to bind the click event on the generate-btn button to the getRandomPassword function. This means that, after this code has been run by the browser engine, every time we click the generate-btn button, the getRandomPassword function is called.
That wasn't so scary, was it? So let's see what we need for the validation part.
Now there is a value in the password field and we want to validate it. We need to call the API and inspect its response. Since passwords can have weird characters, I don't want to pass them on the URL, therefore I will use a POST request, which allows me to put the password in its body. To do this, I need the following code:
var validatePassword = function() {
var apiURL = '{url}/validate'.replace('{url}', baseURL);
$.ajax({
type: 'POST',
url: apiURL,
data: JSON.stringify({'password': $('#id_password').val()}),
contentType: "text/plain", // Avoid CORS preflight
success: function(data, status, request) {
var valid = data['valid'], infoClass, grade;
var msg = (valid?'Valid':'Invalid') + ' password.';
if (valid) {
var score = data['score']['total'];
grade = (score<10?'Poor':(score<18?'Medium':'Strong'));
infoClass = (score<10?'red':(score<18?'orange':'green'));
msg += ' (Score: {score}, {grade})'
.replace('{score}', score).replace('{grade}', grade);
}
$('#pwd-info').html(msg);
$('#pwd-info').removeClass().addClass(infoClass);
},
error: function(data) { alert('Unexpected error'); }
});
}
$(function() {
$('#validate-btn').click(validatePassword);
});The concept is the same as before, only this time it's for the validate-btn button. The body of the AJAX call is similar. We use a POST instead of a GET request, and we define the data as a JSON object, which is the equivalent of using json.dumps({'password': 'some_pwd'}) in Python.
The contentType line is a quick hack to avoid problems with the CORS preflight behavior of the browser. Cross-origin resource sharing (CORS) is a mechanism that allows restricted resources on a web page to be requested from another domain outside of the domain from which the request originated. In a nutshell, since the API is located at 127.0.0.1:5555 and the interface is running at 127.0.0.1:8000, without this hack, the browser wouldn't allow us to perform the calls. In a production environment, you may want to check the documentation for JSONP, which is a much better (albeit more complex) solution to this issue.
The body of the anonymous function which is run if the call succeeds is apparently only a bit complicated. All we need to do is understand if the password is valid (from data['valid']), and assign it a grade and a CSS class based on its score. Validity and score information come from the API response.
The only tricky bit in this code is the JavaScript ternary operator, so let's see a comparative example for it:
# Python error = 'critical' if error_level > 50 else 'medium' // JavaScript equivalent error = (error_level > 50 ? 'critical' : 'medium');
With this example, you shouldn't have any issue reading the rest of the logic in the function. I know, I could have just used a regular if (...), but JavaScript coders use the ternary operator all the time, so you should get used to it. It's good training to scratch our heads a bit harder in order to understand code.
Lastly, I'd like you to take a look at the end of that function. We set the html of the pwd-info span element to the message we assembled (msg), and then we style it. In one line, we remove all the CSS classes from that element (removeClass() with no parameters does that), and we add the infoClass to it. infoClass is either 'red', 'orange', or 'green'. If you go back to the main.css file, you'll see them at the bottom.
Now that we've seen both the template code and the JavaScript to make the calls, let's see a screenshot of the page. We're going to edit the first record, the one about my sister's school.
In the picture, you can see that I updated the password by clicking on the Generate Password button. Then, I saved the record (so you could see the nice message on top), and, finally, I clicked on the Validate Password button.
The result is shown in green on the right-hand side of the Password field. It's strong (23 is actually the maximum score we can get) so the message is displayed in a nice shade of green.
To delete a record, go to the list and click on the delete link. You'll be redirected to a page that asks you for confirmation; you can then choose to proceed and delete the poor record, or to cancel the request and go back to the list page. The template code is the following:
records/templates/records/record_confirm_delete.html
{% extends "records/base.html" %}
{% block title %}Delete record{% endblock title %}
{% block page-content %}
<h1>Confirm Record Deletion</h1>
<form action="." method="post">{% csrf_token %}
<p>Are you sure you want to delete "{{ object }}"?</p>
<input type="submit" value="Confirm" />
<a href="{% url "records:list" %}#record-{{ object.pk }}">
» cancel</a>
</form>
{% endblock page-content %}Since this is a template for a standard Django view, we need to use the naming conventions adopted by Django. Therefore, the record in question is called object in the template. The {{ object }} tag displays a string representation for the object, which is not exactly beautiful at the moment, since the whole line will read: Are you sure you want to delete "Record object"?.
This is because we haven't added a __str__ method to our Model class yet, which means that Python has no idea of what to show us when we ask for a string representation of an instance. Let's change this by completing our model, adding the __str__ method at the bottom of the class body:
records/models.py
class Record(models.Model):
...
def __str__(self):
return '{}'.format(self.title)
Restart the server and now the page will read: Are you sure you want to delete "Some Bank"? where Some Bank is the title of the record whose delete link I clicked on.
We could have just used {{ object.title }}, but I prefer to fix the root of the problem, not just the effect. Adding a __str__ method is in fact something that you ought to do for all of your models.
The interesting bit in this last template is actually the link for canceling the operation. We use the url tag to go back to the list view (records:list), but we add anchor information to it so that it will eventually read something like this (this is for pk=2):
http://127.0.0.1:8000/records/#record-2
This will go back to the list page and scroll down to the container div that has ID record 2, which is nice.
This concludes the interface. Even though this section was similar to what we saw in Chapter 10, Web Development Done Right, we've been able to concentrate more on the code in this chapter. We've seen how useful Django class-based views are, and we even touched on some cool JavaScript. Run $ python manage.py runserver and your interface should be up and running at http://127.0.0.1:8000.
Now it's time to spice things up a bit with the second part of this project.
Talking to the API
Let's now take a look at that JavaScript. I don't expect you to understand everything. Firstly, this is a Python book and secondly, you're supposed to be a beginner (though by now, ninja trained), so fear not. However, as JavaScript has, by now, become essential if you're dealing with a web environment, having a working knowledge of it is extremely important even for a Python developer, so try and get the most out of what I'm about to show you. We'll see the password generation first:
records/static/records/js/api.js
var baseURL = 'http://127.0.0.1:5555/password';
var getRandomPassword = function() {
var apiURL = '{url}/generate'.replace('{url}', baseURL);
$.ajax({
type: 'GET',
url: apiURL,
success: function(data, status, request) {
$('#id_password').val(data[1]);
},
error: function() { alert('Unexpected error'); }
});
}
$(function() {
$('#generate-btn').click(getRandomPassword);
});Firstly, we set a variable for the base API URL: baseURL. Then, we define the getRandomPassword function, which is very simple. At the beginning, it defines the apiURL extending baseURL with a replacement technique. Even if the syntax is different from that of Python, you shouldn't have any issues understanding this line.
After defining the apiURL, the interesting bit comes up. We call $.ajax, which is the jQuery function that performs the AJAX calls. That $ is a shortcut for jQuery. As you can see in the body of the call, it's a GET request to apiURL. If it succeeds (success: ...), an anonymous function is run, which sets the value of the id_password text field to the second element of the returned data. We'll see the structure of the data when we examine the API code, so don't worry about that now. If an error occurs, we simply alert the user that there was an unexpected error.
After the function definition, we run a couple of lines of code to bind the click event on the generate-btn button to the getRandomPassword function. This means that, after this code has been run by the browser engine, every time we click the generate-btn button, the getRandomPassword function is called.
That wasn't so scary, was it? So let's see what we need for the validation part.
Now there is a value in the password field and we want to validate it. We need to call the API and inspect its response. Since passwords can have weird characters, I don't want to pass them on the URL, therefore I will use a POST request, which allows me to put the password in its body. To do this, I need the following code:
var validatePassword = function() {
var apiURL = '{url}/validate'.replace('{url}', baseURL);
$.ajax({
type: 'POST',
url: apiURL,
data: JSON.stringify({'password': $('#id_password').val()}),
contentType: "text/plain", // Avoid CORS preflight
success: function(data, status, request) {
var valid = data['valid'], infoClass, grade;
var msg = (valid?'Valid':'Invalid') + ' password.';
if (valid) {
var score = data['score']['total'];
grade = (score<10?'Poor':(score<18?'Medium':'Strong'));
infoClass = (score<10?'red':(score<18?'orange':'green'));
msg += ' (Score: {score}, {grade})'
.replace('{score}', score).replace('{grade}', grade);
}
$('#pwd-info').html(msg);
$('#pwd-info').removeClass().addClass(infoClass);
},
error: function(data) { alert('Unexpected error'); }
});
}
$(function() {
$('#validate-btn').click(validatePassword);
});The concept is the same as before, only this time it's for the validate-btn button. The body of the AJAX call is similar. We use a POST instead of a GET request, and we define the data as a JSON object, which is the equivalent of using json.dumps({'password': 'some_pwd'}) in Python.
The contentType line is a quick hack to avoid problems with the CORS preflight behavior of the browser. Cross-origin resource sharing (CORS) is a mechanism that allows restricted resources on a web page to be requested from another domain outside of the domain from which the request originated. In a nutshell, since the API is located at 127.0.0.1:5555 and the interface is running at 127.0.0.1:8000, without this hack, the browser wouldn't allow us to perform the calls. In a production environment, you may want to check the documentation for JSONP, which is a much better (albeit more complex) solution to this issue.
The body of the anonymous function which is run if the call succeeds is apparently only a bit complicated. All we need to do is understand if the password is valid (from data['valid']), and assign it a grade and a CSS class based on its score. Validity and score information come from the API response.
The only tricky bit in this code is the JavaScript ternary operator, so let's see a comparative example for it:
# Python error = 'critical' if error_level > 50 else 'medium' // JavaScript equivalent error = (error_level > 50 ? 'critical' : 'medium');
With this example, you shouldn't have any issue reading the rest of the logic in the function. I know, I could have just used a regular if (...), but JavaScript coders use the ternary operator all the time, so you should get used to it. It's good training to scratch our heads a bit harder in order to understand code.
Lastly, I'd like you to take a look at the end of that function. We set the html of the pwd-info span element to the message we assembled (msg), and then we style it. In one line, we remove all the CSS classes from that element (removeClass() with no parameters does that), and we add the infoClass to it. infoClass is either 'red', 'orange', or 'green'. If you go back to the main.css file, you'll see them at the bottom.
Now that we've seen both the template code and the JavaScript to make the calls, let's see a screenshot of the page. We're going to edit the first record, the one about my sister's school.
In the picture, you can see that I updated the password by clicking on the Generate Password button. Then, I saved the record (so you could see the nice message on top), and, finally, I clicked on the Validate Password button.
The result is shown in green on the right-hand side of the Password field. It's strong (23 is actually the maximum score we can get) so the message is displayed in a nice shade of green.
To delete a record, go to the list and click on the delete link. You'll be redirected to a page that asks you for confirmation; you can then choose to proceed and delete the poor record, or to cancel the request and go back to the list page. The template code is the following:
records/templates/records/record_confirm_delete.html
{% extends "records/base.html" %}
{% block title %}Delete record{% endblock title %}
{% block page-content %}
<h1>Confirm Record Deletion</h1>
<form action="." method="post">{% csrf_token %}
<p>Are you sure you want to delete "{{ object }}"?</p>
<input type="submit" value="Confirm" />
<a href="{% url "records:list" %}#record-{{ object.pk }}">
» cancel</a>
</form>
{% endblock page-content %}Since this is a template for a standard Django view, we need to use the naming conventions adopted by Django. Therefore, the record in question is called object in the template. The {{ object }} tag displays a string representation for the object, which is not exactly beautiful at the moment, since the whole line will read: Are you sure you want to delete "Record object"?.
This is because we haven't added a __str__ method to our Model class yet, which means that Python has no idea of what to show us when we ask for a string representation of an instance. Let's change this by completing our model, adding the __str__ method at the bottom of the class body:
records/models.py
class Record(models.Model):
...
def __str__(self):
return '{}'.format(self.title)
Restart the server and now the page will read: Are you sure you want to delete "Some Bank"? where Some Bank is the title of the record whose delete link I clicked on.
We could have just used {{ object.title }}, but I prefer to fix the root of the problem, not just the effect. Adding a __str__ method is in fact something that you ought to do for all of your models.
The interesting bit in this last template is actually the link for canceling the operation. We use the url tag to go back to the list view (records:list), but we add anchor information to it so that it will eventually read something like this (this is for pk=2):
http://127.0.0.1:8000/records/#record-2
This will go back to the list page and scroll down to the container div that has ID record 2, which is nice.
This concludes the interface. Even though this section was similar to what we saw in Chapter 10, Web Development Done Right, we've been able to concentrate more on the code in this chapter. We've seen how useful Django class-based views are, and we even touched on some cool JavaScript. Run $ python manage.py runserver and your interface should be up and running at http://127.0.0.1:8000.
Now it's time to spice things up a bit with the second part of this project.
Deleting records
To delete a record, go to the list and click on the delete link. You'll be redirected to a page that asks you for confirmation; you can then choose to proceed and delete the poor record, or to cancel the request and go back to the list page. The template code is the following:
records/templates/records/record_confirm_delete.html
{% extends "records/base.html" %}
{% block title %}Delete record{% endblock title %}
{% block page-content %}
<h1>Confirm Record Deletion</h1>
<form action="." method="post">{% csrf_token %}
<p>Are you sure you want to delete "{{ object }}"?</p>
<input type="submit" value="Confirm" />
<a href="{% url "records:list" %}#record-{{ object.pk }}">
» cancel</a>
</form>
{% endblock page-content %}Since this is a template for a standard Django view, we need to use the naming conventions adopted by Django. Therefore, the record in question is called object in the template. The {{ object }} tag displays a string representation for the object, which is not exactly beautiful at the moment, since the whole line will read: Are you sure you want to delete "Record object"?.
This is because we haven't added a __str__ method to our Model class yet, which means that Python has no idea of what to show us when we ask for a string representation of an instance. Let's change this by completing our model, adding the __str__ method at the bottom of the class body:
records/models.py
class Record(models.Model):
...
def __str__(self):
return '{}'.format(self.title)
Restart the server and now the page will read: Are you sure you want to delete "Some Bank"? where Some Bank is the title of the record whose delete link I clicked on.
We could have just used {{ object.title }}, but I prefer to fix the root of the problem, not just the effect. Adding a __str__ method is in fact something that you ought to do for all of your models.
The interesting bit in this last template is actually the link for canceling the operation. We use the url tag to go back to the list view (records:list), but we add anchor information to it so that it will eventually read something like this (this is for pk=2):
http://127.0.0.1:8000/records/#record-2
This will go back to the list page and scroll down to the container div that has ID record 2, which is nice.
This concludes the interface. Even though this section was similar to what we saw in Chapter 10, Web Development Done Right, we've been able to concentrate more on the code in this chapter. We've seen how useful Django class-based views are, and we even touched on some cool JavaScript. Run $ python manage.py runserver and your interface should be up and running at http://127.0.0.1:8000.
Now it's time to spice things up a bit with the second part of this project.
The structure of the Falcon project we're about to code is nowhere near as extended as the interface one. We'll code five files altogether. In your ch12 folder, create a new one called pwdapi. This is its final structure:
$ tree -A pwdapi/ pwdapi/ ├── core │ ├── handlers.py │ └── passwords.py ├── main.py └── tests └── test_core ├── test_handlers.py └── test_passwords.py
The API was all coded using TDD, so we're also going to explore the tests. However, I think it's going to be easier for you to understand the tests if you first see the code, so we're going to start with that.
This is the code for the Falcon application:
main.py
import falcon
from core.handlers import (
PasswordValidatorHandler,
PasswordGeneratorHandler,
)
validation_handler = PasswordValidatorHandler()
generator_handler = PasswordGeneratorHandler()
app = falcon.API()
app.add_route('/password/validate/', validation_handler)
app.add_route('/password/generate/', generator_handler)As in the example in Chapter 10, Web Development Done Right, we start by creating one instance for each of the handlers we need, then we create a falcon.API object and, by calling its add_route method, we set up the routing to the URLs of our API. We'll get to the definitions of the handlers in a moment. Firstly, we need a couple of helpers.
In this section, we will take a look at a couple of classes that we'll use in our handlers. It's always good to factor out some logic following the Single Responsibility Principle.
Note
In OOP, the Single Responsibility Principle (SRP) states that every class should have responsibility for a single part of the functionality provided by the software, and that responsibility should be entirely encapsulated by the class. All of its services should be narrowly aligned with that responsibility.
The Single Responsibility Principle is the S in S.O.L.I.D., an acronym for the first five OOP and software design principles introduced by Robert Martin.
I heartily suggest you to open a browser and read up on this subject, it is very important.
All the code in the helpers section belongs to the core/passwords.py module. Here's how it begins:
from math import ceil
from random import sample
from string import ascii_lowercase, ascii_uppercase, digits
punctuation = '!#$%&()*+-?@_|'
allchars = ''.join(
(ascii_lowercase, ascii_uppercase, digits, punctuation))We'll need to handle some randomized calculations but the most important part here is the allowed characters. We will allow letters, digits, and a set of punctuation characters. To ease writing the code, we will merge those parts into the allchars string.
The PasswordValidator class is my favorite bit of logic in the whole API. It exposes an is_valid and a score method. The latter runs all defined validators ("private" methods in the same class), and collects the scores into a single dict which is returned as a result. I'll write this class method by method so that it does not get too complicated:
class PasswordValidator:
def __init__(self, password):
self.password = password.strip()It begins by setting password (with no leading or trailing spaces) as an instance attribute. This way we won't then have to pass it around from method to method. All the methods that will follow belong to this class.
def is_valid(self):
return (len(self.password) > 0 and
all(char in allchars for char in self.password))A password is valid when its length is greater than 0 and all of its characters belong to the allchars string. When you read the is_valid method, it's practically English (that's how amazing Python is). all is a built-in function that tells you if all the elements of the iterable you feed to it are True.
def score(self):
result = {
'length': self._score_length(),
'case': self._score_case(),
'numbers': self._score_numbers(),
'special': self._score_special(),
'ratio': self._score_ratio(),
}
result['total'] = sum(result.values())
return resultThis is the other main method. It's very simple, it just prepares a dict with all the results from the validators. The only independent bit of logic happens at the end, when we sum the grades from each validator and assign it to a 'total' key in the dict, just for convenience.
As you can see, we score a password by length, by letter case, by the presence of numbers, and special characters, and, finally, by the ratio between letters and numbers. Letters allow a character to be between 26 * 2 = 52 different possible choices, while digits allow only 10. Therefore, passwords whose letters to digits ratio is higher are more difficult to crack.
Let's see the length validator:
def _score_length(self):
scores_list = ([0]*4) + ([1]*4) + ([3]*4) + ([5]*4)
scores = dict(enumerate(scores_list))
return scores.get(len(self.password), 7)We assign 0 points to passwords whose length is less than four characters, 1 point for those whose length is less than 8, 3 for a length less than 12, 5 for a length less than 16, and 7 for a length of 16 or more.
In order to avoid a waterfall of if/elif clauses, I have adopted a functional style here. I prepared a score_list, which is basically [0, 0, 0, 0, 1, 1, 1, 1, 3, ...]. Then, by enumerating it, I got a (length, score) pair for each length less than 16. I put those pairs into a dict, which gives me the equivalent in dict form, so it should look like this: {0:0, 1:0, 2:0, 3:0, 4:1, 5:1, ...}. I then perform a get on this dict with the length of the password, setting a value of 7 as the default (which will be returned for lengths of 16 or more, which are not in the dict).
I have nothing against if/elif clauses, of course, but I wanted to take the opportunity to show you different coding styles in this final chapter, to help you get used to reading code which deviates from what you would normally expect. It's only beneficial.
def _score_case(self):
lower = bool(set(ascii_lowercase) & set(self.password))
upper = bool(set(ascii_uppercase) & set(self.password))
return int(lower or upper) + 2 * (lower and upper)The way we validate the case is again with a nice trick. lower is True when the intersection between the password and all lowercase characters is non-empty, otherwise it's False. upper behaves in the same way, only with uppercase characters.
To understand the evaluation that happens on the last line, let's use the inside-out technique once more: lower or upper is True when at least one of the two is True. When it's True, it will be converted to a 1 by the int class. This equates to saying, if there is at least one character, regardless of the casing, the score gets 1 point, otherwise it stays at 0.
Now for the second part: lower and upper is True when both of them are True, which means that we have at least one lowercase and one uppercase character. This means that, to crack the password, a brute-force algorithm would have to loop through 52 letters instead of just 26. Therefore, when that's True, we get an extra two points.
This validator therefore produces a result in the range (0, 1, 3), depending on what the password is.
def _score_numbers(self):
return 2 if (set(self.password) & set(digits)) else 0Scoring on the numbers is simpler. If we have at least one number, we get two points, otherwise we get 0. In this case, I used a ternary operator to return the result.
def _score_special(self):
return 4 if (
set(self.password) & set(punctuation)) else 0The special characters validator has the same logic as the previous one but, since special characters add quite a bit of complexity when it comes to cracking a password, we have scored four points instead of just two.
The last one validates the ratio between the letters and the digits.
def _score_ratio(self):
alpha_count = sum(
1 if c.lower() in ascii_lowercase else 0
for c in self.password)
digits_count = sum(
1 if c in digits else 0 for c in self.password)
if digits_count == 0:
return 0
return min(ceil(alpha_count / digits_count), 7)I highlighted the conditional logic in the expressions in the sum calls. In the first case, we get a 1 for each character whose lowercase version is in ascii_lowercase. This means that summing all those 1's up gives us exactly the count of all the letters. Then, we do the same for the digits, only we use the digits string for reference, and we don't need to lowercase the character. When digits_count is 0, alpha_count / digits_count would cause a ZeroDivisionError, therefore we check on digits_count and when it's 0 we return 0. If we have digits, we calculate the ceiling of the letters:digits ratio, and return it, capped at 7.
Of course, there are many different ways to calculate a score for a password. My aim here is not to give you the finest algorithm to do that, but to show you how you could go about implementing it.
The password generator is a much simpler class than the validator. However, I have coded it so that we won't need to create an instance to use it, just to show you yet again a different coding style.
class PasswordGenerator:
@classmethod
def generate(cls, length, bestof=10):
candidates = sorted([
cls._generate_candidate(length)
for k in range(max(1, bestof))
])
return candidates[-1]
@classmethod
def _generate_candidate(cls, length):
password = cls._generate_password(length)
score = PasswordValidator(password).score()
return (score['total'], password)
@classmethod
def _generate_password(cls, length):
chars = allchars * (ceil(length / len(allchars)))
return ''.join(sample(chars, length))Of the three methods, only the first one is meant to be used. Let's start our analysis with the last one: _generate_password.
This method simply takes a length, which is the desired length for the password we want, and calls the sample function to get a population of length elements out of the chars string. The return value of the sample function is a list of length elements, and we need to make it a string using join.
Before we can call sample, think about this, what if the desired length exceeds the length of allchars? The call would result in ValueError: Sample larger than the population.
Because of this, we create the chars string in a way that it is made by concatenating the allchars string to itself just enough times to cover the desired length. To give you an example, let's say we need a password of 27 characters, and let's pretend allchars is 10 characters long. length / len(allchars) gives 2.7, which, when passed to the ceil function, becomes 3. This means that we're going to assign chars to a triple concatenation of the allchars string, hence chars will be 10 * 3 = 30 characters long, which is enough to cover our requirements.
Note that, in order for these methods to be called without creating an instance of this class, we need to decorate them with the classmethod decorator. The convention is then to call the first argument, cls, instead of self, because Python, behind the scenes, will pass the class object to the call.
The code for _generate_candidate is also very simple. We just generate a password and, given the length, we calculate its score, and return a tuple (score, password).
We do this so that in the generate method we can generate 10 (by default) passwords each time the method is called and return the one that has the highest score. Since our generation logic is based on a random function, it's always a good way to employ a technique like this to avoid worst case scenarios.
This concludes the code for the helpers.
As you may have noticed, the code for the helpers isn't related to Falcon at all. It is just pure Python that we can reuse when we need it. On the other hand, the code for the handlers is of course based on Falcon. The code that follows belongs to the core/handlers.py module so, as we did before, let's start with the first few lines:
import json
import falcon
from .passwords import PasswordValidator, PasswordGenerator
class HeaderMixin:
def set_access_control_allow_origin(self, resp):
resp.set_header('Access-Control-Allow-Origin', '*')That was very simple. We import json, falcon, and our helpers, and then we set up a mixin which we'll need in both handlers. The need for this mixin is to allow the API to serve requests that come from somewhere else. This is the other side of the CORS coin to what we saw in the JavaScript code for the interface. In this case, we boldly go where no security expert would ever dare, and allow requests to come from any domain ('*'). We do this because this is an exercise and, in this context, it is fine, but don't do it in production, okay?
This handler will have to respond to a POST request, therefore I have coded an on_post method, which is the way you react to a POST request in Falcon.
class PasswordValidatorHandler(HeaderMixin):
def on_post(self, req, resp):
self.process_request(req, resp)
password = req.context.get('_body', {}).get('password')
if password is None:
resp.status = falcon.HTTP_BAD_REQUEST
return None
result = self.parse_password(password)
resp.body = json.dumps(result)
def parse_password(self, password):
validator = PasswordValidator(password)
return {
'password': password,
'valid': validator.is_valid(),
'score': validator.score(),
}
def process_request(self, req, resp):
self.set_access_control_allow_origin(resp)
body = req.stream.read()
if not body:
raise falcon.HTTPBadRequest('Empty request body',
'A valid JSON document is required.')
try:
req.context['_body'] = json.loads(
body.decode('utf-8'))
except (ValueError, UnicodeDecodeError):
raise falcon.HTTPError(
falcon.HTTP_753, 'Malformed JSON',
'JSON incorrect or not utf-8 encoded.')Let's start with the on_post method. First of all, we call the process_request method, which does a sanity check on the request body. I won't go into finest detail because it's taken from the Falcon documentation, and it's a standard way of processing a request. Let's just say that, if everything goes well (the highlighted part), we get the body of the request (already decoded from JSON) in req.context['_body']. If things go badly for any reason, we return an appropriate error response.
Let's go back to on_post. We fetch the password from the request context. At this point, process_request has succeeded, but we still don't know if the body was in the correct format. We're expecting something like: {'password': 'my_password'}.
So we proceed with caution. We get the value for the '_body' key and, if that is not present, we return an empty dict. We get the value for 'password' from that. We use get instead of direct access to avoid KeyError issues.
If the password is None, we simply return a 400 error (bad request). Otherwise, we validate it and calculate its score, and then set the result as the body of our response.
You can see how easy it is to validate and calculate the score of the password in the parse_password method, by using our helpers.
We return a dict with three pieces of information: password, valid, and score. The password information is technically redundant because whoever made the request would know the password but, in this case, I think it's a good way of providing enough information for things such as logging, so I added it.
What happens if the JSON-decoded body is not a dict? I will leave it up to you to fix the code, adding some logic to cater for that edge case.
The generator handler has to handle a GET request with one query parameter: the desired password length.
class PasswordGeneratorHandler(HeaderMixin):
def on_get(self, req, resp):
self.process_request(req, resp)
length = req.context.get('_length', 16)
resp.body = json.dumps(
PasswordGenerator.generate(length))
def process_request(self, req, resp):
self.set_access_control_allow_origin(resp)
length = req.get_param('length')
if length is None:
return
try:
length = int(length)
assert length > 0
req.context['_length'] = length
except (ValueError, TypeError, AssertionError):
raise falcon.HTTPBadRequest('Wrong query parameter',
'`length` must be a positive integer.')We have a similar process_request method. It does a sanity check on the request, even though a bit differently from the previous handler. This time, we need to make sure that if the length is provided on the query string (which means, for example, http://our-api-url/?length=23), it's in the correct format. This means that length needs to be a positive integer.
So, to validate that, we do an int conversion (req.get_param('length') returns a string), then we assert that length is greater than zero and, finally, we put it in context under the '_length' key.
Doing the int conversion of a string which is not a suitable representation for an integer raises ValueError, while a conversion from a type that is not a string raises TypeError, therefore we catch those two in the except clause.
We also catch AssertionError, which is raised by the assert length > 0 line when length is not a positive integer. We can then safely guarantee that the length is as desired with one single try/except block.
Tip
Note that, when coding a try/except block, you should usually try and be as specific as possible, separating instructions that would raise different exceptions if a problem arose. This would allow you more control over the issue, and easier debugging. In this case though, since this is a simple API, it's fine to have code which only reacts to a request for which length is not in the right format.
The code for the on_get method is quite straightforward. It starts by processing the request, then the length is fetched, falling back to 16 (the default value) when it's not passed, and then a password is generated and dumped to JSON, and then set to be the body of the response.
In order to run this application, you need to remember that we set the base URL in the interface to http://127.0.0.1:5555. Therefore, we need the following command to start the API:
$ gunicorn -b 127.0.0.1:5555 main:app
Running that will start the app defined in the main module, binding the server instance to port 5555 on localhost. For more information about Gunicorn, please refer to either Chapter 10, Web Development Done Right or directly to the project's home page (http://gunicorn.org/).
The code for the API is now complete so if you have both the interface and the API running, you can try them out together. See if everything works as expected.
In this section, let's take a look at the tests I wrote for the helpers and for the handlers. Tests for the helpers are heavily based on the nose_parameterized library, as my favorite testing style is interface testing, with as little patching as possible. Using nose_parameterized allows me to write tests that are easier to read because the test cases are very visible.
On the other hand, tests for the handlers have to follow the testing conventions for the Falcon library, so they will be a bit different. This is, of course, ideal since it allows me to show you even more.
Due to the limited amount of pages I have left, I'll show you only a part of the tests, so make sure you check them out in full in the source code.
Let's see the tests for the PasswordGenerator class:
tests/test_core/test_passwords.py
class PasswordGeneratorTestCase(TestCase):
def test__generate_password_length(self):
for length in range(300):
assert_equal(
length,
len(PasswordGenerator._generate_password(length))
)
def test__generate_password_validity(self):
for length in range(1, 300):
password = PasswordGenerator._generate_password(
length)
assert_true(PasswordValidator(password).is_valid())
def test__generate_candidate(self):
score, password = (
PasswordGenerator._generate_candidate(42))
expected_score = PasswordValidator(password).score()
assert_equal(expected_score['total'], score)
@patch.object(PasswordGenerator, '_generate_candidate')
def test__generate(self, _generate_candidate_mock):
# checks `generate` returns the highest score candidate
_generate_candidate_mock.side_effect = [
(16, '&a69Ly+0H4jZ'),
(17, 'UXaF4stRfdlh'),
(21, 'aB4Ge_KdTgwR'), # the winner
(12, 'IRLT*XEfcglm'),
(16, '$P92-WZ5+DnG'),
(18, 'Xi#36jcKA_qQ'),
(19, '?p9avQzRMIK0'),
(17, '4@sY&bQ9*H!+'),
(12, 'Cx-QAYXG_Ejq'),
(18, 'C)RAV(HP7j9n'),
]
assert_equal(
(21, 'aB4Ge_KdTgwR'), PasswordGenerator.generate(12))Within test__generate_password_length we make sure the _generate_password method handles the length parameter correctly. We generate a password for each length in the range [0, 300), and verify that it has the correct length.
In the test__generate_password_validity test, we do something similar but, this time, we make sure that whatever length we ask for, the generated password is valid. We use the PasswordValidator class to check for validity.
Finally, we need to test the generate method. The password generation is random, therefore, in order to test this function, we need to mock _generate_candidate, thus controlling its output. We set the side_effect argument on its mock to be a list of 10 candidates, from which we expect the generate method to choose the one with the highest score. Setting side_effect on a mock to a list causes that mock to return the elements of that list, one at a time, each time it's called. To avoid ambiguity, the highest score is 21, and only one candidate has scored that high. We call the method and make sure that that particular one is the candidate which is returned.
Testing the PasswordValidator class requires many more lines of code, so I'll show only a portion of these tests:
pwdapi/tests/test_core/test_passwords.py
from unittest import TestCase
from unittest.mock import patch
from nose_parameterized import parameterized, param
from nose.tools import (
assert_equal, assert_dict_equal, assert_true)
from core.passwords import PasswordValidator, PasswordGenerator
class PasswordValidatorTestCase(TestCase):
@parameterized.expand([
(False, ''),
(False, ' '),
(True, 'abcdefghijklmnopqrstuvwxyz'),
(True, 'ABCDEFGHIJKLMNOPQRSTUVWXYZ'),
(True, '0123456789'),
(True, '!#$%&()*+-?@_|'),
])
def test_is_valid(self, valid, password):
validator = PasswordValidator(password)
assert_equal(valid, validator.is_valid())We start by testing the is_valid method. We test whether or not it returns False when it's fed an empty string, as well as a string made up of only spaces, which makes sure we're testing whether we're calling .strip() when we assign the password.
Then, we use all the characters that we want to be accepted to make sure the function accepts them.
I understand the syntax behind the parameterize.expand decorator can be challenging at first but really, all there is to it is that each tuple consists of an independent test case which, in turn, means that the test_is_valid test is run individually for each tuple, and that the two tuple elements are passed to the method as arguments: valid and password.
We then test for invalid characters. We expect them all to fail so we use param.explicit, which runs the test for each of the characters in that weird string.
@parameterized.expand(
param.explicit(char) for char in '>]{<`\\;,[^/"\'~:}=.'
)
def test_is_valid_invalid_chars(self, password):
validator = PasswordValidator(password)
assert_equal(False, validator.is_valid())They all evaluate to False, so we're good.
@parameterized.expand([
(0, ''), # 0-3: score 0
(0, 'a'), # 0-3: score 0
(0, 'aa'), # 0-3: score 0
(0, 'aaa'), # 0-3: score 0
(1, 'aaab'), # 4-7: score 1
...
(5, 'aaabbbbccccddd'), # 12-15: score 5
(5, 'aaabbbbccccdddd'), # 12-15: score 5
])
def test__score_length(self, score, password):
validator = PasswordValidator(password)
assert_equal(score, validator._score_length())To test the _score_length method, I created 16 test cases for the lengths from 0 to 15. The body of the test simply makes sure that the score is assigned appropriately.
def test__score_length_sixteen_plus(self):
# all password whose length is 16+ score 7 points
password = 'x' * 255
for length in range(16, len(password)):
validator = PasswordValidator(password[:length])
assert_equal(7, validator._score_length())The preceding test is for lengths from 16 to 254. We only need to make sure that any length after 15 gets 7 as a score.
I will skip over the tests for the other internal methods and jump directly to the one for the score method. In order to test it, I want to control exactly what is returned by each of the _score_* methods so I mock them out and in the test, I set a return value for each of them. Note that to mock methods of a class, we use a variant of patch: patch.object. When you set return values on mocks, it's never good to have repetitions because you may not be sure which method returned what, and the test wouldn't fail in the case of a swap. So, always return different values. In my case, I am using the first few prime numbers to be sure there is no possibility of confusion.
@patch.object(PasswordValidator, '_score_length')
@patch.object(PasswordValidator, '_score_case')
@patch.object(PasswordValidator, '_score_numbers')
@patch.object(PasswordValidator, '_score_special')
@patch.object(PasswordValidator, '_score_ratio')
def test_score(
self,
_score_ratio_mock,
_score_special_mock,
_score_numbers_mock,
_score_case_mock,
_score_length_mock):
_score_ratio_mock.return_value = 2
_score_special_mock.return_value = 3
_score_numbers_mock.return_value = 5
_score_case_mock.return_value = 7
_score_length_mock.return_value = 11
expected_result = {
'length': 11,
'case': 7,
'numbers': 5,
'special': 3,
'ratio': 2,
'total': 28,
}
validator = PasswordValidator('')
assert_dict_equal(expected_result, validator.score())I want to point out explicitly that the _score_* methods are mocked, so I set up my validator instance by passing an empty string to the class constructor. This makes it even more evident to the reader that the internals of the class have been mocked out. Then, I just check if the result is the same as what I was expecting.
This last test is the only one in this class in which I used mocks. All the other tests for the _score_* methods are in an interface style, which reads better and usually produces better results.
Let's briefly see one example of a test for a handler:
pwdapi/tests/test_core/test_handlers.py
import json
from unittest.mock import patch
from nose.tools import assert_dict_equal, assert_equal
import falcon
import falcon.testing as testing
from core.handlers import (
PasswordValidatorHandler, PasswordGeneratorHandler)
class PGHTest(PasswordGeneratorHandler):
def process_request(self, req, resp):
self.req, self.resp = req, resp
return super(PGHTest, self).process_request(req, resp)
class PVHTest(PasswordValidatorHandler):
def process_request(self, req, resp):
self.req, self.resp = req, resp
return super(PVHTest, self).process_request(req, resp)Because of the tools Falcon gives you to test your handlers, I created a child for each of the classes I wanted to test. The only thing I changed (by overriding a method) is that in the process_request method, which is called by both classes, before processing the request I make sure I set the req and resp arguments on the instance. The normal behavior of the process_request method is thus not altered in any other way. By doing this, whatever happens over the course of the test, I'll be able to check against those objects.
It's quite common to use tricks like this when testing. We never change the code to adapt for a test, it would be bad practice. We find a way of adapting our tests to suit our needs.
class TestPasswordValidatorHandler(testing.TestBase):
def before(self):
self.resource = PVHTest()
self.api.add_route('/password/validate/', self.resource)The before method is called by the Falcon TestBase logic, and it allows us to set up the resource we want to test (the handler) and a route for it (which is not necessarily the same as the one we use in production).
def test_post(self):
self.simulate_request(
'/password/validate/',
body=json.dumps({'password': 'abcABC0123#&'}),
method='POST')
resp = self.resource.resp
assert_equal('200 OK', resp.status)
assert_dict_equal(
{'password': 'abcABC0123#&',
'score': {'case': 3, 'length': 5, 'numbers': 2,
'special': 4, 'ratio': 2, 'total': 16},
'valid': True},
json.loads(resp.body))This is the test for the happy path. All it does is simulate a POST request with a JSON payload as body. Then, we inspect the response object. In particular, we inspect its status and its body. We make sure that the handler has correctly called the validator and returned its results.
We also test the generator handler:
class TestPasswordGeneratorHandler(testing.TestBase):
def before(self):
self.resource = PGHTest()
self.api.add_route('/password/generate/', self.resource)
@patch('core.handlers.PasswordGenerator')
def test_get(self, PasswordGenerator):
PasswordGenerator.generate.return_value = (7, 'abc123')
self.simulate_request(
'/password/generate/',
query_string='length=7',
method='GET')
resp = self.resource.resp
assert_equal('200 OK', resp.status)
assert_equal([7, 'abc123'], json.loads(resp.body))For this one as well, I will only show you the test for the happy path. We mock out the PasswordGenerator class because we need to control which password it will generate and, unless we mock, we won't be able to do it, as it is a random process.
Once we have correctly set up its return value, we can simulate the request again. In this case, it's a GET request, with a desired length of 7. We use a technique similar to the one we used for the other handler, and check the response status and body.
These are not the only tests you could write against the API, and the style could be different as well. Some people mock often, I tend to mock only when I really have to. Just try to see if you can make some sense out of them. I know they're not really easy but they'll be good training for you. Tests are extremely important so give it your best shot.
The main application
This is the code for the Falcon application:
main.py
import falcon
from core.handlers import (
PasswordValidatorHandler,
PasswordGeneratorHandler,
)
validation_handler = PasswordValidatorHandler()
generator_handler = PasswordGeneratorHandler()
app = falcon.API()
app.add_route('/password/validate/', validation_handler)
app.add_route('/password/generate/', generator_handler)As in the example in Chapter 10, Web Development Done Right, we start by creating one instance for each of the handlers we need, then we create a falcon.API object and, by calling its add_route method, we set up the routing to the URLs of our API. We'll get to the definitions of the handlers in a moment. Firstly, we need a couple of helpers.
In this section, we will take a look at a couple of classes that we'll use in our handlers. It's always good to factor out some logic following the Single Responsibility Principle.
Note
In OOP, the Single Responsibility Principle (SRP) states that every class should have responsibility for a single part of the functionality provided by the software, and that responsibility should be entirely encapsulated by the class. All of its services should be narrowly aligned with that responsibility.
The Single Responsibility Principle is the S in S.O.L.I.D., an acronym for the first five OOP and software design principles introduced by Robert Martin.
I heartily suggest you to open a browser and read up on this subject, it is very important.
All the code in the helpers section belongs to the core/passwords.py module. Here's how it begins:
from math import ceil
from random import sample
from string import ascii_lowercase, ascii_uppercase, digits
punctuation = '!#$%&()*+-?@_|'
allchars = ''.join(
(ascii_lowercase, ascii_uppercase, digits, punctuation))We'll need to handle some randomized calculations but the most important part here is the allowed characters. We will allow letters, digits, and a set of punctuation characters. To ease writing the code, we will merge those parts into the allchars string.
The PasswordValidator class is my favorite bit of logic in the whole API. It exposes an is_valid and a score method. The latter runs all defined validators ("private" methods in the same class), and collects the scores into a single dict which is returned as a result. I'll write this class method by method so that it does not get too complicated:
class PasswordValidator:
def __init__(self, password):
self.password = password.strip()It begins by setting password (with no leading or trailing spaces) as an instance attribute. This way we won't then have to pass it around from method to method. All the methods that will follow belong to this class.
def is_valid(self):
return (len(self.password) > 0 and
all(char in allchars for char in self.password))A password is valid when its length is greater than 0 and all of its characters belong to the allchars string. When you read the is_valid method, it's practically English (that's how amazing Python is). all is a built-in function that tells you if all the elements of the iterable you feed to it are True.
def score(self):
result = {
'length': self._score_length(),
'case': self._score_case(),
'numbers': self._score_numbers(),
'special': self._score_special(),
'ratio': self._score_ratio(),
}
result['total'] = sum(result.values())
return resultThis is the other main method. It's very simple, it just prepares a dict with all the results from the validators. The only independent bit of logic happens at the end, when we sum the grades from each validator and assign it to a 'total' key in the dict, just for convenience.
As you can see, we score a password by length, by letter case, by the presence of numbers, and special characters, and, finally, by the ratio between letters and numbers. Letters allow a character to be between 26 * 2 = 52 different possible choices, while digits allow only 10. Therefore, passwords whose letters to digits ratio is higher are more difficult to crack.
Let's see the length validator:
def _score_length(self):
scores_list = ([0]*4) + ([1]*4) + ([3]*4) + ([5]*4)
scores = dict(enumerate(scores_list))
return scores.get(len(self.password), 7)We assign 0 points to passwords whose length is less than four characters, 1 point for those whose length is less than 8, 3 for a length less than 12, 5 for a length less than 16, and 7 for a length of 16 or more.
In order to avoid a waterfall of if/elif clauses, I have adopted a functional style here. I prepared a score_list, which is basically [0, 0, 0, 0, 1, 1, 1, 1, 3, ...]. Then, by enumerating it, I got a (length, score) pair for each length less than 16. I put those pairs into a dict, which gives me the equivalent in dict form, so it should look like this: {0:0, 1:0, 2:0, 3:0, 4:1, 5:1, ...}. I then perform a get on this dict with the length of the password, setting a value of 7 as the default (which will be returned for lengths of 16 or more, which are not in the dict).
I have nothing against if/elif clauses, of course, but I wanted to take the opportunity to show you different coding styles in this final chapter, to help you get used to reading code which deviates from what you would normally expect. It's only beneficial.
def _score_case(self):
lower = bool(set(ascii_lowercase) & set(self.password))
upper = bool(set(ascii_uppercase) & set(self.password))
return int(lower or upper) + 2 * (lower and upper)The way we validate the case is again with a nice trick. lower is True when the intersection between the password and all lowercase characters is non-empty, otherwise it's False. upper behaves in the same way, only with uppercase characters.
To understand the evaluation that happens on the last line, let's use the inside-out technique once more: lower or upper is True when at least one of the two is True. When it's True, it will be converted to a 1 by the int class. This equates to saying, if there is at least one character, regardless of the casing, the score gets 1 point, otherwise it stays at 0.
Now for the second part: lower and upper is True when both of them are True, which means that we have at least one lowercase and one uppercase character. This means that, to crack the password, a brute-force algorithm would have to loop through 52 letters instead of just 26. Therefore, when that's True, we get an extra two points.
This validator therefore produces a result in the range (0, 1, 3), depending on what the password is.
def _score_numbers(self):
return 2 if (set(self.password) & set(digits)) else 0Scoring on the numbers is simpler. If we have at least one number, we get two points, otherwise we get 0. In this case, I used a ternary operator to return the result.
def _score_special(self):
return 4 if (
set(self.password) & set(punctuation)) else 0The special characters validator has the same logic as the previous one but, since special characters add quite a bit of complexity when it comes to cracking a password, we have scored four points instead of just two.
The last one validates the ratio between the letters and the digits.
def _score_ratio(self):
alpha_count = sum(
1 if c.lower() in ascii_lowercase else 0
for c in self.password)
digits_count = sum(
1 if c in digits else 0 for c in self.password)
if digits_count == 0:
return 0
return min(ceil(alpha_count / digits_count), 7)I highlighted the conditional logic in the expressions in the sum calls. In the first case, we get a 1 for each character whose lowercase version is in ascii_lowercase. This means that summing all those 1's up gives us exactly the count of all the letters. Then, we do the same for the digits, only we use the digits string for reference, and we don't need to lowercase the character. When digits_count is 0, alpha_count / digits_count would cause a ZeroDivisionError, therefore we check on digits_count and when it's 0 we return 0. If we have digits, we calculate the ceiling of the letters:digits ratio, and return it, capped at 7.
Of course, there are many different ways to calculate a score for a password. My aim here is not to give you the finest algorithm to do that, but to show you how you could go about implementing it.
The password generator is a much simpler class than the validator. However, I have coded it so that we won't need to create an instance to use it, just to show you yet again a different coding style.
class PasswordGenerator:
@classmethod
def generate(cls, length, bestof=10):
candidates = sorted([
cls._generate_candidate(length)
for k in range(max(1, bestof))
])
return candidates[-1]
@classmethod
def _generate_candidate(cls, length):
password = cls._generate_password(length)
score = PasswordValidator(password).score()
return (score['total'], password)
@classmethod
def _generate_password(cls, length):
chars = allchars * (ceil(length / len(allchars)))
return ''.join(sample(chars, length))Of the three methods, only the first one is meant to be used. Let's start our analysis with the last one: _generate_password.
This method simply takes a length, which is the desired length for the password we want, and calls the sample function to get a population of length elements out of the chars string. The return value of the sample function is a list of length elements, and we need to make it a string using join.
Before we can call sample, think about this, what if the desired length exceeds the length of allchars? The call would result in ValueError: Sample larger than the population.
Because of this, we create the chars string in a way that it is made by concatenating the allchars string to itself just enough times to cover the desired length. To give you an example, let's say we need a password of 27 characters, and let's pretend allchars is 10 characters long. length / len(allchars) gives 2.7, which, when passed to the ceil function, becomes 3. This means that we're going to assign chars to a triple concatenation of the allchars string, hence chars will be 10 * 3 = 30 characters long, which is enough to cover our requirements.
Note that, in order for these methods to be called without creating an instance of this class, we need to decorate them with the classmethod decorator. The convention is then to call the first argument, cls, instead of self, because Python, behind the scenes, will pass the class object to the call.
The code for _generate_candidate is also very simple. We just generate a password and, given the length, we calculate its score, and return a tuple (score, password).
We do this so that in the generate method we can generate 10 (by default) passwords each time the method is called and return the one that has the highest score. Since our generation logic is based on a random function, it's always a good way to employ a technique like this to avoid worst case scenarios.
This concludes the code for the helpers.
As you may have noticed, the code for the helpers isn't related to Falcon at all. It is just pure Python that we can reuse when we need it. On the other hand, the code for the handlers is of course based on Falcon. The code that follows belongs to the core/handlers.py module so, as we did before, let's start with the first few lines:
import json
import falcon
from .passwords import PasswordValidator, PasswordGenerator
class HeaderMixin:
def set_access_control_allow_origin(self, resp):
resp.set_header('Access-Control-Allow-Origin', '*')That was very simple. We import json, falcon, and our helpers, and then we set up a mixin which we'll need in both handlers. The need for this mixin is to allow the API to serve requests that come from somewhere else. This is the other side of the CORS coin to what we saw in the JavaScript code for the interface. In this case, we boldly go where no security expert would ever dare, and allow requests to come from any domain ('*'). We do this because this is an exercise and, in this context, it is fine, but don't do it in production, okay?
This handler will have to respond to a POST request, therefore I have coded an on_post method, which is the way you react to a POST request in Falcon.
class PasswordValidatorHandler(HeaderMixin):
def on_post(self, req, resp):
self.process_request(req, resp)
password = req.context.get('_body', {}).get('password')
if password is None:
resp.status = falcon.HTTP_BAD_REQUEST
return None
result = self.parse_password(password)
resp.body = json.dumps(result)
def parse_password(self, password):
validator = PasswordValidator(password)
return {
'password': password,
'valid': validator.is_valid(),
'score': validator.score(),
}
def process_request(self, req, resp):
self.set_access_control_allow_origin(resp)
body = req.stream.read()
if not body:
raise falcon.HTTPBadRequest('Empty request body',
'A valid JSON document is required.')
try:
req.context['_body'] = json.loads(
body.decode('utf-8'))
except (ValueError, UnicodeDecodeError):
raise falcon.HTTPError(
falcon.HTTP_753, 'Malformed JSON',
'JSON incorrect or not utf-8 encoded.')Let's start with the on_post method. First of all, we call the process_request method, which does a sanity check on the request body. I won't go into finest detail because it's taken from the Falcon documentation, and it's a standard way of processing a request. Let's just say that, if everything goes well (the highlighted part), we get the body of the request (already decoded from JSON) in req.context['_body']. If things go badly for any reason, we return an appropriate error response.
Let's go back to on_post. We fetch the password from the request context. At this point, process_request has succeeded, but we still don't know if the body was in the correct format. We're expecting something like: {'password': 'my_password'}.
So we proceed with caution. We get the value for the '_body' key and, if that is not present, we return an empty dict. We get the value for 'password' from that. We use get instead of direct access to avoid KeyError issues.
If the password is None, we simply return a 400 error (bad request). Otherwise, we validate it and calculate its score, and then set the result as the body of our response.
You can see how easy it is to validate and calculate the score of the password in the parse_password method, by using our helpers.
We return a dict with three pieces of information: password, valid, and score. The password information is technically redundant because whoever made the request would know the password but, in this case, I think it's a good way of providing enough information for things such as logging, so I added it.
What happens if the JSON-decoded body is not a dict? I will leave it up to you to fix the code, adding some logic to cater for that edge case.
The generator handler has to handle a GET request with one query parameter: the desired password length.
class PasswordGeneratorHandler(HeaderMixin):
def on_get(self, req, resp):
self.process_request(req, resp)
length = req.context.get('_length', 16)
resp.body = json.dumps(
PasswordGenerator.generate(length))
def process_request(self, req, resp):
self.set_access_control_allow_origin(resp)
length = req.get_param('length')
if length is None:
return
try:
length = int(length)
assert length > 0
req.context['_length'] = length
except (ValueError, TypeError, AssertionError):
raise falcon.HTTPBadRequest('Wrong query parameter',
'`length` must be a positive integer.')We have a similar process_request method. It does a sanity check on the request, even though a bit differently from the previous handler. This time, we need to make sure that if the length is provided on the query string (which means, for example, http://our-api-url/?length=23), it's in the correct format. This means that length needs to be a positive integer.
So, to validate that, we do an int conversion (req.get_param('length') returns a string), then we assert that length is greater than zero and, finally, we put it in context under the '_length' key.
Doing the int conversion of a string which is not a suitable representation for an integer raises ValueError, while a conversion from a type that is not a string raises TypeError, therefore we catch those two in the except clause.
We also catch AssertionError, which is raised by the assert length > 0 line when length is not a positive integer. We can then safely guarantee that the length is as desired with one single try/except block.
Tip
Note that, when coding a try/except block, you should usually try and be as specific as possible, separating instructions that would raise different exceptions if a problem arose. This would allow you more control over the issue, and easier debugging. In this case though, since this is a simple API, it's fine to have code which only reacts to a request for which length is not in the right format.
The code for the on_get method is quite straightforward. It starts by processing the request, then the length is fetched, falling back to 16 (the default value) when it's not passed, and then a password is generated and dumped to JSON, and then set to be the body of the response.
In order to run this application, you need to remember that we set the base URL in the interface to http://127.0.0.1:5555. Therefore, we need the following command to start the API:
$ gunicorn -b 127.0.0.1:5555 main:app
Running that will start the app defined in the main module, binding the server instance to port 5555 on localhost. For more information about Gunicorn, please refer to either Chapter 10, Web Development Done Right or directly to the project's home page (http://gunicorn.org/).
The code for the API is now complete so if you have both the interface and the API running, you can try them out together. See if everything works as expected.
In this section, let's take a look at the tests I wrote for the helpers and for the handlers. Tests for the helpers are heavily based on the nose_parameterized library, as my favorite testing style is interface testing, with as little patching as possible. Using nose_parameterized allows me to write tests that are easier to read because the test cases are very visible.
On the other hand, tests for the handlers have to follow the testing conventions for the Falcon library, so they will be a bit different. This is, of course, ideal since it allows me to show you even more.
Due to the limited amount of pages I have left, I'll show you only a part of the tests, so make sure you check them out in full in the source code.
Let's see the tests for the PasswordGenerator class:
tests/test_core/test_passwords.py
class PasswordGeneratorTestCase(TestCase):
def test__generate_password_length(self):
for length in range(300):
assert_equal(
length,
len(PasswordGenerator._generate_password(length))
)
def test__generate_password_validity(self):
for length in range(1, 300):
password = PasswordGenerator._generate_password(
length)
assert_true(PasswordValidator(password).is_valid())
def test__generate_candidate(self):
score, password = (
PasswordGenerator._generate_candidate(42))
expected_score = PasswordValidator(password).score()
assert_equal(expected_score['total'], score)
@patch.object(PasswordGenerator, '_generate_candidate')
def test__generate(self, _generate_candidate_mock):
# checks `generate` returns the highest score candidate
_generate_candidate_mock.side_effect = [
(16, '&a69Ly+0H4jZ'),
(17, 'UXaF4stRfdlh'),
(21, 'aB4Ge_KdTgwR'), # the winner
(12, 'IRLT*XEfcglm'),
(16, '$P92-WZ5+DnG'),
(18, 'Xi#36jcKA_qQ'),
(19, '?p9avQzRMIK0'),
(17, '4@sY&bQ9*H!+'),
(12, 'Cx-QAYXG_Ejq'),
(18, 'C)RAV(HP7j9n'),
]
assert_equal(
(21, 'aB4Ge_KdTgwR'), PasswordGenerator.generate(12))Within test__generate_password_length we make sure the _generate_password method handles the length parameter correctly. We generate a password for each length in the range [0, 300), and verify that it has the correct length.
In the test__generate_password_validity test, we do something similar but, this time, we make sure that whatever length we ask for, the generated password is valid. We use the PasswordValidator class to check for validity.
Finally, we need to test the generate method. The password generation is random, therefore, in order to test this function, we need to mock _generate_candidate, thus controlling its output. We set the side_effect argument on its mock to be a list of 10 candidates, from which we expect the generate method to choose the one with the highest score. Setting side_effect on a mock to a list causes that mock to return the elements of that list, one at a time, each time it's called. To avoid ambiguity, the highest score is 21, and only one candidate has scored that high. We call the method and make sure that that particular one is the candidate which is returned.
Testing the PasswordValidator class requires many more lines of code, so I'll show only a portion of these tests:
pwdapi/tests/test_core/test_passwords.py
from unittest import TestCase
from unittest.mock import patch
from nose_parameterized import parameterized, param
from nose.tools import (
assert_equal, assert_dict_equal, assert_true)
from core.passwords import PasswordValidator, PasswordGenerator
class PasswordValidatorTestCase(TestCase):
@parameterized.expand([
(False, ''),
(False, ' '),
(True, 'abcdefghijklmnopqrstuvwxyz'),
(True, 'ABCDEFGHIJKLMNOPQRSTUVWXYZ'),
(True, '0123456789'),
(True, '!#$%&()*+-?@_|'),
])
def test_is_valid(self, valid, password):
validator = PasswordValidator(password)
assert_equal(valid, validator.is_valid())We start by testing the is_valid method. We test whether or not it returns False when it's fed an empty string, as well as a string made up of only spaces, which makes sure we're testing whether we're calling .strip() when we assign the password.
Then, we use all the characters that we want to be accepted to make sure the function accepts them.
I understand the syntax behind the parameterize.expand decorator can be challenging at first but really, all there is to it is that each tuple consists of an independent test case which, in turn, means that the test_is_valid test is run individually for each tuple, and that the two tuple elements are passed to the method as arguments: valid and password.
We then test for invalid characters. We expect them all to fail so we use param.explicit, which runs the test for each of the characters in that weird string.
@parameterized.expand(
param.explicit(char) for char in '>]{<`\\;,[^/"\'~:}=.'
)
def test_is_valid_invalid_chars(self, password):
validator = PasswordValidator(password)
assert_equal(False, validator.is_valid())They all evaluate to False, so we're good.
@parameterized.expand([
(0, ''), # 0-3: score 0
(0, 'a'), # 0-3: score 0
(0, 'aa'), # 0-3: score 0
(0, 'aaa'), # 0-3: score 0
(1, 'aaab'), # 4-7: score 1
...
(5, 'aaabbbbccccddd'), # 12-15: score 5
(5, 'aaabbbbccccdddd'), # 12-15: score 5
])
def test__score_length(self, score, password):
validator = PasswordValidator(password)
assert_equal(score, validator._score_length())To test the _score_length method, I created 16 test cases for the lengths from 0 to 15. The body of the test simply makes sure that the score is assigned appropriately.
def test__score_length_sixteen_plus(self):
# all password whose length is 16+ score 7 points
password = 'x' * 255
for length in range(16, len(password)):
validator = PasswordValidator(password[:length])
assert_equal(7, validator._score_length())The preceding test is for lengths from 16 to 254. We only need to make sure that any length after 15 gets 7 as a score.
I will skip over the tests for the other internal methods and jump directly to the one for the score method. In order to test it, I want to control exactly what is returned by each of the _score_* methods so I mock them out and in the test, I set a return value for each of them. Note that to mock methods of a class, we use a variant of patch: patch.object. When you set return values on mocks, it's never good to have repetitions because you may not be sure which method returned what, and the test wouldn't fail in the case of a swap. So, always return different values. In my case, I am using the first few prime numbers to be sure there is no possibility of confusion.
@patch.object(PasswordValidator, '_score_length')
@patch.object(PasswordValidator, '_score_case')
@patch.object(PasswordValidator, '_score_numbers')
@patch.object(PasswordValidator, '_score_special')
@patch.object(PasswordValidator, '_score_ratio')
def test_score(
self,
_score_ratio_mock,
_score_special_mock,
_score_numbers_mock,
_score_case_mock,
_score_length_mock):
_score_ratio_mock.return_value = 2
_score_special_mock.return_value = 3
_score_numbers_mock.return_value = 5
_score_case_mock.return_value = 7
_score_length_mock.return_value = 11
expected_result = {
'length': 11,
'case': 7,
'numbers': 5,
'special': 3,
'ratio': 2,
'total': 28,
}
validator = PasswordValidator('')
assert_dict_equal(expected_result, validator.score())I want to point out explicitly that the _score_* methods are mocked, so I set up my validator instance by passing an empty string to the class constructor. This makes it even more evident to the reader that the internals of the class have been mocked out. Then, I just check if the result is the same as what I was expecting.
This last test is the only one in this class in which I used mocks. All the other tests for the _score_* methods are in an interface style, which reads better and usually produces better results.
Let's briefly see one example of a test for a handler:
pwdapi/tests/test_core/test_handlers.py
import json
from unittest.mock import patch
from nose.tools import assert_dict_equal, assert_equal
import falcon
import falcon.testing as testing
from core.handlers import (
PasswordValidatorHandler, PasswordGeneratorHandler)
class PGHTest(PasswordGeneratorHandler):
def process_request(self, req, resp):
self.req, self.resp = req, resp
return super(PGHTest, self).process_request(req, resp)
class PVHTest(PasswordValidatorHandler):
def process_request(self, req, resp):
self.req, self.resp = req, resp
return super(PVHTest, self).process_request(req, resp)Because of the tools Falcon gives you to test your handlers, I created a child for each of the classes I wanted to test. The only thing I changed (by overriding a method) is that in the process_request method, which is called by both classes, before processing the request I make sure I set the req and resp arguments on the instance. The normal behavior of the process_request method is thus not altered in any other way. By doing this, whatever happens over the course of the test, I'll be able to check against those objects.
It's quite common to use tricks like this when testing. We never change the code to adapt for a test, it would be bad practice. We find a way of adapting our tests to suit our needs.
class TestPasswordValidatorHandler(testing.TestBase):
def before(self):
self.resource = PVHTest()
self.api.add_route('/password/validate/', self.resource)The before method is called by the Falcon TestBase logic, and it allows us to set up the resource we want to test (the handler) and a route for it (which is not necessarily the same as the one we use in production).
def test_post(self):
self.simulate_request(
'/password/validate/',
body=json.dumps({'password': 'abcABC0123#&'}),
method='POST')
resp = self.resource.resp
assert_equal('200 OK', resp.status)
assert_dict_equal(
{'password': 'abcABC0123#&',
'score': {'case': 3, 'length': 5, 'numbers': 2,
'special': 4, 'ratio': 2, 'total': 16},
'valid': True},
json.loads(resp.body))This is the test for the happy path. All it does is simulate a POST request with a JSON payload as body. Then, we inspect the response object. In particular, we inspect its status and its body. We make sure that the handler has correctly called the validator and returned its results.
We also test the generator handler:
class TestPasswordGeneratorHandler(testing.TestBase):
def before(self):
self.resource = PGHTest()
self.api.add_route('/password/generate/', self.resource)
@patch('core.handlers.PasswordGenerator')
def test_get(self, PasswordGenerator):
PasswordGenerator.generate.return_value = (7, 'abc123')
self.simulate_request(
'/password/generate/',
query_string='length=7',
method='GET')
resp = self.resource.resp
assert_equal('200 OK', resp.status)
assert_equal([7, 'abc123'], json.loads(resp.body))For this one as well, I will only show you the test for the happy path. We mock out the PasswordGenerator class because we need to control which password it will generate and, unless we mock, we won't be able to do it, as it is a random process.
Once we have correctly set up its return value, we can simulate the request again. In this case, it's a GET request, with a desired length of 7. We use a technique similar to the one we used for the other handler, and check the response status and body.
These are not the only tests you could write against the API, and the style could be different as well. Some people mock often, I tend to mock only when I really have to. Just try to see if you can make some sense out of them. I know they're not really easy but they'll be good training for you. Tests are extremely important so give it your best shot.
Writing the helpers
In this section, we will take a look at a couple of classes that we'll use in our handlers. It's always good to factor out some logic following the Single Responsibility Principle.
Note
In OOP, the Single Responsibility Principle (SRP) states that every class should have responsibility for a single part of the functionality provided by the software, and that responsibility should be entirely encapsulated by the class. All of its services should be narrowly aligned with that responsibility.
The Single Responsibility Principle is the S in S.O.L.I.D., an acronym for the first five OOP and software design principles introduced by Robert Martin.
I heartily suggest you to open a browser and read up on this subject, it is very important.
All the code in the helpers section belongs to the core/passwords.py module. Here's how it begins:
from math import ceil
from random import sample
from string import ascii_lowercase, ascii_uppercase, digits
punctuation = '!#$%&()*+-?@_|'
allchars = ''.join(
(ascii_lowercase, ascii_uppercase, digits, punctuation))We'll need to handle some randomized calculations but the most important part here is the allowed characters. We will allow letters, digits, and a set of punctuation characters. To ease writing the code, we will merge those parts into the allchars string.
The PasswordValidator class is my favorite bit of logic in the whole API. It exposes an is_valid and a score method. The latter runs all defined validators ("private" methods in the same class), and collects the scores into a single dict which is returned as a result. I'll write this class method by method so that it does not get too complicated:
class PasswordValidator:
def __init__(self, password):
self.password = password.strip()It begins by setting password (with no leading or trailing spaces) as an instance attribute. This way we won't then have to pass it around from method to method. All the methods that will follow belong to this class.
def is_valid(self):
return (len(self.password) > 0 and
all(char in allchars for char in self.password))A password is valid when its length is greater than 0 and all of its characters belong to the allchars string. When you read the is_valid method, it's practically English (that's how amazing Python is). all is a built-in function that tells you if all the elements of the iterable you feed to it are True.
def score(self):
result = {
'length': self._score_length(),
'case': self._score_case(),
'numbers': self._score_numbers(),
'special': self._score_special(),
'ratio': self._score_ratio(),
}
result['total'] = sum(result.values())
return resultThis is the other main method. It's very simple, it just prepares a dict with all the results from the validators. The only independent bit of logic happens at the end, when we sum the grades from each validator and assign it to a 'total' key in the dict, just for convenience.
As you can see, we score a password by length, by letter case, by the presence of numbers, and special characters, and, finally, by the ratio between letters and numbers. Letters allow a character to be between 26 * 2 = 52 different possible choices, while digits allow only 10. Therefore, passwords whose letters to digits ratio is higher are more difficult to crack.
Let's see the length validator:
def _score_length(self):
scores_list = ([0]*4) + ([1]*4) + ([3]*4) + ([5]*4)
scores = dict(enumerate(scores_list))
return scores.get(len(self.password), 7)We assign 0 points to passwords whose length is less than four characters, 1 point for those whose length is less than 8, 3 for a length less than 12, 5 for a length less than 16, and 7 for a length of 16 or more.
In order to avoid a waterfall of if/elif clauses, I have adopted a functional style here. I prepared a score_list, which is basically [0, 0, 0, 0, 1, 1, 1, 1, 3, ...]. Then, by enumerating it, I got a (length, score) pair for each length less than 16. I put those pairs into a dict, which gives me the equivalent in dict form, so it should look like this: {0:0, 1:0, 2:0, 3:0, 4:1, 5:1, ...}. I then perform a get on this dict with the length of the password, setting a value of 7 as the default (which will be returned for lengths of 16 or more, which are not in the dict).
I have nothing against if/elif clauses, of course, but I wanted to take the opportunity to show you different coding styles in this final chapter, to help you get used to reading code which deviates from what you would normally expect. It's only beneficial.
def _score_case(self):
lower = bool(set(ascii_lowercase) & set(self.password))
upper = bool(set(ascii_uppercase) & set(self.password))
return int(lower or upper) + 2 * (lower and upper)The way we validate the case is again with a nice trick. lower is True when the intersection between the password and all lowercase characters is non-empty, otherwise it's False. upper behaves in the same way, only with uppercase characters.
To understand the evaluation that happens on the last line, let's use the inside-out technique once more: lower or upper is True when at least one of the two is True. When it's True, it will be converted to a 1 by the int class. This equates to saying, if there is at least one character, regardless of the casing, the score gets 1 point, otherwise it stays at 0.
Now for the second part: lower and upper is True when both of them are True, which means that we have at least one lowercase and one uppercase character. This means that, to crack the password, a brute-force algorithm would have to loop through 52 letters instead of just 26. Therefore, when that's True, we get an extra two points.
This validator therefore produces a result in the range (0, 1, 3), depending on what the password is.
def _score_numbers(self):
return 2 if (set(self.password) & set(digits)) else 0Scoring on the numbers is simpler. If we have at least one number, we get two points, otherwise we get 0. In this case, I used a ternary operator to return the result.
def _score_special(self):
return 4 if (
set(self.password) & set(punctuation)) else 0The special characters validator has the same logic as the previous one but, since special characters add quite a bit of complexity when it comes to cracking a password, we have scored four points instead of just two.
The last one validates the ratio between the letters and the digits.
def _score_ratio(self):
alpha_count = sum(
1 if c.lower() in ascii_lowercase else 0
for c in self.password)
digits_count = sum(
1 if c in digits else 0 for c in self.password)
if digits_count == 0:
return 0
return min(ceil(alpha_count / digits_count), 7)I highlighted the conditional logic in the expressions in the sum calls. In the first case, we get a 1 for each character whose lowercase version is in ascii_lowercase. This means that summing all those 1's up gives us exactly the count of all the letters. Then, we do the same for the digits, only we use the digits string for reference, and we don't need to lowercase the character. When digits_count is 0, alpha_count / digits_count would cause a ZeroDivisionError, therefore we check on digits_count and when it's 0 we return 0. If we have digits, we calculate the ceiling of the letters:digits ratio, and return it, capped at 7.
Of course, there are many different ways to calculate a score for a password. My aim here is not to give you the finest algorithm to do that, but to show you how you could go about implementing it.
The password generator is a much simpler class than the validator. However, I have coded it so that we won't need to create an instance to use it, just to show you yet again a different coding style.
class PasswordGenerator:
@classmethod
def generate(cls, length, bestof=10):
candidates = sorted([
cls._generate_candidate(length)
for k in range(max(1, bestof))
])
return candidates[-1]
@classmethod
def _generate_candidate(cls, length):
password = cls._generate_password(length)
score = PasswordValidator(password).score()
return (score['total'], password)
@classmethod
def _generate_password(cls, length):
chars = allchars * (ceil(length / len(allchars)))
return ''.join(sample(chars, length))Of the three methods, only the first one is meant to be used. Let's start our analysis with the last one: _generate_password.
This method simply takes a length, which is the desired length for the password we want, and calls the sample function to get a population of length elements out of the chars string. The return value of the sample function is a list of length elements, and we need to make it a string using join.
Before we can call sample, think about this, what if the desired length exceeds the length of allchars? The call would result in ValueError: Sample larger than the population.
Because of this, we create the chars string in a way that it is made by concatenating the allchars string to itself just enough times to cover the desired length. To give you an example, let's say we need a password of 27 characters, and let's pretend allchars is 10 characters long. length / len(allchars) gives 2.7, which, when passed to the ceil function, becomes 3. This means that we're going to assign chars to a triple concatenation of the allchars string, hence chars will be 10 * 3 = 30 characters long, which is enough to cover our requirements.
Note that, in order for these methods to be called without creating an instance of this class, we need to decorate them with the classmethod decorator. The convention is then to call the first argument, cls, instead of self, because Python, behind the scenes, will pass the class object to the call.
The code for _generate_candidate is also very simple. We just generate a password and, given the length, we calculate its score, and return a tuple (score, password).
We do this so that in the generate method we can generate 10 (by default) passwords each time the method is called and return the one that has the highest score. Since our generation logic is based on a random function, it's always a good way to employ a technique like this to avoid worst case scenarios.
This concludes the code for the helpers.
As you may have noticed, the code for the helpers isn't related to Falcon at all. It is just pure Python that we can reuse when we need it. On the other hand, the code for the handlers is of course based on Falcon. The code that follows belongs to the core/handlers.py module so, as we did before, let's start with the first few lines:
import json
import falcon
from .passwords import PasswordValidator, PasswordGenerator
class HeaderMixin:
def set_access_control_allow_origin(self, resp):
resp.set_header('Access-Control-Allow-Origin', '*')That was very simple. We import json, falcon, and our helpers, and then we set up a mixin which we'll need in both handlers. The need for this mixin is to allow the API to serve requests that come from somewhere else. This is the other side of the CORS coin to what we saw in the JavaScript code for the interface. In this case, we boldly go where no security expert would ever dare, and allow requests to come from any domain ('*'). We do this because this is an exercise and, in this context, it is fine, but don't do it in production, okay?
This handler will have to respond to a POST request, therefore I have coded an on_post method, which is the way you react to a POST request in Falcon.
class PasswordValidatorHandler(HeaderMixin):
def on_post(self, req, resp):
self.process_request(req, resp)
password = req.context.get('_body', {}).get('password')
if password is None:
resp.status = falcon.HTTP_BAD_REQUEST
return None
result = self.parse_password(password)
resp.body = json.dumps(result)
def parse_password(self, password):
validator = PasswordValidator(password)
return {
'password': password,
'valid': validator.is_valid(),
'score': validator.score(),
}
def process_request(self, req, resp):
self.set_access_control_allow_origin(resp)
body = req.stream.read()
if not body:
raise falcon.HTTPBadRequest('Empty request body',
'A valid JSON document is required.')
try:
req.context['_body'] = json.loads(
body.decode('utf-8'))
except (ValueError, UnicodeDecodeError):
raise falcon.HTTPError(
falcon.HTTP_753, 'Malformed JSON',
'JSON incorrect or not utf-8 encoded.')Let's start with the on_post method. First of all, we call the process_request method, which does a sanity check on the request body. I won't go into finest detail because it's taken from the Falcon documentation, and it's a standard way of processing a request. Let's just say that, if everything goes well (the highlighted part), we get the body of the request (already decoded from JSON) in req.context['_body']. If things go badly for any reason, we return an appropriate error response.
Let's go back to on_post. We fetch the password from the request context. At this point, process_request has succeeded, but we still don't know if the body was in the correct format. We're expecting something like: {'password': 'my_password'}.
So we proceed with caution. We get the value for the '_body' key and, if that is not present, we return an empty dict. We get the value for 'password' from that. We use get instead of direct access to avoid KeyError issues.
If the password is None, we simply return a 400 error (bad request). Otherwise, we validate it and calculate its score, and then set the result as the body of our response.
You can see how easy it is to validate and calculate the score of the password in the parse_password method, by using our helpers.
We return a dict with three pieces of information: password, valid, and score. The password information is technically redundant because whoever made the request would know the password but, in this case, I think it's a good way of providing enough information for things such as logging, so I added it.
What happens if the JSON-decoded body is not a dict? I will leave it up to you to fix the code, adding some logic to cater for that edge case.
The generator handler has to handle a GET request with one query parameter: the desired password length.
class PasswordGeneratorHandler(HeaderMixin):
def on_get(self, req, resp):
self.process_request(req, resp)
length = req.context.get('_length', 16)
resp.body = json.dumps(
PasswordGenerator.generate(length))
def process_request(self, req, resp):
self.set_access_control_allow_origin(resp)
length = req.get_param('length')
if length is None:
return
try:
length = int(length)
assert length > 0
req.context['_length'] = length
except (ValueError, TypeError, AssertionError):
raise falcon.HTTPBadRequest('Wrong query parameter',
'`length` must be a positive integer.')We have a similar process_request method. It does a sanity check on the request, even though a bit differently from the previous handler. This time, we need to make sure that if the length is provided on the query string (which means, for example, http://our-api-url/?length=23), it's in the correct format. This means that length needs to be a positive integer.
So, to validate that, we do an int conversion (req.get_param('length') returns a string), then we assert that length is greater than zero and, finally, we put it in context under the '_length' key.
Doing the int conversion of a string which is not a suitable representation for an integer raises ValueError, while a conversion from a type that is not a string raises TypeError, therefore we catch those two in the except clause.
We also catch AssertionError, which is raised by the assert length > 0 line when length is not a positive integer. We can then safely guarantee that the length is as desired with one single try/except block.
Tip
Note that, when coding a try/except block, you should usually try and be as specific as possible, separating instructions that would raise different exceptions if a problem arose. This would allow you more control over the issue, and easier debugging. In this case though, since this is a simple API, it's fine to have code which only reacts to a request for which length is not in the right format.
The code for the on_get method is quite straightforward. It starts by processing the request, then the length is fetched, falling back to 16 (the default value) when it's not passed, and then a password is generated and dumped to JSON, and then set to be the body of the response.
In order to run this application, you need to remember that we set the base URL in the interface to http://127.0.0.1:5555. Therefore, we need the following command to start the API:
$ gunicorn -b 127.0.0.1:5555 main:app
Running that will start the app defined in the main module, binding the server instance to port 5555 on localhost. For more information about Gunicorn, please refer to either Chapter 10, Web Development Done Right or directly to the project's home page (http://gunicorn.org/).
The code for the API is now complete so if you have both the interface and the API running, you can try them out together. See if everything works as expected.
In this section, let's take a look at the tests I wrote for the helpers and for the handlers. Tests for the helpers are heavily based on the nose_parameterized library, as my favorite testing style is interface testing, with as little patching as possible. Using nose_parameterized allows me to write tests that are easier to read because the test cases are very visible.
On the other hand, tests for the handlers have to follow the testing conventions for the Falcon library, so they will be a bit different. This is, of course, ideal since it allows me to show you even more.
Due to the limited amount of pages I have left, I'll show you only a part of the tests, so make sure you check them out in full in the source code.
Let's see the tests for the PasswordGenerator class:
tests/test_core/test_passwords.py
class PasswordGeneratorTestCase(TestCase):
def test__generate_password_length(self):
for length in range(300):
assert_equal(
length,
len(PasswordGenerator._generate_password(length))
)
def test__generate_password_validity(self):
for length in range(1, 300):
password = PasswordGenerator._generate_password(
length)
assert_true(PasswordValidator(password).is_valid())
def test__generate_candidate(self):
score, password = (
PasswordGenerator._generate_candidate(42))
expected_score = PasswordValidator(password).score()
assert_equal(expected_score['total'], score)
@patch.object(PasswordGenerator, '_generate_candidate')
def test__generate(self, _generate_candidate_mock):
# checks `generate` returns the highest score candidate
_generate_candidate_mock.side_effect = [
(16, '&a69Ly+0H4jZ'),
(17, 'UXaF4stRfdlh'),
(21, 'aB4Ge_KdTgwR'), # the winner
(12, 'IRLT*XEfcglm'),
(16, '$P92-WZ5+DnG'),
(18, 'Xi#36jcKA_qQ'),
(19, '?p9avQzRMIK0'),
(17, '4@sY&bQ9*H!+'),
(12, 'Cx-QAYXG_Ejq'),
(18, 'C)RAV(HP7j9n'),
]
assert_equal(
(21, 'aB4Ge_KdTgwR'), PasswordGenerator.generate(12))Within test__generate_password_length we make sure the _generate_password method handles the length parameter correctly. We generate a password for each length in the range [0, 300), and verify that it has the correct length.
In the test__generate_password_validity test, we do something similar but, this time, we make sure that whatever length we ask for, the generated password is valid. We use the PasswordValidator class to check for validity.
Finally, we need to test the generate method. The password generation is random, therefore, in order to test this function, we need to mock _generate_candidate, thus controlling its output. We set the side_effect argument on its mock to be a list of 10 candidates, from which we expect the generate method to choose the one with the highest score. Setting side_effect on a mock to a list causes that mock to return the elements of that list, one at a time, each time it's called. To avoid ambiguity, the highest score is 21, and only one candidate has scored that high. We call the method and make sure that that particular one is the candidate which is returned.
Testing the PasswordValidator class requires many more lines of code, so I'll show only a portion of these tests:
pwdapi/tests/test_core/test_passwords.py
from unittest import TestCase
from unittest.mock import patch
from nose_parameterized import parameterized, param
from nose.tools import (
assert_equal, assert_dict_equal, assert_true)
from core.passwords import PasswordValidator, PasswordGenerator
class PasswordValidatorTestCase(TestCase):
@parameterized.expand([
(False, ''),
(False, ' '),
(True, 'abcdefghijklmnopqrstuvwxyz'),
(True, 'ABCDEFGHIJKLMNOPQRSTUVWXYZ'),
(True, '0123456789'),
(True, '!#$%&()*+-?@_|'),
])
def test_is_valid(self, valid, password):
validator = PasswordValidator(password)
assert_equal(valid, validator.is_valid())We start by testing the is_valid method. We test whether or not it returns False when it's fed an empty string, as well as a string made up of only spaces, which makes sure we're testing whether we're calling .strip() when we assign the password.
Then, we use all the characters that we want to be accepted to make sure the function accepts them.
I understand the syntax behind the parameterize.expand decorator can be challenging at first but really, all there is to it is that each tuple consists of an independent test case which, in turn, means that the test_is_valid test is run individually for each tuple, and that the two tuple elements are passed to the method as arguments: valid and password.
We then test for invalid characters. We expect them all to fail so we use param.explicit, which runs the test for each of the characters in that weird string.
@parameterized.expand(
param.explicit(char) for char in '>]{<`\\;,[^/"\'~:}=.'
)
def test_is_valid_invalid_chars(self, password):
validator = PasswordValidator(password)
assert_equal(False, validator.is_valid())They all evaluate to False, so we're good.
@parameterized.expand([
(0, ''), # 0-3: score 0
(0, 'a'), # 0-3: score 0
(0, 'aa'), # 0-3: score 0
(0, 'aaa'), # 0-3: score 0
(1, 'aaab'), # 4-7: score 1
...
(5, 'aaabbbbccccddd'), # 12-15: score 5
(5, 'aaabbbbccccdddd'), # 12-15: score 5
])
def test__score_length(self, score, password):
validator = PasswordValidator(password)
assert_equal(score, validator._score_length())To test the _score_length method, I created 16 test cases for the lengths from 0 to 15. The body of the test simply makes sure that the score is assigned appropriately.
def test__score_length_sixteen_plus(self):
# all password whose length is 16+ score 7 points
password = 'x' * 255
for length in range(16, len(password)):
validator = PasswordValidator(password[:length])
assert_equal(7, validator._score_length())The preceding test is for lengths from 16 to 254. We only need to make sure that any length after 15 gets 7 as a score.
I will skip over the tests for the other internal methods and jump directly to the one for the score method. In order to test it, I want to control exactly what is returned by each of the _score_* methods so I mock them out and in the test, I set a return value for each of them. Note that to mock methods of a class, we use a variant of patch: patch.object. When you set return values on mocks, it's never good to have repetitions because you may not be sure which method returned what, and the test wouldn't fail in the case of a swap. So, always return different values. In my case, I am using the first few prime numbers to be sure there is no possibility of confusion.
@patch.object(PasswordValidator, '_score_length')
@patch.object(PasswordValidator, '_score_case')
@patch.object(PasswordValidator, '_score_numbers')
@patch.object(PasswordValidator, '_score_special')
@patch.object(PasswordValidator, '_score_ratio')
def test_score(
self,
_score_ratio_mock,
_score_special_mock,
_score_numbers_mock,
_score_case_mock,
_score_length_mock):
_score_ratio_mock.return_value = 2
_score_special_mock.return_value = 3
_score_numbers_mock.return_value = 5
_score_case_mock.return_value = 7
_score_length_mock.return_value = 11
expected_result = {
'length': 11,
'case': 7,
'numbers': 5,
'special': 3,
'ratio': 2,
'total': 28,
}
validator = PasswordValidator('')
assert_dict_equal(expected_result, validator.score())I want to point out explicitly that the _score_* methods are mocked, so I set up my validator instance by passing an empty string to the class constructor. This makes it even more evident to the reader that the internals of the class have been mocked out. Then, I just check if the result is the same as what I was expecting.
This last test is the only one in this class in which I used mocks. All the other tests for the _score_* methods are in an interface style, which reads better and usually produces better results.
Let's briefly see one example of a test for a handler:
pwdapi/tests/test_core/test_handlers.py
import json
from unittest.mock import patch
from nose.tools import assert_dict_equal, assert_equal
import falcon
import falcon.testing as testing
from core.handlers import (
PasswordValidatorHandler, PasswordGeneratorHandler)
class PGHTest(PasswordGeneratorHandler):
def process_request(self, req, resp):
self.req, self.resp = req, resp
return super(PGHTest, self).process_request(req, resp)
class PVHTest(PasswordValidatorHandler):
def process_request(self, req, resp):
self.req, self.resp = req, resp
return super(PVHTest, self).process_request(req, resp)Because of the tools Falcon gives you to test your handlers, I created a child for each of the classes I wanted to test. The only thing I changed (by overriding a method) is that in the process_request method, which is called by both classes, before processing the request I make sure I set the req and resp arguments on the instance. The normal behavior of the process_request method is thus not altered in any other way. By doing this, whatever happens over the course of the test, I'll be able to check against those objects.
It's quite common to use tricks like this when testing. We never change the code to adapt for a test, it would be bad practice. We find a way of adapting our tests to suit our needs.
class TestPasswordValidatorHandler(testing.TestBase):
def before(self):
self.resource = PVHTest()
self.api.add_route('/password/validate/', self.resource)The before method is called by the Falcon TestBase logic, and it allows us to set up the resource we want to test (the handler) and a route for it (which is not necessarily the same as the one we use in production).
def test_post(self):
self.simulate_request(
'/password/validate/',
body=json.dumps({'password': 'abcABC0123#&'}),
method='POST')
resp = self.resource.resp
assert_equal('200 OK', resp.status)
assert_dict_equal(
{'password': 'abcABC0123#&',
'score': {'case': 3, 'length': 5, 'numbers': 2,
'special': 4, 'ratio': 2, 'total': 16},
'valid': True},
json.loads(resp.body))This is the test for the happy path. All it does is simulate a POST request with a JSON payload as body. Then, we inspect the response object. In particular, we inspect its status and its body. We make sure that the handler has correctly called the validator and returned its results.
We also test the generator handler:
class TestPasswordGeneratorHandler(testing.TestBase):
def before(self):
self.resource = PGHTest()
self.api.add_route('/password/generate/', self.resource)
@patch('core.handlers.PasswordGenerator')
def test_get(self, PasswordGenerator):
PasswordGenerator.generate.return_value = (7, 'abc123')
self.simulate_request(
'/password/generate/',
query_string='length=7',
method='GET')
resp = self.resource.resp
assert_equal('200 OK', resp.status)
assert_equal([7, 'abc123'], json.loads(resp.body))For this one as well, I will only show you the test for the happy path. We mock out the PasswordGenerator class because we need to control which password it will generate and, unless we mock, we won't be able to do it, as it is a random process.
Once we have correctly set up its return value, we can simulate the request again. In this case, it's a GET request, with a desired length of 7. We use a technique similar to the one we used for the other handler, and check the response status and body.
These are not the only tests you could write against the API, and the style could be different as well. Some people mock often, I tend to mock only when I really have to. Just try to see if you can make some sense out of them. I know they're not really easy but they'll be good training for you. Tests are extremely important so give it your best shot.
Coding the password validator
The PasswordValidator class is my favorite bit of logic in the whole API. It exposes an is_valid and a score method. The latter runs all defined validators ("private" methods in the same class), and collects the scores into a single dict which is returned as a result. I'll write this class method by method so that it does not get too complicated:
class PasswordValidator:
def __init__(self, password):
self.password = password.strip()It begins by setting password (with no leading or trailing spaces) as an instance attribute. This way we won't then have to pass it around from method to method. All the methods that will follow belong to this class.
def is_valid(self):
return (len(self.password) > 0 and
all(char in allchars for char in self.password))A password is valid when its length is greater than 0 and all of its characters belong to the allchars string. When you read the is_valid method, it's practically English (that's how amazing Python is). all is a built-in function that tells you if all the elements of the iterable you feed to it are True.
def score(self):
result = {
'length': self._score_length(),
'case': self._score_case(),
'numbers': self._score_numbers(),
'special': self._score_special(),
'ratio': self._score_ratio(),
}
result['total'] = sum(result.values())
return resultThis is the other main method. It's very simple, it just prepares a dict with all the results from the validators. The only independent bit of logic happens at the end, when we sum the grades from each validator and assign it to a 'total' key in the dict, just for convenience.
As you can see, we score a password by length, by letter case, by the presence of numbers, and special characters, and, finally, by the ratio between letters and numbers. Letters allow a character to be between 26 * 2 = 52 different possible choices, while digits allow only 10. Therefore, passwords whose letters to digits ratio is higher are more difficult to crack.
Let's see the length validator:
def _score_length(self):
scores_list = ([0]*4) + ([1]*4) + ([3]*4) + ([5]*4)
scores = dict(enumerate(scores_list))
return scores.get(len(self.password), 7)We assign 0 points to passwords whose length is less than four characters, 1 point for those whose length is less than 8, 3 for a length less than 12, 5 for a length less than 16, and 7 for a length of 16 or more.
In order to avoid a waterfall of if/elif clauses, I have adopted a functional style here. I prepared a score_list, which is basically [0, 0, 0, 0, 1, 1, 1, 1, 3, ...]. Then, by enumerating it, I got a (length, score) pair for each length less than 16. I put those pairs into a dict, which gives me the equivalent in dict form, so it should look like this: {0:0, 1:0, 2:0, 3:0, 4:1, 5:1, ...}. I then perform a get on this dict with the length of the password, setting a value of 7 as the default (which will be returned for lengths of 16 or more, which are not in the dict).
I have nothing against if/elif clauses, of course, but I wanted to take the opportunity to show you different coding styles in this final chapter, to help you get used to reading code which deviates from what you would normally expect. It's only beneficial.
def _score_case(self):
lower = bool(set(ascii_lowercase) & set(self.password))
upper = bool(set(ascii_uppercase) & set(self.password))
return int(lower or upper) + 2 * (lower and upper)The way we validate the case is again with a nice trick. lower is True when the intersection between the password and all lowercase characters is non-empty, otherwise it's False. upper behaves in the same way, only with uppercase characters.
To understand the evaluation that happens on the last line, let's use the inside-out technique once more: lower or upper is True when at least one of the two is True. When it's True, it will be converted to a 1 by the int class. This equates to saying, if there is at least one character, regardless of the casing, the score gets 1 point, otherwise it stays at 0.
Now for the second part: lower and upper is True when both of them are True, which means that we have at least one lowercase and one uppercase character. This means that, to crack the password, a brute-force algorithm would have to loop through 52 letters instead of just 26. Therefore, when that's True, we get an extra two points.
This validator therefore produces a result in the range (0, 1, 3), depending on what the password is.
def _score_numbers(self):
return 2 if (set(self.password) & set(digits)) else 0Scoring on the numbers is simpler. If we have at least one number, we get two points, otherwise we get 0. In this case, I used a ternary operator to return the result.
def _score_special(self):
return 4 if (
set(self.password) & set(punctuation)) else 0The special characters validator has the same logic as the previous one but, since special characters add quite a bit of complexity when it comes to cracking a password, we have scored four points instead of just two.
The last one validates the ratio between the letters and the digits.
def _score_ratio(self):
alpha_count = sum(
1 if c.lower() in ascii_lowercase else 0
for c in self.password)
digits_count = sum(
1 if c in digits else 0 for c in self.password)
if digits_count == 0:
return 0
return min(ceil(alpha_count / digits_count), 7)I highlighted the conditional logic in the expressions in the sum calls. In the first case, we get a 1 for each character whose lowercase version is in ascii_lowercase. This means that summing all those 1's up gives us exactly the count of all the letters. Then, we do the same for the digits, only we use the digits string for reference, and we don't need to lowercase the character. When digits_count is 0, alpha_count / digits_count would cause a ZeroDivisionError, therefore we check on digits_count and when it's 0 we return 0. If we have digits, we calculate the ceiling of the letters:digits ratio, and return it, capped at 7.
Of course, there are many different ways to calculate a score for a password. My aim here is not to give you the finest algorithm to do that, but to show you how you could go about implementing it.
The password generator is a much simpler class than the validator. However, I have coded it so that we won't need to create an instance to use it, just to show you yet again a different coding style.
class PasswordGenerator:
@classmethod
def generate(cls, length, bestof=10):
candidates = sorted([
cls._generate_candidate(length)
for k in range(max(1, bestof))
])
return candidates[-1]
@classmethod
def _generate_candidate(cls, length):
password = cls._generate_password(length)
score = PasswordValidator(password).score()
return (score['total'], password)
@classmethod
def _generate_password(cls, length):
chars = allchars * (ceil(length / len(allchars)))
return ''.join(sample(chars, length))Of the three methods, only the first one is meant to be used. Let's start our analysis with the last one: _generate_password.
This method simply takes a length, which is the desired length for the password we want, and calls the sample function to get a population of length elements out of the chars string. The return value of the sample function is a list of length elements, and we need to make it a string using join.
Before we can call sample, think about this, what if the desired length exceeds the length of allchars? The call would result in ValueError: Sample larger than the population.
Because of this, we create the chars string in a way that it is made by concatenating the allchars string to itself just enough times to cover the desired length. To give you an example, let's say we need a password of 27 characters, and let's pretend allchars is 10 characters long. length / len(allchars) gives 2.7, which, when passed to the ceil function, becomes 3. This means that we're going to assign chars to a triple concatenation of the allchars string, hence chars will be 10 * 3 = 30 characters long, which is enough to cover our requirements.
Note that, in order for these methods to be called without creating an instance of this class, we need to decorate them with the classmethod decorator. The convention is then to call the first argument, cls, instead of self, because Python, behind the scenes, will pass the class object to the call.
The code for _generate_candidate is also very simple. We just generate a password and, given the length, we calculate its score, and return a tuple (score, password).
We do this so that in the generate method we can generate 10 (by default) passwords each time the method is called and return the one that has the highest score. Since our generation logic is based on a random function, it's always a good way to employ a technique like this to avoid worst case scenarios.
This concludes the code for the helpers.
As you may have noticed, the code for the helpers isn't related to Falcon at all. It is just pure Python that we can reuse when we need it. On the other hand, the code for the handlers is of course based on Falcon. The code that follows belongs to the core/handlers.py module so, as we did before, let's start with the first few lines:
import json
import falcon
from .passwords import PasswordValidator, PasswordGenerator
class HeaderMixin:
def set_access_control_allow_origin(self, resp):
resp.set_header('Access-Control-Allow-Origin', '*')That was very simple. We import json, falcon, and our helpers, and then we set up a mixin which we'll need in both handlers. The need for this mixin is to allow the API to serve requests that come from somewhere else. This is the other side of the CORS coin to what we saw in the JavaScript code for the interface. In this case, we boldly go where no security expert would ever dare, and allow requests to come from any domain ('*'). We do this because this is an exercise and, in this context, it is fine, but don't do it in production, okay?
This handler will have to respond to a POST request, therefore I have coded an on_post method, which is the way you react to a POST request in Falcon.
class PasswordValidatorHandler(HeaderMixin):
def on_post(self, req, resp):
self.process_request(req, resp)
password = req.context.get('_body', {}).get('password')
if password is None:
resp.status = falcon.HTTP_BAD_REQUEST
return None
result = self.parse_password(password)
resp.body = json.dumps(result)
def parse_password(self, password):
validator = PasswordValidator(password)
return {
'password': password,
'valid': validator.is_valid(),
'score': validator.score(),
}
def process_request(self, req, resp):
self.set_access_control_allow_origin(resp)
body = req.stream.read()
if not body:
raise falcon.HTTPBadRequest('Empty request body',
'A valid JSON document is required.')
try:
req.context['_body'] = json.loads(
body.decode('utf-8'))
except (ValueError, UnicodeDecodeError):
raise falcon.HTTPError(
falcon.HTTP_753, 'Malformed JSON',
'JSON incorrect or not utf-8 encoded.')Let's start with the on_post method. First of all, we call the process_request method, which does a sanity check on the request body. I won't go into finest detail because it's taken from the Falcon documentation, and it's a standard way of processing a request. Let's just say that, if everything goes well (the highlighted part), we get the body of the request (already decoded from JSON) in req.context['_body']. If things go badly for any reason, we return an appropriate error response.
Let's go back to on_post. We fetch the password from the request context. At this point, process_request has succeeded, but we still don't know if the body was in the correct format. We're expecting something like: {'password': 'my_password'}.
So we proceed with caution. We get the value for the '_body' key and, if that is not present, we return an empty dict. We get the value for 'password' from that. We use get instead of direct access to avoid KeyError issues.
If the password is None, we simply return a 400 error (bad request). Otherwise, we validate it and calculate its score, and then set the result as the body of our response.
You can see how easy it is to validate and calculate the score of the password in the parse_password method, by using our helpers.
We return a dict with three pieces of information: password, valid, and score. The password information is technically redundant because whoever made the request would know the password but, in this case, I think it's a good way of providing enough information for things such as logging, so I added it.
What happens if the JSON-decoded body is not a dict? I will leave it up to you to fix the code, adding some logic to cater for that edge case.
The generator handler has to handle a GET request with one query parameter: the desired password length.
class PasswordGeneratorHandler(HeaderMixin):
def on_get(self, req, resp):
self.process_request(req, resp)
length = req.context.get('_length', 16)
resp.body = json.dumps(
PasswordGenerator.generate(length))
def process_request(self, req, resp):
self.set_access_control_allow_origin(resp)
length = req.get_param('length')
if length is None:
return
try:
length = int(length)
assert length > 0
req.context['_length'] = length
except (ValueError, TypeError, AssertionError):
raise falcon.HTTPBadRequest('Wrong query parameter',
'`length` must be a positive integer.')We have a similar process_request method. It does a sanity check on the request, even though a bit differently from the previous handler. This time, we need to make sure that if the length is provided on the query string (which means, for example, http://our-api-url/?length=23), it's in the correct format. This means that length needs to be a positive integer.
So, to validate that, we do an int conversion (req.get_param('length') returns a string), then we assert that length is greater than zero and, finally, we put it in context under the '_length' key.
Doing the int conversion of a string which is not a suitable representation for an integer raises ValueError, while a conversion from a type that is not a string raises TypeError, therefore we catch those two in the except clause.
We also catch AssertionError, which is raised by the assert length > 0 line when length is not a positive integer. We can then safely guarantee that the length is as desired with one single try/except block.
Tip
Note that, when coding a try/except block, you should usually try and be as specific as possible, separating instructions that would raise different exceptions if a problem arose. This would allow you more control over the issue, and easier debugging. In this case though, since this is a simple API, it's fine to have code which only reacts to a request for which length is not in the right format.
The code for the on_get method is quite straightforward. It starts by processing the request, then the length is fetched, falling back to 16 (the default value) when it's not passed, and then a password is generated and dumped to JSON, and then set to be the body of the response.
In order to run this application, you need to remember that we set the base URL in the interface to http://127.0.0.1:5555. Therefore, we need the following command to start the API:
$ gunicorn -b 127.0.0.1:5555 main:app
Running that will start the app defined in the main module, binding the server instance to port 5555 on localhost. For more information about Gunicorn, please refer to either Chapter 10, Web Development Done Right or directly to the project's home page (http://gunicorn.org/).
The code for the API is now complete so if you have both the interface and the API running, you can try them out together. See if everything works as expected.
In this section, let's take a look at the tests I wrote for the helpers and for the handlers. Tests for the helpers are heavily based on the nose_parameterized library, as my favorite testing style is interface testing, with as little patching as possible. Using nose_parameterized allows me to write tests that are easier to read because the test cases are very visible.
On the other hand, tests for the handlers have to follow the testing conventions for the Falcon library, so they will be a bit different. This is, of course, ideal since it allows me to show you even more.
Due to the limited amount of pages I have left, I'll show you only a part of the tests, so make sure you check them out in full in the source code.
Let's see the tests for the PasswordGenerator class:
tests/test_core/test_passwords.py
class PasswordGeneratorTestCase(TestCase):
def test__generate_password_length(self):
for length in range(300):
assert_equal(
length,
len(PasswordGenerator._generate_password(length))
)
def test__generate_password_validity(self):
for length in range(1, 300):
password = PasswordGenerator._generate_password(
length)
assert_true(PasswordValidator(password).is_valid())
def test__generate_candidate(self):
score, password = (
PasswordGenerator._generate_candidate(42))
expected_score = PasswordValidator(password).score()
assert_equal(expected_score['total'], score)
@patch.object(PasswordGenerator, '_generate_candidate')
def test__generate(self, _generate_candidate_mock):
# checks `generate` returns the highest score candidate
_generate_candidate_mock.side_effect = [
(16, '&a69Ly+0H4jZ'),
(17, 'UXaF4stRfdlh'),
(21, 'aB4Ge_KdTgwR'), # the winner
(12, 'IRLT*XEfcglm'),
(16, '$P92-WZ5+DnG'),
(18, 'Xi#36jcKA_qQ'),
(19, '?p9avQzRMIK0'),
(17, '4@sY&bQ9*H!+'),
(12, 'Cx-QAYXG_Ejq'),
(18, 'C)RAV(HP7j9n'),
]
assert_equal(
(21, 'aB4Ge_KdTgwR'), PasswordGenerator.generate(12))Within test__generate_password_length we make sure the _generate_password method handles the length parameter correctly. We generate a password for each length in the range [0, 300), and verify that it has the correct length.
In the test__generate_password_validity test, we do something similar but, this time, we make sure that whatever length we ask for, the generated password is valid. We use the PasswordValidator class to check for validity.
Finally, we need to test the generate method. The password generation is random, therefore, in order to test this function, we need to mock _generate_candidate, thus controlling its output. We set the side_effect argument on its mock to be a list of 10 candidates, from which we expect the generate method to choose the one with the highest score. Setting side_effect on a mock to a list causes that mock to return the elements of that list, one at a time, each time it's called. To avoid ambiguity, the highest score is 21, and only one candidate has scored that high. We call the method and make sure that that particular one is the candidate which is returned.
Testing the PasswordValidator class requires many more lines of code, so I'll show only a portion of these tests:
pwdapi/tests/test_core/test_passwords.py
from unittest import TestCase
from unittest.mock import patch
from nose_parameterized import parameterized, param
from nose.tools import (
assert_equal, assert_dict_equal, assert_true)
from core.passwords import PasswordValidator, PasswordGenerator
class PasswordValidatorTestCase(TestCase):
@parameterized.expand([
(False, ''),
(False, ' '),
(True, 'abcdefghijklmnopqrstuvwxyz'),
(True, 'ABCDEFGHIJKLMNOPQRSTUVWXYZ'),
(True, '0123456789'),
(True, '!#$%&()*+-?@_|'),
])
def test_is_valid(self, valid, password):
validator = PasswordValidator(password)
assert_equal(valid, validator.is_valid())We start by testing the is_valid method. We test whether or not it returns False when it's fed an empty string, as well as a string made up of only spaces, which makes sure we're testing whether we're calling .strip() when we assign the password.
Then, we use all the characters that we want to be accepted to make sure the function accepts them.
I understand the syntax behind the parameterize.expand decorator can be challenging at first but really, all there is to it is that each tuple consists of an independent test case which, in turn, means that the test_is_valid test is run individually for each tuple, and that the two tuple elements are passed to the method as arguments: valid and password.
We then test for invalid characters. We expect them all to fail so we use param.explicit, which runs the test for each of the characters in that weird string.
@parameterized.expand(
param.explicit(char) for char in '>]{<`\\;,[^/"\'~:}=.'
)
def test_is_valid_invalid_chars(self, password):
validator = PasswordValidator(password)
assert_equal(False, validator.is_valid())They all evaluate to False, so we're good.
@parameterized.expand([
(0, ''), # 0-3: score 0
(0, 'a'), # 0-3: score 0
(0, 'aa'), # 0-3: score 0
(0, 'aaa'), # 0-3: score 0
(1, 'aaab'), # 4-7: score 1
...
(5, 'aaabbbbccccddd'), # 12-15: score 5
(5, 'aaabbbbccccdddd'), # 12-15: score 5
])
def test__score_length(self, score, password):
validator = PasswordValidator(password)
assert_equal(score, validator._score_length())To test the _score_length method, I created 16 test cases for the lengths from 0 to 15. The body of the test simply makes sure that the score is assigned appropriately.
def test__score_length_sixteen_plus(self):
# all password whose length is 16+ score 7 points
password = 'x' * 255
for length in range(16, len(password)):
validator = PasswordValidator(password[:length])
assert_equal(7, validator._score_length())The preceding test is for lengths from 16 to 254. We only need to make sure that any length after 15 gets 7 as a score.
I will skip over the tests for the other internal methods and jump directly to the one for the score method. In order to test it, I want to control exactly what is returned by each of the _score_* methods so I mock them out and in the test, I set a return value for each of them. Note that to mock methods of a class, we use a variant of patch: patch.object. When you set return values on mocks, it's never good to have repetitions because you may not be sure which method returned what, and the test wouldn't fail in the case of a swap. So, always return different values. In my case, I am using the first few prime numbers to be sure there is no possibility of confusion.
@patch.object(PasswordValidator, '_score_length')
@patch.object(PasswordValidator, '_score_case')
@patch.object(PasswordValidator, '_score_numbers')
@patch.object(PasswordValidator, '_score_special')
@patch.object(PasswordValidator, '_score_ratio')
def test_score(
self,
_score_ratio_mock,
_score_special_mock,
_score_numbers_mock,
_score_case_mock,
_score_length_mock):
_score_ratio_mock.return_value = 2
_score_special_mock.return_value = 3
_score_numbers_mock.return_value = 5
_score_case_mock.return_value = 7
_score_length_mock.return_value = 11
expected_result = {
'length': 11,
'case': 7,
'numbers': 5,
'special': 3,
'ratio': 2,
'total': 28,
}
validator = PasswordValidator('')
assert_dict_equal(expected_result, validator.score())I want to point out explicitly that the _score_* methods are mocked, so I set up my validator instance by passing an empty string to the class constructor. This makes it even more evident to the reader that the internals of the class have been mocked out. Then, I just check if the result is the same as what I was expecting.
This last test is the only one in this class in which I used mocks. All the other tests for the _score_* methods are in an interface style, which reads better and usually produces better results.
Let's briefly see one example of a test for a handler:
pwdapi/tests/test_core/test_handlers.py
import json
from unittest.mock import patch
from nose.tools import assert_dict_equal, assert_equal
import falcon
import falcon.testing as testing
from core.handlers import (
PasswordValidatorHandler, PasswordGeneratorHandler)
class PGHTest(PasswordGeneratorHandler):
def process_request(self, req, resp):
self.req, self.resp = req, resp
return super(PGHTest, self).process_request(req, resp)
class PVHTest(PasswordValidatorHandler):
def process_request(self, req, resp):
self.req, self.resp = req, resp
return super(PVHTest, self).process_request(req, resp)Because of the tools Falcon gives you to test your handlers, I created a child for each of the classes I wanted to test. The only thing I changed (by overriding a method) is that in the process_request method, which is called by both classes, before processing the request I make sure I set the req and resp arguments on the instance. The normal behavior of the process_request method is thus not altered in any other way. By doing this, whatever happens over the course of the test, I'll be able to check against those objects.
It's quite common to use tricks like this when testing. We never change the code to adapt for a test, it would be bad practice. We find a way of adapting our tests to suit our needs.
class TestPasswordValidatorHandler(testing.TestBase):
def before(self):
self.resource = PVHTest()
self.api.add_route('/password/validate/', self.resource)The before method is called by the Falcon TestBase logic, and it allows us to set up the resource we want to test (the handler) and a route for it (which is not necessarily the same as the one we use in production).
def test_post(self):
self.simulate_request(
'/password/validate/',
body=json.dumps({'password': 'abcABC0123#&'}),
method='POST')
resp = self.resource.resp
assert_equal('200 OK', resp.status)
assert_dict_equal(
{'password': 'abcABC0123#&',
'score': {'case': 3, 'length': 5, 'numbers': 2,
'special': 4, 'ratio': 2, 'total': 16},
'valid': True},
json.loads(resp.body))This is the test for the happy path. All it does is simulate a POST request with a JSON payload as body. Then, we inspect the response object. In particular, we inspect its status and its body. We make sure that the handler has correctly called the validator and returned its results.
We also test the generator handler:
class TestPasswordGeneratorHandler(testing.TestBase):
def before(self):
self.resource = PGHTest()
self.api.add_route('/password/generate/', self.resource)
@patch('core.handlers.PasswordGenerator')
def test_get(self, PasswordGenerator):
PasswordGenerator.generate.return_value = (7, 'abc123')
self.simulate_request(
'/password/generate/',
query_string='length=7',
method='GET')
resp = self.resource.resp
assert_equal('200 OK', resp.status)
assert_equal([7, 'abc123'], json.loads(resp.body))For this one as well, I will only show you the test for the happy path. We mock out the PasswordGenerator class because we need to control which password it will generate and, unless we mock, we won't be able to do it, as it is a random process.
Once we have correctly set up its return value, we can simulate the request again. In this case, it's a GET request, with a desired length of 7. We use a technique similar to the one we used for the other handler, and check the response status and body.
These are not the only tests you could write against the API, and the style could be different as well. Some people mock often, I tend to mock only when I really have to. Just try to see if you can make some sense out of them. I know they're not really easy but they'll be good training for you. Tests are extremely important so give it your best shot.
Coding the password generator
The password generator is a much simpler class than the validator. However, I have coded it so that we won't need to create an instance to use it, just to show you yet again a different coding style.
class PasswordGenerator:
@classmethod
def generate(cls, length, bestof=10):
candidates = sorted([
cls._generate_candidate(length)
for k in range(max(1, bestof))
])
return candidates[-1]
@classmethod
def _generate_candidate(cls, length):
password = cls._generate_password(length)
score = PasswordValidator(password).score()
return (score['total'], password)
@classmethod
def _generate_password(cls, length):
chars = allchars * (ceil(length / len(allchars)))
return ''.join(sample(chars, length))Of the three methods, only the first one is meant to be used. Let's start our analysis with the last one: _generate_password.
This method simply takes a length, which is the desired length for the password we want, and calls the sample function to get a population of length elements out of the chars string. The return value of the sample function is a list of length elements, and we need to make it a string using join.
Before we can call sample, think about this, what if the desired length exceeds the length of allchars? The call would result in ValueError: Sample larger than the population.
Because of this, we create the chars string in a way that it is made by concatenating the allchars string to itself just enough times to cover the desired length. To give you an example, let's say we need a password of 27 characters, and let's pretend allchars is 10 characters long. length / len(allchars) gives 2.7, which, when passed to the ceil function, becomes 3. This means that we're going to assign chars to a triple concatenation of the allchars string, hence chars will be 10 * 3 = 30 characters long, which is enough to cover our requirements.
Note that, in order for these methods to be called without creating an instance of this class, we need to decorate them with the classmethod decorator. The convention is then to call the first argument, cls, instead of self, because Python, behind the scenes, will pass the class object to the call.
The code for _generate_candidate is also very simple. We just generate a password and, given the length, we calculate its score, and return a tuple (score, password).
We do this so that in the generate method we can generate 10 (by default) passwords each time the method is called and return the one that has the highest score. Since our generation logic is based on a random function, it's always a good way to employ a technique like this to avoid worst case scenarios.
This concludes the code for the helpers.
As you may have noticed, the code for the helpers isn't related to Falcon at all. It is just pure Python that we can reuse when we need it. On the other hand, the code for the handlers is of course based on Falcon. The code that follows belongs to the core/handlers.py module so, as we did before, let's start with the first few lines:
import json
import falcon
from .passwords import PasswordValidator, PasswordGenerator
class HeaderMixin:
def set_access_control_allow_origin(self, resp):
resp.set_header('Access-Control-Allow-Origin', '*')That was very simple. We import json, falcon, and our helpers, and then we set up a mixin which we'll need in both handlers. The need for this mixin is to allow the API to serve requests that come from somewhere else. This is the other side of the CORS coin to what we saw in the JavaScript code for the interface. In this case, we boldly go where no security expert would ever dare, and allow requests to come from any domain ('*'). We do this because this is an exercise and, in this context, it is fine, but don't do it in production, okay?
This handler will have to respond to a POST request, therefore I have coded an on_post method, which is the way you react to a POST request in Falcon.
class PasswordValidatorHandler(HeaderMixin):
def on_post(self, req, resp):
self.process_request(req, resp)
password = req.context.get('_body', {}).get('password')
if password is None:
resp.status = falcon.HTTP_BAD_REQUEST
return None
result = self.parse_password(password)
resp.body = json.dumps(result)
def parse_password(self, password):
validator = PasswordValidator(password)
return {
'password': password,
'valid': validator.is_valid(),
'score': validator.score(),
}
def process_request(self, req, resp):
self.set_access_control_allow_origin(resp)
body = req.stream.read()
if not body:
raise falcon.HTTPBadRequest('Empty request body',
'A valid JSON document is required.')
try:
req.context['_body'] = json.loads(
body.decode('utf-8'))
except (ValueError, UnicodeDecodeError):
raise falcon.HTTPError(
falcon.HTTP_753, 'Malformed JSON',
'JSON incorrect or not utf-8 encoded.')Let's start with the on_post method. First of all, we call the process_request method, which does a sanity check on the request body. I won't go into finest detail because it's taken from the Falcon documentation, and it's a standard way of processing a request. Let's just say that, if everything goes well (the highlighted part), we get the body of the request (already decoded from JSON) in req.context['_body']. If things go badly for any reason, we return an appropriate error response.
Let's go back to on_post. We fetch the password from the request context. At this point, process_request has succeeded, but we still don't know if the body was in the correct format. We're expecting something like: {'password': 'my_password'}.
So we proceed with caution. We get the value for the '_body' key and, if that is not present, we return an empty dict. We get the value for 'password' from that. We use get instead of direct access to avoid KeyError issues.
If the password is None, we simply return a 400 error (bad request). Otherwise, we validate it and calculate its score, and then set the result as the body of our response.
You can see how easy it is to validate and calculate the score of the password in the parse_password method, by using our helpers.
We return a dict with three pieces of information: password, valid, and score. The password information is technically redundant because whoever made the request would know the password but, in this case, I think it's a good way of providing enough information for things such as logging, so I added it.
What happens if the JSON-decoded body is not a dict? I will leave it up to you to fix the code, adding some logic to cater for that edge case.
The generator handler has to handle a GET request with one query parameter: the desired password length.
class PasswordGeneratorHandler(HeaderMixin):
def on_get(self, req, resp):
self.process_request(req, resp)
length = req.context.get('_length', 16)
resp.body = json.dumps(
PasswordGenerator.generate(length))
def process_request(self, req, resp):
self.set_access_control_allow_origin(resp)
length = req.get_param('length')
if length is None:
return
try:
length = int(length)
assert length > 0
req.context['_length'] = length
except (ValueError, TypeError, AssertionError):
raise falcon.HTTPBadRequest('Wrong query parameter',
'`length` must be a positive integer.')We have a similar process_request method. It does a sanity check on the request, even though a bit differently from the previous handler. This time, we need to make sure that if the length is provided on the query string (which means, for example, http://our-api-url/?length=23), it's in the correct format. This means that length needs to be a positive integer.
So, to validate that, we do an int conversion (req.get_param('length') returns a string), then we assert that length is greater than zero and, finally, we put it in context under the '_length' key.
Doing the int conversion of a string which is not a suitable representation for an integer raises ValueError, while a conversion from a type that is not a string raises TypeError, therefore we catch those two in the except clause.
We also catch AssertionError, which is raised by the assert length > 0 line when length is not a positive integer. We can then safely guarantee that the length is as desired with one single try/except block.
Tip
Note that, when coding a try/except block, you should usually try and be as specific as possible, separating instructions that would raise different exceptions if a problem arose. This would allow you more control over the issue, and easier debugging. In this case though, since this is a simple API, it's fine to have code which only reacts to a request for which length is not in the right format.
The code for the on_get method is quite straightforward. It starts by processing the request, then the length is fetched, falling back to 16 (the default value) when it's not passed, and then a password is generated and dumped to JSON, and then set to be the body of the response.
In order to run this application, you need to remember that we set the base URL in the interface to http://127.0.0.1:5555. Therefore, we need the following command to start the API:
$ gunicorn -b 127.0.0.1:5555 main:app
Running that will start the app defined in the main module, binding the server instance to port 5555 on localhost. For more information about Gunicorn, please refer to either Chapter 10, Web Development Done Right or directly to the project's home page (http://gunicorn.org/).
The code for the API is now complete so if you have both the interface and the API running, you can try them out together. See if everything works as expected.
In this section, let's take a look at the tests I wrote for the helpers and for the handlers. Tests for the helpers are heavily based on the nose_parameterized library, as my favorite testing style is interface testing, with as little patching as possible. Using nose_parameterized allows me to write tests that are easier to read because the test cases are very visible.
On the other hand, tests for the handlers have to follow the testing conventions for the Falcon library, so they will be a bit different. This is, of course, ideal since it allows me to show you even more.
Due to the limited amount of pages I have left, I'll show you only a part of the tests, so make sure you check them out in full in the source code.
Let's see the tests for the PasswordGenerator class:
tests/test_core/test_passwords.py
class PasswordGeneratorTestCase(TestCase):
def test__generate_password_length(self):
for length in range(300):
assert_equal(
length,
len(PasswordGenerator._generate_password(length))
)
def test__generate_password_validity(self):
for length in range(1, 300):
password = PasswordGenerator._generate_password(
length)
assert_true(PasswordValidator(password).is_valid())
def test__generate_candidate(self):
score, password = (
PasswordGenerator._generate_candidate(42))
expected_score = PasswordValidator(password).score()
assert_equal(expected_score['total'], score)
@patch.object(PasswordGenerator, '_generate_candidate')
def test__generate(self, _generate_candidate_mock):
# checks `generate` returns the highest score candidate
_generate_candidate_mock.side_effect = [
(16, '&a69Ly+0H4jZ'),
(17, 'UXaF4stRfdlh'),
(21, 'aB4Ge_KdTgwR'), # the winner
(12, 'IRLT*XEfcglm'),
(16, '$P92-WZ5+DnG'),
(18, 'Xi#36jcKA_qQ'),
(19, '?p9avQzRMIK0'),
(17, '4@sY&bQ9*H!+'),
(12, 'Cx-QAYXG_Ejq'),
(18, 'C)RAV(HP7j9n'),
]
assert_equal(
(21, 'aB4Ge_KdTgwR'), PasswordGenerator.generate(12))Within test__generate_password_length we make sure the _generate_password method handles the length parameter correctly. We generate a password for each length in the range [0, 300), and verify that it has the correct length.
In the test__generate_password_validity test, we do something similar but, this time, we make sure that whatever length we ask for, the generated password is valid. We use the PasswordValidator class to check for validity.
Finally, we need to test the generate method. The password generation is random, therefore, in order to test this function, we need to mock _generate_candidate, thus controlling its output. We set the side_effect argument on its mock to be a list of 10 candidates, from which we expect the generate method to choose the one with the highest score. Setting side_effect on a mock to a list causes that mock to return the elements of that list, one at a time, each time it's called. To avoid ambiguity, the highest score is 21, and only one candidate has scored that high. We call the method and make sure that that particular one is the candidate which is returned.
Testing the PasswordValidator class requires many more lines of code, so I'll show only a portion of these tests:
pwdapi/tests/test_core/test_passwords.py
from unittest import TestCase
from unittest.mock import patch
from nose_parameterized import parameterized, param
from nose.tools import (
assert_equal, assert_dict_equal, assert_true)
from core.passwords import PasswordValidator, PasswordGenerator
class PasswordValidatorTestCase(TestCase):
@parameterized.expand([
(False, ''),
(False, ' '),
(True, 'abcdefghijklmnopqrstuvwxyz'),
(True, 'ABCDEFGHIJKLMNOPQRSTUVWXYZ'),
(True, '0123456789'),
(True, '!#$%&()*+-?@_|'),
])
def test_is_valid(self, valid, password):
validator = PasswordValidator(password)
assert_equal(valid, validator.is_valid())We start by testing the is_valid method. We test whether or not it returns False when it's fed an empty string, as well as a string made up of only spaces, which makes sure we're testing whether we're calling .strip() when we assign the password.
Then, we use all the characters that we want to be accepted to make sure the function accepts them.
I understand the syntax behind the parameterize.expand decorator can be challenging at first but really, all there is to it is that each tuple consists of an independent test case which, in turn, means that the test_is_valid test is run individually for each tuple, and that the two tuple elements are passed to the method as arguments: valid and password.
We then test for invalid characters. We expect them all to fail so we use param.explicit, which runs the test for each of the characters in that weird string.
@parameterized.expand(
param.explicit(char) for char in '>]{<`\\;,[^/"\'~:}=.'
)
def test_is_valid_invalid_chars(self, password):
validator = PasswordValidator(password)
assert_equal(False, validator.is_valid())They all evaluate to False, so we're good.
@parameterized.expand([
(0, ''), # 0-3: score 0
(0, 'a'), # 0-3: score 0
(0, 'aa'), # 0-3: score 0
(0, 'aaa'), # 0-3: score 0
(1, 'aaab'), # 4-7: score 1
...
(5, 'aaabbbbccccddd'), # 12-15: score 5
(5, 'aaabbbbccccdddd'), # 12-15: score 5
])
def test__score_length(self, score, password):
validator = PasswordValidator(password)
assert_equal(score, validator._score_length())To test the _score_length method, I created 16 test cases for the lengths from 0 to 15. The body of the test simply makes sure that the score is assigned appropriately.
def test__score_length_sixteen_plus(self):
# all password whose length is 16+ score 7 points
password = 'x' * 255
for length in range(16, len(password)):
validator = PasswordValidator(password[:length])
assert_equal(7, validator._score_length())The preceding test is for lengths from 16 to 254. We only need to make sure that any length after 15 gets 7 as a score.
I will skip over the tests for the other internal methods and jump directly to the one for the score method. In order to test it, I want to control exactly what is returned by each of the _score_* methods so I mock them out and in the test, I set a return value for each of them. Note that to mock methods of a class, we use a variant of patch: patch.object. When you set return values on mocks, it's never good to have repetitions because you may not be sure which method returned what, and the test wouldn't fail in the case of a swap. So, always return different values. In my case, I am using the first few prime numbers to be sure there is no possibility of confusion.
@patch.object(PasswordValidator, '_score_length')
@patch.object(PasswordValidator, '_score_case')
@patch.object(PasswordValidator, '_score_numbers')
@patch.object(PasswordValidator, '_score_special')
@patch.object(PasswordValidator, '_score_ratio')
def test_score(
self,
_score_ratio_mock,
_score_special_mock,
_score_numbers_mock,
_score_case_mock,
_score_length_mock):
_score_ratio_mock.return_value = 2
_score_special_mock.return_value = 3
_score_numbers_mock.return_value = 5
_score_case_mock.return_value = 7
_score_length_mock.return_value = 11
expected_result = {
'length': 11,
'case': 7,
'numbers': 5,
'special': 3,
'ratio': 2,
'total': 28,
}
validator = PasswordValidator('')
assert_dict_equal(expected_result, validator.score())I want to point out explicitly that the _score_* methods are mocked, so I set up my validator instance by passing an empty string to the class constructor. This makes it even more evident to the reader that the internals of the class have been mocked out. Then, I just check if the result is the same as what I was expecting.
This last test is the only one in this class in which I used mocks. All the other tests for the _score_* methods are in an interface style, which reads better and usually produces better results.
Let's briefly see one example of a test for a handler:
pwdapi/tests/test_core/test_handlers.py
import json
from unittest.mock import patch
from nose.tools import assert_dict_equal, assert_equal
import falcon
import falcon.testing as testing
from core.handlers import (
PasswordValidatorHandler, PasswordGeneratorHandler)
class PGHTest(PasswordGeneratorHandler):
def process_request(self, req, resp):
self.req, self.resp = req, resp
return super(PGHTest, self).process_request(req, resp)
class PVHTest(PasswordValidatorHandler):
def process_request(self, req, resp):
self.req, self.resp = req, resp
return super(PVHTest, self).process_request(req, resp)Because of the tools Falcon gives you to test your handlers, I created a child for each of the classes I wanted to test. The only thing I changed (by overriding a method) is that in the process_request method, which is called by both classes, before processing the request I make sure I set the req and resp arguments on the instance. The normal behavior of the process_request method is thus not altered in any other way. By doing this, whatever happens over the course of the test, I'll be able to check against those objects.
It's quite common to use tricks like this when testing. We never change the code to adapt for a test, it would be bad practice. We find a way of adapting our tests to suit our needs.
class TestPasswordValidatorHandler(testing.TestBase):
def before(self):
self.resource = PVHTest()
self.api.add_route('/password/validate/', self.resource)The before method is called by the Falcon TestBase logic, and it allows us to set up the resource we want to test (the handler) and a route for it (which is not necessarily the same as the one we use in production).
def test_post(self):
self.simulate_request(
'/password/validate/',
body=json.dumps({'password': 'abcABC0123#&'}),
method='POST')
resp = self.resource.resp
assert_equal('200 OK', resp.status)
assert_dict_equal(
{'password': 'abcABC0123#&',
'score': {'case': 3, 'length': 5, 'numbers': 2,
'special': 4, 'ratio': 2, 'total': 16},
'valid': True},
json.loads(resp.body))This is the test for the happy path. All it does is simulate a POST request with a JSON payload as body. Then, we inspect the response object. In particular, we inspect its status and its body. We make sure that the handler has correctly called the validator and returned its results.
We also test the generator handler:
class TestPasswordGeneratorHandler(testing.TestBase):
def before(self):
self.resource = PGHTest()
self.api.add_route('/password/generate/', self.resource)
@patch('core.handlers.PasswordGenerator')
def test_get(self, PasswordGenerator):
PasswordGenerator.generate.return_value = (7, 'abc123')
self.simulate_request(
'/password/generate/',
query_string='length=7',
method='GET')
resp = self.resource.resp
assert_equal('200 OK', resp.status)
assert_equal([7, 'abc123'], json.loads(resp.body))For this one as well, I will only show you the test for the happy path. We mock out the PasswordGenerator class because we need to control which password it will generate and, unless we mock, we won't be able to do it, as it is a random process.
Once we have correctly set up its return value, we can simulate the request again. In this case, it's a GET request, with a desired length of 7. We use a technique similar to the one we used for the other handler, and check the response status and body.
These are not the only tests you could write against the API, and the style could be different as well. Some people mock often, I tend to mock only when I really have to. Just try to see if you can make some sense out of them. I know they're not really easy but they'll be good training for you. Tests are extremely important so give it your best shot.
Writing the handlers
As you may have noticed, the code for the helpers isn't related to Falcon at all. It is just pure Python that we can reuse when we need it. On the other hand, the code for the handlers is of course based on Falcon. The code that follows belongs to the core/handlers.py module so, as we did before, let's start with the first few lines:
import json
import falcon
from .passwords import PasswordValidator, PasswordGenerator
class HeaderMixin:
def set_access_control_allow_origin(self, resp):
resp.set_header('Access-Control-Allow-Origin', '*')That was very simple. We import json, falcon, and our helpers, and then we set up a mixin which we'll need in both handlers. The need for this mixin is to allow the API to serve requests that come from somewhere else. This is the other side of the CORS coin to what we saw in the JavaScript code for the interface. In this case, we boldly go where no security expert would ever dare, and allow requests to come from any domain ('*'). We do this because this is an exercise and, in this context, it is fine, but don't do it in production, okay?
This handler will have to respond to a POST request, therefore I have coded an on_post method, which is the way you react to a POST request in Falcon.
class PasswordValidatorHandler(HeaderMixin):
def on_post(self, req, resp):
self.process_request(req, resp)
password = req.context.get('_body', {}).get('password')
if password is None:
resp.status = falcon.HTTP_BAD_REQUEST
return None
result = self.parse_password(password)
resp.body = json.dumps(result)
def parse_password(self, password):
validator = PasswordValidator(password)
return {
'password': password,
'valid': validator.is_valid(),
'score': validator.score(),
}
def process_request(self, req, resp):
self.set_access_control_allow_origin(resp)
body = req.stream.read()
if not body:
raise falcon.HTTPBadRequest('Empty request body',
'A valid JSON document is required.')
try:
req.context['_body'] = json.loads(
body.decode('utf-8'))
except (ValueError, UnicodeDecodeError):
raise falcon.HTTPError(
falcon.HTTP_753, 'Malformed JSON',
'JSON incorrect or not utf-8 encoded.')Let's start with the on_post method. First of all, we call the process_request method, which does a sanity check on the request body. I won't go into finest detail because it's taken from the Falcon documentation, and it's a standard way of processing a request. Let's just say that, if everything goes well (the highlighted part), we get the body of the request (already decoded from JSON) in req.context['_body']. If things go badly for any reason, we return an appropriate error response.
Let's go back to on_post. We fetch the password from the request context. At this point, process_request has succeeded, but we still don't know if the body was in the correct format. We're expecting something like: {'password': 'my_password'}.
So we proceed with caution. We get the value for the '_body' key and, if that is not present, we return an empty dict. We get the value for 'password' from that. We use get instead of direct access to avoid KeyError issues.
If the password is None, we simply return a 400 error (bad request). Otherwise, we validate it and calculate its score, and then set the result as the body of our response.
You can see how easy it is to validate and calculate the score of the password in the parse_password method, by using our helpers.
We return a dict with three pieces of information: password, valid, and score. The password information is technically redundant because whoever made the request would know the password but, in this case, I think it's a good way of providing enough information for things such as logging, so I added it.
What happens if the JSON-decoded body is not a dict? I will leave it up to you to fix the code, adding some logic to cater for that edge case.
The generator handler has to handle a GET request with one query parameter: the desired password length.
class PasswordGeneratorHandler(HeaderMixin):
def on_get(self, req, resp):
self.process_request(req, resp)
length = req.context.get('_length', 16)
resp.body = json.dumps(
PasswordGenerator.generate(length))
def process_request(self, req, resp):
self.set_access_control_allow_origin(resp)
length = req.get_param('length')
if length is None:
return
try:
length = int(length)
assert length > 0
req.context['_length'] = length
except (ValueError, TypeError, AssertionError):
raise falcon.HTTPBadRequest('Wrong query parameter',
'`length` must be a positive integer.')We have a similar process_request method. It does a sanity check on the request, even though a bit differently from the previous handler. This time, we need to make sure that if the length is provided on the query string (which means, for example, http://our-api-url/?length=23), it's in the correct format. This means that length needs to be a positive integer.
So, to validate that, we do an int conversion (req.get_param('length') returns a string), then we assert that length is greater than zero and, finally, we put it in context under the '_length' key.
Doing the int conversion of a string which is not a suitable representation for an integer raises ValueError, while a conversion from a type that is not a string raises TypeError, therefore we catch those two in the except clause.
We also catch AssertionError, which is raised by the assert length > 0 line when length is not a positive integer. We can then safely guarantee that the length is as desired with one single try/except block.
Tip
Note that, when coding a try/except block, you should usually try and be as specific as possible, separating instructions that would raise different exceptions if a problem arose. This would allow you more control over the issue, and easier debugging. In this case though, since this is a simple API, it's fine to have code which only reacts to a request for which length is not in the right format.
The code for the on_get method is quite straightforward. It starts by processing the request, then the length is fetched, falling back to 16 (the default value) when it's not passed, and then a password is generated and dumped to JSON, and then set to be the body of the response.
In order to run this application, you need to remember that we set the base URL in the interface to http://127.0.0.1:5555. Therefore, we need the following command to start the API:
$ gunicorn -b 127.0.0.1:5555 main:app
Running that will start the app defined in the main module, binding the server instance to port 5555 on localhost. For more information about Gunicorn, please refer to either Chapter 10, Web Development Done Right or directly to the project's home page (http://gunicorn.org/).
The code for the API is now complete so if you have both the interface and the API running, you can try them out together. See if everything works as expected.
In this section, let's take a look at the tests I wrote for the helpers and for the handlers. Tests for the helpers are heavily based on the nose_parameterized library, as my favorite testing style is interface testing, with as little patching as possible. Using nose_parameterized allows me to write tests that are easier to read because the test cases are very visible.
On the other hand, tests for the handlers have to follow the testing conventions for the Falcon library, so they will be a bit different. This is, of course, ideal since it allows me to show you even more.
Due to the limited amount of pages I have left, I'll show you only a part of the tests, so make sure you check them out in full in the source code.
Let's see the tests for the PasswordGenerator class:
tests/test_core/test_passwords.py
class PasswordGeneratorTestCase(TestCase):
def test__generate_password_length(self):
for length in range(300):
assert_equal(
length,
len(PasswordGenerator._generate_password(length))
)
def test__generate_password_validity(self):
for length in range(1, 300):
password = PasswordGenerator._generate_password(
length)
assert_true(PasswordValidator(password).is_valid())
def test__generate_candidate(self):
score, password = (
PasswordGenerator._generate_candidate(42))
expected_score = PasswordValidator(password).score()
assert_equal(expected_score['total'], score)
@patch.object(PasswordGenerator, '_generate_candidate')
def test__generate(self, _generate_candidate_mock):
# checks `generate` returns the highest score candidate
_generate_candidate_mock.side_effect = [
(16, '&a69Ly+0H4jZ'),
(17, 'UXaF4stRfdlh'),
(21, 'aB4Ge_KdTgwR'), # the winner
(12, 'IRLT*XEfcglm'),
(16, '$P92-WZ5+DnG'),
(18, 'Xi#36jcKA_qQ'),
(19, '?p9avQzRMIK0'),
(17, '4@sY&bQ9*H!+'),
(12, 'Cx-QAYXG_Ejq'),
(18, 'C)RAV(HP7j9n'),
]
assert_equal(
(21, 'aB4Ge_KdTgwR'), PasswordGenerator.generate(12))Within test__generate_password_length we make sure the _generate_password method handles the length parameter correctly. We generate a password for each length in the range [0, 300), and verify that it has the correct length.
In the test__generate_password_validity test, we do something similar but, this time, we make sure that whatever length we ask for, the generated password is valid. We use the PasswordValidator class to check for validity.
Finally, we need to test the generate method. The password generation is random, therefore, in order to test this function, we need to mock _generate_candidate, thus controlling its output. We set the side_effect argument on its mock to be a list of 10 candidates, from which we expect the generate method to choose the one with the highest score. Setting side_effect on a mock to a list causes that mock to return the elements of that list, one at a time, each time it's called. To avoid ambiguity, the highest score is 21, and only one candidate has scored that high. We call the method and make sure that that particular one is the candidate which is returned.
Testing the PasswordValidator class requires many more lines of code, so I'll show only a portion of these tests:
pwdapi/tests/test_core/test_passwords.py
from unittest import TestCase
from unittest.mock import patch
from nose_parameterized import parameterized, param
from nose.tools import (
assert_equal, assert_dict_equal, assert_true)
from core.passwords import PasswordValidator, PasswordGenerator
class PasswordValidatorTestCase(TestCase):
@parameterized.expand([
(False, ''),
(False, ' '),
(True, 'abcdefghijklmnopqrstuvwxyz'),
(True, 'ABCDEFGHIJKLMNOPQRSTUVWXYZ'),
(True, '0123456789'),
(True, '!#$%&()*+-?@_|'),
])
def test_is_valid(self, valid, password):
validator = PasswordValidator(password)
assert_equal(valid, validator.is_valid())We start by testing the is_valid method. We test whether or not it returns False when it's fed an empty string, as well as a string made up of only spaces, which makes sure we're testing whether we're calling .strip() when we assign the password.
Then, we use all the characters that we want to be accepted to make sure the function accepts them.
I understand the syntax behind the parameterize.expand decorator can be challenging at first but really, all there is to it is that each tuple consists of an independent test case which, in turn, means that the test_is_valid test is run individually for each tuple, and that the two tuple elements are passed to the method as arguments: valid and password.
We then test for invalid characters. We expect them all to fail so we use param.explicit, which runs the test for each of the characters in that weird string.
@parameterized.expand(
param.explicit(char) for char in '>]{<`\\;,[^/"\'~:}=.'
)
def test_is_valid_invalid_chars(self, password):
validator = PasswordValidator(password)
assert_equal(False, validator.is_valid())They all evaluate to False, so we're good.
@parameterized.expand([
(0, ''), # 0-3: score 0
(0, 'a'), # 0-3: score 0
(0, 'aa'), # 0-3: score 0
(0, 'aaa'), # 0-3: score 0
(1, 'aaab'), # 4-7: score 1
...
(5, 'aaabbbbccccddd'), # 12-15: score 5
(5, 'aaabbbbccccdddd'), # 12-15: score 5
])
def test__score_length(self, score, password):
validator = PasswordValidator(password)
assert_equal(score, validator._score_length())To test the _score_length method, I created 16 test cases for the lengths from 0 to 15. The body of the test simply makes sure that the score is assigned appropriately.
def test__score_length_sixteen_plus(self):
# all password whose length is 16+ score 7 points
password = 'x' * 255
for length in range(16, len(password)):
validator = PasswordValidator(password[:length])
assert_equal(7, validator._score_length())The preceding test is for lengths from 16 to 254. We only need to make sure that any length after 15 gets 7 as a score.
I will skip over the tests for the other internal methods and jump directly to the one for the score method. In order to test it, I want to control exactly what is returned by each of the _score_* methods so I mock them out and in the test, I set a return value for each of them. Note that to mock methods of a class, we use a variant of patch: patch.object. When you set return values on mocks, it's never good to have repetitions because you may not be sure which method returned what, and the test wouldn't fail in the case of a swap. So, always return different values. In my case, I am using the first few prime numbers to be sure there is no possibility of confusion.
@patch.object(PasswordValidator, '_score_length')
@patch.object(PasswordValidator, '_score_case')
@patch.object(PasswordValidator, '_score_numbers')
@patch.object(PasswordValidator, '_score_special')
@patch.object(PasswordValidator, '_score_ratio')
def test_score(
self,
_score_ratio_mock,
_score_special_mock,
_score_numbers_mock,
_score_case_mock,
_score_length_mock):
_score_ratio_mock.return_value = 2
_score_special_mock.return_value = 3
_score_numbers_mock.return_value = 5
_score_case_mock.return_value = 7
_score_length_mock.return_value = 11
expected_result = {
'length': 11,
'case': 7,
'numbers': 5,
'special': 3,
'ratio': 2,
'total': 28,
}
validator = PasswordValidator('')
assert_dict_equal(expected_result, validator.score())I want to point out explicitly that the _score_* methods are mocked, so I set up my validator instance by passing an empty string to the class constructor. This makes it even more evident to the reader that the internals of the class have been mocked out. Then, I just check if the result is the same as what I was expecting.
This last test is the only one in this class in which I used mocks. All the other tests for the _score_* methods are in an interface style, which reads better and usually produces better results.
Let's briefly see one example of a test for a handler:
pwdapi/tests/test_core/test_handlers.py
import json
from unittest.mock import patch
from nose.tools import assert_dict_equal, assert_equal
import falcon
import falcon.testing as testing
from core.handlers import (
PasswordValidatorHandler, PasswordGeneratorHandler)
class PGHTest(PasswordGeneratorHandler):
def process_request(self, req, resp):
self.req, self.resp = req, resp
return super(PGHTest, self).process_request(req, resp)
class PVHTest(PasswordValidatorHandler):
def process_request(self, req, resp):
self.req, self.resp = req, resp
return super(PVHTest, self).process_request(req, resp)Because of the tools Falcon gives you to test your handlers, I created a child for each of the classes I wanted to test. The only thing I changed (by overriding a method) is that in the process_request method, which is called by both classes, before processing the request I make sure I set the req and resp arguments on the instance. The normal behavior of the process_request method is thus not altered in any other way. By doing this, whatever happens over the course of the test, I'll be able to check against those objects.
It's quite common to use tricks like this when testing. We never change the code to adapt for a test, it would be bad practice. We find a way of adapting our tests to suit our needs.
class TestPasswordValidatorHandler(testing.TestBase):
def before(self):
self.resource = PVHTest()
self.api.add_route('/password/validate/', self.resource)The before method is called by the Falcon TestBase logic, and it allows us to set up the resource we want to test (the handler) and a route for it (which is not necessarily the same as the one we use in production).
def test_post(self):
self.simulate_request(
'/password/validate/',
body=json.dumps({'password': 'abcABC0123#&'}),
method='POST')
resp = self.resource.resp
assert_equal('200 OK', resp.status)
assert_dict_equal(
{'password': 'abcABC0123#&',
'score': {'case': 3, 'length': 5, 'numbers': 2,
'special': 4, 'ratio': 2, 'total': 16},
'valid': True},
json.loads(resp.body))This is the test for the happy path. All it does is simulate a POST request with a JSON payload as body. Then, we inspect the response object. In particular, we inspect its status and its body. We make sure that the handler has correctly called the validator and returned its results.
We also test the generator handler:
class TestPasswordGeneratorHandler(testing.TestBase):
def before(self):
self.resource = PGHTest()
self.api.add_route('/password/generate/', self.resource)
@patch('core.handlers.PasswordGenerator')
def test_get(self, PasswordGenerator):
PasswordGenerator.generate.return_value = (7, 'abc123')
self.simulate_request(
'/password/generate/',
query_string='length=7',
method='GET')
resp = self.resource.resp
assert_equal('200 OK', resp.status)
assert_equal([7, 'abc123'], json.loads(resp.body))For this one as well, I will only show you the test for the happy path. We mock out the PasswordGenerator class because we need to control which password it will generate and, unless we mock, we won't be able to do it, as it is a random process.
Once we have correctly set up its return value, we can simulate the request again. In this case, it's a GET request, with a desired length of 7. We use a technique similar to the one we used for the other handler, and check the response status and body.
These are not the only tests you could write against the API, and the style could be different as well. Some people mock often, I tend to mock only when I really have to. Just try to see if you can make some sense out of them. I know they're not really easy but they'll be good training for you. Tests are extremely important so give it your best shot.
Coding the password validator handler
This handler will have to respond to a POST request, therefore I have coded an on_post method, which is the way you react to a POST request in Falcon.
class PasswordValidatorHandler(HeaderMixin):
def on_post(self, req, resp):
self.process_request(req, resp)
password = req.context.get('_body', {}).get('password')
if password is None:
resp.status = falcon.HTTP_BAD_REQUEST
return None
result = self.parse_password(password)
resp.body = json.dumps(result)
def parse_password(self, password):
validator = PasswordValidator(password)
return {
'password': password,
'valid': validator.is_valid(),
'score': validator.score(),
}
def process_request(self, req, resp):
self.set_access_control_allow_origin(resp)
body = req.stream.read()
if not body:
raise falcon.HTTPBadRequest('Empty request body',
'A valid JSON document is required.')
try:
req.context['_body'] = json.loads(
body.decode('utf-8'))
except (ValueError, UnicodeDecodeError):
raise falcon.HTTPError(
falcon.HTTP_753, 'Malformed JSON',
'JSON incorrect or not utf-8 encoded.')Let's start with the on_post method. First of all, we call the process_request method, which does a sanity check on the request body. I won't go into finest detail because it's taken from the Falcon documentation, and it's a standard way of processing a request. Let's just say that, if everything goes well (the highlighted part), we get the body of the request (already decoded from JSON) in req.context['_body']. If things go badly for any reason, we return an appropriate error response.
Let's go back to on_post. We fetch the password from the request context. At this point, process_request has succeeded, but we still don't know if the body was in the correct format. We're expecting something like: {'password': 'my_password'}.
So we proceed with caution. We get the value for the '_body' key and, if that is not present, we return an empty dict. We get the value for 'password' from that. We use get instead of direct access to avoid KeyError issues.
If the password is None, we simply return a 400 error (bad request). Otherwise, we validate it and calculate its score, and then set the result as the body of our response.
You can see how easy it is to validate and calculate the score of the password in the parse_password method, by using our helpers.
We return a dict with three pieces of information: password, valid, and score. The password information is technically redundant because whoever made the request would know the password but, in this case, I think it's a good way of providing enough information for things such as logging, so I added it.
What happens if the JSON-decoded body is not a dict? I will leave it up to you to fix the code, adding some logic to cater for that edge case.
The generator handler has to handle a GET request with one query parameter: the desired password length.
class PasswordGeneratorHandler(HeaderMixin):
def on_get(self, req, resp):
self.process_request(req, resp)
length = req.context.get('_length', 16)
resp.body = json.dumps(
PasswordGenerator.generate(length))
def process_request(self, req, resp):
self.set_access_control_allow_origin(resp)
length = req.get_param('length')
if length is None:
return
try:
length = int(length)
assert length > 0
req.context['_length'] = length
except (ValueError, TypeError, AssertionError):
raise falcon.HTTPBadRequest('Wrong query parameter',
'`length` must be a positive integer.')We have a similar process_request method. It does a sanity check on the request, even though a bit differently from the previous handler. This time, we need to make sure that if the length is provided on the query string (which means, for example, http://our-api-url/?length=23), it's in the correct format. This means that length needs to be a positive integer.
So, to validate that, we do an int conversion (req.get_param('length') returns a string), then we assert that length is greater than zero and, finally, we put it in context under the '_length' key.
Doing the int conversion of a string which is not a suitable representation for an integer raises ValueError, while a conversion from a type that is not a string raises TypeError, therefore we catch those two in the except clause.
We also catch AssertionError, which is raised by the assert length > 0 line when length is not a positive integer. We can then safely guarantee that the length is as desired with one single try/except block.
Tip
Note that, when coding a try/except block, you should usually try and be as specific as possible, separating instructions that would raise different exceptions if a problem arose. This would allow you more control over the issue, and easier debugging. In this case though, since this is a simple API, it's fine to have code which only reacts to a request for which length is not in the right format.
The code for the on_get method is quite straightforward. It starts by processing the request, then the length is fetched, falling back to 16 (the default value) when it's not passed, and then a password is generated and dumped to JSON, and then set to be the body of the response.
In order to run this application, you need to remember that we set the base URL in the interface to http://127.0.0.1:5555. Therefore, we need the following command to start the API:
$ gunicorn -b 127.0.0.1:5555 main:app
Running that will start the app defined in the main module, binding the server instance to port 5555 on localhost. For more information about Gunicorn, please refer to either Chapter 10, Web Development Done Right or directly to the project's home page (http://gunicorn.org/).
The code for the API is now complete so if you have both the interface and the API running, you can try them out together. See if everything works as expected.
In this section, let's take a look at the tests I wrote for the helpers and for the handlers. Tests for the helpers are heavily based on the nose_parameterized library, as my favorite testing style is interface testing, with as little patching as possible. Using nose_parameterized allows me to write tests that are easier to read because the test cases are very visible.
On the other hand, tests for the handlers have to follow the testing conventions for the Falcon library, so they will be a bit different. This is, of course, ideal since it allows me to show you even more.
Due to the limited amount of pages I have left, I'll show you only a part of the tests, so make sure you check them out in full in the source code.
Let's see the tests for the PasswordGenerator class:
tests/test_core/test_passwords.py
class PasswordGeneratorTestCase(TestCase):
def test__generate_password_length(self):
for length in range(300):
assert_equal(
length,
len(PasswordGenerator._generate_password(length))
)
def test__generate_password_validity(self):
for length in range(1, 300):
password = PasswordGenerator._generate_password(
length)
assert_true(PasswordValidator(password).is_valid())
def test__generate_candidate(self):
score, password = (
PasswordGenerator._generate_candidate(42))
expected_score = PasswordValidator(password).score()
assert_equal(expected_score['total'], score)
@patch.object(PasswordGenerator, '_generate_candidate')
def test__generate(self, _generate_candidate_mock):
# checks `generate` returns the highest score candidate
_generate_candidate_mock.side_effect = [
(16, '&a69Ly+0H4jZ'),
(17, 'UXaF4stRfdlh'),
(21, 'aB4Ge_KdTgwR'), # the winner
(12, 'IRLT*XEfcglm'),
(16, '$P92-WZ5+DnG'),
(18, 'Xi#36jcKA_qQ'),
(19, '?p9avQzRMIK0'),
(17, '4@sY&bQ9*H!+'),
(12, 'Cx-QAYXG_Ejq'),
(18, 'C)RAV(HP7j9n'),
]
assert_equal(
(21, 'aB4Ge_KdTgwR'), PasswordGenerator.generate(12))Within test__generate_password_length we make sure the _generate_password method handles the length parameter correctly. We generate a password for each length in the range [0, 300), and verify that it has the correct length.
In the test__generate_password_validity test, we do something similar but, this time, we make sure that whatever length we ask for, the generated password is valid. We use the PasswordValidator class to check for validity.
Finally, we need to test the generate method. The password generation is random, therefore, in order to test this function, we need to mock _generate_candidate, thus controlling its output. We set the side_effect argument on its mock to be a list of 10 candidates, from which we expect the generate method to choose the one with the highest score. Setting side_effect on a mock to a list causes that mock to return the elements of that list, one at a time, each time it's called. To avoid ambiguity, the highest score is 21, and only one candidate has scored that high. We call the method and make sure that that particular one is the candidate which is returned.
Testing the PasswordValidator class requires many more lines of code, so I'll show only a portion of these tests:
pwdapi/tests/test_core/test_passwords.py
from unittest import TestCase
from unittest.mock import patch
from nose_parameterized import parameterized, param
from nose.tools import (
assert_equal, assert_dict_equal, assert_true)
from core.passwords import PasswordValidator, PasswordGenerator
class PasswordValidatorTestCase(TestCase):
@parameterized.expand([
(False, ''),
(False, ' '),
(True, 'abcdefghijklmnopqrstuvwxyz'),
(True, 'ABCDEFGHIJKLMNOPQRSTUVWXYZ'),
(True, '0123456789'),
(True, '!#$%&()*+-?@_|'),
])
def test_is_valid(self, valid, password):
validator = PasswordValidator(password)
assert_equal(valid, validator.is_valid())We start by testing the is_valid method. We test whether or not it returns False when it's fed an empty string, as well as a string made up of only spaces, which makes sure we're testing whether we're calling .strip() when we assign the password.
Then, we use all the characters that we want to be accepted to make sure the function accepts them.
I understand the syntax behind the parameterize.expand decorator can be challenging at first but really, all there is to it is that each tuple consists of an independent test case which, in turn, means that the test_is_valid test is run individually for each tuple, and that the two tuple elements are passed to the method as arguments: valid and password.
We then test for invalid characters. We expect them all to fail so we use param.explicit, which runs the test for each of the characters in that weird string.
@parameterized.expand(
param.explicit(char) for char in '>]{<`\\;,[^/"\'~:}=.'
)
def test_is_valid_invalid_chars(self, password):
validator = PasswordValidator(password)
assert_equal(False, validator.is_valid())They all evaluate to False, so we're good.
@parameterized.expand([
(0, ''), # 0-3: score 0
(0, 'a'), # 0-3: score 0
(0, 'aa'), # 0-3: score 0
(0, 'aaa'), # 0-3: score 0
(1, 'aaab'), # 4-7: score 1
...
(5, 'aaabbbbccccddd'), # 12-15: score 5
(5, 'aaabbbbccccdddd'), # 12-15: score 5
])
def test__score_length(self, score, password):
validator = PasswordValidator(password)
assert_equal(score, validator._score_length())To test the _score_length method, I created 16 test cases for the lengths from 0 to 15. The body of the test simply makes sure that the score is assigned appropriately.
def test__score_length_sixteen_plus(self):
# all password whose length is 16+ score 7 points
password = 'x' * 255
for length in range(16, len(password)):
validator = PasswordValidator(password[:length])
assert_equal(7, validator._score_length())The preceding test is for lengths from 16 to 254. We only need to make sure that any length after 15 gets 7 as a score.
I will skip over the tests for the other internal methods and jump directly to the one for the score method. In order to test it, I want to control exactly what is returned by each of the _score_* methods so I mock them out and in the test, I set a return value for each of them. Note that to mock methods of a class, we use a variant of patch: patch.object. When you set return values on mocks, it's never good to have repetitions because you may not be sure which method returned what, and the test wouldn't fail in the case of a swap. So, always return different values. In my case, I am using the first few prime numbers to be sure there is no possibility of confusion.
@patch.object(PasswordValidator, '_score_length')
@patch.object(PasswordValidator, '_score_case')
@patch.object(PasswordValidator, '_score_numbers')
@patch.object(PasswordValidator, '_score_special')
@patch.object(PasswordValidator, '_score_ratio')
def test_score(
self,
_score_ratio_mock,
_score_special_mock,
_score_numbers_mock,
_score_case_mock,
_score_length_mock):
_score_ratio_mock.return_value = 2
_score_special_mock.return_value = 3
_score_numbers_mock.return_value = 5
_score_case_mock.return_value = 7
_score_length_mock.return_value = 11
expected_result = {
'length': 11,
'case': 7,
'numbers': 5,
'special': 3,
'ratio': 2,
'total': 28,
}
validator = PasswordValidator('')
assert_dict_equal(expected_result, validator.score())I want to point out explicitly that the _score_* methods are mocked, so I set up my validator instance by passing an empty string to the class constructor. This makes it even more evident to the reader that the internals of the class have been mocked out. Then, I just check if the result is the same as what I was expecting.
This last test is the only one in this class in which I used mocks. All the other tests for the _score_* methods are in an interface style, which reads better and usually produces better results.
Let's briefly see one example of a test for a handler:
pwdapi/tests/test_core/test_handlers.py
import json
from unittest.mock import patch
from nose.tools import assert_dict_equal, assert_equal
import falcon
import falcon.testing as testing
from core.handlers import (
PasswordValidatorHandler, PasswordGeneratorHandler)
class PGHTest(PasswordGeneratorHandler):
def process_request(self, req, resp):
self.req, self.resp = req, resp
return super(PGHTest, self).process_request(req, resp)
class PVHTest(PasswordValidatorHandler):
def process_request(self, req, resp):
self.req, self.resp = req, resp
return super(PVHTest, self).process_request(req, resp)Because of the tools Falcon gives you to test your handlers, I created a child for each of the classes I wanted to test. The only thing I changed (by overriding a method) is that in the process_request method, which is called by both classes, before processing the request I make sure I set the req and resp arguments on the instance. The normal behavior of the process_request method is thus not altered in any other way. By doing this, whatever happens over the course of the test, I'll be able to check against those objects.
It's quite common to use tricks like this when testing. We never change the code to adapt for a test, it would be bad practice. We find a way of adapting our tests to suit our needs.
class TestPasswordValidatorHandler(testing.TestBase):
def before(self):
self.resource = PVHTest()
self.api.add_route('/password/validate/', self.resource)The before method is called by the Falcon TestBase logic, and it allows us to set up the resource we want to test (the handler) and a route for it (which is not necessarily the same as the one we use in production).
def test_post(self):
self.simulate_request(
'/password/validate/',
body=json.dumps({'password': 'abcABC0123#&'}),
method='POST')
resp = self.resource.resp
assert_equal('200 OK', resp.status)
assert_dict_equal(
{'password': 'abcABC0123#&',
'score': {'case': 3, 'length': 5, 'numbers': 2,
'special': 4, 'ratio': 2, 'total': 16},
'valid': True},
json.loads(resp.body))This is the test for the happy path. All it does is simulate a POST request with a JSON payload as body. Then, we inspect the response object. In particular, we inspect its status and its body. We make sure that the handler has correctly called the validator and returned its results.
We also test the generator handler:
class TestPasswordGeneratorHandler(testing.TestBase):
def before(self):
self.resource = PGHTest()
self.api.add_route('/password/generate/', self.resource)
@patch('core.handlers.PasswordGenerator')
def test_get(self, PasswordGenerator):
PasswordGenerator.generate.return_value = (7, 'abc123')
self.simulate_request(
'/password/generate/',
query_string='length=7',
method='GET')
resp = self.resource.resp
assert_equal('200 OK', resp.status)
assert_equal([7, 'abc123'], json.loads(resp.body))For this one as well, I will only show you the test for the happy path. We mock out the PasswordGenerator class because we need to control which password it will generate and, unless we mock, we won't be able to do it, as it is a random process.
Once we have correctly set up its return value, we can simulate the request again. In this case, it's a GET request, with a desired length of 7. We use a technique similar to the one we used for the other handler, and check the response status and body.
These are not the only tests you could write against the API, and the style could be different as well. Some people mock often, I tend to mock only when I really have to. Just try to see if you can make some sense out of them. I know they're not really easy but they'll be good training for you. Tests are extremely important so give it your best shot.
Coding the password generator handler
The generator handler has to handle a GET request with one query parameter: the desired password length.
class PasswordGeneratorHandler(HeaderMixin):
def on_get(self, req, resp):
self.process_request(req, resp)
length = req.context.get('_length', 16)
resp.body = json.dumps(
PasswordGenerator.generate(length))
def process_request(self, req, resp):
self.set_access_control_allow_origin(resp)
length = req.get_param('length')
if length is None:
return
try:
length = int(length)
assert length > 0
req.context['_length'] = length
except (ValueError, TypeError, AssertionError):
raise falcon.HTTPBadRequest('Wrong query parameter',
'`length` must be a positive integer.')We have a similar process_request method. It does a sanity check on the request, even though a bit differently from the previous handler. This time, we need to make sure that if the length is provided on the query string (which means, for example, http://our-api-url/?length=23), it's in the correct format. This means that length needs to be a positive integer.
So, to validate that, we do an int conversion (req.get_param('length') returns a string), then we assert that length is greater than zero and, finally, we put it in context under the '_length' key.
Doing the int conversion of a string which is not a suitable representation for an integer raises ValueError, while a conversion from a type that is not a string raises TypeError, therefore we catch those two in the except clause.
We also catch AssertionError, which is raised by the assert length > 0 line when length is not a positive integer. We can then safely guarantee that the length is as desired with one single try/except block.
Tip
Note that, when coding a try/except block, you should usually try and be as specific as possible, separating instructions that would raise different exceptions if a problem arose. This would allow you more control over the issue, and easier debugging. In this case though, since this is a simple API, it's fine to have code which only reacts to a request for which length is not in the right format.
The code for the on_get method is quite straightforward. It starts by processing the request, then the length is fetched, falling back to 16 (the default value) when it's not passed, and then a password is generated and dumped to JSON, and then set to be the body of the response.
In order to run this application, you need to remember that we set the base URL in the interface to http://127.0.0.1:5555. Therefore, we need the following command to start the API:
$ gunicorn -b 127.0.0.1:5555 main:app
Running that will start the app defined in the main module, binding the server instance to port 5555 on localhost. For more information about Gunicorn, please refer to either Chapter 10, Web Development Done Right or directly to the project's home page (http://gunicorn.org/).
The code for the API is now complete so if you have both the interface and the API running, you can try them out together. See if everything works as expected.
In this section, let's take a look at the tests I wrote for the helpers and for the handlers. Tests for the helpers are heavily based on the nose_parameterized library, as my favorite testing style is interface testing, with as little patching as possible. Using nose_parameterized allows me to write tests that are easier to read because the test cases are very visible.
On the other hand, tests for the handlers have to follow the testing conventions for the Falcon library, so they will be a bit different. This is, of course, ideal since it allows me to show you even more.
Due to the limited amount of pages I have left, I'll show you only a part of the tests, so make sure you check them out in full in the source code.
Let's see the tests for the PasswordGenerator class:
tests/test_core/test_passwords.py
class PasswordGeneratorTestCase(TestCase):
def test__generate_password_length(self):
for length in range(300):
assert_equal(
length,
len(PasswordGenerator._generate_password(length))
)
def test__generate_password_validity(self):
for length in range(1, 300):
password = PasswordGenerator._generate_password(
length)
assert_true(PasswordValidator(password).is_valid())
def test__generate_candidate(self):
score, password = (
PasswordGenerator._generate_candidate(42))
expected_score = PasswordValidator(password).score()
assert_equal(expected_score['total'], score)
@patch.object(PasswordGenerator, '_generate_candidate')
def test__generate(self, _generate_candidate_mock):
# checks `generate` returns the highest score candidate
_generate_candidate_mock.side_effect = [
(16, '&a69Ly+0H4jZ'),
(17, 'UXaF4stRfdlh'),
(21, 'aB4Ge_KdTgwR'), # the winner
(12, 'IRLT*XEfcglm'),
(16, '$P92-WZ5+DnG'),
(18, 'Xi#36jcKA_qQ'),
(19, '?p9avQzRMIK0'),
(17, '4@sY&bQ9*H!+'),
(12, 'Cx-QAYXG_Ejq'),
(18, 'C)RAV(HP7j9n'),
]
assert_equal(
(21, 'aB4Ge_KdTgwR'), PasswordGenerator.generate(12))Within test__generate_password_length we make sure the _generate_password method handles the length parameter correctly. We generate a password for each length in the range [0, 300), and verify that it has the correct length.
In the test__generate_password_validity test, we do something similar but, this time, we make sure that whatever length we ask for, the generated password is valid. We use the PasswordValidator class to check for validity.
Finally, we need to test the generate method. The password generation is random, therefore, in order to test this function, we need to mock _generate_candidate, thus controlling its output. We set the side_effect argument on its mock to be a list of 10 candidates, from which we expect the generate method to choose the one with the highest score. Setting side_effect on a mock to a list causes that mock to return the elements of that list, one at a time, each time it's called. To avoid ambiguity, the highest score is 21, and only one candidate has scored that high. We call the method and make sure that that particular one is the candidate which is returned.
Testing the PasswordValidator class requires many more lines of code, so I'll show only a portion of these tests:
pwdapi/tests/test_core/test_passwords.py
from unittest import TestCase
from unittest.mock import patch
from nose_parameterized import parameterized, param
from nose.tools import (
assert_equal, assert_dict_equal, assert_true)
from core.passwords import PasswordValidator, PasswordGenerator
class PasswordValidatorTestCase(TestCase):
@parameterized.expand([
(False, ''),
(False, ' '),
(True, 'abcdefghijklmnopqrstuvwxyz'),
(True, 'ABCDEFGHIJKLMNOPQRSTUVWXYZ'),
(True, '0123456789'),
(True, '!#$%&()*+-?@_|'),
])
def test_is_valid(self, valid, password):
validator = PasswordValidator(password)
assert_equal(valid, validator.is_valid())We start by testing the is_valid method. We test whether or not it returns False when it's fed an empty string, as well as a string made up of only spaces, which makes sure we're testing whether we're calling .strip() when we assign the password.
Then, we use all the characters that we want to be accepted to make sure the function accepts them.
I understand the syntax behind the parameterize.expand decorator can be challenging at first but really, all there is to it is that each tuple consists of an independent test case which, in turn, means that the test_is_valid test is run individually for each tuple, and that the two tuple elements are passed to the method as arguments: valid and password.
We then test for invalid characters. We expect them all to fail so we use param.explicit, which runs the test for each of the characters in that weird string.
@parameterized.expand(
param.explicit(char) for char in '>]{<`\\;,[^/"\'~:}=.'
)
def test_is_valid_invalid_chars(self, password):
validator = PasswordValidator(password)
assert_equal(False, validator.is_valid())They all evaluate to False, so we're good.
@parameterized.expand([
(0, ''), # 0-3: score 0
(0, 'a'), # 0-3: score 0
(0, 'aa'), # 0-3: score 0
(0, 'aaa'), # 0-3: score 0
(1, 'aaab'), # 4-7: score 1
...
(5, 'aaabbbbccccddd'), # 12-15: score 5
(5, 'aaabbbbccccdddd'), # 12-15: score 5
])
def test__score_length(self, score, password):
validator = PasswordValidator(password)
assert_equal(score, validator._score_length())To test the _score_length method, I created 16 test cases for the lengths from 0 to 15. The body of the test simply makes sure that the score is assigned appropriately.
def test__score_length_sixteen_plus(self):
# all password whose length is 16+ score 7 points
password = 'x' * 255
for length in range(16, len(password)):
validator = PasswordValidator(password[:length])
assert_equal(7, validator._score_length())The preceding test is for lengths from 16 to 254. We only need to make sure that any length after 15 gets 7 as a score.
I will skip over the tests for the other internal methods and jump directly to the one for the score method. In order to test it, I want to control exactly what is returned by each of the _score_* methods so I mock them out and in the test, I set a return value for each of them. Note that to mock methods of a class, we use a variant of patch: patch.object. When you set return values on mocks, it's never good to have repetitions because you may not be sure which method returned what, and the test wouldn't fail in the case of a swap. So, always return different values. In my case, I am using the first few prime numbers to be sure there is no possibility of confusion.
@patch.object(PasswordValidator, '_score_length')
@patch.object(PasswordValidator, '_score_case')
@patch.object(PasswordValidator, '_score_numbers')
@patch.object(PasswordValidator, '_score_special')
@patch.object(PasswordValidator, '_score_ratio')
def test_score(
self,
_score_ratio_mock,
_score_special_mock,
_score_numbers_mock,
_score_case_mock,
_score_length_mock):
_score_ratio_mock.return_value = 2
_score_special_mock.return_value = 3
_score_numbers_mock.return_value = 5
_score_case_mock.return_value = 7
_score_length_mock.return_value = 11
expected_result = {
'length': 11,
'case': 7,
'numbers': 5,
'special': 3,
'ratio': 2,
'total': 28,
}
validator = PasswordValidator('')
assert_dict_equal(expected_result, validator.score())I want to point out explicitly that the _score_* methods are mocked, so I set up my validator instance by passing an empty string to the class constructor. This makes it even more evident to the reader that the internals of the class have been mocked out. Then, I just check if the result is the same as what I was expecting.
This last test is the only one in this class in which I used mocks. All the other tests for the _score_* methods are in an interface style, which reads better and usually produces better results.
Let's briefly see one example of a test for a handler:
pwdapi/tests/test_core/test_handlers.py
import json
from unittest.mock import patch
from nose.tools import assert_dict_equal, assert_equal
import falcon
import falcon.testing as testing
from core.handlers import (
PasswordValidatorHandler, PasswordGeneratorHandler)
class PGHTest(PasswordGeneratorHandler):
def process_request(self, req, resp):
self.req, self.resp = req, resp
return super(PGHTest, self).process_request(req, resp)
class PVHTest(PasswordValidatorHandler):
def process_request(self, req, resp):
self.req, self.resp = req, resp
return super(PVHTest, self).process_request(req, resp)Because of the tools Falcon gives you to test your handlers, I created a child for each of the classes I wanted to test. The only thing I changed (by overriding a method) is that in the process_request method, which is called by both classes, before processing the request I make sure I set the req and resp arguments on the instance. The normal behavior of the process_request method is thus not altered in any other way. By doing this, whatever happens over the course of the test, I'll be able to check against those objects.
It's quite common to use tricks like this when testing. We never change the code to adapt for a test, it would be bad practice. We find a way of adapting our tests to suit our needs.
class TestPasswordValidatorHandler(testing.TestBase):
def before(self):
self.resource = PVHTest()
self.api.add_route('/password/validate/', self.resource)The before method is called by the Falcon TestBase logic, and it allows us to set up the resource we want to test (the handler) and a route for it (which is not necessarily the same as the one we use in production).
def test_post(self):
self.simulate_request(
'/password/validate/',
body=json.dumps({'password': 'abcABC0123#&'}),
method='POST')
resp = self.resource.resp
assert_equal('200 OK', resp.status)
assert_dict_equal(
{'password': 'abcABC0123#&',
'score': {'case': 3, 'length': 5, 'numbers': 2,
'special': 4, 'ratio': 2, 'total': 16},
'valid': True},
json.loads(resp.body))This is the test for the happy path. All it does is simulate a POST request with a JSON payload as body. Then, we inspect the response object. In particular, we inspect its status and its body. We make sure that the handler has correctly called the validator and returned its results.
We also test the generator handler:
class TestPasswordGeneratorHandler(testing.TestBase):
def before(self):
self.resource = PGHTest()
self.api.add_route('/password/generate/', self.resource)
@patch('core.handlers.PasswordGenerator')
def test_get(self, PasswordGenerator):
PasswordGenerator.generate.return_value = (7, 'abc123')
self.simulate_request(
'/password/generate/',
query_string='length=7',
method='GET')
resp = self.resource.resp
assert_equal('200 OK', resp.status)
assert_equal([7, 'abc123'], json.loads(resp.body))For this one as well, I will only show you the test for the happy path. We mock out the PasswordGenerator class because we need to control which password it will generate and, unless we mock, we won't be able to do it, as it is a random process.
Once we have correctly set up its return value, we can simulate the request again. In this case, it's a GET request, with a desired length of 7. We use a technique similar to the one we used for the other handler, and check the response status and body.
These are not the only tests you could write against the API, and the style could be different as well. Some people mock often, I tend to mock only when I really have to. Just try to see if you can make some sense out of them. I know they're not really easy but they'll be good training for you. Tests are extremely important so give it your best shot.
Running the API
In order to run this application, you need to remember that we set the base URL in the interface to http://127.0.0.1:5555. Therefore, we need the following command to start the API:
$ gunicorn -b 127.0.0.1:5555 main:app
Running that will start the app defined in the main module, binding the server instance to port 5555 on localhost. For more information about Gunicorn, please refer to either Chapter 10, Web Development Done Right or directly to the project's home page (http://gunicorn.org/).
The code for the API is now complete so if you have both the interface and the API running, you can try them out together. See if everything works as expected.
In this section, let's take a look at the tests I wrote for the helpers and for the handlers. Tests for the helpers are heavily based on the nose_parameterized library, as my favorite testing style is interface testing, with as little patching as possible. Using nose_parameterized allows me to write tests that are easier to read because the test cases are very visible.
On the other hand, tests for the handlers have to follow the testing conventions for the Falcon library, so they will be a bit different. This is, of course, ideal since it allows me to show you even more.
Due to the limited amount of pages I have left, I'll show you only a part of the tests, so make sure you check them out in full in the source code.
Let's see the tests for the PasswordGenerator class:
tests/test_core/test_passwords.py
class PasswordGeneratorTestCase(TestCase):
def test__generate_password_length(self):
for length in range(300):
assert_equal(
length,
len(PasswordGenerator._generate_password(length))
)
def test__generate_password_validity(self):
for length in range(1, 300):
password = PasswordGenerator._generate_password(
length)
assert_true(PasswordValidator(password).is_valid())
def test__generate_candidate(self):
score, password = (
PasswordGenerator._generate_candidate(42))
expected_score = PasswordValidator(password).score()
assert_equal(expected_score['total'], score)
@patch.object(PasswordGenerator, '_generate_candidate')
def test__generate(self, _generate_candidate_mock):
# checks `generate` returns the highest score candidate
_generate_candidate_mock.side_effect = [
(16, '&a69Ly+0H4jZ'),
(17, 'UXaF4stRfdlh'),
(21, 'aB4Ge_KdTgwR'), # the winner
(12, 'IRLT*XEfcglm'),
(16, '$P92-WZ5+DnG'),
(18, 'Xi#36jcKA_qQ'),
(19, '?p9avQzRMIK0'),
(17, '4@sY&bQ9*H!+'),
(12, 'Cx-QAYXG_Ejq'),
(18, 'C)RAV(HP7j9n'),
]
assert_equal(
(21, 'aB4Ge_KdTgwR'), PasswordGenerator.generate(12))Within test__generate_password_length we make sure the _generate_password method handles the length parameter correctly. We generate a password for each length in the range [0, 300), and verify that it has the correct length.
In the test__generate_password_validity test, we do something similar but, this time, we make sure that whatever length we ask for, the generated password is valid. We use the PasswordValidator class to check for validity.
Finally, we need to test the generate method. The password generation is random, therefore, in order to test this function, we need to mock _generate_candidate, thus controlling its output. We set the side_effect argument on its mock to be a list of 10 candidates, from which we expect the generate method to choose the one with the highest score. Setting side_effect on a mock to a list causes that mock to return the elements of that list, one at a time, each time it's called. To avoid ambiguity, the highest score is 21, and only one candidate has scored that high. We call the method and make sure that that particular one is the candidate which is returned.
Testing the PasswordValidator class requires many more lines of code, so I'll show only a portion of these tests:
pwdapi/tests/test_core/test_passwords.py
from unittest import TestCase
from unittest.mock import patch
from nose_parameterized import parameterized, param
from nose.tools import (
assert_equal, assert_dict_equal, assert_true)
from core.passwords import PasswordValidator, PasswordGenerator
class PasswordValidatorTestCase(TestCase):
@parameterized.expand([
(False, ''),
(False, ' '),
(True, 'abcdefghijklmnopqrstuvwxyz'),
(True, 'ABCDEFGHIJKLMNOPQRSTUVWXYZ'),
(True, '0123456789'),
(True, '!#$%&()*+-?@_|'),
])
def test_is_valid(self, valid, password):
validator = PasswordValidator(password)
assert_equal(valid, validator.is_valid())We start by testing the is_valid method. We test whether or not it returns False when it's fed an empty string, as well as a string made up of only spaces, which makes sure we're testing whether we're calling .strip() when we assign the password.
Then, we use all the characters that we want to be accepted to make sure the function accepts them.
I understand the syntax behind the parameterize.expand decorator can be challenging at first but really, all there is to it is that each tuple consists of an independent test case which, in turn, means that the test_is_valid test is run individually for each tuple, and that the two tuple elements are passed to the method as arguments: valid and password.
We then test for invalid characters. We expect them all to fail so we use param.explicit, which runs the test for each of the characters in that weird string.
@parameterized.expand(
param.explicit(char) for char in '>]{<`\\;,[^/"\'~:}=.'
)
def test_is_valid_invalid_chars(self, password):
validator = PasswordValidator(password)
assert_equal(False, validator.is_valid())They all evaluate to False, so we're good.
@parameterized.expand([
(0, ''), # 0-3: score 0
(0, 'a'), # 0-3: score 0
(0, 'aa'), # 0-3: score 0
(0, 'aaa'), # 0-3: score 0
(1, 'aaab'), # 4-7: score 1
...
(5, 'aaabbbbccccddd'), # 12-15: score 5
(5, 'aaabbbbccccdddd'), # 12-15: score 5
])
def test__score_length(self, score, password):
validator = PasswordValidator(password)
assert_equal(score, validator._score_length())To test the _score_length method, I created 16 test cases for the lengths from 0 to 15. The body of the test simply makes sure that the score is assigned appropriately.
def test__score_length_sixteen_plus(self):
# all password whose length is 16+ score 7 points
password = 'x' * 255
for length in range(16, len(password)):
validator = PasswordValidator(password[:length])
assert_equal(7, validator._score_length())The preceding test is for lengths from 16 to 254. We only need to make sure that any length after 15 gets 7 as a score.
I will skip over the tests for the other internal methods and jump directly to the one for the score method. In order to test it, I want to control exactly what is returned by each of the _score_* methods so I mock them out and in the test, I set a return value for each of them. Note that to mock methods of a class, we use a variant of patch: patch.object. When you set return values on mocks, it's never good to have repetitions because you may not be sure which method returned what, and the test wouldn't fail in the case of a swap. So, always return different values. In my case, I am using the first few prime numbers to be sure there is no possibility of confusion.
@patch.object(PasswordValidator, '_score_length')
@patch.object(PasswordValidator, '_score_case')
@patch.object(PasswordValidator, '_score_numbers')
@patch.object(PasswordValidator, '_score_special')
@patch.object(PasswordValidator, '_score_ratio')
def test_score(
self,
_score_ratio_mock,
_score_special_mock,
_score_numbers_mock,
_score_case_mock,
_score_length_mock):
_score_ratio_mock.return_value = 2
_score_special_mock.return_value = 3
_score_numbers_mock.return_value = 5
_score_case_mock.return_value = 7
_score_length_mock.return_value = 11
expected_result = {
'length': 11,
'case': 7,
'numbers': 5,
'special': 3,
'ratio': 2,
'total': 28,
}
validator = PasswordValidator('')
assert_dict_equal(expected_result, validator.score())I want to point out explicitly that the _score_* methods are mocked, so I set up my validator instance by passing an empty string to the class constructor. This makes it even more evident to the reader that the internals of the class have been mocked out. Then, I just check if the result is the same as what I was expecting.
This last test is the only one in this class in which I used mocks. All the other tests for the _score_* methods are in an interface style, which reads better and usually produces better results.
Let's briefly see one example of a test for a handler:
pwdapi/tests/test_core/test_handlers.py
import json
from unittest.mock import patch
from nose.tools import assert_dict_equal, assert_equal
import falcon
import falcon.testing as testing
from core.handlers import (
PasswordValidatorHandler, PasswordGeneratorHandler)
class PGHTest(PasswordGeneratorHandler):
def process_request(self, req, resp):
self.req, self.resp = req, resp
return super(PGHTest, self).process_request(req, resp)
class PVHTest(PasswordValidatorHandler):
def process_request(self, req, resp):
self.req, self.resp = req, resp
return super(PVHTest, self).process_request(req, resp)Because of the tools Falcon gives you to test your handlers, I created a child for each of the classes I wanted to test. The only thing I changed (by overriding a method) is that in the process_request method, which is called by both classes, before processing the request I make sure I set the req and resp arguments on the instance. The normal behavior of the process_request method is thus not altered in any other way. By doing this, whatever happens over the course of the test, I'll be able to check against those objects.
It's quite common to use tricks like this when testing. We never change the code to adapt for a test, it would be bad practice. We find a way of adapting our tests to suit our needs.
class TestPasswordValidatorHandler(testing.TestBase):
def before(self):
self.resource = PVHTest()
self.api.add_route('/password/validate/', self.resource)The before method is called by the Falcon TestBase logic, and it allows us to set up the resource we want to test (the handler) and a route for it (which is not necessarily the same as the one we use in production).
def test_post(self):
self.simulate_request(
'/password/validate/',
body=json.dumps({'password': 'abcABC0123#&'}),
method='POST')
resp = self.resource.resp
assert_equal('200 OK', resp.status)
assert_dict_equal(
{'password': 'abcABC0123#&',
'score': {'case': 3, 'length': 5, 'numbers': 2,
'special': 4, 'ratio': 2, 'total': 16},
'valid': True},
json.loads(resp.body))This is the test for the happy path. All it does is simulate a POST request with a JSON payload as body. Then, we inspect the response object. In particular, we inspect its status and its body. We make sure that the handler has correctly called the validator and returned its results.
We also test the generator handler:
class TestPasswordGeneratorHandler(testing.TestBase):
def before(self):
self.resource = PGHTest()
self.api.add_route('/password/generate/', self.resource)
@patch('core.handlers.PasswordGenerator')
def test_get(self, PasswordGenerator):
PasswordGenerator.generate.return_value = (7, 'abc123')
self.simulate_request(
'/password/generate/',
query_string='length=7',
method='GET')
resp = self.resource.resp
assert_equal('200 OK', resp.status)
assert_equal([7, 'abc123'], json.loads(resp.body))For this one as well, I will only show you the test for the happy path. We mock out the PasswordGenerator class because we need to control which password it will generate and, unless we mock, we won't be able to do it, as it is a random process.
Once we have correctly set up its return value, we can simulate the request again. In this case, it's a GET request, with a desired length of 7. We use a technique similar to the one we used for the other handler, and check the response status and body.
These are not the only tests you could write against the API, and the style could be different as well. Some people mock often, I tend to mock only when I really have to. Just try to see if you can make some sense out of them. I know they're not really easy but they'll be good training for you. Tests are extremely important so give it your best shot.
Testing the API
In this section, let's take a look at the tests I wrote for the helpers and for the handlers. Tests for the helpers are heavily based on the nose_parameterized library, as my favorite testing style is interface testing, with as little patching as possible. Using nose_parameterized allows me to write tests that are easier to read because the test cases are very visible.
On the other hand, tests for the handlers have to follow the testing conventions for the Falcon library, so they will be a bit different. This is, of course, ideal since it allows me to show you even more.
Due to the limited amount of pages I have left, I'll show you only a part of the tests, so make sure you check them out in full in the source code.
Let's see the tests for the PasswordGenerator class:
tests/test_core/test_passwords.py
class PasswordGeneratorTestCase(TestCase):
def test__generate_password_length(self):
for length in range(300):
assert_equal(
length,
len(PasswordGenerator._generate_password(length))
)
def test__generate_password_validity(self):
for length in range(1, 300):
password = PasswordGenerator._generate_password(
length)
assert_true(PasswordValidator(password).is_valid())
def test__generate_candidate(self):
score, password = (
PasswordGenerator._generate_candidate(42))
expected_score = PasswordValidator(password).score()
assert_equal(expected_score['total'], score)
@patch.object(PasswordGenerator, '_generate_candidate')
def test__generate(self, _generate_candidate_mock):
# checks `generate` returns the highest score candidate
_generate_candidate_mock.side_effect = [
(16, '&a69Ly+0H4jZ'),
(17, 'UXaF4stRfdlh'),
(21, 'aB4Ge_KdTgwR'), # the winner
(12, 'IRLT*XEfcglm'),
(16, '$P92-WZ5+DnG'),
(18, 'Xi#36jcKA_qQ'),
(19, '?p9avQzRMIK0'),
(17, '4@sY&bQ9*H!+'),
(12, 'Cx-QAYXG_Ejq'),
(18, 'C)RAV(HP7j9n'),
]
assert_equal(
(21, 'aB4Ge_KdTgwR'), PasswordGenerator.generate(12))Within test__generate_password_length we make sure the _generate_password method handles the length parameter correctly. We generate a password for each length in the range [0, 300), and verify that it has the correct length.
In the test__generate_password_validity test, we do something similar but, this time, we make sure that whatever length we ask for, the generated password is valid. We use the PasswordValidator class to check for validity.
Finally, we need to test the generate method. The password generation is random, therefore, in order to test this function, we need to mock _generate_candidate, thus controlling its output. We set the side_effect argument on its mock to be a list of 10 candidates, from which we expect the generate method to choose the one with the highest score. Setting side_effect on a mock to a list causes that mock to return the elements of that list, one at a time, each time it's called. To avoid ambiguity, the highest score is 21, and only one candidate has scored that high. We call the method and make sure that that particular one is the candidate which is returned.
Testing the PasswordValidator class requires many more lines of code, so I'll show only a portion of these tests:
pwdapi/tests/test_core/test_passwords.py
from unittest import TestCase
from unittest.mock import patch
from nose_parameterized import parameterized, param
from nose.tools import (
assert_equal, assert_dict_equal, assert_true)
from core.passwords import PasswordValidator, PasswordGenerator
class PasswordValidatorTestCase(TestCase):
@parameterized.expand([
(False, ''),
(False, ' '),
(True, 'abcdefghijklmnopqrstuvwxyz'),
(True, 'ABCDEFGHIJKLMNOPQRSTUVWXYZ'),
(True, '0123456789'),
(True, '!#$%&()*+-?@_|'),
])
def test_is_valid(self, valid, password):
validator = PasswordValidator(password)
assert_equal(valid, validator.is_valid())We start by testing the is_valid method. We test whether or not it returns False when it's fed an empty string, as well as a string made up of only spaces, which makes sure we're testing whether we're calling .strip() when we assign the password.
Then, we use all the characters that we want to be accepted to make sure the function accepts them.
I understand the syntax behind the parameterize.expand decorator can be challenging at first but really, all there is to it is that each tuple consists of an independent test case which, in turn, means that the test_is_valid test is run individually for each tuple, and that the two tuple elements are passed to the method as arguments: valid and password.
We then test for invalid characters. We expect them all to fail so we use param.explicit, which runs the test for each of the characters in that weird string.
@parameterized.expand(
param.explicit(char) for char in '>]{<`\\;,[^/"\'~:}=.'
)
def test_is_valid_invalid_chars(self, password):
validator = PasswordValidator(password)
assert_equal(False, validator.is_valid())They all evaluate to False, so we're good.
@parameterized.expand([
(0, ''), # 0-3: score 0
(0, 'a'), # 0-3: score 0
(0, 'aa'), # 0-3: score 0
(0, 'aaa'), # 0-3: score 0
(1, 'aaab'), # 4-7: score 1
...
(5, 'aaabbbbccccddd'), # 12-15: score 5
(5, 'aaabbbbccccdddd'), # 12-15: score 5
])
def test__score_length(self, score, password):
validator = PasswordValidator(password)
assert_equal(score, validator._score_length())To test the _score_length method, I created 16 test cases for the lengths from 0 to 15. The body of the test simply makes sure that the score is assigned appropriately.
def test__score_length_sixteen_plus(self):
# all password whose length is 16+ score 7 points
password = 'x' * 255
for length in range(16, len(password)):
validator = PasswordValidator(password[:length])
assert_equal(7, validator._score_length())The preceding test is for lengths from 16 to 254. We only need to make sure that any length after 15 gets 7 as a score.
I will skip over the tests for the other internal methods and jump directly to the one for the score method. In order to test it, I want to control exactly what is returned by each of the _score_* methods so I mock them out and in the test, I set a return value for each of them. Note that to mock methods of a class, we use a variant of patch: patch.object. When you set return values on mocks, it's never good to have repetitions because you may not be sure which method returned what, and the test wouldn't fail in the case of a swap. So, always return different values. In my case, I am using the first few prime numbers to be sure there is no possibility of confusion.
@patch.object(PasswordValidator, '_score_length')
@patch.object(PasswordValidator, '_score_case')
@patch.object(PasswordValidator, '_score_numbers')
@patch.object(PasswordValidator, '_score_special')
@patch.object(PasswordValidator, '_score_ratio')
def test_score(
self,
_score_ratio_mock,
_score_special_mock,
_score_numbers_mock,
_score_case_mock,
_score_length_mock):
_score_ratio_mock.return_value = 2
_score_special_mock.return_value = 3
_score_numbers_mock.return_value = 5
_score_case_mock.return_value = 7
_score_length_mock.return_value = 11
expected_result = {
'length': 11,
'case': 7,
'numbers': 5,
'special': 3,
'ratio': 2,
'total': 28,
}
validator = PasswordValidator('')
assert_dict_equal(expected_result, validator.score())I want to point out explicitly that the _score_* methods are mocked, so I set up my validator instance by passing an empty string to the class constructor. This makes it even more evident to the reader that the internals of the class have been mocked out. Then, I just check if the result is the same as what I was expecting.
This last test is the only one in this class in which I used mocks. All the other tests for the _score_* methods are in an interface style, which reads better and usually produces better results.
Let's briefly see one example of a test for a handler:
pwdapi/tests/test_core/test_handlers.py
import json
from unittest.mock import patch
from nose.tools import assert_dict_equal, assert_equal
import falcon
import falcon.testing as testing
from core.handlers import (
PasswordValidatorHandler, PasswordGeneratorHandler)
class PGHTest(PasswordGeneratorHandler):
def process_request(self, req, resp):
self.req, self.resp = req, resp
return super(PGHTest, self).process_request(req, resp)
class PVHTest(PasswordValidatorHandler):
def process_request(self, req, resp):
self.req, self.resp = req, resp
return super(PVHTest, self).process_request(req, resp)Because of the tools Falcon gives you to test your handlers, I created a child for each of the classes I wanted to test. The only thing I changed (by overriding a method) is that in the process_request method, which is called by both classes, before processing the request I make sure I set the req and resp arguments on the instance. The normal behavior of the process_request method is thus not altered in any other way. By doing this, whatever happens over the course of the test, I'll be able to check against those objects.
It's quite common to use tricks like this when testing. We never change the code to adapt for a test, it would be bad practice. We find a way of adapting our tests to suit our needs.
class TestPasswordValidatorHandler(testing.TestBase):
def before(self):
self.resource = PVHTest()
self.api.add_route('/password/validate/', self.resource)The before method is called by the Falcon TestBase logic, and it allows us to set up the resource we want to test (the handler) and a route for it (which is not necessarily the same as the one we use in production).
def test_post(self):
self.simulate_request(
'/password/validate/',
body=json.dumps({'password': 'abcABC0123#&'}),
method='POST')
resp = self.resource.resp
assert_equal('200 OK', resp.status)
assert_dict_equal(
{'password': 'abcABC0123#&',
'score': {'case': 3, 'length': 5, 'numbers': 2,
'special': 4, 'ratio': 2, 'total': 16},
'valid': True},
json.loads(resp.body))This is the test for the happy path. All it does is simulate a POST request with a JSON payload as body. Then, we inspect the response object. In particular, we inspect its status and its body. We make sure that the handler has correctly called the validator and returned its results.
We also test the generator handler:
class TestPasswordGeneratorHandler(testing.TestBase):
def before(self):
self.resource = PGHTest()
self.api.add_route('/password/generate/', self.resource)
@patch('core.handlers.PasswordGenerator')
def test_get(self, PasswordGenerator):
PasswordGenerator.generate.return_value = (7, 'abc123')
self.simulate_request(
'/password/generate/',
query_string='length=7',
method='GET')
resp = self.resource.resp
assert_equal('200 OK', resp.status)
assert_equal([7, 'abc123'], json.loads(resp.body))For this one as well, I will only show you the test for the happy path. We mock out the PasswordGenerator class because we need to control which password it will generate and, unless we mock, we won't be able to do it, as it is a random process.
Once we have correctly set up its return value, we can simulate the request again. In this case, it's a GET request, with a desired length of 7. We use a technique similar to the one we used for the other handler, and check the response status and body.
These are not the only tests you could write against the API, and the style could be different as well. Some people mock often, I tend to mock only when I really have to. Just try to see if you can make some sense out of them. I know they're not really easy but they'll be good training for you. Tests are extremely important so give it your best shot.
Testing the helpers
Let's see the tests for the PasswordGenerator class:
tests/test_core/test_passwords.py
class PasswordGeneratorTestCase(TestCase):
def test__generate_password_length(self):
for length in range(300):
assert_equal(
length,
len(PasswordGenerator._generate_password(length))
)
def test__generate_password_validity(self):
for length in range(1, 300):
password = PasswordGenerator._generate_password(
length)
assert_true(PasswordValidator(password).is_valid())
def test__generate_candidate(self):
score, password = (
PasswordGenerator._generate_candidate(42))
expected_score = PasswordValidator(password).score()
assert_equal(expected_score['total'], score)
@patch.object(PasswordGenerator, '_generate_candidate')
def test__generate(self, _generate_candidate_mock):
# checks `generate` returns the highest score candidate
_generate_candidate_mock.side_effect = [
(16, '&a69Ly+0H4jZ'),
(17, 'UXaF4stRfdlh'),
(21, 'aB4Ge_KdTgwR'), # the winner
(12, 'IRLT*XEfcglm'),
(16, '$P92-WZ5+DnG'),
(18, 'Xi#36jcKA_qQ'),
(19, '?p9avQzRMIK0'),
(17, '4@sY&bQ9*H!+'),
(12, 'Cx-QAYXG_Ejq'),
(18, 'C)RAV(HP7j9n'),
]
assert_equal(
(21, 'aB4Ge_KdTgwR'), PasswordGenerator.generate(12))Within test__generate_password_length we make sure the _generate_password method handles the length parameter correctly. We generate a password for each length in the range [0, 300), and verify that it has the correct length.
In the test__generate_password_validity test, we do something similar but, this time, we make sure that whatever length we ask for, the generated password is valid. We use the PasswordValidator class to check for validity.
Finally, we need to test the generate method. The password generation is random, therefore, in order to test this function, we need to mock _generate_candidate, thus controlling its output. We set the side_effect argument on its mock to be a list of 10 candidates, from which we expect the generate method to choose the one with the highest score. Setting side_effect on a mock to a list causes that mock to return the elements of that list, one at a time, each time it's called. To avoid ambiguity, the highest score is 21, and only one candidate has scored that high. We call the method and make sure that that particular one is the candidate which is returned.
Testing the PasswordValidator class requires many more lines of code, so I'll show only a portion of these tests:
pwdapi/tests/test_core/test_passwords.py
from unittest import TestCase
from unittest.mock import patch
from nose_parameterized import parameterized, param
from nose.tools import (
assert_equal, assert_dict_equal, assert_true)
from core.passwords import PasswordValidator, PasswordGenerator
class PasswordValidatorTestCase(TestCase):
@parameterized.expand([
(False, ''),
(False, ' '),
(True, 'abcdefghijklmnopqrstuvwxyz'),
(True, 'ABCDEFGHIJKLMNOPQRSTUVWXYZ'),
(True, '0123456789'),
(True, '!#$%&()*+-?@_|'),
])
def test_is_valid(self, valid, password):
validator = PasswordValidator(password)
assert_equal(valid, validator.is_valid())We start by testing the is_valid method. We test whether or not it returns False when it's fed an empty string, as well as a string made up of only spaces, which makes sure we're testing whether we're calling .strip() when we assign the password.
Then, we use all the characters that we want to be accepted to make sure the function accepts them.
I understand the syntax behind the parameterize.expand decorator can be challenging at first but really, all there is to it is that each tuple consists of an independent test case which, in turn, means that the test_is_valid test is run individually for each tuple, and that the two tuple elements are passed to the method as arguments: valid and password.
We then test for invalid characters. We expect them all to fail so we use param.explicit, which runs the test for each of the characters in that weird string.
@parameterized.expand(
param.explicit(char) for char in '>]{<`\\;,[^/"\'~:}=.'
)
def test_is_valid_invalid_chars(self, password):
validator = PasswordValidator(password)
assert_equal(False, validator.is_valid())They all evaluate to False, so we're good.
@parameterized.expand([
(0, ''), # 0-3: score 0
(0, 'a'), # 0-3: score 0
(0, 'aa'), # 0-3: score 0
(0, 'aaa'), # 0-3: score 0
(1, 'aaab'), # 4-7: score 1
...
(5, 'aaabbbbccccddd'), # 12-15: score 5
(5, 'aaabbbbccccdddd'), # 12-15: score 5
])
def test__score_length(self, score, password):
validator = PasswordValidator(password)
assert_equal(score, validator._score_length())To test the _score_length method, I created 16 test cases for the lengths from 0 to 15. The body of the test simply makes sure that the score is assigned appropriately.
def test__score_length_sixteen_plus(self):
# all password whose length is 16+ score 7 points
password = 'x' * 255
for length in range(16, len(password)):
validator = PasswordValidator(password[:length])
assert_equal(7, validator._score_length())The preceding test is for lengths from 16 to 254. We only need to make sure that any length after 15 gets 7 as a score.
I will skip over the tests for the other internal methods and jump directly to the one for the score method. In order to test it, I want to control exactly what is returned by each of the _score_* methods so I mock them out and in the test, I set a return value for each of them. Note that to mock methods of a class, we use a variant of patch: patch.object. When you set return values on mocks, it's never good to have repetitions because you may not be sure which method returned what, and the test wouldn't fail in the case of a swap. So, always return different values. In my case, I am using the first few prime numbers to be sure there is no possibility of confusion.
@patch.object(PasswordValidator, '_score_length')
@patch.object(PasswordValidator, '_score_case')
@patch.object(PasswordValidator, '_score_numbers')
@patch.object(PasswordValidator, '_score_special')
@patch.object(PasswordValidator, '_score_ratio')
def test_score(
self,
_score_ratio_mock,
_score_special_mock,
_score_numbers_mock,
_score_case_mock,
_score_length_mock):
_score_ratio_mock.return_value = 2
_score_special_mock.return_value = 3
_score_numbers_mock.return_value = 5
_score_case_mock.return_value = 7
_score_length_mock.return_value = 11
expected_result = {
'length': 11,
'case': 7,
'numbers': 5,
'special': 3,
'ratio': 2,
'total': 28,
}
validator = PasswordValidator('')
assert_dict_equal(expected_result, validator.score())I want to point out explicitly that the _score_* methods are mocked, so I set up my validator instance by passing an empty string to the class constructor. This makes it even more evident to the reader that the internals of the class have been mocked out. Then, I just check if the result is the same as what I was expecting.
This last test is the only one in this class in which I used mocks. All the other tests for the _score_* methods are in an interface style, which reads better and usually produces better results.
Let's briefly see one example of a test for a handler:
pwdapi/tests/test_core/test_handlers.py
import json
from unittest.mock import patch
from nose.tools import assert_dict_equal, assert_equal
import falcon
import falcon.testing as testing
from core.handlers import (
PasswordValidatorHandler, PasswordGeneratorHandler)
class PGHTest(PasswordGeneratorHandler):
def process_request(self, req, resp):
self.req, self.resp = req, resp
return super(PGHTest, self).process_request(req, resp)
class PVHTest(PasswordValidatorHandler):
def process_request(self, req, resp):
self.req, self.resp = req, resp
return super(PVHTest, self).process_request(req, resp)Because of the tools Falcon gives you to test your handlers, I created a child for each of the classes I wanted to test. The only thing I changed (by overriding a method) is that in the process_request method, which is called by both classes, before processing the request I make sure I set the req and resp arguments on the instance. The normal behavior of the process_request method is thus not altered in any other way. By doing this, whatever happens over the course of the test, I'll be able to check against those objects.
It's quite common to use tricks like this when testing. We never change the code to adapt for a test, it would be bad practice. We find a way of adapting our tests to suit our needs.
class TestPasswordValidatorHandler(testing.TestBase):
def before(self):
self.resource = PVHTest()
self.api.add_route('/password/validate/', self.resource)The before method is called by the Falcon TestBase logic, and it allows us to set up the resource we want to test (the handler) and a route for it (which is not necessarily the same as the one we use in production).
def test_post(self):
self.simulate_request(
'/password/validate/',
body=json.dumps({'password': 'abcABC0123#&'}),
method='POST')
resp = self.resource.resp
assert_equal('200 OK', resp.status)
assert_dict_equal(
{'password': 'abcABC0123#&',
'score': {'case': 3, 'length': 5, 'numbers': 2,
'special': 4, 'ratio': 2, 'total': 16},
'valid': True},
json.loads(resp.body))This is the test for the happy path. All it does is simulate a POST request with a JSON payload as body. Then, we inspect the response object. In particular, we inspect its status and its body. We make sure that the handler has correctly called the validator and returned its results.
We also test the generator handler:
class TestPasswordGeneratorHandler(testing.TestBase):
def before(self):
self.resource = PGHTest()
self.api.add_route('/password/generate/', self.resource)
@patch('core.handlers.PasswordGenerator')
def test_get(self, PasswordGenerator):
PasswordGenerator.generate.return_value = (7, 'abc123')
self.simulate_request(
'/password/generate/',
query_string='length=7',
method='GET')
resp = self.resource.resp
assert_equal('200 OK', resp.status)
assert_equal([7, 'abc123'], json.loads(resp.body))For this one as well, I will only show you the test for the happy path. We mock out the PasswordGenerator class because we need to control which password it will generate and, unless we mock, we won't be able to do it, as it is a random process.
Once we have correctly set up its return value, we can simulate the request again. In this case, it's a GET request, with a desired length of 7. We use a technique similar to the one we used for the other handler, and check the response status and body.
These are not the only tests you could write against the API, and the style could be different as well. Some people mock often, I tend to mock only when I really have to. Just try to see if you can make some sense out of them. I know they're not really easy but they'll be good training for you. Tests are extremely important so give it your best shot.
Testing the handlers
Let's briefly see one example of a test for a handler:
pwdapi/tests/test_core/test_handlers.py
import json
from unittest.mock import patch
from nose.tools import assert_dict_equal, assert_equal
import falcon
import falcon.testing as testing
from core.handlers import (
PasswordValidatorHandler, PasswordGeneratorHandler)
class PGHTest(PasswordGeneratorHandler):
def process_request(self, req, resp):
self.req, self.resp = req, resp
return super(PGHTest, self).process_request(req, resp)
class PVHTest(PasswordValidatorHandler):
def process_request(self, req, resp):
self.req, self.resp = req, resp
return super(PVHTest, self).process_request(req, resp)Because of the tools Falcon gives you to test your handlers, I created a child for each of the classes I wanted to test. The only thing I changed (by overriding a method) is that in the process_request method, which is called by both classes, before processing the request I make sure I set the req and resp arguments on the instance. The normal behavior of the process_request method is thus not altered in any other way. By doing this, whatever happens over the course of the test, I'll be able to check against those objects.
It's quite common to use tricks like this when testing. We never change the code to adapt for a test, it would be bad practice. We find a way of adapting our tests to suit our needs.
class TestPasswordValidatorHandler(testing.TestBase):
def before(self):
self.resource = PVHTest()
self.api.add_route('/password/validate/', self.resource)The before method is called by the Falcon TestBase logic, and it allows us to set up the resource we want to test (the handler) and a route for it (which is not necessarily the same as the one we use in production).
def test_post(self):
self.simulate_request(
'/password/validate/',
body=json.dumps({'password': 'abcABC0123#&'}),
method='POST')
resp = self.resource.resp
assert_equal('200 OK', resp.status)
assert_dict_equal(
{'password': 'abcABC0123#&',
'score': {'case': 3, 'length': 5, 'numbers': 2,
'special': 4, 'ratio': 2, 'total': 16},
'valid': True},
json.loads(resp.body))This is the test for the happy path. All it does is simulate a POST request with a JSON payload as body. Then, we inspect the response object. In particular, we inspect its status and its body. We make sure that the handler has correctly called the validator and returned its results.
We also test the generator handler:
class TestPasswordGeneratorHandler(testing.TestBase):
def before(self):
self.resource = PGHTest()
self.api.add_route('/password/generate/', self.resource)
@patch('core.handlers.PasswordGenerator')
def test_get(self, PasswordGenerator):
PasswordGenerator.generate.return_value = (7, 'abc123')
self.simulate_request(
'/password/generate/',
query_string='length=7',
method='GET')
resp = self.resource.resp
assert_equal('200 OK', resp.status)
assert_equal([7, 'abc123'], json.loads(resp.body))For this one as well, I will only show you the test for the happy path. We mock out the PasswordGenerator class because we need to control which password it will generate and, unless we mock, we won't be able to do it, as it is a random process.
Once we have correctly set up its return value, we can simulate the request again. In this case, it's a GET request, with a desired length of 7. We use a technique similar to the one we used for the other handler, and check the response status and body.
These are not the only tests you could write against the API, and the style could be different as well. Some people mock often, I tend to mock only when I really have to. Just try to see if you can make some sense out of them. I know they're not really easy but they'll be good training for you. Tests are extremely important so give it your best shot.
If you liked this project and you feel like expanding it, here are a few suggestions:
- Implement the encryption in the mechanism of a custom Django field.
- Amend the template for the record list so that you can search for a particular record.
- Amend the JavaScript to use JSONP with a callback to overcome the CORS issue.
- Amend the JavaScript to fire the validation call when the password field changes.
- Write a Django command that allows you to encrypt and decrypt the database file. When you do it from the command line, incorporate that behavior into the website, possibly on the home page, so that you don't have access to the records unless you are authenticated. This is definitely a hard challenge as it requires either another database with an authentication password stored properly with a one way hash, or some serious reworking of the data structure used to hold the record model data. Even if you don't have the means to do it now, try and think about how you would solve this problem.
- Set up PostgreSQL on your machine and switch to using it instead of the SQLite file that is the default.
- Add the ability to attach a file to a record.
- Play with the application, try to find out which features you want to add or change, and then do it.
In this chapter, we've worked on a final project that involves an interface and an API. We have used two different frameworks to accomplish our goal: Django and Falcon. They are very different and have allowed us to explore different concepts and techniques to craft our software and make this fun application come alive.
We have seen an example of symmetric encryption and explored code that was written in a more functional style, as opposed to a more classic control flow-oriented approach. We have reused and extended the Django class-based views, reducing to a minimum the amount of code we had to write.
When coding the API, we decoupled handling requests from password management. This way it's much easier to see which part of the code depends on the Falcon framework and which is independent from it.
Finally, we saw a few tests for the helpers and handlers of the API. We have briefly touched on a technique that I use to expand classes under test in order to be able to test against those parts of the code which would not normally be available.
My aim in this chapter was to provide you with an interesting example that could be expanded and improved in different ways. I also wanted to give you a few examples of different coding styles and techniques, which is why I chose to spread things apart and use different frameworks.