
In the last chapter, we were briefly introduced to design patterns, and covered the iterator pattern, a pattern so useful and common that it has been abstracted into the core of the programming language itself. In this chapter, we'll be reviewing other common patterns, and how they are implemented in Python. As with iteration, Python often provides an alternative syntax to make working with such problems simpler. We will cover both the "traditional" design, and the Python version for these patterns. In summary, we'll see:
- Numerous specific patterns
- A canonical implementation of each pattern in Python
- Python syntax to replace certain patterns
The decorator pattern allows us to "wrap" an object that provides core functionality with other objects that alter this functionality. Any object that uses the decorated object will interact with it in exactly the same way as if it were undecorated (that is, the interface of the decorated object is identical to that of the core object).
There are two primary uses of the decorator pattern:
- Enhancing the response of a component as it sends data to a second component
- Supporting multiple optional behaviors
The second option is often a suitable alternative to multiple inheritance. We can construct a core object, and then create a decorator around that core. Since the decorator object has the same interface as the core object, we can even wrap the new object in other decorators. Here's how it looks in UML:

Here, Core and all the decorators implement a specific Interface. The decorators maintain a reference to another instance of that Interface via composition. When called, the decorator does some added processing before or after calling its wrapped interface. The wrapped object may be another decorator, or the core functionality. While multiple decorators may wrap each other, the object in the "center" of all those decorators provides the core functionality.
Let's look at an example from network programming. We'll be using a TCP socket. The socket.send() method takes a string of input bytes and outputs them to the receiving socket at the other end. There are plenty of libraries that accept sockets and access this function to send data on the stream. Let's create such an object; it will be an interactive shell that waits for a connection from a client and then prompts the user for a string response:
import socket
def respond(client):
response = input("Enter a value: ")
client.send(bytes(response, 'utf8'))
client.close()
server = socket.socket(socket.AF_INET, socket.SOCK_STREAM)
server.bind(('localhost',2401))
server.listen(1)
try:
while True:
client, addr = server.accept()
respond(client)
finally:
server.close()The
respond function accepts a socket parameter and prompts for data to be sent as a reply, then sends it. To use it, we construct a server socket and tell it to listen on port 2401 (I picked the port randomly) on the local computer. When a client connects, it calls the respond function, which requests data interactively and responds appropriately. The important thing to notice is that the respond function only cares about two methods of the socket interface: send and close. To test this, we can write a very simple client that connects to the same port and outputs the response before exiting:
import socket
client = socket.socket(socket.AF_INET, socket.SOCK_STREAM)
client.connect(('localhost', 2401))
print("Received: {0}".format(client.recv(1024)))
client.close()To use these programs:
- Start the server in one terminal.
- Open a second terminal window and run the client.
- At the Enter a value: prompt in the server window, type a value and press enter.
- The client will receive what you typed, print it to the console, and exit. Run the client a second time; the server will prompt for a second value.
Now, looking again at our server code, we see two sections. The respond function sends data into a socket object. The remaining script is responsible for creating that socket object. We'll create a pair of decorators that customize the socket behavior without having to extend or modify the socket itself.
Let's start with a "logging" decorator. This object outputs any data being sent to the server's console before it sends it to the client:
class LogSocket:
def __init__(self, socket):
self.socket = socket
def send(self, data):
print("Sending {0} to {1}".format(
data, self.socket.getpeername()[0]))
self.socket.send(data)
def close(self):
self.socket.close()
This class decorates a socket object and presents the send and close interface to client sockets. A better decorator would also implement (and possibly customize) all of the remaining socket methods. It should properly implement all of the arguments to send, (which actually accepts an optional flags argument) as well, but let's keep our example simple! Whenever send is called on this object, it logs the output to the screen before sending data to the client using the original socket.
We only have to change one line in our original code to use this decorator. Instead of calling respond with the socket, we call it with a decorated socket:
respond(LogSocket(client))
While that's quite simple, we have to ask ourselves why we didn't just extend the socket class and override the send method. We could call super().send to do the actual sending, after we logged it. There is nothing wrong with this design either.
When faced with a choice between decorators and inheritance, we should only use decorators if we need to modify the object dynamically, according to some condition. For example, we may only want to enable the logging decorator if the server is currently in debugging mode. Decorators also beat multiple inheritance when we have more than one optional behavior. As an example, we can write a second decorator that compresses data using gzip compression whenever send is called:
import gzip
from io import BytesIO
class GzipSocket:
def __init__(self, socket):
self.socket = socket
def send(self, data):
buf = BytesIO()
zipfile = gzip.GzipFile(fileobj=buf, mode="w")
zipfile.write(data)
zipfile.close()
self.socket.send(buf.getvalue())
def close(self):
self.socket.close()The send method in this version compresses the incoming data before sending it on to the client.
Now that we have these two decorators, we can write code that dynamically switches between them when responding. This example is not complete, but it illustrates the logic we might follow to mix and match decorators:
client, addr = server.accept()
if log_send:
client = LoggingSocket(client)
if client.getpeername()[0] in compress_hosts:
client = GzipSocket(client)
respond(client)This code checks a hypothetical configuration variable named log_send. If it's enabled, it wraps the socket in a LoggingSocket decorator. Similarly, it checks whether the client that has connected is in a list of addresses known to accept compressed content. If so, it wraps the client in a GzipSocket decorator. Notice that none, either, or both of the decorators may be enabled, depending on the configuration and connecting client. Try writing this using multiple inheritance and see how confused you get!
The decorator pattern is useful in Python, but there are other options. For example, we may be able to use monkey-patching, which we discussed in Chapter 7, Python Object-oriented Shortcuts, to get a similar effect. Single inheritance, where the "optional" calculations are done in one large method can be an option, and multiple inheritance should not be written off just because it's not suitable for the specific example seen previously!
In Python, it is very common to use this pattern on functions. As we saw in a previous chapter, functions are objects too. In fact, function decoration is so common that Python provides a special syntax to make it easy to apply such decorators to functions.
For example, we can look at the logging example in a more general way. Instead of logging, only send calls on sockets, we may find it helpful to log all calls to certain functions or methods. The following example implements a decorator that does just this:
import time def log_calls(func): def wrapper(*args, **kwargs): now = time.time() print("Calling {0} with {1} and {2}".format( func.__name__, args, kwargs)) return_value = func(*args, **kwargs) print("Executed {0} in {1}ms".format( func.__name__, time.time() - now)) return return_value return wrapper def test1(a,b,c): print("\ttest1 called") def test2(a,b): print("\ttest2 called") def test3(a,b): print("\ttest3 called") time.sleep(1) test1 = log_calls(test1) test2 = log_calls(test2) test3 = log_calls(test3) test1(1,2,3) test2(4,b=5) test3(6,7)
This decorator function is very similar to the example we explored earlier; in those cases, the decorator took a socket-like object and created a socket-like object. This time, our decorator takes a function object and returns a new function object. This code is comprised of three separate tasks:
- A function,
log_calls, that accepts another function - This function defines (internally) a new function, named
wrapper, that does some extra work before calling the original function - This new function is returned
Three sample functions demonstrate the decorator in use. The third one includes a sleep call to demonstrate the timing test. We pass each function into the decorator, which returns a new function. We assign this new function to the original variable name, effectively replacing the original function with a decorated one.
This syntax allows us to build up decorated function objects dynamically, just as we did with the socket example; if we don't replace the name, we can even keep decorated and non-decorated versions for different situations.
Often these decorators are general modifications that are applied permanently to different functions. In this situation, Python supports a special syntax to apply the decorator at the time the function is defined. We've already seen this syntax when we discussed the property decorator; now, let's understand how it works.
Instead of applying the decorator function after the method definition, we can use the @decorator syntax to do it all at once:
@log_calls
def test1(a,b,c):
print("\ttest1 called")The primary benefit of this syntax is that we can easily see that the function has been decorated at the time it is defined. If the decorator is applied later, someone reading the code may miss that the function has been altered at all. Answering a question like, "Why is my program logging function calls to the console?" can become much more difficult! However, the syntax can only be applied to functions we define, since we don't have access to the source code of other modules. If we need to decorate functions that are part of somebody else's third-party library, we have to use the earlier syntax.
There is more to the decorator syntax than we've seen here. We don't have room to cover the advanced topics here, so check the Python reference manual or other tutorials for more information. Decorators can be created as callable objects, not just functions that return functions. Classes can also be decorated; in that case, the decorator returns a new class instead of a new function. Finally, decorators can take arguments to customize them on a per-function basis.
The observer pattern is useful for state monitoring and event handling situations. This pattern allows a given object to be monitored by an unknown and dynamic group of "observer" objects.
Whenever a value on the core object changes, it lets all the observer objects know that a change has occurred, by calling an update() method. Each observer may be responsible for different tasks whenever the core object changes; the core object doesn't know or care what those tasks are, and the observers don't typically know or care what other observers are doing.
Here, it is in UML:

The observer pattern might be useful in a redundant backup system. We can write a core object that maintains certain values, and then have one or more observers create serialized copies of that object. These copies might be stored in a database, on a remote host, or in a local file, for example. Let's implement the core object using properties:
class Inventory:
def __init__(self):
self.observers = []
self._product = None
self._quantity = 0
def attach(self, observer):
self.observers.append(observer)
@property
def product(self):
return self._product
@product.setter
def product(self, value):
self._product = value
self._update_observers()
@property
def quantity(self):
return self._quantity
@quantity.setter
def quantity(self, value):
self._quantity = value
self._update_observers()
def _update_observers(self):
for observer in self.observers:
observer()This object has two properties that, when set, call the _update_observers method on itself. All this method does is loop over the available observers and let each one know that something has changed. In this case, we call the observer object directly; the object will have to implement __call__ to process the update. This would not be possible in many object-oriented programming languages, but it's a useful shortcut in Python that can help make our code more readable.
Now let's implement a simple observer object; this one will just print out some state to the console:
class ConsoleObserver:
def __init__(self, inventory):
self.inventory = inventory
def __call__(self):
print(self.inventory.product)
print(self.inventory.quantity)There's nothing terribly exciting here; the observed object is set up in the initializer, and when the observer is called, we do "something." We can test the observer in an interactive console:
>>> i = Inventory() >>> c = ConsoleObserver(i) >>> i.attach(c) >>> i.product = "Widget" Widget 0 >>> i.quantity = 5 Widget 5
After attaching the observer to the inventory object, whenever we change one of the two observed properties, the observer is called and its action is invoked. We can even add two different observer instances:
>>> i = Inventory() >>> c1 = ConsoleObserver(i) >>> c2 = ConsoleObserver(i) >>> i.attach(c1) >>> i.attach(c2) >>> i.product = "Gadget" Gadget 0 Gadget 0
This time when we change the product, there are two sets of output, one for each observer. The key idea here is that we can easily add totally different types of observers that back up the data in a file, database, or Internet application at the same time.
The observer pattern detaches the code being observed from the code doing the observing. If we were not using this pattern, we would have had to put code in each of the properties to handle the different cases that might come up; logging to the console, updating a database or file, and so on. The code for each of these tasks would all be mixed in with the observed object. Maintaining it would be a nightmare, and adding new monitoring functionality at a later date would be painful.
An observer example
The observer pattern might be useful in a redundant backup system. We can write a core object that maintains certain values, and then have one or more observers create serialized copies of that object. These copies might be stored in a database, on a remote host, or in a local file, for example. Let's implement the core object using properties:
class Inventory:
def __init__(self):
self.observers = []
self._product = None
self._quantity = 0
def attach(self, observer):
self.observers.append(observer)
@property
def product(self):
return self._product
@product.setter
def product(self, value):
self._product = value
self._update_observers()
@property
def quantity(self):
return self._quantity
@quantity.setter
def quantity(self, value):
self._quantity = value
self._update_observers()
def _update_observers(self):
for observer in self.observers:
observer()This object has two properties that, when set, call the _update_observers method on itself. All this method does is loop over the available observers and let each one know that something has changed. In this case, we call the observer object directly; the object will have to implement __call__ to process the update. This would not be possible in many object-oriented programming languages, but it's a useful shortcut in Python that can help make our code more readable.
Now let's implement a simple observer object; this one will just print out some state to the console:
class ConsoleObserver:
def __init__(self, inventory):
self.inventory = inventory
def __call__(self):
print(self.inventory.product)
print(self.inventory.quantity)There's nothing terribly exciting here; the observed object is set up in the initializer, and when the observer is called, we do "something." We can test the observer in an interactive console:
>>> i = Inventory() >>> c = ConsoleObserver(i) >>> i.attach(c) >>> i.product = "Widget" Widget 0 >>> i.quantity = 5 Widget 5
After attaching the observer to the inventory object, whenever we change one of the two observed properties, the observer is called and its action is invoked. We can even add two different observer instances:
>>> i = Inventory() >>> c1 = ConsoleObserver(i) >>> c2 = ConsoleObserver(i) >>> i.attach(c1) >>> i.attach(c2) >>> i.product = "Gadget" Gadget 0 Gadget 0
This time when we change the product, there are two sets of output, one for each observer. The key idea here is that we can easily add totally different types of observers that back up the data in a file, database, or Internet application at the same time.
The observer pattern detaches the code being observed from the code doing the observing. If we were not using this pattern, we would have had to put code in each of the properties to handle the different cases that might come up; logging to the console, updating a database or file, and so on. The code for each of these tasks would all be mixed in with the observed object. Maintaining it would be a nightmare, and adding new monitoring functionality at a later date would be painful.
The strategy pattern is a common demonstration of abstraction in object-oriented programming. The pattern implements different solutions to a single problem, each in a different object. The client code can then choose the most appropriate implementation dynamically at runtime.
Typically, different algorithms have different trade-offs; one might be faster than another, but uses a lot more memory, while a third algorithm may be most suitable when multiple CPUs are present or a distributed system is provided. Here is the strategy pattern in UML:

The User code connecting to the strategy pattern simply needs to know that it is dealing with the Abstraction interface. The actual implementation chosen performs the same task, but in different ways; either way, the interface is identical.
The canonical example of the strategy pattern is sort routines; over the years, numerous algorithms have been invented for sorting a collection of objects; quick sort, merge sort, and heap sort are all fast sort algorithms with different features, each useful in its own right, depending on the size and type of inputs, how out of order they are, and the requirements of the system.
If we have client code that needs to sort a collection, we could pass it to an object with a sort() method. This object may be a QuickSorter or MergeSorter object, but the result will be the same in either case: a sorted list. The strategy used to do the sorting is abstracted from the calling code, making it modular and replaceable.
Of course, in Python, we typically just call the sorted function or list.sort method and trust that it will do the sorting in a near-optimal fashion. So, we really need to look at a better example.
Let's consider a desktop wallpaper manager. When an image is displayed on a desktop background, it can be adjusted to the screen size in different ways. For example, assuming the image is smaller than the screen, it can be tiled across the screen, centered on it, or scaled to fit. There are other, more complicated, strategies that can be used as well, such as scaling to the maximum height or width, combining it with a solid, semi-transparent, or gradient background color, or other manipulations. While we may want to add these strategies later, let's start with the basic ones.
Our strategy objects takes two inputs; the image to be displayed, and a tuple of the width and height of the screen. They each return a new image the size of the screen, with the image manipulated to fit according to the given strategy. You'll need to install the pillow module with pip3 install pillow for this example to work:
from PIL import Image
class TiledStrategy:
def make_background(self, img_file, desktop_size):
in_img = Image.open(img_file)
out_img = Image.new('RGB', desktop_size)
num_tiles = [
o // i + 1 for o, i in
zip(out_img.size, in_img.size)
]
for x in range(num_tiles[0]):
for y in range(num_tiles[1]):
out_img.paste(
in_img,
(
in_img.size[0] * x,
in_img.size[1] * y,
in_img.size[0] * (x+1),
in_img.size[1] * (y+1)
)
)
return out_img
class CenteredStrategy:
def make_background(self, img_file, desktop_size):
in_img = Image.open(img_file)
out_img = Image.new('RGB', desktop_size)
left = (out_img.size[0] - in_img.size[0]) // 2
top = (out_img.size[1] - in_img.size[1]) // 2
out_img.paste(
in_img,
(
left,
top,
left+in_img.size[0],
top + in_img.size[1]
)
)
return out_img
class ScaledStrategy:
def make_background(self, img_file, desktop_size):
in_img = Image.open(img_file)
out_img = in_img.resize(desktop_size)
return out_imgHere we have three strategies, each using PIL to perform their task. Individual strategies have a make_background method that accepts the same set of parameters. Once selected, the appropriate strategy can be called to create a correctly sized version of the desktop image. TiledStrategy loops over the number of input images that would fit in the width and height of the image and copies it into each location, repeatedly. CenteredStrategy figures out how much space needs to be left on the four edges of the image to center it. ScaledStrategy forces the image to the output size (ignoring aspect ratio).
Consider how switching between these options would be implemented without the strategy pattern. We'd need to put all the code inside one great big method and use an awkward if statement to select the expected one. Every time we wanted to add a new strategy, we'd have to make the method even more ungainly.
The preceding canonical implementation of the strategy pattern, while very common in most object-oriented libraries, is rarely seen in Python programming.
These classes each represent objects that do nothing but provide a single function. We could just as easily call that function __call__ and make the object callable directly. Since there is no other data associated with the object, we need do no more than create a set of top-level functions and pass them around as our strategies instead.
Opponents of design pattern philosophy will therefore say, "because Python has first-class functions, the strategy pattern is unnecessary". In truth, Python's first-class functions allow us to implement the strategy pattern in a more straightforward way. Knowing the pattern exists can still help us choose a correct design for our program, but implement it using a more readable syntax. The strategy pattern, or a top-level function implementation of it, should be used when we need to allow client code or the end user to select from multiple implementations of the same interface.
A strategy example
The canonical example of the strategy pattern is sort routines; over the years, numerous algorithms have been invented for sorting a collection of objects; quick sort, merge sort, and heap sort are all fast sort algorithms with different features, each useful in its own right, depending on the size and type of inputs, how out of order they are, and the requirements of the system.
If we have client code that needs to sort a collection, we could pass it to an object with a sort() method. This object may be a QuickSorter or MergeSorter object, but the result will be the same in either case: a sorted list. The strategy used to do the sorting is abstracted from the calling code, making it modular and replaceable.
Of course, in Python, we typically just call the sorted function or list.sort method and trust that it will do the sorting in a near-optimal fashion. So, we really need to look at a better example.
Let's consider a desktop wallpaper manager. When an image is displayed on a desktop background, it can be adjusted to the screen size in different ways. For example, assuming the image is smaller than the screen, it can be tiled across the screen, centered on it, or scaled to fit. There are other, more complicated, strategies that can be used as well, such as scaling to the maximum height or width, combining it with a solid, semi-transparent, or gradient background color, or other manipulations. While we may want to add these strategies later, let's start with the basic ones.
Our strategy objects takes two inputs; the image to be displayed, and a tuple of the width and height of the screen. They each return a new image the size of the screen, with the image manipulated to fit according to the given strategy. You'll need to install the pillow module with pip3 install pillow for this example to work:
from PIL import Image
class TiledStrategy:
def make_background(self, img_file, desktop_size):
in_img = Image.open(img_file)
out_img = Image.new('RGB', desktop_size)
num_tiles = [
o // i + 1 for o, i in
zip(out_img.size, in_img.size)
]
for x in range(num_tiles[0]):
for y in range(num_tiles[1]):
out_img.paste(
in_img,
(
in_img.size[0] * x,
in_img.size[1] * y,
in_img.size[0] * (x+1),
in_img.size[1] * (y+1)
)
)
return out_img
class CenteredStrategy:
def make_background(self, img_file, desktop_size):
in_img = Image.open(img_file)
out_img = Image.new('RGB', desktop_size)
left = (out_img.size[0] - in_img.size[0]) // 2
top = (out_img.size[1] - in_img.size[1]) // 2
out_img.paste(
in_img,
(
left,
top,
left+in_img.size[0],
top + in_img.size[1]
)
)
return out_img
class ScaledStrategy:
def make_background(self, img_file, desktop_size):
in_img = Image.open(img_file)
out_img = in_img.resize(desktop_size)
return out_imgHere we have three strategies, each using PIL to perform their task. Individual strategies have a make_background method that accepts the same set of parameters. Once selected, the appropriate strategy can be called to create a correctly sized version of the desktop image. TiledStrategy loops over the number of input images that would fit in the width and height of the image and copies it into each location, repeatedly. CenteredStrategy figures out how much space needs to be left on the four edges of the image to center it. ScaledStrategy forces the image to the output size (ignoring aspect ratio).
Consider how switching between these options would be implemented without the strategy pattern. We'd need to put all the code inside one great big method and use an awkward if statement to select the expected one. Every time we wanted to add a new strategy, we'd have to make the method even more ungainly.
The preceding canonical implementation of the strategy pattern, while very common in most object-oriented libraries, is rarely seen in Python programming.
These classes each represent objects that do nothing but provide a single function. We could just as easily call that function __call__ and make the object callable directly. Since there is no other data associated with the object, we need do no more than create a set of top-level functions and pass them around as our strategies instead.
Opponents of design pattern philosophy will therefore say, "because Python has first-class functions, the strategy pattern is unnecessary". In truth, Python's first-class functions allow us to implement the strategy pattern in a more straightforward way. Knowing the pattern exists can still help us choose a correct design for our program, but implement it using a more readable syntax. The strategy pattern, or a top-level function implementation of it, should be used when we need to allow client code or the end user to select from multiple implementations of the same interface.
Strategy in Python
The preceding canonical implementation of the strategy pattern, while very common in most object-oriented libraries, is rarely seen in Python programming.
These classes each represent objects that do nothing but provide a single function. We could just as easily call that function __call__ and make the object callable directly. Since there is no other data associated with the object, we need do no more than create a set of top-level functions and pass them around as our strategies instead.
Opponents of design pattern philosophy will therefore say, "because Python has first-class functions, the strategy pattern is unnecessary". In truth, Python's first-class functions allow us to implement the strategy pattern in a more straightforward way. Knowing the pattern exists can still help us choose a correct design for our program, but implement it using a more readable syntax. The strategy pattern, or a top-level function implementation of it, should be used when we need to allow client code or the end user to select from multiple implementations of the same interface.
The state pattern is structurally similar to the strategy pattern, but its intent and purpose are very different. The goal of the state pattern is to represent state-transition systems: systems where it is obvious that an object can be in a specific state, and that certain activities may drive it to a different state.
To make this work, we need a manager, or context class that provides an interface for switching states. Internally, this class contains a pointer to the current state; each state knows what other states it is allowed to be in and will transition to those states depending on actions invoked upon it.
So we have two types of classes, the context class and multiple state classes. The context class maintains the current state, and forwards actions to the state classes. The state classes are typically hidden from any other objects that are calling the context; it acts like a black box that happens to perform state management internally. Here's how it looks in UML:

To illustrate the state pattern, let's build an XML parsing tool. The context class will be the parser itself. It will take a string as input and place the tool in an initial parsing state. The various parsing states will eat characters, looking for a specific value, and when that value is found, change to a different state. The goal is to create a tree of node objects for each tag and its contents. To keep things manageable, we'll parse only a subset of XML - tags and tag names. We won't be able to handle attributes on tags. It will parse text content of tags, but won't attempt to parse "mixed" content, which has tags inside of text. Here is an example "simplified XML" file that we'll be able to parse:
<book>
<author>Dusty Phillips</author>
<publisher>Packt Publishing</publisher>
<title>Python 3 Object Oriented Programming</title>
<content>
<chapter>
<number>1</number>
<title>Object Oriented Design</title>
</chapter>
<chapter>
<number>2</number>
<title>Objects In Python</title>
</chapter>
</content>
</book>Before we look at the states and the parser, let's consider the output of this program. We know we want a tree of Node objects, but what does a Node look like? Well, clearly it'll need to know the name of the tag it is parsing, and since it's a tree, it should probably maintain a pointer to the parent node and a list of the node's children in order. Some nodes have a text value, but not all of them. Let's look at this Node class first:
class Node:
def __init__(self, tag_name, parent=None):
self.parent = parent
self.tag_name = tag_name
self.children = []
self.text=""
def __str__(self):
if self.text:
return self.tag_name + ": " + self.text
else:
return self.tag_nameThis class sets default attribute values upon initialization. The __str__ method is supplied to help visualize the tree structure when we're finished.
Now, looking at the example document, we need to consider what states our parser can be in. Clearly it's going to start in a state where no nodes have yet been processed. We'll need a state for processing opening tags and closing tags. And when we're inside a tag with text contents, we'll have to process that as a separate state, too.
Switching states can be tricky; how do we know if the next node is an opening tag, a closing tag, or a text node? We could put a little logic in each state to work this out, but it actually makes more sense to create a new state whose sole purpose is figuring out which state we'll be switching to next. If we call this transition state ChildNode, we end up with the following states:
- FirstTag
- ChildNode
- OpenTag
- CloseTag
- Text
The FirstTag state will switch to ChildNode, which is responsible for deciding which of the other three states to switch to; when those states are finished, they'll switch back to ChildNode. The following state-transition diagram shows the available state changes:
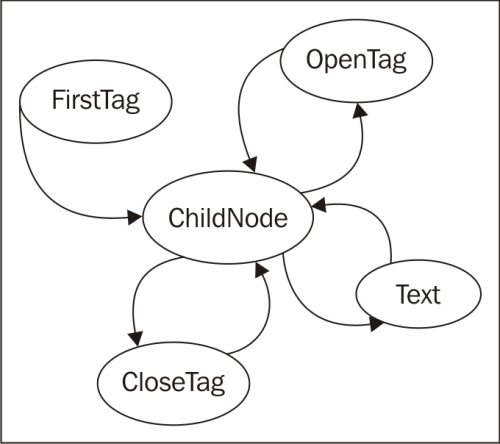
The states are responsible for taking "what's left of the string", processing as much of it as they know what to do with, and then telling the parser to take care of the rest of it. Let's construct the Parser class first:
class Parser:
def __init__(self, parse_string):
self.parse_string = parse_string
self.root = None
self.current_node = None
self.state = FirstTag()
def process(self, remaining_string):
remaining = self.state.process(remaining_string, self)
if remaining:
self.process(remaining)
def start(self):
self.process(self.parse_string)The initializer sets up a few variables on the class that the individual states will access. The parse_string instance variable is the text that we are trying to parse. The root node is the "top" node in the XML structure. The current_node instance variable is the one that we are currently adding children to.
The important feature of this parser is the process method, which accepts the remaining string, and passes it off to the current state. The parser (the self argument) is also passed into the state's process method so that the state can manipulate it. The state is expected to return the remainder of the unparsed string when it is finished processing. The parser then recursively calls the process method on this remaining string to construct the rest of the tree.
Now, let's have a look at the FirstTag state:
class FirstTag:
def process(self, remaining_string, parser):
i_start_tag = remaining_string.find('<')
i_end_tag = remaining_string.find('>')
tag_name = remaining_string[i_start_tag+1:i_end_tag]
root = Node(tag_name)
parser.root = parser.current_node = root
parser.state = ChildNode()
return remaining_string[i_end_tag+1:]
This state finds the index (the i_ stands for index) of the opening and closing angle brackets on the first tag. You may think this state is unnecessary, since XML requires that there be no text before an opening tag. However, there may be whitespace that needs to be consumed; this is why we search for the opening angle bracket instead of assuming it is the first character in the document. Note that this code is assuming a valid input file. A proper implementation would be rigorously testing for invalid input, and would attempt to recover or display an extremely descriptive error message.
The method extracts the name of the tag and assigns it to the root node of the parser. It also assigns it to current_node, since that's the one we'll be adding children to next.
Then comes the important part: the method changes the current state on the parser object to a ChildNode state. It then returns the remainder of the string (after the opening tag) to allow it to be processed.
The ChildNode state, which seems quite complicated, turns out to require nothing but a simple conditional:
class ChildNode:
def process(self, remaining_string, parser):
stripped = remaining_string.strip()
if stripped.startswith("</"):
parser.state = CloseTag()
elif stripped.startswith("<"):
parser.state = OpenTag()
else:
parser.state = TextNode()
return strippedThe strip() call removes whitespace from the string. Then the parser determines if the next item is an opening or closing tag, or a string of text. Depending on which possibility occurs, it sets the parser to a particular state, and then tells it to parse the remainder of the string.
The OpenTag state is similar to the FirstTag state, except that it adds the newly created node to the previous current_node object's children and sets it as the new current_node. It places the processor back in the ChildNode state before continuing:
class OpenTag:
def process(self, remaining_string, parser):
i_start_tag = remaining_string.find('<')
i_end_tag = remaining_string.find('>')
tag_name = remaining_string[i_start_tag+1:i_end_tag]
node = Node(tag_name, parser.current_node)
parser.current_node.children.append(node)
parser.current_node = node
parser.state = ChildNode()
return remaining_string[i_end_tag+1:]The CloseTag state basically does the opposite; it sets the parser's current_node back to the parent node so any further children in the outside tag can be added to it:
class CloseTag:
def process(self, remaining_string, parser):
i_start_tag = remaining_string.find('<')
i_end_tag = remaining_string.find('>')
assert remaining_string[i_start_tag+1] == "/"
tag_name = remaining_string[i_start_tag+2:i_end_tag]
assert tag_name == parser.current_node.tag_name
parser.current_node = parser.current_node.parent
parser.state = ChildNode()
return remaining_string[i_end_tag+1:].strip()The two assert statements help ensure that the parse strings are consistent. The if statement at the end of the method ensures that the processor terminates when it is finished. If the parent of a node is None, it means that we are working on the root node.
Finally, the TextNode state very simply extracts the text before the next close tag and sets it as a value on the current node:
class TextNode:
def process(self, remaining_string, parser):
i_start_tag = remaining_string.find('<')
text = remaining_string[:i_start_tag]
parser.current_node.text = text
parser.state = ChildNode()
return remaining_string[i_start_tag:]Now we just have to set up the initial state on the parser object we created. The initial state is a FirstTag object, so just add the following to the __init__ method:
self.state = FirstTag()
To test the class, let's add a main script that opens an file from the command line, parses it, and prints the nodes:
if __name__ == "__main__":
import sys
with open(sys.argv[1]) as file:
contents = file.read()
p = Parser(contents)
p.start()
nodes = [p.root]
while nodes:
node = nodes.pop(0)
print(node)
nodes = node.children + nodesThis code opens the file, loads the contents, and parses the result. Then it prints each node and its children in order. The __str__ method we originally added on the node class takes care of formatting the nodes for printing. If we run the script on the earlier example, it outputs the tree as follows:
book author: Dusty Phillips publisher: Packt Publishing title: Python 3 Object Oriented Programming content chapter number: 1 title: Object Oriented Design chapter number: 2 title: Objects In Python
Comparing this to the original simplified XML document tells us the parser is working.
The state pattern looks very similar to the strategy pattern; indeed, the UML diagrams for the two are identical. The implementation, too, is identical; we could even have written our states as first-class functions instead of wrapping them in objects, as was suggested for strategy.
While the two patterns have identical structures, they solve completely different problems. The strategy pattern is used to choose an algorithm at runtime; generally, only one of those algorithms is going to be chosen for a particular use case. The state pattern, on the other hand is designed to allow switching between different states dynamically, as some process evolves. In code, the primary difference is that the strategy pattern is not typically aware of other strategy objects. In the state pattern, either the state or the context needs to know which other states that it can switch to.
The state pattern is the canonical object-oriented solution to state-transition problems. However, the syntax for this pattern is rather verbose. You can get a similar effect by constructing your objects as coroutines. Remember the regular expression log file parser we built in Chapter 9, The Iterator Pattern? That was a state-transition problem in disguise. The main difference between that implementation and one that defines all the objects (or functions) used in the state pattern is that the coroutine solution allows us to encode more of the boilerplate in language constructs. There are two implementations, but neither one is inherently better than the other, but you may find that coroutines are more readable, for a given definition of "readable" (you have to understand the syntax of coroutines, first!).
A state example
To illustrate the state pattern, let's build an XML parsing tool. The context class will be the parser itself. It will take a string as input and place the tool in an initial parsing state. The various parsing states will eat characters, looking for a specific value, and when that value is found, change to a different state. The goal is to create a tree of node objects for each tag and its contents. To keep things manageable, we'll parse only a subset of XML - tags and tag names. We won't be able to handle attributes on tags. It will parse text content of tags, but won't attempt to parse "mixed" content, which has tags inside of text. Here is an example "simplified XML" file that we'll be able to parse:
<book>
<author>Dusty Phillips</author>
<publisher>Packt Publishing</publisher>
<title>Python 3 Object Oriented Programming</title>
<content>
<chapter>
<number>1</number>
<title>Object Oriented Design</title>
</chapter>
<chapter>
<number>2</number>
<title>Objects In Python</title>
</chapter>
</content>
</book>Before we look at the states and the parser, let's consider the output of this program. We know we want a tree of Node objects, but what does a Node look like? Well, clearly it'll need to know the name of the tag it is parsing, and since it's a tree, it should probably maintain a pointer to the parent node and a list of the node's children in order. Some nodes have a text value, but not all of them. Let's look at this Node class first:
class Node:
def __init__(self, tag_name, parent=None):
self.parent = parent
self.tag_name = tag_name
self.children = []
self.text=""
def __str__(self):
if self.text:
return self.tag_name + ": " + self.text
else:
return self.tag_nameThis class sets default attribute values upon initialization. The __str__ method is supplied to help visualize the tree structure when we're finished.
Now, looking at the example document, we need to consider what states our parser can be in. Clearly it's going to start in a state where no nodes have yet been processed. We'll need a state for processing opening tags and closing tags. And when we're inside a tag with text contents, we'll have to process that as a separate state, too.
Switching states can be tricky; how do we know if the next node is an opening tag, a closing tag, or a text node? We could put a little logic in each state to work this out, but it actually makes more sense to create a new state whose sole purpose is figuring out which state we'll be switching to next. If we call this transition state ChildNode, we end up with the following states:
- FirstTag
- ChildNode
- OpenTag
- CloseTag
- Text
The FirstTag state will switch to ChildNode, which is responsible for deciding which of the other three states to switch to; when those states are finished, they'll switch back to ChildNode. The following state-transition diagram shows the available state changes:
The states are responsible for taking "what's left of the string", processing as much of it as they know what to do with, and then telling the parser to take care of the rest of it. Let's construct the Parser class first:
class Parser:
def __init__(self, parse_string):
self.parse_string = parse_string
self.root = None
self.current_node = None
self.state = FirstTag()
def process(self, remaining_string):
remaining = self.state.process(remaining_string, self)
if remaining:
self.process(remaining)
def start(self):
self.process(self.parse_string)The initializer sets up a few variables on the class that the individual states will access. The parse_string instance variable is the text that we are trying to parse. The root node is the "top" node in the XML structure. The current_node instance variable is the one that we are currently adding children to.
The important feature of this parser is the process method, which accepts the remaining string, and passes it off to the current state. The parser (the self argument) is also passed into the state's process method so that the state can manipulate it. The state is expected to return the remainder of the unparsed string when it is finished processing. The parser then recursively calls the process method on this remaining string to construct the rest of the tree.
Now, let's have a look at the FirstTag state:
class FirstTag:
def process(self, remaining_string, parser):
i_start_tag = remaining_string.find('<')
i_end_tag = remaining_string.find('>')
tag_name = remaining_string[i_start_tag+1:i_end_tag]
root = Node(tag_name)
parser.root = parser.current_node = root
parser.state = ChildNode()
return remaining_string[i_end_tag+1:]
This state finds the index (the i_ stands for index) of the opening and closing angle brackets on the first tag. You may think this state is unnecessary, since XML requires that there be no text before an opening tag. However, there may be whitespace that needs to be consumed; this is why we search for the opening angle bracket instead of assuming it is the first character in the document. Note that this code is assuming a valid input file. A proper implementation would be rigorously testing for invalid input, and would attempt to recover or display an extremely descriptive error message.
The method extracts the name of the tag and assigns it to the root node of the parser. It also assigns it to current_node, since that's the one we'll be adding children to next.
Then comes the important part: the method changes the current state on the parser object to a ChildNode state. It then returns the remainder of the string (after the opening tag) to allow it to be processed.
The ChildNode state, which seems quite complicated, turns out to require nothing but a simple conditional:
class ChildNode:
def process(self, remaining_string, parser):
stripped = remaining_string.strip()
if stripped.startswith("</"):
parser.state = CloseTag()
elif stripped.startswith("<"):
parser.state = OpenTag()
else:
parser.state = TextNode()
return strippedThe strip() call removes whitespace from the string. Then the parser determines if the next item is an opening or closing tag, or a string of text. Depending on which possibility occurs, it sets the parser to a particular state, and then tells it to parse the remainder of the string.
The OpenTag state is similar to the FirstTag state, except that it adds the newly created node to the previous current_node object's children and sets it as the new current_node. It places the processor back in the ChildNode state before continuing:
class OpenTag:
def process(self, remaining_string, parser):
i_start_tag = remaining_string.find('<')
i_end_tag = remaining_string.find('>')
tag_name = remaining_string[i_start_tag+1:i_end_tag]
node = Node(tag_name, parser.current_node)
parser.current_node.children.append(node)
parser.current_node = node
parser.state = ChildNode()
return remaining_string[i_end_tag+1:]The CloseTag state basically does the opposite; it sets the parser's current_node back to the parent node so any further children in the outside tag can be added to it:
class CloseTag:
def process(self, remaining_string, parser):
i_start_tag = remaining_string.find('<')
i_end_tag = remaining_string.find('>')
assert remaining_string[i_start_tag+1] == "/"
tag_name = remaining_string[i_start_tag+2:i_end_tag]
assert tag_name == parser.current_node.tag_name
parser.current_node = parser.current_node.parent
parser.state = ChildNode()
return remaining_string[i_end_tag+1:].strip()The two assert statements help ensure that the parse strings are consistent. The if statement at the end of the method ensures that the processor terminates when it is finished. If the parent of a node is None, it means that we are working on the root node.
Finally, the TextNode state very simply extracts the text before the next close tag and sets it as a value on the current node:
class TextNode:
def process(self, remaining_string, parser):
i_start_tag = remaining_string.find('<')
text = remaining_string[:i_start_tag]
parser.current_node.text = text
parser.state = ChildNode()
return remaining_string[i_start_tag:]Now we just have to set up the initial state on the parser object we created. The initial state is a FirstTag object, so just add the following to the __init__ method:
self.state = FirstTag()
To test the class, let's add a main script that opens an file from the command line, parses it, and prints the nodes:
if __name__ == "__main__":
import sys
with open(sys.argv[1]) as file:
contents = file.read()
p = Parser(contents)
p.start()
nodes = [p.root]
while nodes:
node = nodes.pop(0)
print(node)
nodes = node.children + nodesThis code opens the file, loads the contents, and parses the result. Then it prints each node and its children in order. The __str__ method we originally added on the node class takes care of formatting the nodes for printing. If we run the script on the earlier example, it outputs the tree as follows:
book author: Dusty Phillips publisher: Packt Publishing title: Python 3 Object Oriented Programming content chapter number: 1 title: Object Oriented Design chapter number: 2 title: Objects In Python
Comparing this to the original simplified XML document tells us the parser is working.
The state pattern looks very similar to the strategy pattern; indeed, the UML diagrams for the two are identical. The implementation, too, is identical; we could even have written our states as first-class functions instead of wrapping them in objects, as was suggested for strategy.
While the two patterns have identical structures, they solve completely different problems. The strategy pattern is used to choose an algorithm at runtime; generally, only one of those algorithms is going to be chosen for a particular use case. The state pattern, on the other hand is designed to allow switching between different states dynamically, as some process evolves. In code, the primary difference is that the strategy pattern is not typically aware of other strategy objects. In the state pattern, either the state or the context needs to know which other states that it can switch to.
The state pattern is the canonical object-oriented solution to state-transition problems. However, the syntax for this pattern is rather verbose. You can get a similar effect by constructing your objects as coroutines. Remember the regular expression log file parser we built in Chapter 9, The Iterator Pattern? That was a state-transition problem in disguise. The main difference between that implementation and one that defines all the objects (or functions) used in the state pattern is that the coroutine solution allows us to encode more of the boilerplate in language constructs. There are two implementations, but neither one is inherently better than the other, but you may find that coroutines are more readable, for a given definition of "readable" (you have to understand the syntax of coroutines, first!).
State versus strategy
The state pattern looks very similar to the strategy pattern; indeed, the UML diagrams for the two are identical. The implementation, too, is identical; we could even have written our states as first-class functions instead of wrapping them in objects, as was suggested for strategy.
While the two patterns have identical structures, they solve completely different problems. The strategy pattern is used to choose an algorithm at runtime; generally, only one of those algorithms is going to be chosen for a particular use case. The state pattern, on the other hand is designed to allow switching between different states dynamically, as some process evolves. In code, the primary difference is that the strategy pattern is not typically aware of other strategy objects. In the state pattern, either the state or the context needs to know which other states that it can switch to.
The state pattern is the canonical object-oriented solution to state-transition problems. However, the syntax for this pattern is rather verbose. You can get a similar effect by constructing your objects as coroutines. Remember the regular expression log file parser we built in Chapter 9, The Iterator Pattern? That was a state-transition problem in disguise. The main difference between that implementation and one that defines all the objects (or functions) used in the state pattern is that the coroutine solution allows us to encode more of the boilerplate in language constructs. There are two implementations, but neither one is inherently better than the other, but you may find that coroutines are more readable, for a given definition of "readable" (you have to understand the syntax of coroutines, first!).
State transition as coroutines
The state pattern is the canonical object-oriented solution to state-transition problems. However, the syntax for this pattern is rather verbose. You can get a similar effect by constructing your objects as coroutines. Remember the regular expression log file parser we built in Chapter 9, The Iterator Pattern? That was a state-transition problem in disguise. The main difference between that implementation and one that defines all the objects (or functions) used in the state pattern is that the coroutine solution allows us to encode more of the boilerplate in language constructs. There are two implementations, but neither one is inherently better than the other, but you may find that coroutines are more readable, for a given definition of "readable" (you have to understand the syntax of coroutines, first!).
The singleton pattern is one of the most controversial patterns; many have accused it of being an "anti-pattern", a pattern that should be avoided, not promoted. In Python, if someone is using the singleton pattern, they're almost certainly doing something wrong, probably because they're coming from a more restrictive programming language.
So why discuss it at all? Singleton is one of the most famous of all design patterns. It is useful in overly object-oriented languages, and is a vital part of traditional object-oriented programming. More relevantly, the idea behind singleton is useful, even if we implement that idea in a totally different way in Python.
The basic idea behind the singleton pattern is to allow exactly one instance of a certain object to exist. Typically, this object is a sort of manager class like those we discussed in Chapter 5, When to Use Object-oriented Programming. Such objects often need to be referenced by a wide variety of other objects, and passing references to the manager object around to the methods and constructors that need them can make code hard to read.
Instead, when a singleton is used, the separate objects request the single instance of the manager object from the class, so a reference to it need not to be passed around. The UML diagram doesn't fully describe it, but here it is for completeness:
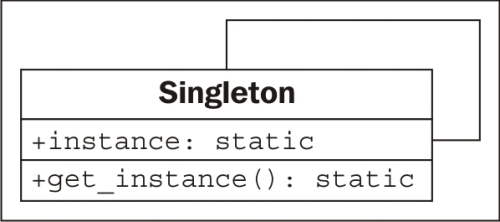
In most programming environments, singletons are enforced by making the constructor private (so no one can create additional instances of it), and then providing a static method to retrieve the single instance. This method creates a new instance the first time it is called, and then returns that same instance each time it is called again.
Python doesn't have private constructors, but for this purpose, it has something even better. We can use the __new__ class method to ensure that only one instance is ever created:
class OneOnly:
_singleton = None
def __new__(cls, *args, **kwargs):
if not cls._singleton:
cls._singleton = super(OneOnly, cls
).__new__(cls, *args, **kwargs)
return cls._singletonWhen __new__ is called, it normally constructs a new instance of that class. When we override it, we first check if our singleton instance has been created; if not, we create it using a super call. Thus, whenever we call the constructor on OneOnly, we always get the exact same instance:
>>> o1 = OneOnly() >>> o2 = OneOnly() >>> o1 == o2 True >>> o1 <__main__.OneOnly object at 0xb71c008c> >>> o2 <__main__.OneOnly object at 0xb71c008c>
The two objects are equal and located at the same address; thus, they are the same object. This particular implementation isn't very transparent, since it's not obvious that a singleton object has been created. Whenever we call a constructor, we expect a new instance of that object; in this case, that contract is violated. Perhaps, good docstrings on the class could alleviate this problem if we really think we need a singleton.
But we don't need it. Python coders frown on forcing the users of their code into a specific mindset. We may think only one instance of a class will ever be required, but other programmers may have different ideas. Singletons can interfere with distributed computing, parallel programming, and automated testing, for example. In all those cases, it can be very useful to have multiple or alternative instances of a specific object, even though a "normal' operation may never require one.
Module variables can mimic singletons
Normally, in Python, the singleton pattern can be sufficiently mimicked using module-level variables. It's not as "safe" as a singleton in that people could reassign those variables at any time, but as with the private variables we discussed in Chapter 2, Objects in Python, this is acceptable in Python. If someone has a valid reason to change those variables, why should we stop them? It also doesn't stop people from instantiating multiple instances of the object, but again, if they have a valid reason to do so, why interfere?
Ideally, we should give them a mechanism to get access to the "default singleton" value, while also allowing them to create other instances if they need them. While technically not a singleton at all, it provides the most Pythonic mechanism for singleton-like behavior.
To use module-level variables instead of a singleton, we instantiate an instance of the class after we've defined it. We can improve our state pattern to use singletons. Instead of creating a new object every time we change states, we can create a module-level variable that is always accessible:
class FirstTag:
def process(self, remaining_string, parser):
i_start_tag = remaining_string.find('<')
i_end_tag = remaining_string.find('>')
tag_name = remaining_string[i_start_tag+1:i_end_tag]
root = Node(tag_name)
parser.root = parser.current_node = root
parser.state = child_node
return remaining_string[i_end_tag+1:]
class ChildNode:
def process(self, remaining_string, parser):
stripped = remaining_string.strip()
if stripped.startswith("</"):
parser.state = close_tag
elif stripped.startswith("<"):
parser.state = open_tag
else:
parser.state = text_node
return stripped
class OpenTag:
def process(self, remaining_string, parser):
i_start_tag = remaining_string.find('<')
i_end_tag = remaining_string.find('>')
tag_name = remaining_string[i_start_tag+1:i_end_tag]
node = Node(tag_name, parser.current_node)
parser.current_node.children.append(node)
parser.current_node = node
parser.state = child_node
return remaining_string[i_end_tag+1:]
class TextNode:
def process(self, remaining_string, parser):
i_start_tag = remaining_string.find('<')
text = remaining_string[:i_start_tag]
parser.current_node.text = text
parser.state = child_node
return remaining_string[i_start_tag:]
class CloseTag:
def process(self, remaining_string, parser):
i_start_tag = remaining_string.find('<')
i_end_tag = remaining_string.find('>')
assert remaining_string[i_start_tag+1] == "/"
tag_name = remaining_string[i_start_tag+2:i_end_tag]
assert tag_name == parser.current_node.tag_name
parser.current_node = parser.current_node.parent
parser.state = child_node
return remaining_string[i_end_tag+1:].strip()
first_tag = FirstTag()
child_node = ChildNode()
text_node = TextNode()
open_tag = OpenTag()
close_tag = CloseTag()
All we've done is create instances of the various state classes that can be reused. Notice how we can access these module variables inside the classes, even before the variables have been defined? This is because the code inside the classes is not executed until the method is called, and by this point, the entire module will have been defined.
The difference in this example is that instead of wasting memory creating a bunch of new instances that must be garbage collected, we are reusing a single state object for each state. Even if multiple parsers are running at once, only these state classes need to be used.
When we originally created the state-based parser, you may have wondered why we didn't pass the parser object to __init__ on each individual state, instead of passing it into the process method as we did. The state could then have been referenced as self.parser. This is a perfectly valid implementation of the state pattern, but it would not have allowed leveraging the singleton pattern. If the state objects maintain a reference to the parser, then they cannot be used simultaneously to reference other parsers.
Singleton implementation
Python doesn't have private constructors, but for this purpose, it has something even better. We can use the __new__ class method to ensure that only one instance is ever created:
class OneOnly:
_singleton = None
def __new__(cls, *args, **kwargs):
if not cls._singleton:
cls._singleton = super(OneOnly, cls
).__new__(cls, *args, **kwargs)
return cls._singletonWhen __new__ is called, it normally constructs a new instance of that class. When we override it, we first check if our singleton instance has been created; if not, we create it using a super call. Thus, whenever we call the constructor on OneOnly, we always get the exact same instance:
>>> o1 = OneOnly() >>> o2 = OneOnly() >>> o1 == o2 True >>> o1 <__main__.OneOnly object at 0xb71c008c> >>> o2 <__main__.OneOnly object at 0xb71c008c>
The two objects are equal and located at the same address; thus, they are the same object. This particular implementation isn't very transparent, since it's not obvious that a singleton object has been created. Whenever we call a constructor, we expect a new instance of that object; in this case, that contract is violated. Perhaps, good docstrings on the class could alleviate this problem if we really think we need a singleton.
But we don't need it. Python coders frown on forcing the users of their code into a specific mindset. We may think only one instance of a class will ever be required, but other programmers may have different ideas. Singletons can interfere with distributed computing, parallel programming, and automated testing, for example. In all those cases, it can be very useful to have multiple or alternative instances of a specific object, even though a "normal' operation may never require one.
Module variables can mimic singletons
Normally, in Python, the singleton pattern can be sufficiently mimicked using module-level variables. It's not as "safe" as a singleton in that people could reassign those variables at any time, but as with the private variables we discussed in Chapter 2, Objects in Python, this is acceptable in Python. If someone has a valid reason to change those variables, why should we stop them? It also doesn't stop people from instantiating multiple instances of the object, but again, if they have a valid reason to do so, why interfere?
Ideally, we should give them a mechanism to get access to the "default singleton" value, while also allowing them to create other instances if they need them. While technically not a singleton at all, it provides the most Pythonic mechanism for singleton-like behavior.
To use module-level variables instead of a singleton, we instantiate an instance of the class after we've defined it. We can improve our state pattern to use singletons. Instead of creating a new object every time we change states, we can create a module-level variable that is always accessible:
class FirstTag:
def process(self, remaining_string, parser):
i_start_tag = remaining_string.find('<')
i_end_tag = remaining_string.find('>')
tag_name = remaining_string[i_start_tag+1:i_end_tag]
root = Node(tag_name)
parser.root = parser.current_node = root
parser.state = child_node
return remaining_string[i_end_tag+1:]
class ChildNode:
def process(self, remaining_string, parser):
stripped = remaining_string.strip()
if stripped.startswith("</"):
parser.state = close_tag
elif stripped.startswith("<"):
parser.state = open_tag
else:
parser.state = text_node
return stripped
class OpenTag:
def process(self, remaining_string, parser):
i_start_tag = remaining_string.find('<')
i_end_tag = remaining_string.find('>')
tag_name = remaining_string[i_start_tag+1:i_end_tag]
node = Node(tag_name, parser.current_node)
parser.current_node.children.append(node)
parser.current_node = node
parser.state = child_node
return remaining_string[i_end_tag+1:]
class TextNode:
def process(self, remaining_string, parser):
i_start_tag = remaining_string.find('<')
text = remaining_string[:i_start_tag]
parser.current_node.text = text
parser.state = child_node
return remaining_string[i_start_tag:]
class CloseTag:
def process(self, remaining_string, parser):
i_start_tag = remaining_string.find('<')
i_end_tag = remaining_string.find('>')
assert remaining_string[i_start_tag+1] == "/"
tag_name = remaining_string[i_start_tag+2:i_end_tag]
assert tag_name == parser.current_node.tag_name
parser.current_node = parser.current_node.parent
parser.state = child_node
return remaining_string[i_end_tag+1:].strip()
first_tag = FirstTag()
child_node = ChildNode()
text_node = TextNode()
open_tag = OpenTag()
close_tag = CloseTag()
All we've done is create instances of the various state classes that can be reused. Notice how we can access these module variables inside the classes, even before the variables have been defined? This is because the code inside the classes is not executed until the method is called, and by this point, the entire module will have been defined.
The difference in this example is that instead of wasting memory creating a bunch of new instances that must be garbage collected, we are reusing a single state object for each state. Even if multiple parsers are running at once, only these state classes need to be used.
When we originally created the state-based parser, you may have wondered why we didn't pass the parser object to __init__ on each individual state, instead of passing it into the process method as we did. The state could then have been referenced as self.parser. This is a perfectly valid implementation of the state pattern, but it would not have allowed leveraging the singleton pattern. If the state objects maintain a reference to the parser, then they cannot be used simultaneously to reference other parsers.
The template pattern is useful for removing duplicate code; it's an implementation to support the Don't Repeat Yourself principle we discussed in Chapter 5, When to Use Object-oriented Programming. It is designed for situations where we have several different tasks to accomplish that have some, but not all, steps in common. The common steps are implemented in a base class, and the distinct steps are overridden in subclasses to provide custom behavior. In some ways, it's like a generalized strategy pattern, except similar sections of the algorithms are shared using a base class. Here it is in the UML format:

Let's create a car sales reporter as an example. We can store records of sales in an SQLite database table. SQLite is a simple file-based database engine that allows us to store records using SQL syntax. Python 3 includes SQLite in its standard library, so there are no extra modules required.
We have two common tasks we need to perform:
- Select all sales of new vehicles and output them to the screen in a comma-delimited format
- Output a comma-delimited list of all salespeople with their gross sales and save it to a file that can be imported to a spreadsheet
These seem like quite different tasks, but they have some common features. In both cases, we need to perform the following steps:
- Connect to the database.
- Construct a query for new vehicles or gross sales.
- Issue the query.
- Format the results into a comma-delimited string.
- Output the data to a file or e-mail.
The query construction and output steps are different for the two tasks, but the remaining steps are identical. We can use the template pattern to put the common steps in a base class, and the varying steps in two subclasses.
Before we start, let's create a database and put some sample data in it, using a few lines of SQL:
import sqlite3
conn = sqlite3.connect("sales.db")
conn.execute("CREATE TABLE Sales (salesperson text, "
"amt currency, year integer, model text, new boolean)")
conn.execute("INSERT INTO Sales values"
" ('Tim', 16000, 2010, 'Honda Fit', 'true')")
conn.execute("INSERT INTO Sales values"
" ('Tim', 9000, 2006, 'Ford Focus', 'false')")
conn.execute("INSERT INTO Sales values"
" ('Gayle', 8000, 2004, 'Dodge Neon', 'false')")
conn.execute("INSERT INTO Sales values"
" ('Gayle', 28000, 2009, 'Ford Mustang', 'true')")
conn.execute("INSERT INTO Sales values"
" ('Gayle', 50000, 2010, 'Lincoln Navigator', 'true')")
conn.execute("INSERT INTO Sales values"
" ('Don', 20000, 2008, 'Toyota Prius', 'false')")
conn.commit()
conn.close()Hopefully you can see what's going on here even if you don't know SQL; we've created a table to hold the data, and used six insert statements to add sales records. The data is stored in a file named sales.db. Now we have a sample we can work with in developing our template pattern.
Since we've already outlined the steps that the template has to perform, we can start by defining the base class that contains the steps. Each step gets its own method (to make it easy to selectively override any one step), and we have one more managerial method that calls the steps in turn. Without any method content, here's how it might look:
class QueryTemplate:
def connect(self):
pass
def construct_query(self):
pass
def do_query(self):
pass
def format_results(self):
pass
def output_results(self):
pass
def process_format(self):
self.connect()
self.construct_query()
self.do_query()
self.format_results()
self.output_results()The
process_format method is the primary method to be called by an outside client. It ensures each step is executed in order, but it does not care if that step is implemented in this class or in a subclass. For our examples, we know that three methods are going to be identical between our two classes:
import sqlite3
class QueryTemplate:
def connect(self):
self.conn = sqlite3.connect("sales.db")
def construct_query(self):
raise NotImplementedError()
def do_query(self):
results = self.conn.execute(self.query)
self.results = results.fetchall()
def format_results(self):
output = []
for row in self.results:
row =[str(i) for i in row]
output.append(", ".join(row))
self.formatted_results = "\n".join(output)
def output_results(self):
raise NotImplementedError()
To help with implementing subclasses, the two methods that are not specified raise NotImplementedError. This is a common way to specify abstract interfaces in Python when abstract base classes seem too heavyweight. The methods could have empty implementations (with pass), or could be fully unspecified. Raising NotImplementedError, however, helps the programmer understand that the class is meant to be subclassed and these methods overridden; empty methods or methods that do not exist are harder to identify as needing to be implemented and to debug if we forget to implement them.
Now we have a template class that takes care of the boring details, but is flexible enough to allow the execution and formatting of a wide variety of queries. The best part is, if we ever want to change our database engine from SQLite to another database engine (such as py-postgresql), we only have to do it here, in this template class, and we don't have to touch the two (or two hundred) subclasses we might have written.
Let's have a look at the concrete classes now:
import datetime class NewVehiclesQuery(QueryTemplate): def construct_query(self): self.query = "select * from Sales where new='true'" def output_results(self): print(self.formatted_results) class UserGrossQuery(QueryTemplate): def construct_query(self): self.query = ("select salesperson, sum(amt) " + " from Sales group by salesperson") def output_results(self): filename = "gross_sales_{0}".format( datetime.date.today().strftime("%Y%m%d") ) with open(filename, 'w') as outfile: outfile.write(self.formatted_results)
These two classes are actually pretty short, considering what they're doing: connecting to a database, executing a query, formatting the results, and outputting them. The superclass takes care of the repetitive work, but lets us easily specify those steps that vary between tasks. Further, we can also easily change steps that are provided in the base class. For example, if we wanted to output something other than a comma-delimited string (for example: an HTML report to be uploaded to a website), we can still override format_results.
A template example
Let's create a car sales reporter as an example. We can store records of sales in an SQLite database table. SQLite is a simple file-based database engine that allows us to store records using SQL syntax. Python 3 includes SQLite in its standard library, so there are no extra modules required.
We have two common tasks we need to perform:
- Select all sales of new vehicles and output them to the screen in a comma-delimited format
- Output a comma-delimited list of all salespeople with their gross sales and save it to a file that can be imported to a spreadsheet
These seem like quite different tasks, but they have some common features. In both cases, we need to perform the following steps:
- Connect to the database.
- Construct a query for new vehicles or gross sales.
- Issue the query.
- Format the results into a comma-delimited string.
- Output the data to a file or e-mail.
The query construction and output steps are different for the two tasks, but the remaining steps are identical. We can use the template pattern to put the common steps in a base class, and the varying steps in two subclasses.
Before we start, let's create a database and put some sample data in it, using a few lines of SQL:
import sqlite3
conn = sqlite3.connect("sales.db")
conn.execute("CREATE TABLE Sales (salesperson text, "
"amt currency, year integer, model text, new boolean)")
conn.execute("INSERT INTO Sales values"
" ('Tim', 16000, 2010, 'Honda Fit', 'true')")
conn.execute("INSERT INTO Sales values"
" ('Tim', 9000, 2006, 'Ford Focus', 'false')")
conn.execute("INSERT INTO Sales values"
" ('Gayle', 8000, 2004, 'Dodge Neon', 'false')")
conn.execute("INSERT INTO Sales values"
" ('Gayle', 28000, 2009, 'Ford Mustang', 'true')")
conn.execute("INSERT INTO Sales values"
" ('Gayle', 50000, 2010, 'Lincoln Navigator', 'true')")
conn.execute("INSERT INTO Sales values"
" ('Don', 20000, 2008, 'Toyota Prius', 'false')")
conn.commit()
conn.close()Hopefully you can see what's going on here even if you don't know SQL; we've created a table to hold the data, and used six insert statements to add sales records. The data is stored in a file named sales.db. Now we have a sample we can work with in developing our template pattern.
Since we've already outlined the steps that the template has to perform, we can start by defining the base class that contains the steps. Each step gets its own method (to make it easy to selectively override any one step), and we have one more managerial method that calls the steps in turn. Without any method content, here's how it might look:
class QueryTemplate:
def connect(self):
pass
def construct_query(self):
pass
def do_query(self):
pass
def format_results(self):
pass
def output_results(self):
pass
def process_format(self):
self.connect()
self.construct_query()
self.do_query()
self.format_results()
self.output_results()The
process_format method is the primary method to be called by an outside client. It ensures each step is executed in order, but it does not care if that step is implemented in this class or in a subclass. For our examples, we know that three methods are going to be identical between our two classes:
import sqlite3
class QueryTemplate:
def connect(self):
self.conn = sqlite3.connect("sales.db")
def construct_query(self):
raise NotImplementedError()
def do_query(self):
results = self.conn.execute(self.query)
self.results = results.fetchall()
def format_results(self):
output = []
for row in self.results:
row =[str(i) for i in row]
output.append(", ".join(row))
self.formatted_results = "\n".join(output)
def output_results(self):
raise NotImplementedError()
To help with implementing subclasses, the two methods that are not specified raise NotImplementedError. This is a common way to specify abstract interfaces in Python when abstract base classes seem too heavyweight. The methods could have empty implementations (with pass), or could be fully unspecified. Raising NotImplementedError, however, helps the programmer understand that the class is meant to be subclassed and these methods overridden; empty methods or methods that do not exist are harder to identify as needing to be implemented and to debug if we forget to implement them.
Now we have a template class that takes care of the boring details, but is flexible enough to allow the execution and formatting of a wide variety of queries. The best part is, if we ever want to change our database engine from SQLite to another database engine (such as py-postgresql), we only have to do it here, in this template class, and we don't have to touch the two (or two hundred) subclasses we might have written.
Let's have a look at the concrete classes now:
import datetime class NewVehiclesQuery(QueryTemplate): def construct_query(self): self.query = "select * from Sales where new='true'" def output_results(self): print(self.formatted_results) class UserGrossQuery(QueryTemplate): def construct_query(self): self.query = ("select salesperson, sum(amt) " + " from Sales group by salesperson") def output_results(self): filename = "gross_sales_{0}".format( datetime.date.today().strftime("%Y%m%d") ) with open(filename, 'w') as outfile: outfile.write(self.formatted_results)
These two classes are actually pretty short, considering what they're doing: connecting to a database, executing a query, formatting the results, and outputting them. The superclass takes care of the repetitive work, but lets us easily specify those steps that vary between tasks. Further, we can also easily change steps that are provided in the base class. For example, if we wanted to output something other than a comma-delimited string (for example: an HTML report to be uploaded to a website), we can still override format_results.
While writing this chapter, I discovered that it can be very difficult, and extremely educational, to come up with good examples where specific design patterns should be used. Instead of going over current or old projects to see where you can apply these patterns, as I've suggested in previous chapters, think about the patterns and different situations where they might come up. Try to think outside your own experiences. If your current projects are in the banking business, consider how you'd apply these design patterns in a retail or point-of-sale application. If you normally write web applications, think about using design patterns while writing a compiler.
Look at the decorator pattern and come up with some good examples of when to apply it. Focus on the pattern itself, not the Python syntax we discussed; it's a bit more general than the actual pattern. The special syntax for decorators is, however, something you may want to look for places to apply in existing projects too.
What are some good areas to use the observer pattern? Why? Think about not only how you'd apply the pattern, but how you would implement the same task without using observer? What do you gain, or lose, by choosing to use it?
Consider the difference between the strategy and state patterns. Implementation-wise, they look very similar, yet they have different purposes. Can you think of cases where the patterns could be interchanged? Would it be reasonable to redesign a state-based system to use strategy instead, or vice versa? How different would the design actually be?
The template pattern is such an obvious application of inheritance to reduce duplicate code that you may have used it before, without knowing its name. Try to think of at least half a dozen different scenarios where it would be useful. If you can do this, you'll be finding places for it in your daily coding all the time.
This chapter discussed several common design patterns in detail, with examples, UML diagrams, and a discussion of the differences between Python and statically typed object-oriented languages. The decorator pattern is often implemented using Python's more generic decorator syntax. The observer pattern is a useful way to decouple events from actions taken on those events. The strategy pattern allows different algorithms to be chosen to accomplish the same task. The state pattern looks similar, but is used instead to represent systems can move between different states using well-defined actions. The singleton pattern, popular in some statically typed languages, is almost always an anti-pattern in Python.
In the next chapter, we'll wrap up our discussion of design patterns.