
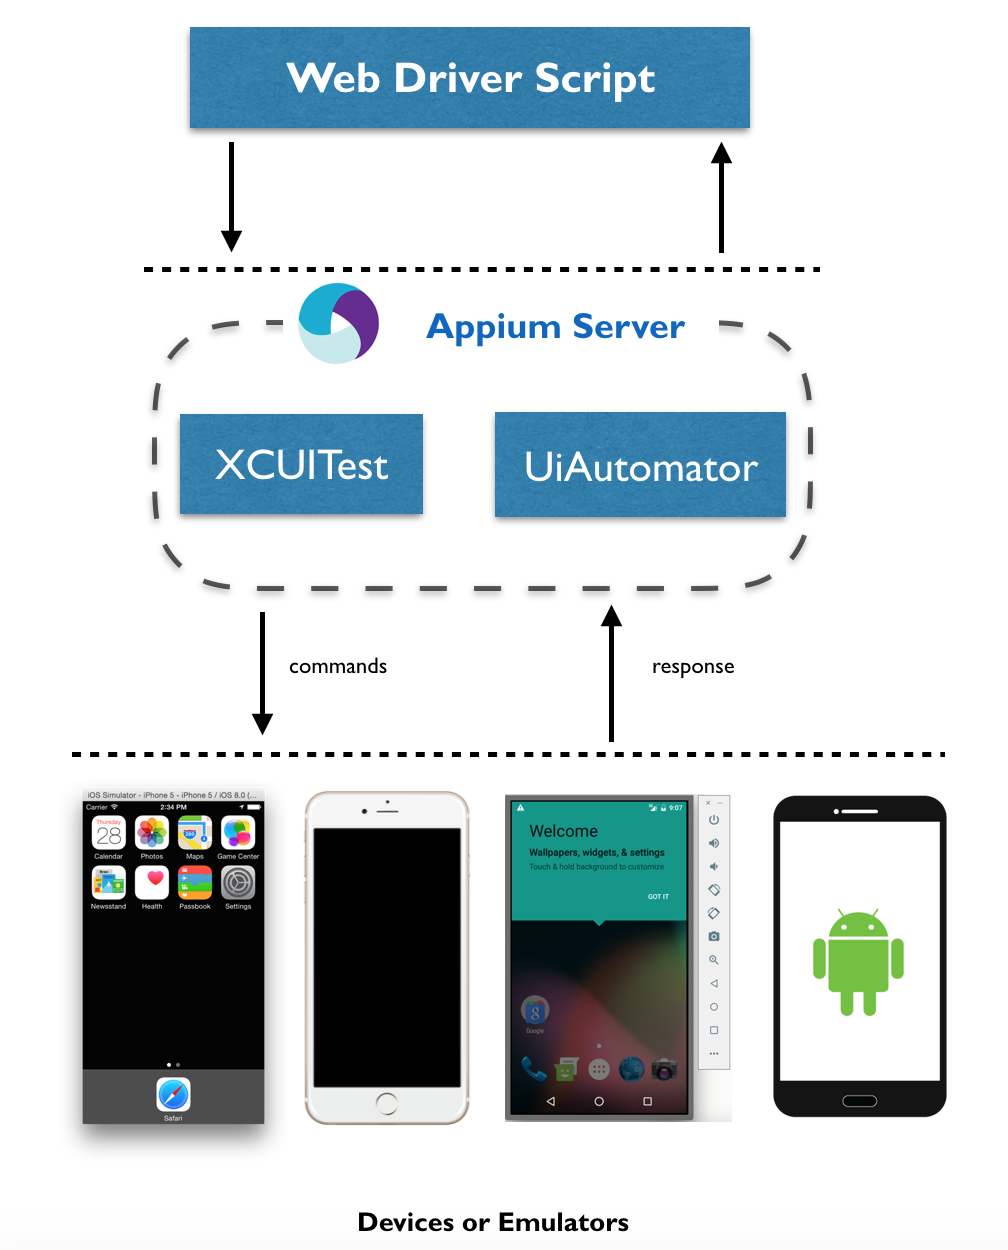
Now that we have understood the different types of mobile apps, let's take a look at how Appium is architected to support mobile app automation. Appium is basically a web server written in Node.js. The server performs actions in the given order:
- Receives connection from client and initiates a session
- Listens for commands issued
- Executes those commands
- Returns the command execution status
So basically, Appium is a client-server architecture.
The Appium server receives a connection from client in the form of a JSON object over HTTP. Once the server receives the details, it creates a session, as specified in JSON, and returns the session ID, which will be maintained until the Appium server is running. So, all testing will be performed in the context of this newly created session. The following is a diagram depicting the Appium architecture:
The Appium server is written in Node.js; it can be installed via npm or directly from source.
XCUITest is an automation framework introduced by Apple with the iOS 9.3 version. However, from iOS 10 and later versions, it's the only supported automation framework.
Appium 1.6.0 uses Apple's new XCUITest framework, which supports iOS 10/Xcode 8. Appium internally uses Facebook's WebDriverAgent project to support XCUITest. For the older iOS version (<=9.3), Appium uses Apple's UIAutomation library. Typical usage would be to pass the following in desired capabilities:
automationName: XCUITestFacebook WebDriverAgent is a WebDriver server implementation for iOS. It is used to remote control connected devices or simulators and allows one to launch an app, perform commands (such as tap and scroll), and kill applications.
The UIAutomation library communicates with bootstrap.js, which is running inside the device or simulator to perform the commands received by the Appium client:

UIAutomator 2 is an automation framework based on Android instrumentation and allows one to build and run UI tests.
Appium uses Google's UIAutomator to execute commands on real devices and emulators. UIAutomator is Google's test framework for native app automation at the UI level. Typical usage would be to pass the following in desired capabilities:
automationName: uiautomator2With version 1.6, Appium has provided support to UiAutomator 2. Appium uses the appium-android-bootstrap module to interact with UI Automator. It allows commands to be sent to the device, which are then executed on real devices using Android's UIAutomator testing framework.
When Appium client requests to create a new AndroidDriver session, the client passes the desired capability to the Appium node server. The UIAutomator2 driver module creates the session. It then installs the UIAutomator2 server APK on the connected Android device, starts the Netty server, and initiates a session. Once the Netty server session is started, the UIAutomator2 server continues to listen on the device for requests and responds:

Picture courtesy--GitHub Appium page
Appium has many advantages; some of them are listed here:
- It's an open source tool backed by a very active community.
- It supports multiple languages (Java, JavaScript, Objective C, C#, PHP, Python, Ruby, Clojure, and Perl).
- It doesn't force you to recompile an app or modify it. You can test the same version that you have planned to submit to the play store or app store.
- It allows you to write cross-platform tests.