
So far, we have tested the .NET Standard 2.0 class library with a Windows console application that runs under full .NET Framework version 4.6.1. In this recipe, we are going to create an ASP.NET Core 2.0 application. ASP.NET Core uses .NET Core, which is an open source, cross-platform supported .NET flavor.
Let's get ready to create the ASP.NET Core application to use the .NET Standard library we have built in the previous recipe when we created the .NET Standard library. If you haven't followed that recipe, make sure you have completed it. We are going to use that solution and add the ASP.NET Core application to it. Also, make sure you have downloaded and installed the latest version of .NET Core Framework, which is available at http://www.dot.net/core.
Open Visual Studio 2017 and open the solution we saved from the previous recipe. Click Build | Build Solution, or press Ctrl + Shift + B, and the solution should build successfully. Everything's ready for testing our class library.
- Open Visual Studio 2017.
- Now, open the solution from the previous recipe. Click
File|Open|Open Project/Solution, or press Ctrl + Shift + O, and select theChapter1.StandardLibsolution.

- In the
Name:text box, typeChapter1.StandardLib.AspNetCoreas the name of the project and leave theLocation:as it is:

- Click
OK.

- Leave the defaults as they are and Click
OK.
- Now, the
Solution Explorershould look like this:
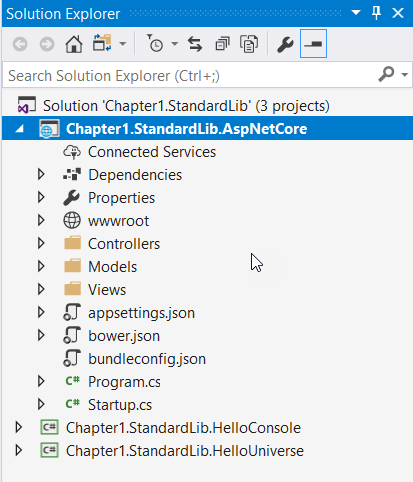
- Select the
Chapter1.StandardLib.AspNetCoreproject, right-click, and selectSet as Startup Project.

Default ASP.NET Core template running on your default browser
- Let's close the browser and add our .NET Standard class library as a reference. To do this, expand the
Chapter1.StandardLib.AspNetCoreproject tree and selectDependencies. - Right-click on the
Dependencieslabel and selectAdd Reference.
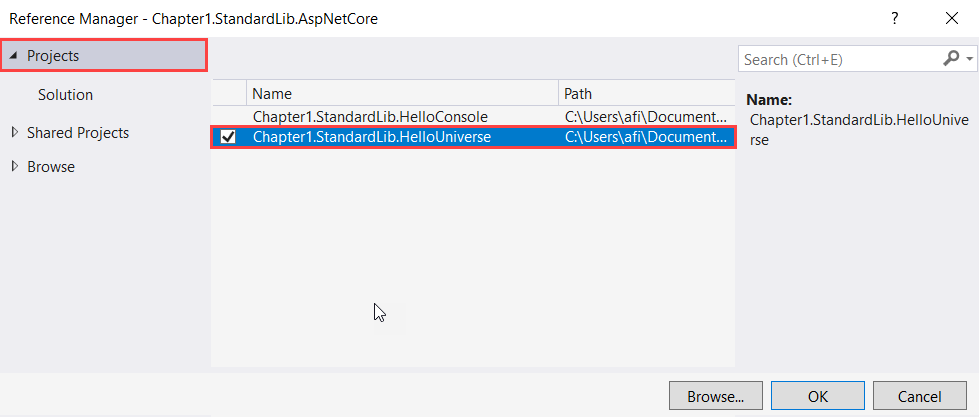
- Under the
Reference Managerdialog box, click on theProjectslabel in the left-hand pane. In the middle pane, check theChapter1.StandardLib.HelloUniverseproject and clickOK.
- Let's expand the
Controllersfolder and double-clickHomeController.cs. - In
HomeController.cs, add this code right next to the last line of theusingdirective block:
using Chapter1.StandardLib;
- Now, inside the
About()action, add the following code block after theViewData["Message"]line (by default, this is after line 21 in the default template):
      var myName = "Fiqri Ismail";
      var helloMessage = new HelloUniverse();
ViewData["HelloMessage"] = helloMessage.SayHello(myName);- Now expand the
Viewsfolder. Again, expand theHomefolder as well. - Double-click on
About.cshtml. - At the end of
About.cshtml, add the following code:
<p>@ViewData["HelloMessage"]</p>
- Now press F5 to see it in action.

About.cshtml page
- Excellent, now you have used a .NET Standard 2.0 library with an ASP.NET Core 2.0 web application.
Let's have a look what we did just now. From steps 1 to 9, we opened and previously built an existing solution containing .NET Standard 2.0 library code. Then, we added an ASP.NET Core project to that solution. In step 10, we told Visual Studio to execute the ASP.NET Core project when we hit F5 or started debugging. In step 11, we tested the default template of ASP.NET Core in a default browser.
In steps 12 to 14, we added the reference to our ASP.NET Core application from the .NET Standard 2.0 class library. This allows you to access the library from an ASP.NET Core 2.0 web application. In step 16, we referenced the class library using the using directive. In step 17, we created a variable to hold the name and created an instance of the HelloUniverse class.
Finally, we have stored the message from the SayHello() method in the ViewData collection. The ViewData collection allows you to transfer data from Controllers to Views. In steps 19 and 20, we opened the relevant view for the About() action, which is About.cshtml. Finally, in step 20, we added simple HTML code to display the stored value in ViewData in the HomeController class. As a last step, we executed the web application and tested it.