Under the purview of styling, we will cover how to apply different colors, fonts, border widths, reliefs, cursors, and bitmap icons to widgets.
First, let's see how to specify the color options for a widget. You can specify the following two types of color for most widgets:
- The background color
- The foreground color
You can specify the color by using hexadecimal color codes for the proportion of red(r), green(g), and blue(b). The commonly used representations are #rgb (4 bits), #rrggbb (8 bits), and #rrrgggbbb (12 bits).
For example, #fff is white, #000000 is black, #f00 is red (R=0xf, G=0x0 , B=0x0 ), #00ff00 is green (R=0x00, G=0xff, B=0x00), and #000000fff is blue (R=0x000 , G=0x000 , B=0xfff ).
Alternatively, Tkinter provides mapping for standard color names. For a list of predefined named colors, visit http://wiki.tcl.tk/37701 or http://wiki.tcl.tk/16166.
Next, let's have a look at how to specify fonts for our widgets. A font can be represented as a string by using the following string signature:
{font family} fontsize fontstyle
The elements of the preceding syntax can be explained as follows:
- font family: This is the complete font family long name. It should preferably be in lowercase, such as font="{nimbus roman} 36 bold italic".
- fontsize: This is in the printer's point unit (pt) or pixel unit (px).
- fontstyle: This is a mix of normal/bold/italic and underline/overstrike.
The following are examples that illustrate the method of specifying fonts:
widget.configure (font='Times 8')
widget.configure(font='Helvetica 24 bold italic')
If you set a Tkinter dimension in a plain integer, the measurements take place in pixel units. Alternatively, Tkinter accepts four other measurement units, which are m(millimeters), c(centimeters), i(inches), and p(printer's points, which are about 1/72").
For instance, if you want to specify the wrap length of a button in terms of a printer's point, you can specify it as follows:
button.configure(wraplength="36p")
The default border width for most Tkinter widgets is 2 px. You can change the border width for widgets by specifying it explicitly, as shown in the following line:
button.configure(borderwidth=5)
The relief style of a widget refers to the difference between the highest and lowest elevations in a widget. Tkinter offers six possible relief styles—flat, raised, sunken, groove, solid, and ridge:
button.configure(relief='raised')
Tkinter lets you change the style of the mouse cursor when you hover over a particular widget. This is done by using the option cursor, as follows:
button.configure(cursor='cross')
For a complete list of available cursors, refer to https://www.tcl.tk/man/tcl8.6/TkCmd/cursors.htm.
Though you can specify the styling options at each widget level, sometimes it may be cumbersome to do so individually for each widget. Widget-specific styling has the following disadvantages:
- It mixes logic and presentation into one file, making the code bulky and difficult to manage
- Any change in styling has to be applied to each widget individually
- It violates the don't repeat yourself (DRY) principle of effective coding, as you keep specifying the same style for a large number of widgets
Fortunately, Tkinter now offers a way to separate presentation from logic and specify styles in what is called the external option database. This is just a text file where you can specify common styling options.
A typical option database text file looks like this:
*background: AntiqueWhite1
*Text*background: #454545
*Button*foreground: gray55
*Button*relief: raised
*Button*width: 3
In its simplest use, the asterisk (*) symbol here means that the particular style is applied to all the instances of the given widget. For a more complex usage of the asterisk in styling, refer to http://infohost.nmt.edu/tcc/help/pubs/tkinter/web/resource-lines.html.
These entries are placed in an external text (.txt) file. To apply this styling to a particular piece of code, you can simply call it by using the option_readfile() call early in your code, as shown here:
root.option_readfile('optionDB.txt')
Let's have a look at an example (see code 1.12.py ) of using this external styling text file in a program:
import tkinter as tk
root = tk.Tk()
root.configure(background='#4D4D4D')#top level styling
# connecting to the external styling optionDB.txt
root.option_readfile('optionDB.txt')
#widget specific styling
mytext = tk.Text(root, background='#101010', foreground="#D6D6D6",
              borderwidth=18, relief='sunken',width=17, height=5)
mytext.insert(tk.END, "Style is knowing who you are, what you want to
                   say, and not giving a damn.")
mytext.grid(row=0, column=0, columnspan=6, padx=5, pady=5)
# all the below widgets get their styling from optionDB.txt file
tk.Button(root, text='*').grid(row=1, column=1)
tk.Button(root, text='^').grid(row=1, column=2)
tk.Button(root, text='#').grid(row=1, column=3)
tk.Button(root, text='<').grid(row=2, column=1)
tk.Button(root, text='OK', cursor='target').grid(row=2, column=2)#changing cursor style
tk.Button(root, text='>').grid(row=2, column=3)
tk.Button(root, text='+').grid(row=3, column=1)
tk.Button(root, text='v').grid(row=3, column=2)
tk.Button(root, text='-').grid(row=3, column=3)
for i in range(9):
   tk.Button(root, text=str(i+1)).grid(row=4+i//3, column=1+i%3)
root.mainloop()
The following is a description of the preceding code:
- The code connects to an external styling file called optionDB.txt that defines common styling for the widgets.
- The next segment of code creates a Text widget and specifies styling on the widget level.
- The next segment of code has several buttons, all of which derive their styling from the centralized optionDB.txt file. One of the buttons also defines a custom cursor.
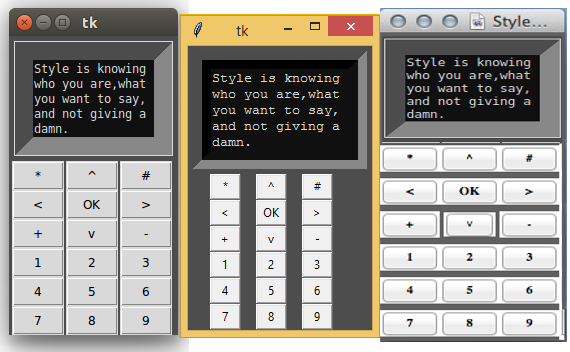
Specifying attributes such as font sizes, the border width, the widget width, the widget height, and padding in absolute numbers, as we have done in the preceding example, can cause some display variations between different operating systems such as Ubuntu, Windows, and Mac respectively, as shown in the following screenshot. This is due to differences in the rendering engines of different operating systems:
When deploying cross-platform, it is better to avoid specifying attribute sizes in absolute numbers. It is often the best choice to let the platform handle the attribute sizes.