

Now that we have a sketch mode, a cartoon mode (painting + sketch mask), and an evil mode (painting + evil mask), for fun let's try something more complex: an "alien" mode, by detecting the skin regions of the face and then changing the skin color to be green.
There are many different techniques used for detecting skin regions, from simple color thresholds using RGB (Red-Green-Blue) or HSV (Hue-Saturation-Brightness) values or color histogram calculation and reprojection, to complex machine-learning algorithms of mixture models that need camera calibration in the CIELab color space and offline training with many sample faces, and so on. But even the complex methods don't necessarily work robustly across various camera and lighting conditions and skin types. Since we want our skin detection to run on a mobile device without any calibration or training, and we are just using skin detection for a "fun" image filter, it is sufficient for us to use a simple skin-detection method. However, the color response from the tiny camera sensors in mobile devices tend to vary significantly, and we want to support skin detection for people of any skin color but without any calibration, so we need something more robust than simple color thresholds.
For example, a simple HSV skin detector can treat any pixel as skin if its hue is fairly red, saturation is fairly high but not extremely high, and its brightness is not too dark or too bright. But mobile cameras often have bad white balancing, and so a person's skin might look slightly blue instead of red, and so on, and this would be a major problem for simple HSV thresholding.
A more robust solution is to perform face detection with a Haar or LBP cascade classifier (shown in Chapter 8, Face Recognition using Eigenfaces), and then look at the range of colors for the pixels in the middle of the detected face since you know that those pixels should be skin pixels of the actual person. You could then scan the whole image or the nearby region for pixels of a similar color as the center of the face. This has the advantage that it is very likely to find at least some of the true skin region of any detected person no matter what their skin color is or even if their skin appears somewhat blue or red in the camera image.
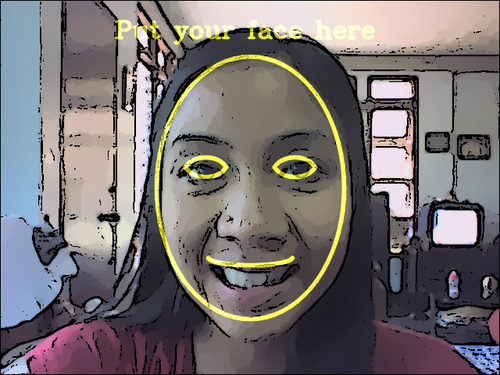
Unfortunately, face detection using cascade classifiers is quite slow on current mobile devices, so this method might be less ideal for some real-time mobile applications. On the other hand, we can take advantage of the fact that for mobile apps it can be assumed that the user will be holding the camera directly towards a person's face from close up, and since the user is holding the camera in their hand, which they can easily move, it is quite reasonable to ask the user to place their face at a specific location and distance, rather than try to detect the location and size of their face. This is the basis of many mobile phone apps where the app asks the user to place their face at a certain position or perhaps to manually drag points on the screen to show where the corners of their face are in a photo. So let's simply draw the outline of a face in the center of the screen and ask the user to move their face to the shown position and size.
When the alien mode is first started, we will draw the face outline on top of the camera frame so the user knows where to put their face. We will draw a big ellipse covering 70 percent of the image height, with a fixed aspect ratio of 0.72 so that the face will not become too skinny or fat depending on the aspect ratio of the camera:
// Draw the color face onto a black background.
Mat faceOutline = Mat::zeros(size, CV_8UC3);
Scalar color = CV_RGB(255,255,0);    // Yellow.
int thickness = 4;
// Use 70% of the screen height as the face height.
int sw = size.width;
int sh = size.height;
int faceH = sh/2 * 70/100;  // "faceH" is the radius of the ellipse.
// Scale the width to be the same shape for any screen width. int faceW = faceH * 72/100;
// Draw the face outline.
ellipse(faceOutline, Point(sw/2, sh/2), Size(faceW, faceH),
        0, 0, 360, color, thickness, CV_AA);
To make it more obvious that it is a face, let's also draw two eye outlines. Rather than drawing an eye as an ellipse, we can make it a bit more realistic (see the following figure) by drawing a truncated
ellipse for the top of the eye and a truncated ellipse for the bottom of the eye, since we can specify the start and end angles when drawing with ellipse():
// Draw the eye outlines, as 2 arcs per eye.
int eyeW = faceW * 23/100;
int eyeH = faceH * 11/100;
int eyeX = faceW * 48/100;
int eyeY = faceH * 13/100;
Size eyeSize = Size(eyeW, eyeH);
// Set the angle and shift for the eye half ellipses.
int eyeA = 15; // angle in degrees.
int eyeYshift = 11;
// Draw the top of the right eye.
ellipse(faceOutline, Point(sw/2 - eyeX, sh/2 – eyeY),
        eyeSize, 0, 180+eyeA, 360-eyeA, color, thickness, CV_AA);
// Draw the bottom of the right eye.
ellipse(faceOutline, Point(sw/2 - eyeX, sh/2 - eyeY – eyeYshift),
       eyeSize, 0, 0+eyeA, 180-eyeA, color, thickness, CV_AA);
// Draw the top of the left eye.
ellipse(faceOutline, Point(sw/2 + eyeX, sh/2 - eyeY),
       eyeSize, 0, 180+eyeA, 360-eyeA, color, thickness, CV_AA);
// Draw the bottom of the left eye.
ellipse(faceOutline, Point(sw/2 + eyeX, sh/2 - eyeY – eyeYshift),
       eyeSize, 0, 0+eyeA, 180-eyeA, color, thickness, CV_AA);
We can use the same method to draw the bottom lip of the mouth:
// Draw the bottom lip of the mouth.
int mouthY = faceH * 48/100;
int mouthW = faceW * 45/100;
int mouthH = faceH * 6/100;
ellipse(faceOutline, Point(sw/2, sh/2 + mouthY), Size(mouthW,
        mouthH), 0, 0, 180, color, thickness, CV_AA);
To make it even more obvious that the user should put their face where shown, let's write a message on the screen!
// Draw anti-aliased text.
int fontFace = FONT_HERSHEY_COMPLEX;
float fontScale = 1.0f;
int fontThickness = 2;
char *szMsg = "Put your face here";
putText(faceOutline, szMsg, Point(sw * 23/100, sh * 10/100),
       fontFace, fontScale, color, fontThickness, CV_AA);
Now that we have the face outline drawn, we can overlay it onto the displayed image by using alpha blending to combine the cartoonified image with this drawn outline:
addWeighted(dst, 1.0, faceOutline, 0.7, 0, dst, CV_8UC3);
This results in the outline on the following figure, showing the user where to put their face so we don't have to detect the face location:
Rather than detecting the skin color and then the region with that skin color, we can use OpenCV's floodFill(), which is similar to the bucket fill tool in many image editing programs. We know that the regions in the middle of the screen should be skin pixels (since we asked the user to put their face in the middle), so to change the whole face to have green skin, we can just apply a green flood fill on the center pixel, which will always color at least some parts of the face as green. In reality, the color, saturation, and brightness is likely to be different in different parts of the face, so a flood fill will rarely cover all the skin pixels of a face unless the threshold is so low that it also covers unwanted pixels outside the face. So, instead of applying a single flood fill in the center of the image, let's apply a flood fill on six different points around the face that should be skin pixels.
A nice feature of OpenCV's floodFill() function is that it can draw the flood fill into an external image rather than modifying the input image. So this feature can give us a mask image for adjusting the color of the skin pixels without necessarily changing the brightness or saturation, producing a more realistic image than if all skin pixels became an identical green pixel (losing significant face detail as a result).
Skin-color changing does not work so well in the RGB color-space. This is because you want to allow brightness to vary in the face but not allow skin color to vary much, and RGB does not separate brightness from color. One solution is to use the Hue-Saturation-Brightness (HSV) color-space, since it separates brightness from the color (hue) as well as the colorfulness (saturation). Unfortunately, HSV wraps the hue value around red, and since skin is mostly red it means that you need to work both with a hue of less than 10 percent and a hue greater than 90 percent, since these are both red. Accordingly, we will instead use the Y'CrCb color-space (the variant of YUV, which is in OpenCV), since it separates brightness from color, and only has a single range of values for typical skin color rather than two. Note that most cameras, images, and videos actually use some type of YUV as their color-space before conversion to RGB, so in many cases you can get a YUV image without having to convert it yourself.
Since we want our alien mode to look like a cartoon, we will apply the alien filter after the image has already been cartoonified; in other words, we have access to the shrunken color image produced by the bilateral filter, and to the full-sized edge mask. Skin detection often works better at low resolutions, since it is the equivalent of analyzing the average value of each high-resolution pixel's neighbors (or the low-frequency signal instead of the high-frequency noisy signal). So let's work at the same shrunken scale as the bilateral filter (half width and half height). Let's convert the painting image to YUV:
Mat yuv = Mat(smallSize, CV_8UC3);
cvtColor(smallImg, yuv, CV_BGR2YCrCb);
We also need to shrink the edge mask so it is at the same scale as the painting image. There is a complication with OpenCV's floodFill() function when storing to a separate mask image, in that the mask should have a 1-pixel border around the whole image, so if the input image is W x H pixels in size, the separate mask image should be (W+2) x (H+2) pixels in size. But floodFill() also allows us to initialize the mask with edges that the flood-fill algorithm will ensure it does not cross. Let's use this feature in the hope that it helps prevent the flood fill from extending outside the face. So we need to provide two mask images: the edge mask that measures W x H in size, and the same edge mask but measuring (W+2) x (H+2) in size because it should include a border around the image. It is possible to have multiple cv::Mat objects (or headers) referencing the same data, or even to have a cv::Mat object that references a sub-region of another cv::Mat image. So instead of allocating two separate images and copying the edge mask pixels across, let's allocate a single mask image including the border, and create an extra cv::Mat header of W x H (that just references the region of interest in the flood-fill mask without the border). In other words, there is just one array of pixels of size (W+2) x (H+2) but two cv::Mat objects, where one is referencing the whole (W+2) x (H+2) image and the other is referencing the W x H region in the middle of that image:
int sw = smallSize.width;
int sh = smallSize.height;
Mat mask, maskPlusBorder;
maskPlusBorder = Mat::zeros(sh+2, sw+2, CV_8UC1);
mask = maskPlusBorder(Rect(1,1,sw,sh)); // mask is in maskPlusBorder.
resize(edge, mask, smallSize);         // Put edges in both of them.
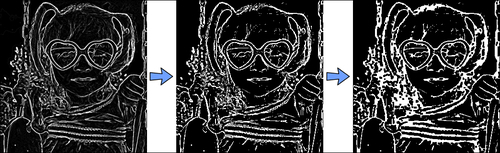
The edge mask
(shown on the left-hand side of the following figure) is full of both strong and weak edges; but we only want strong edges, so we will apply a binary threshold (resulting in the middle image in the following figure). To join some gaps between edges we will then combine the morphological operators dilate() and erode() to remove some gaps (also referred to as the "close" operator), resulting in the right side of the figure:
const int EDGES_THRESHOLD = 80;
threshold(mask, mask, EDGES_THRESHOLD, 255, THRESH_BINARY);
dilate(mask, mask, Mat());
erode(mask, mask, Mat());
As mentioned earlier, we want to apply flood fills in numerous points around the face to make sure we include the various colors and shades of the whole face. Let's choose six points around the nose, cheeks, and forehead, as shown on the left side of the next figure. Note that these values are dependent on the face outline drawn earlier:
int const NUM_SKIN_POINTS = 6;
Point skinPts[NUM_SKIN_POINTS];
skinPts[0] = Point(sw/2,          sh/2 - sh/6);
skinPts[1] = Point(sw/2 - sw/11,  sh/2 - sh/6);
skinPts[2] = Point(sw/2 + sw/11,  sh/2 - sh/6);
skinPts[3] = Point(sw/2,          sh/2 + sh/16);
skinPts[4] = Point(sw/2 - sw/9,   sh/2 + sh/16);
skinPts[5] = Point(sw/2 + sw/9,   sh/2 + sh/16);
Now we just need to find some good lower and upper bounds for the flood fill. Remember that this is being performed in the Y'CrCb color space, so we basically decide how much the brightness, red component, and blue component can vary. We want to allow the brightness to vary a lot, to include shadows as well as highlights and reflections, but we don't want the colors to vary much at all:
const int LOWER_Y = 60;
const int UPPER_Y = 80;
const int LOWER_Cr = 25;
const int UPPER_Cr = 15;
const int LOWER_Cb = 20;
const int UPPER_Cb = 15;
Scalar lowerDiff = Scalar(LOWER_Y, LOWER_Cr, LOWER_Cb);
Scalar upperDiff = Scalar(UPPER_Y, UPPER_Cr, UPPER_Cb);
We will use floodFill() with its default flags, except that we want to store to an external mask, so we must specify FLOODFILL_MASK_ONLY:
const int CONNECTED_COMPONENTS = 4;  // To fill diagonally, use 8. const int flags = CONNECTED_COMPONENTS | FLOODFILL_FIXED_RANGE \
     | FLOODFILL_MASK_ONLY;
Mat edgeMask = mask.clone();    // Keep a copy of the edge mask.
// "maskPlusBorder" is initialized with edges to block floodFill().
for (int i=0; i< NUM_SKIN_POINTS; i++) {
  floodFill(yuv, maskPlusBorder, skinPts[i], Scalar(), NULL,
          lowerDiff, upperDiff, flags);
}
In the following figure, the left side shows the six flood-fill locations (shown as blue circles), and the right side of the figure shows the external mask that is generated, where skin is shown as gray and edges are shown as white. Note that the right-side image was modified for this book so that skin pixels (of value 1) are clearly visible:
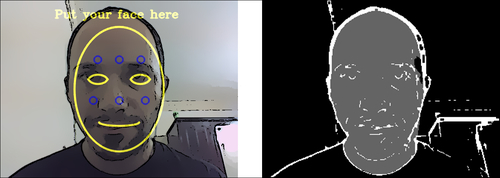
The mask image (shown on the right side of the previous figure) now contains:
pixels of value 255 for the edge pixels
pixels of value 1 for the skin regions
pixels of value 0 for the rest
Meanwhile, edgeMask just
contains edge pixels (as value 255). So to get just the skin pixels, we can remove the edges from it:
mask -= edgeMask;
The mask image now just contains 1s for skin pixels and 0s for non-skin pixels. To change the skin color and brightness of the original image, we can use cv::add() with the skin mask to increase the green component in the original BGR image:
int Red = 0;
int Green = 70;
int Blue = 0;
add(smallImgBGR, CV_RGB(Red, Green, Blue), smallImgBGR, mask);
The following figure shows the original image on the left, and the final alien cartoon image on the right, where at least six parts of the face will now be green!
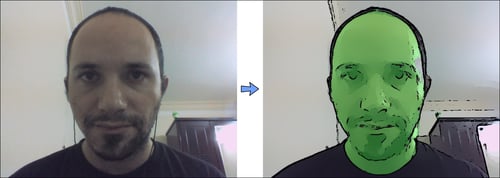
Notice that we
have not only made the skin look green but also brighter (to look like an alien that glows in the dark). If you want to just change the skin color without making it brighter, you can use other color-changing methods, such as adding 70 to green while subtracting 70 from red and blue, or convert to HSV color space using cvtColor(src, dst, "CV_BGR2HSV_FULL"), and adjust the hue and saturation.
That's all! Run the app in the different modes until you are ready to port it to your mobile.