

Map is the core concept in OpenLayers. It allows us to visualize information from different kinds of layers and brings us methods to manage layers attached to it.
In this recipe, we will learn how to control layers. This is important because add, remove, or reorder layers are very common operations we need to do on almost every web mapping application.
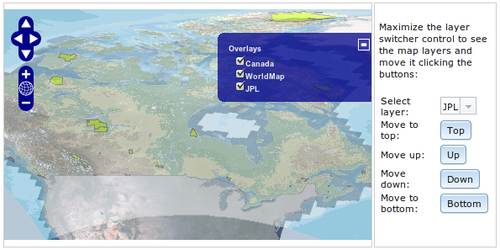
The application will show a map on the left and a control panel on the right, with some buttons to control the layers.
Note
Remember we have used the Dojo toolkit framework (http://dojotoolkit.org) to code a nicer and richer application to show the recipes of this book.
Because of this, you can see strange attributes in the HTML elements such as dojoType="dijit.form.Button" or onClick="topLayer". Do not worry about it, there is no impact in the OpenLayers code we are covering in this book.
Start by creating an
index.htmlfile to put the code needed to create the application layout. We place it within a table. On the left we put the map:<table class="tm"> <tr> <td class="left"> <div id="ch1_managing_layers" style="width: 100%; height: 500px;"></div> </td>And, on the right we put the controls:
        <td class="right">
            <p>Maximize the layer switcher control to see the map layers and move it clicking the buttons:</p>

            <table class="tb">
                <tr>
                    <td>Select layer:</td>
                    <td>
                        <select id="layerSelection" data-dojo-type="dijit.form.Select">
                            <option value="JPL">JPL</option>
                            <option value="WorldMap">WorldMap</option>
                            <option value="Canada">Canada</option>
                        </select>
                    </td>
                </tr>
                <tr>
                    <td>Move to top:</td>
                    <td><button dojoType="dijit.form.Button" onClick="topLayer">Top</button></td>
                </tr>
                <tr>
                    <td>Move up:</td>
                    <td><button dojoType="dijit.form.Button" onClick="raiseLayer">Up</button></td>
                </tr>
                <tr>
                    <td>Move down:</td>
                    <td><button dojoType="dijit.form.Button" onClick="lowerLayer">Down</button></td>
                </tr>
                <tr>
                    <td>Move to bottom:</td>
                    <td><button dojoType="dijit.form.Button" onClick="bottomLayer">Bottom</button></td>
                </tr>
            </table>

        </td>
    </tr>
</table>
Create an
OpenLayers.Mapinstance working in theallOverlaysmode:var map = new OpenLayers.Map("ch1_managing_layers", { allOverlays: true });Add some layers to the map:
var jpl = new OpenLayers.Layer.WMS("JPL", [ "http://t1.hypercube.telascience.org/tiles?", "http://t2.hypercube.telascience.org/tiles?", "http://t3.hypercube.telascience.org/tiles?", "http://t4.hypercube.telascience.org/tiles?" ], { layers: 'landsat7' }); var worldmap = new OpenLayers.Layer.WMS("WorldMap", "http://vmap0.tiles.osgeo.org/wms/vmap0", { layers: 'basic', format: 'image/png' }, { opacity: 0.5 }); var canada = new OpenLayers.Layer.WMS("Canada", "http://www2.dmsolutions.ca/cgi-bin/mswms_gmap", { layers: "bathymetry,land_fn,park", transparent: "true", format: "image/png" }, { opacity: 0.5 }); map.addLayers([jpl, worldmap, canada]);Add a layers switcher control (to show the layers) and center the map view:
Finally, add the JavaScript code that will react when the previous four buttons were clicked:
function raiseLayer() { var layerName = dijit.byId('layerSelection').get('value'); var layer = map.getLayersByName(layerName)[0]; map.raiseLayer(layer, 1); } function lowerLayer() { var layerName = dijit.byId('layerSelection').get('value'); var layer = map.getLayersByName(layerName)[0]; map.raiseLayer(layer, -1); } function topLayer() { var layerName = dijit.byId('layerSelection').get('value'); var layer = map.getLayersByName(layerName)[0]; var lastIndex = map.getNumLayers()-1; map.setLayerIndex(layer, lastIndex); } function bottomLayer() { var layerName = dijit.byId('layerSelection').get('value'); var layer = map.getLayersByName(layerName)[0]; map.setLayerIndex(layer, 0); }
There is not much to say about the HTML code for the layout. We have used a table to put the map on the left and the set of buttons on the right. In addition, we have associated actions to the buttons that will be executed when they are clicked.
With respect to the OpenLayers code, we have created the map instance working in the allOverlays mode. This will let us move any layer without being worried about a base layer:
var map = new OpenLayers.Map("ch1_managing_layers", {
    allOverlays: true
});Later, we created three WMS layers and added them to the map. For some of them we have set the opacity property to 50% to see through them:
map.addLayers([jpl, worldmap, canada]);
It is very important to note that we have used the same name for the option's value attribute in the HTML select element as we have used for the layer. Later, this will let us select a map's layer by its name.
Next, we have added an OpenLayers.Control.LayerSwitcher control by setting its ascending property to false:
map.addControl(new OpenLayers.Control.LayerSwitcher({
    ascending: false
}));
You can think of the map as storing layers in a stack and they are rendered from bottom to top, so the above layers can hide beneath the below layers depending on its opacity and extent.
Tip
By default the
ascending property is true, and the layer switcher control shows the layers of the map in the reverse order, that is, the bottom layer is drawn first in the control and the top layer is drawn last. You can avoid this by setting ascending to false.
Finally, the only thing we need to take a look at is the code responsible for button actions, which is the most interesting code in this recipe.
Let's take a look to the raiseLayer() action (which is very similar to lowerLayer() action):
function raiseLayer() {
    var layerName = dijit.byId('layerSelection').get('value');
    var layer = map.getLayersByName(layerName)[0];
    map.raiseLayer(layer, 1);
}
First, we get the name of the currently selected layer in the select element (don't worry if you don't understand that line completely, it is more related to the Dojo framework than to OpenLayers).
Then, we use the
map.getLayersByName() method, which returns an array with all the layers that have the specified name. Because of this, we get the first element of the array.
Now we have a reference to the layer instance. We can raise it in the map using the map.raiseLayer() method. You can raise it by one or more positions indicating a delta number or, like in the lowerLayer() function, you can lower it by one or more positions indicating a negative value.
Internally OpenLayers.Map stores layers in an array (the layers attribute) and they are rendered in the order they are stored in the array (so the first element is the bottom layer).
The topLayer() and bottomLayer() actions are similar too, they move the specified layer to the top or bottom of the stack. They both work using the map.setLayerIndex() method, which is responsible to move a layer to a specified position.
Because the bottom layer corresponds to the first layer in the array of layers, the bottomLayer() action is the easiest to implement because we simply need to move the layer to the first position:
function bottomLayer() {
    var layerName = dijit.byId('layerSelection').get('value');
    var layer = map.getLayersByName(layerName)[0];
    map.setLayerIndex(layer, 0);
}
For the topLayer() actions, we need to move the layer to the last position. To do this, we can get help from the map.getNumLayers() method, which returns the total number of layers in the map. In this way, if we have four layers in the map, the last corresponds to the index 3 (because the index value changes from 0 to 3).
function topLayer() {
    var layerName = dijit.byId('layerSelection').get('value');
    var layer = map.getLayersByName(layerName)[0];
    var lastIndex = map.getNumLayers()-1;
    map.setLayerIndex(layer, lastIndex);
}