As discussed earlier, if you are going to build solutions that integrate with Dynamics GP, it is critical that you know how it works. By "know how it works" we don't mean you should learn the intricacies of how to run the general ledger, but rather understand what makes this program tick. Learn how data is exchanged and how you can interact with that exchange. You need to understand the table structure and how to discover the location of the data you seek.
Remember, Dynamics GP is essentially just another database program. When working with any database application, you need to know your CRUD!
C = Create a Record
R = Read a Record
U = Update a Record
D = Delete a Record
Let's find out what it takes to launch the application – what happens when a user double-clicks on the Dynamics GP program icon?
If you look at the properties of the Dynamics GP shortcut, you'll see the expected executable file (Dynamics.exe) and something extra. The extra is a reference to the Dynamics.set file. The full shortcut on my machine looks like this:
Dynamics.set
There is no path designation for the Dynamics.set file because that file is in the same location as the runtime engine. If you place the Dynamics.set file in a different location, you would also need to provide the full path to its location.
For example, if you placed the Dynamics.set file in the folder C:\LaunchFile, the properties of your shortcut would look like this:
"C:\Program Files (x86)\Microsoft Dynamics\GP2010\Dynamics.exe" "C:\LaunchFile\Dynamics.set"
Without the Dynamics.set parameter, the Dynamics runtime engine will launch and you will get the following window:
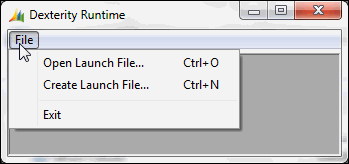
Selecting the File menu will provide you with the opportunity to either Open Launch File… or Create Launch File…. Do not select Create Launch File… as the file that is created is not usable. Instead, open the Dynamics.set file, which is Dynamics GP's proper launch file.
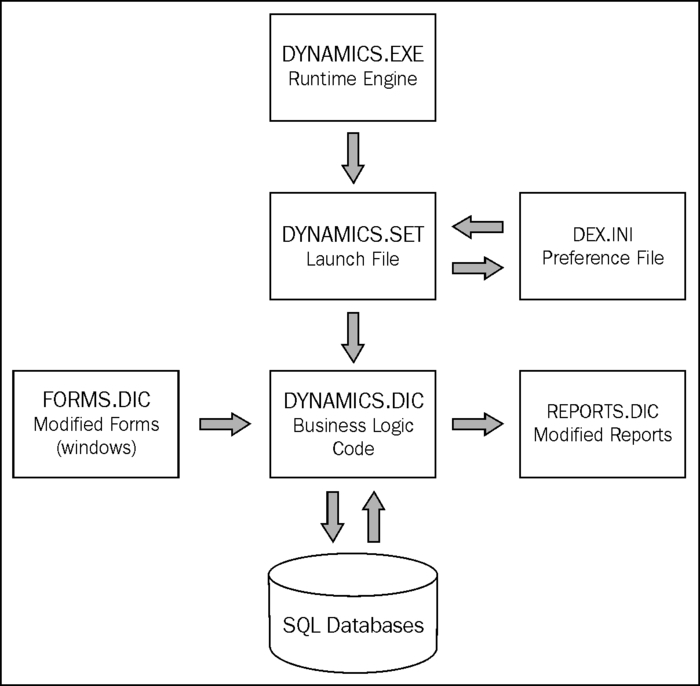
We have just identified two of the files involved in getting Dynamics GP to run. These two files are components of Dexterity. The runtime environment consists of seven main components:
The launch file (
Dynamics.set) defines each of the components included when Dynamics GP loadsThe Preferences file (
Dex.ini) stores settings such as OLE pathname and the location of the help filesThe Dexterity Runtime engine (
Dynamics.exe) interprets the resources in the dictionary to present a functioning applicationThe Application dictionary (
Dynamics.dic) holds all resources in an applicationThe Forms dictionary (
Forms.dic) stores forms modified by the userThe Reports dictionary (
Reports.dic) stores reports modified by the userThe Microsoft SQL Server databases hold all of the data elements of the system and the companies
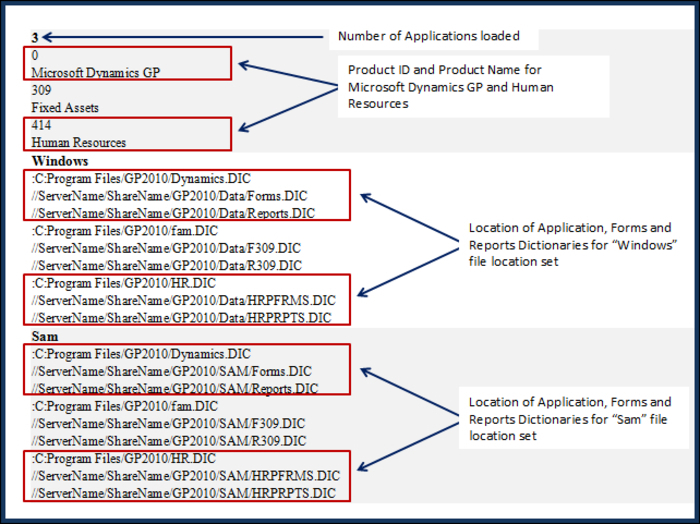
As stated earlier, the Dynamics.set file is also known as the launch file. It defines each of the components included when Dynamics GP loads. Several pieces of information are necessary for a successful launch. The combination of information in the Dynamics.set file and the Dex.ini file identify each of these components. From the Dynamics.set file we get the following information:
The total number of dictionaries used by the Dynamics GP application when launched from this workstation
The product ID assigned to each dictionary
Each product's name
The name of each set of dictionary locations in this
Dynamics.setfileThe path to and the name of the product's core Application dictionary
The path to and the name of the product's modified Forms dictionary
The path to and the name of the product's modified Reports dictionary
The following screenshot shows the various elements of a Dynamics.set file:
The path locations must be listed in the same order that they appear in the top section of the file. The elements should be in the following order:
Application dictionary
Modified Forms dictionary
Modified Reports dictionary
The Dynamics.set file illustrated earlier contains two dictionary location IDs, Windows and Sam. The Workstation2= switch in the Dex.ini file indicates which set of paths should be used by the workstation. We'll talk about the Dex.ini file in the next section.
The product ID is assigned to the developer by Microsoft; no two products can have the same ID. The dictionary names are determined by you, the developer, but can be changed by the user without ill effect. Any time you refer to an application dictionary in your code, you identify it by the product ID, not the name. The Dynamics.set file is a simple text file and can be read and edited using Notepad.
The dictionaries are accessed by Dynamics GP in the order that they are listed in the Dynamics.set file. The products may be listed in any order with the exception that the Dynamics.dic file must always be listed first, and always has the product ID of zero.
Dynamics GP may respond differently if the order of the products is changed. Be aware of this possibility as you test your add-on application.
If there is a deviation in the order across different products' dictionaries, Dynamics GP will not launch. If there is a deviation in the order of the dictionaries for the same product (Application dictionary, Forms dictionary, Reports dictionary), Dynamics GP will launch, but upon accessing the resources, an error message will display. Study the position of products and dictionaries in the Dynamics.set file carefully if unusual errors are presented at launch.
The Dex.ini file lives in the Data folder inside of the GP2010 folder. In releases 9 and before, the Dex.ini file was located in the same folder as the Dynamics.exe file.
The location of the Dex.ini file in a default 32-bit installation is as follows: C:\Program Files\Microsoft Dynamics\GP2010\Data\Dex.ini.
The location of the Dex.ini file in a default 64-bit installation is as follows: C:\Program Files (x86)\Microsoft Dynamics\GP2010\Data\Dex.ini.
The Dex.ini file is also known as the Preferences file. It works the same as all other .ini files in that it stores settings that are later read by the application in performing some task. Like the Dynamics.set file, you can read and edit the Dex.ini file using Notepad, as it is also a simple text file.
The Dex.ini file is divided into sections by a bracketed word and each section contains zero or more lines of switches that control Dynamics's behavior. Some switches are mandatory and are typically added by the application itself; other switches are optional according to user preferences; still other switches are included by the application that do nothing at all. The bracketed section names should never be changed, but you have a wide variety of switches to choose from.
An excerpt of a typical Dex.ini file is shown in the following screenshot. Explanations will be included for each of the Dex.ini switches enclosed in a box. An extensive list of Dex.ini switches is available at http://dynamicsconfessions.blogspot.com/2010/07/dexini-switches-now-available-to.html.

When set to TRUE, the SQLLogSQLStmt switch causes the system to create (or append to) a text file named DEXSQL.LOG and logs all SQL statements being sent to the SQL Server. This file is created in the same folder that holds the Dex.ini file; the DEXSQL.LOG file is used to troubleshoot errors in the application.
When set to TRUE, the SQLLogODBCMessages switch causes the system to create (or append to) a text file named DEXSQL.LOG and logs all ODBC messages returned from the SQL Server. This file is created in the same folder that holds the Dex.ini file. The DEXSQL.LOG is used to troubleshoot errors in the application.
The SQLLogAllODBCMessages switch is one of those settings that appears in the Dex.ini file that does nothing at all. The only setting you need for ODBC logging is SQLLogODBCMessages=TRUE. Nearly every technology support person will tell you that this has to be set to TRUE if you want to include ODBC messages in the Dexsql.log and that is just wrong. You can delete this setting from the Dex.ini file if you want.
The Synchronize switch
indicates whether Dynamics Utilities has aligned the Dynamics.dic to the account framework
. The account framework was defined when Dynamics GP was initially installed. FALSE signifies that the Dynamics.dic has been synchronized. TRUE indicates that synchronization is needed. You use the Dynamics Utilities application to accomplish synchronization. The account framework is stored in the DYNAMICS database and is not consistent across installations.
The Workstation switch was used to read the Location Translation table (DYNAMICS.dbo.SY03600) to determine if any string substitutions needed to be made to the pathnames listed inside the Dynamics.set file. You will find this entry in every Dex.ini file, but Dynamics GP will launch just fine without it. Although WINDOWS
is populated as the default setting on windows workstations, the entry was not dependent on the operating system. You could have changed it to CLARK and as long as you had CLARK defined in the Location Translation table, the program would have been just fine. The Location Translation table exists in the DYNAMICS database as table SY03600.
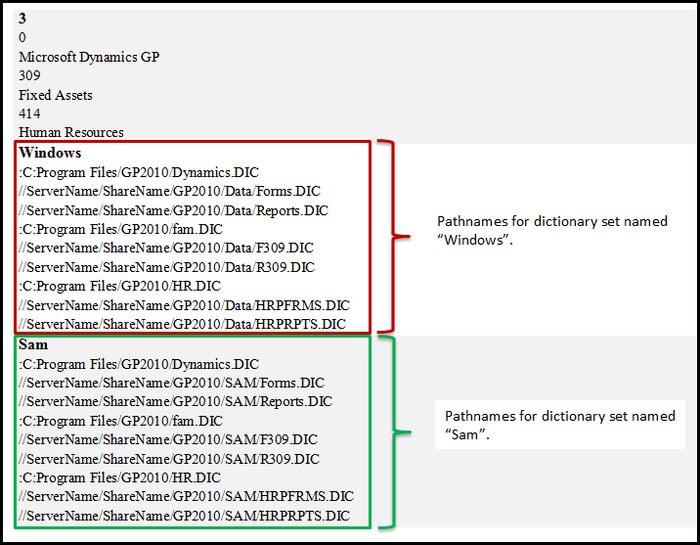
The Workstation2 switch identifies which set of dictionary locations listed in the Dynamics.set file should be used by the runtime engine. Though rarely implemented, the Dynamics.set file could contain several sets of file locations. Revisiting our earlier Dynamics.set file (refer to the following screenshot), we see that there are two sets of dictionary locations defined: Windows and Sam. If Workstation2=Sam were used in the Dex.ini file, any modified reports would come from the Reports.dic file at //ServerName/ShareName/GP2010/SAM/Reports.dic. Conversely, if the Dex.ini file setting was Workstation2=Windows, modified reports would come from the Reports.dic file at //ServerName/ShareName/GP2010/Data/Reports.dic.
The Workstation2 switch is required in order to launch Dynamics GP. If it is missing, you will be presented with the following dialog box asking you to select a dictionary location ID. Notice that the system reads the Dynamics.set file in order to determine the available choices.
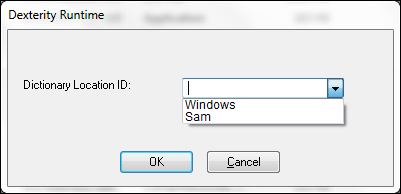
Upon selecting a Dictionary Location ID, Dynamics GP will launch normally. The default setting for the Workstation2 switch is Windows.
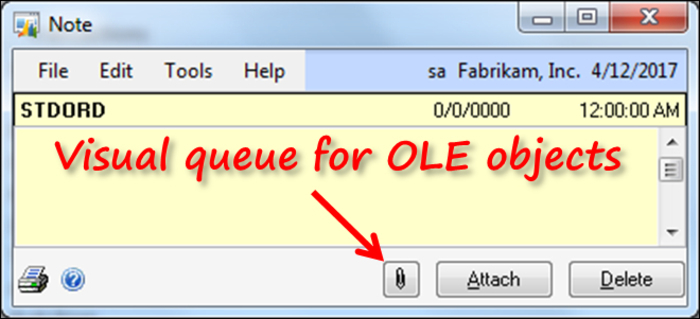
The OLEPath switch is used to indicate where the OLE object container is located. A user can attach and/or link documents to certain record types in Dynamics GP. The ability to take advantage of this functionality is dependent on the OLEPath switch properly pointing to the location of the OLE container. This is an often-overlooked switch. It is either absent, and therefore no OLE support exists, or it is improperly set. You should include some logic in your application to check for this switch if you need to interact with OLE objects.
If the switch is missing, the user is not even aware that OLE attachments are a possibility because the visual queue is missing from the window, as shown in the following screenshot:
If the switch is set to a local path (that is the default), then only one workstation can access the objects. If each user on the system should have the ability to read the OLE objects, then OLEPath should point to a shared location.
If the shared location is a mapped network drive, then each user's profile on each machine they use to access Dynamics GP must include the same drive mapping. While drive mapping may involve a little more diligence in creating the appropriate network login scripts, its advantage is that the directory structure necessary to store OLE notes will be created automatically by the application the first time the OLE container is accessed.
If the shared location is indicated by a Uniform Naming Convention (UNC) path then the full directory structure supporting OLE notes for each company must exist before the workstation attempts to attach or access OLE objects.
That's a lot of rules for a simple switch, but this switch opens up a very powerful feature in Dynamics GP that should be exploited.
To illustrate what the full directory structure looks like, let's assume your installation has two company databases, DB1 and DB2. Let's further assume that you want to store the OLE Notes in \\ServerName\ShareName\GP2010\Data\ and you want to use a UNC reference for the OLEPath switch in the Dex.ini file. Since the note folders will not be created automatically if you use the UNC reference, you must create the folders yourself. The following structures are needed:
\\ServerName\ShareName\GP2010\Data\DB1\OLENotes\
\\ServerName\ShareName\GP2010\Data\DB2\OLENotes\
If you create these folders manually, your UNC reference in the Dex.ini file will work.
The RememberUser switch indicates whether the checkbox on the Welcome to Microsoft Dynamics GP window (the Welcome window) is available.
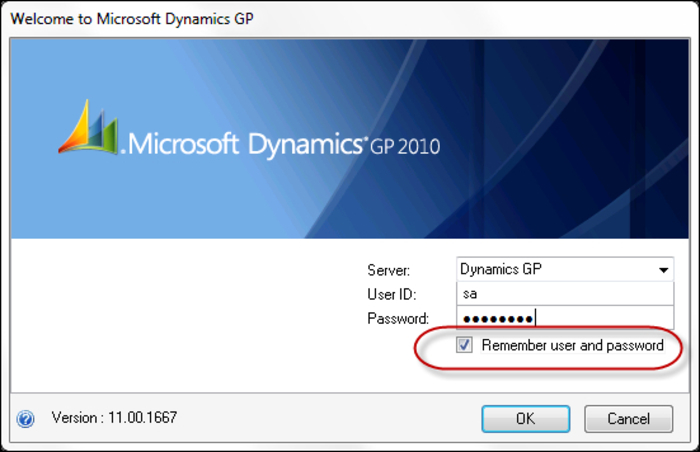
If the setting is TRUE, then the checkbox on the Welcome window will be active and you can click on it and mark it. If it is set to FALSE, then the field will be disabled.
Your ability to click in the box, however, does not change whether the user and password are in fact remembered. If the option Remember the user and password has not been selected in the System Preferences window, the fact that you checked the box on the Welcome window has no impact on system behavior. When you close Dynamics GP, the Dex.ini setting is changed to FALSE if the System Preferences object has not been checked. It's odd behavior, but it's good to know that changing the Dex.ini setting doesn't cause the user and password to be stored.
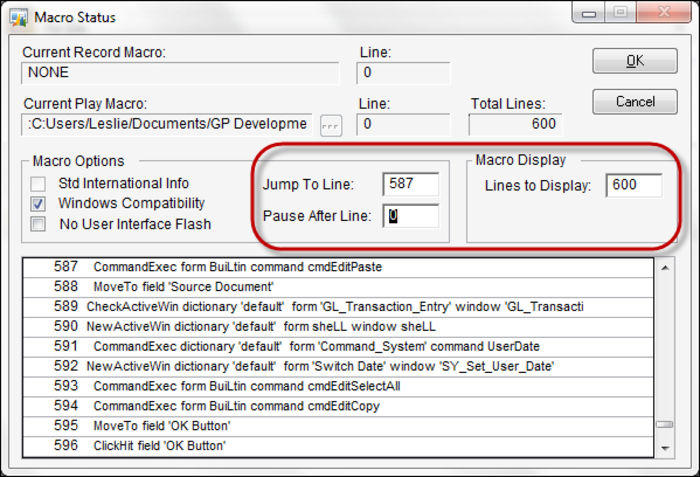
When the ShowAdvancedMacroMenu switch is set to TRUE, an Advanced menu item is revealed under Microsoft Dynamics GP | Tools | Macro that contains several additional utilities which you can use to work with Macros. Refer to the following screenshot:
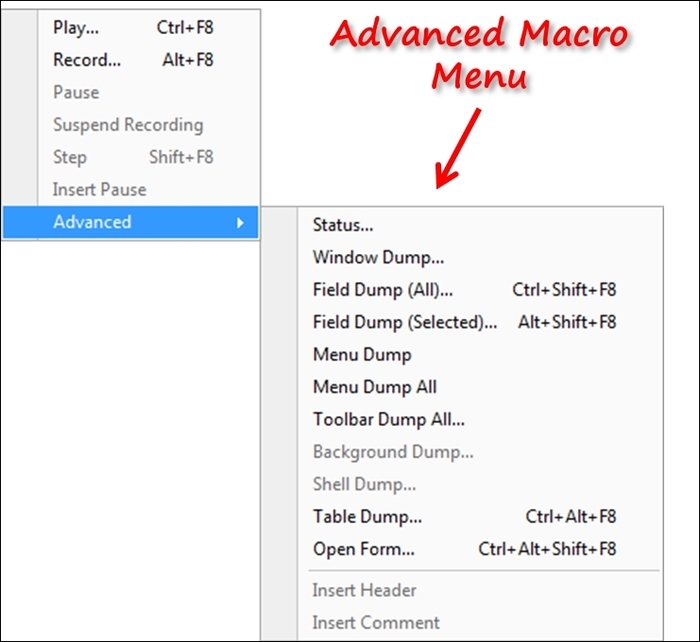
Since the macro language built into Dynamics GP is used extensively in testing, it is definitely something you should learn to use. ShowAdvancedMacroMenu = TRUE should be automatically added every time you set up your Dynamics GP environment.
One of the handiest Advanced Macro utilities gives you the ability to jump to a specific line in a macro. This is especially helpful if your macro should fail (imagine!). The dialog that comes up tells you what line it failed on; if it's line 587, it could be a long day trying to count down to that line. The Macro Status tool lets you jump to that specific line to inspect your macro.
When the ExportOneLineBody switch is set to TRUE, any fields in the body of a report in Report Writer come out as a single line when printing the report to a file. It isn't displayed on the window like that, but in the file it is. This is very helpful if you want to save a report to a spreadsheet-friendly format, such as a tab-delimited file for instance. The Report Writer layout window is only as wide as the paper size set under Printer Setup. It is very easy to run out of space if you have to set the fields horizontally across the layout. An old trick to get more space was to load print drivers for a plotter because plotter paper was so much wider. With this switch in the Dex.ini file, you can simply list the fields vertically and they will come out as a single row once the report is printed to a file.
There are some benefits to using Report Writer to export data. One, it doesn't require that you have access to a SQL tool, and two, you can make use of data in temporary tables, and you can embed Excel formulas into the report.
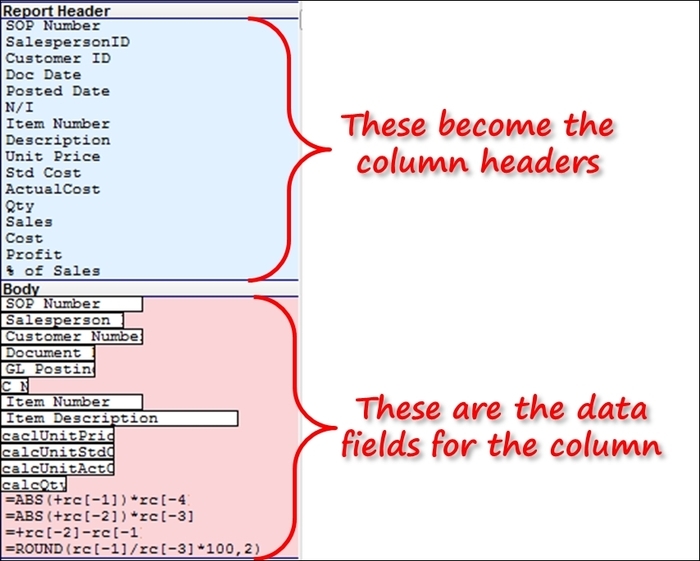
The following screenshot shows the Report Writer view of a short sales report. Notice that the last four lines of the screenshot are really Excel formulas. When the report is printed to the screen, it looks much like the layout, only with data. However, if you look at the file, all of the fields come out in a single row per record. If you open this file using Excel with the R1C1 reference style, the hardcoded fields become valid Excel formulas.
The following screenshot represents what the report looks like when printed to the screen. The screen output follows the same form as the report layout.

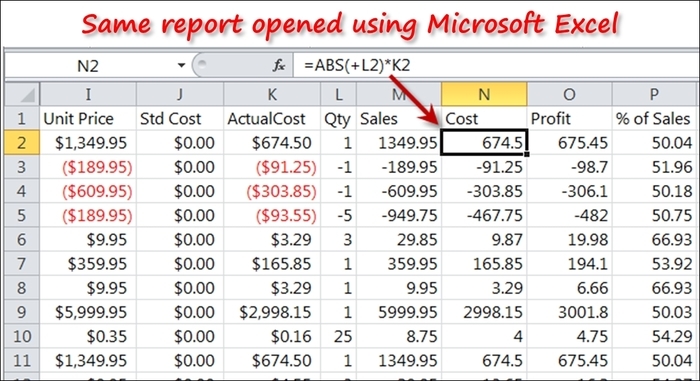
The following spreadsheet is the result of opening the tab-delimited file produced by the report. Notice how the formula =ABS(+rc[-2])*rc[-3] coded into the report layout resolves to the formula =ABS(+L2)*K2 in cell N2.
As you can see, these simple .ini switches can be used to your advantage when working with Dynamics GP. It's worth your time to find them and engage them to help cut down the time you spend navigating through the complexities of the application. Even better, develop some of your own .ini switches to store settings or reveal functionality for your application.
The Dynamics.exe file is the runtime engine. Information from the Dynamics.set and Dex.ini files locate the Dynamics.dic file. The Dynamics.dic file contains all of the resources and scripting that results in the functioning application when interpreted by the runtime engine. Resources include all of the fields, forms, windows, tables, scripts, reports, buttons, boxes, formats, strings, procedures, functions, and so on. In short, everything, that is the application, you have come to know is Dynamics GP.
Two additional dictionary files, Reports.dic and Forms.dic, are generated if the user launches the Report Writer (for reports) or the Modifier (for forms). Remember, only user-created (or modified) resources live in these dictionaries. All of the original resources remain in the Dynamics.dic.
The following diagram presents the components of Dynamics GP if only the core modules were loaded. In reality, a typical Dynamics GP installation includes nearly 20 dictionaries. We have seen implementations that are comprised of over 40 dictionaries. Each module has its own modified forms and reports dictionaries. You determine what these dictionaries, if created, are named when you build your application's chunk file. The chunk file is a self-installing data dictionary file that extracts to become the application dictionary of your customization.