Book Image

Microsoft Dynamics CRM 2011 New Features

By : Jim Wang, Darren Liu
Book Image

Microsoft Dynamics CRM 2011 New Features

By: Jim Wang, Darren Liu

Overview of this book

Microsoft Dynamics CRM 2011 offers exciting new features that enable you to build and maintain a robust customer relationship management system in your organisation.This book is your one stop resource to get to grips with all the new features of Dynamics CRM 2011. To make learning fun and engaging, we will build an Airline Compensation Management (ACM) system using Dynamics CRM 2011.The book starts by setting up the development environment for Microsoft Dynamics CRM 2011. We will then build a structural architecture for the ACM system and configure it in Dynamics CRM 2011. While doing this, we will learn about the new customization features offered by Dynamics CRM 2011.We will then move on to Data Importing and will cover the Import Data Wizard tool, as well as the Import file/data web service which provides additional capabilities that are not available in the Import Data Wizard.We will use client-side programming to perform data validation, automation, and process enhancement and learn powerful event driven server-side programming methods: Plug-Ins and Processes (Formerly Workflows).The book then steers you towards SharePoint integration, Charts and Dashboards, Customizing the Ribbon and Sitemap, and extending Dynamics CRM 2011 in the cloud. Finally we will package the ACM solution and learn how to deploy it.
Table of Contents (18 chapters)
Microsoft Dynamics CRM 2011 New Features
Credits
About the Authors
Acknowledgement
About the Reviewers
www.PacktPub.com
Preface
Index

Setting up Microsoft Hyper-V


To set up Hyper-V on your Windows Server 2008 Workstation, please follow these steps:

  1. Install the Hyper-V server role on the workstation:

    • Start | Run…, type in "ServerManager.msc" and press Enter.

    • Right-click Roles and then select Add Roles.

    • Select Hyper-V and then click Next and then Install.

  2. Create two Virtual Network connections that allow a remote desktop connection from the workstation to the VM:

    • Open Hyper-V manager, select the Virtual Network Manager… on the Action menu, add two Virtual Networks as per the following table, and then click OK.

      Name

      Connection Type

      External—Virtual Network

      External (with your network connection)

      Internal—Virtual Network

      Internal only

    • Hyper-V will create two new network connections. Go to Control Panel | Network and Internet | Network Connections, and rename the connections to:

      • Hyper-V External Connection

      • Hyper-V Internal Connection

  3. Set up the Internet access via a wireless network:

    • Out of the box, Hyper-V doesn't support Internet access via the wireless network. We need to create a wireless network connection in order for VM to access the Internet.

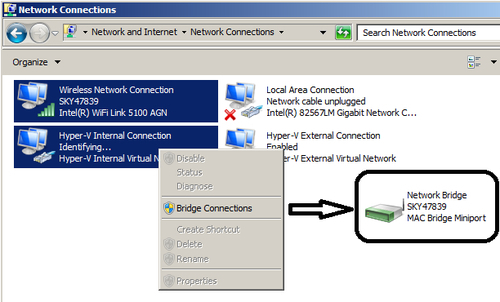
    • Go to Control Panel | Network and Internet | Network Connections, and select both Hyper-V Internal Connection and your Wireless Network Connection, right-click and select Bridge Connections. This will create a Network Bridge between the workstation and VM, which allows Internet access via the workstation's wireless connection.