
How can reports be printed? What are the options to select a printer (printer selections) and which properties can be set when printing a report? What's the difference between printing reports from the Classic Client and from the Role Tailored Client, and how can you use the report viewer? These are all questions I will answer in this section.
To print a report:
Open the report you want to print.
Click File | Print, or click the Print button on the toolbar.
You can also print a report by clicking Print in the report windows.
You can print the contents of any window that has a Print button. When you choose File, Print, the system opens a window where you can enter details about how the printing will be done.
In the uppermost field, you can see the name of the printer that is selected in the Windows Control Panel as your default printer. The printer selection will be valid for all of Microsoft Dynamics NAV until you choose a different one, or unless you associate a certain printer with a certain user and/or report in the Printer Selections window.
When you print a report and you have specified print and layout settings in the design of the report layout, you can also specify print and layout settings in the request page, in the printer properties of the selected printer, and in the print layout view of the report viewer at runtime. So then, which print settings will get priority?
You can specify page settings and page orientation for a printed report from the following UI locations:
The Report Properties dialog box on the client report definition (RDLC) report layout in Visual Studio
The Properties dialog box for the printer
The Print dialog box that is displayed immediately before you print
The Page Setup dialog box from the Print Preview page in the
RoleTailoredclient
The page settings that are used for the printed report depend on the mode in which you print the report.
You can use the following modes to print a report from the RoleTailored client:
The printer that you use determines how to handle the case in which the actual paper size in the printer is different from the page size that is specified.
The following table describes how you access each of the dialog boxes in which you can specify page settings and orientation:
|
Print mode |
To access the Report Properties dialog box |
To access the Properties dialog box for the printer |
To access the Print dialog box |
To access the Page Setup dialog box |
|---|---|---|---|---|
|
Run a report that does not have a request page |
When you design the report layout in Visual Studio, on the Report menu, click Report Properties. |
In Control Panel, double-click Printers. Right-click the selected printer and then click Properties. |
Cannot access. |
Cannot access. |
|
Print a report from the request page without previewing |
When you design the report layout in Visual Studio, on the Report menu, click Report Properties. |
In Control Panel, double-click Printers. Right-click the selected printer, and then click Properties. |
On the request page, click Print. |
Cannot access. |
|
View a preview of a report |
When you design the report layout in Visual Studio, on the Report menu, click Report Properties. |
In Control Panel, double-click Printers. Right-click the selected printer and then click Properties. |
In the Print Preview window, click the Print icon. |
In the Print Preview window, click the Page Setup icon. |
When you are printing a report without a request page, then the following table applies:
|
If |
Then the printed report paper size and margins are determined by |
And the printed report orientation is determined by |
|---|---|---|
|
The settings in the Report Properties dialog box on the layout of the report specify a standard paper size. |
The settings in the Report Properties dialog box on the RDLC layout. |
The settings in the Properties dialog box for the printer. |
|
The settings in the Report Properties dialog box on the layout of the report specify a custom paper size. |
The settings in the Properties dialog box for the printer. |
The settings in the Properties dialog box for the printer. |
When you are printing a report from the request page, the following table applies:
|
If |
Then the printed report paper size and margins are determined by |
And the printed report orientation is determined by |
|---|---|---|
|
The settings in the Report Properties dialog box on the layout of the report specify a standard paper size. |
The settings in the Report Properties dialog box on the RDLC layout, but is overridden if you change the settings in the Print dialog box. |
The settings in the Report Properties dialog box on the RDLC layout, but is overridden if you change the settings in the Print dialog box. |
|
The settings in the Report Properties dialog box on the layout of the report specify a custom paper size. |
The settings in the Properties dialog box for the printer, but is overridden if you change the settings in the Print dialog box. |
The settings in the Report Properties dialog box on the RDLC layout, but is overridden if you change the settings in the Print dialog box. |
Tip
The values in the Print dialog box are initially set to the values from the Report Properties dialog box on the RDLC report layout.
When you are printing a report from the print preview page, the following table applies:
|
If |
Then the printed report paper size and margins are determined by |
And the printed report orientation is determined by |
|---|---|---|
|
The settings in the Report Properties dialog box on the layout of the report specify a standard paper size. |
The settings in the Report Properties dialog box on the RDLC layout, but is overridden if you change the settings in the Page Setup dialog box. |
The paper size settings in the Report Properties dialog box on the RDLC layout, but is overridden if you change the settings in the Page Setup dialog box. |
|
The settings in the Report Properties dialog box on the layout of the report specify a custom paper size. |
The settings in the Report Properties dialog box on the RDLC layout, but is overridden if you change the settings in the Page Setup dialog box. |
The paper size settings in the Report Properties dialog box on the RDLC layout, but is overridden if you change the settings in the Page Setup dialog box. |
When you print invoices, credit memos, and so on, it is important to choose the correct printer. You use the Printer Selection table to control this. In this table you can assign certain printers to certain users and/or reports so that the invoice report, for example, is always printed on printer X. You can also specify that only user Y will always print credit memos on printer X, for example.
Once you have set up the connections among users, reports and printers, the program will automatically use the information to direct future printouts.
You can set up reports so that they must be printed on a specific printer from the Role Tailored client. For example, you can print reports on a special company letterhead or on different paper sizes, or you can print reports on the default printer of a specified employee.
You can set different values to obtain different outputs. If you set a specific printer selection, then it takes precedence over a more general printer selection. For example, you can set a printer selection that has values in the User ID, Report ID, and Printer Name fields. This printer selection takes precedence over a printer selection that has blank entries in the User ID or Report ID fields.
The following table describes the combination of values to specify when you set up printer selections for a report:
|
To |
Set these values |
|---|---|
|
Print a report to a specific printer for all users |
Specify values in the Report ID and Printer Name fields and leave the User ID field blank |
|
Print all reports to a specific printer for a specific user |
Specify values in the User ID and Printer Name fields and leave the Report ID field blank |
|
Set the default printer for all reports |
Specify a value in the Printer Name field and leave the User ID and Report ID fields blank |
|
Print a specific report to a specific printer for a specific user |
Specify values in all three fields |
To set up printer selections for a report:
In the Role Tailored client, in the navigation pane, click Departments, click Administration, click IT Administration, click General, and then click Printer Selections.
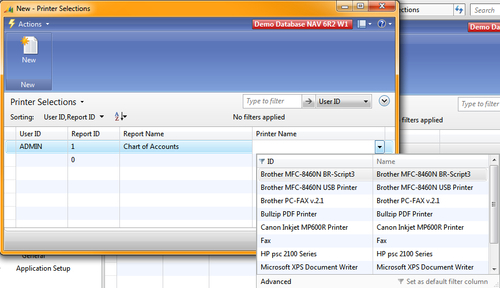
In the Action Pane, click New to add a printer selection for a specific report.
In the User ID field, select whether the printer selection applies to a specific user.
In the Report ID field, select the ID of the report to print. The Report Name field is automatically populated with the report name.
In the Printer Name field, select from the list of available printers. The list of available printers is generated from the printers that are currently installed. Different users on different computers may see different options.
Click OK to close the page.
The specified report is now set up to print to the selected printer. You can always change the printer selection in the Print dialog box.
When you work with the various documents for sales and purchases (orders, quotes, invoices, credit memos, and so on), you can print different reports. For example, you print a sales invoice when you click the Posting button on an invoice in a sales application area and select Post and Print.
The program has preselected which report will be printed when you click the Print button on various types of purchase and sales headers. For example, when you click the Print button on an order, the Order Confirmation report is automatically printed.
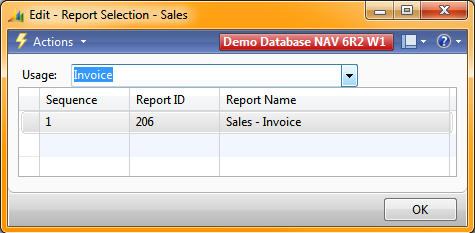
The Report Selections table contains the specification of which report will be printed in different situations. The Report Selection table also contains the report ID and report name for the report that will be printed when you work with a given document type.
You can, of course, choose to have the program print a different report than the preselected one. You can also add reports to the Report Selection table to have the program print more than one report per document type.
Note
The advantage of Report Selections is to have one location where you manage which reports will be executed when a user selects an action in the RTC. When you create a new report that will replace an existing document report, like for example the Sales Invoice, then you do not need to redesign the page objects linking to the old report. All you have to do is make one change in the Report Selection table.