
Continuing the theme of using the Intranet as a communications mechanism, this next solution will leverage the Notification bar within SharePoint to communicate messages to users anywhere within the site. This is a great way to communicate topics like system status, organization news, or security bulletins.
The notification details will include a title, notification message, a category which will be used to change the notification background color and to display a corresponding image, as well as start and end dates in order to support scheduling to keep the content fresh and accurate.
This solution requires two parts:
A list to manage the content
Code embedded in the Master Page to handle the message retrieval and display
We will provision a List Definition and List Instance to store the notification content. This will make it easy to reuse the list if necessary in cases where you need to manage the notifications separately for sites that target different sets of users or in different farms.
To create the feature perform the following steps:
1. Open Visual Studio 2010.
2. Select File, then New Project.
3. Browse the Installed Templates and select Visual C# | SharePoint 2010, and then List Definition as shown in the following screenshot:

4. Enter the project details such as Name, Location, and Solution name.
5. Within the SharePoint Customization Wizard, provide a path to your SharePoint site and then be sure to select the option to Deploy as a farm solution as shown in the following screenshot:

6. Rename the ListDefinition1 item
NotificationDefinition.7. Rename the ListInstance1 item
Notification.8. Rename the Feature1 item
SPBlueprints Notification List Feature.9. Select the SPBlueprints Notification List Feature.feature item and provide a Title and Description. It should resemble the following screenshot:

10. Next we will edit the
NotificationDefinition/Elements.xmlfile to complete the List Definition. TheElements.xmlfile is used to describe the list and fields.11. First, we will add in the field definitions. The following table provides a brief overview of the field element and attributes that we describe when defining a new field:
Attribute name
Description
TypeUsed to describe which SharePoint field type will be used. Options include
Text, Choice, Decimal, URL, andDateTimeDisplayNameThe label that will be shown on forms and within the list views
RequiredBoolean value that determines if it is a required field
MaxLengthIf it is a
Textfield, the maximum number of characters allowed can be specifiedIDThe unique ID or GUID used to identify the field
StaticNameThe internal name of the field; this label cannot be changed and is set when the field is initially created
NameThe name of the field
GroupThe
Groupattribute is used for associating fields to make them easier to locate within the administration screens12. For the
Notificationfield, we will define aTextfield with the following elements:<Field Type="Text" DisplayName="Notification" Required="TRUE" MaxLength="255" ID="{6807197A-5A93-48D0-90B5-95DD0212ACDE}" StaticName="Notification" Name="Notification" Group="Communication Columns" />13. For the
InfoLinkfield, we will define aURLfield with the following elements:<Field Type="URL" DisplayName="Info Link" Required="FALSE" ID="{FEF259DC-8845-45E5-B9DB-578E905CA853}" StaticName="InfoLink" Name="InfoLink" Group="Communication Columns" />14. For the
NotifStartfield, we will define a simpleDateTimefield as follows:<Field Type="DateTime" DisplayName="Start Date" Required="FALSE" ID="{CD648248-7769-428C-955C-2E341A23848E}" StaticName="NotifStart" Name="NotifStart" Group="Communication Columns" />15. The
NotifEndfield will be anotherDateTimefield with the following elements:<Field Type="DateTime" DisplayName="End Date" Required="FALSE" ID="{0444ABD1-7E04-4EBF-9FF9-87061CA410F4}" StaticName="NotifEnd" Name="NotifEnd" Group="Communication Columns" />16. Next we define the attributes of the
ContentTypeelement, and set the field references to the IDs of the fields defined previously along with the standardIDfield associated with the base content type item:<ContentType ID="0x010089E3E6DB8C9B4B3FBB980447E313CE96" Name="Notification Item" Group="Communication Content Types" Description="Notification List Content Type." Version="0"> <FieldRefs> <FieldRef ID="{fa564e0f-0c70-4ab9-b863-0177e6ddd247}" /> <FieldRef ID="{6807197A-5A93-48D0-90B5-95DD0212ACDE}" /> <FieldRef ID="{24380857-433E-4A73-BD71-16F3BB1E443D}" /> <FieldRef ID="{CD648248-7769-428C-955C-2E341A23848E}" /> <FieldRef ID="{0444ABD1-7E04-4EBF-9FF9-87061CA410F4}" /> <FieldRef ID="{FEF259DC-8845-45E5-B9DB-578E905CA853}" /> </FieldRefs> </ContentType>17. Next we will identify the attributes for the
ListTemplateelement, which completes the configuration for the new List Definition:<ListTemplate Name="NotificationDefinition" DisallowContentTypes="FALSE" Type="12001" BaseType="0" OnQuickLaunch="FALSE" SecurityBits="11" Sequence="410" DisplayName="Notification List Definition" Description="Notification Definition" Image="/_layouts/images/itgen.png"/>
18. Edit the
NotificationDefinition/Notification/Elements.xmlfile to set the configuration for the List Instance that will be provisioned:<ListInstance Title="Notification" OnQuickLaunch="FALSE" TemplateType="12001" Url="Lists/Notification" Description="Notification List Instance"> </ListInstance>
19. To build the project, select Build, then Build SPBlueprints.Lists.Notification.
20. To deploy to the local server, select Build, then Deploy SPBlueprints.Lists.Notification.
21. The completed project structure should resemble the following screenshot:

Since we are creating both a List Definition and a List Instance, the defined list will be automatically created once the SPBlueprints Notification List Feature is activated. It is important to note that the OnQuickLaunch property was set to FALSE so the list will not show up in the Quick Launch menu. To access the list you will need to click the Site Actions menu, and select the View All Site Content menu item.
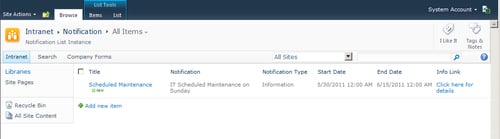
The pre-defined list view also makes it easy for the content manager to review the currently logged notifications as shown in the following screenshot:
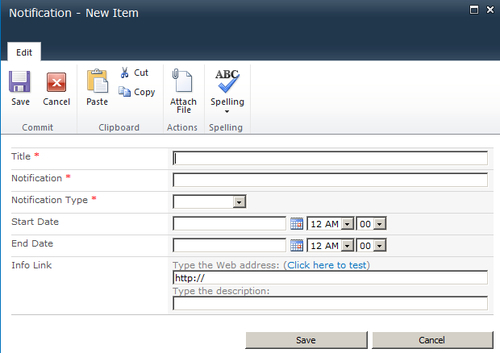
The New Item form includes the fields we defined in the List Definition, and can be used to log a variety of notifications as displayed in the following screenshot:
To display notifications on the page we will query the Notification list we previously deployed, and leverage the SP.UI.Status class made available in the ECMA Client OM.
The SP.UI.Status class supports a number of methods that allow you to add, update, append, and remove status messages as well as set a background color for the status bar. For the purpose of this particular feature, we will focus on the addStatus and setStatusPriColor functions.
Since this is part of the Client OM, it is accessible from any SharePoint page. The scripts can be added to a Content Editor Web Part, included in a custom Web Part, or as in this example added directly to the site's Master Page.
In this section we will add the SetStatus code to the Master Page for the status updates to be added to the page. It should be positioned just before the</Body> tag.
To start with, create a div container to hold the code and define the script block. The remainder of the code will be placed inside of the script block. The SetStatus script container code is shown as follows:
<div id="SetStatus">
<script type="text/ecmascript" language="ecmascript">
</script>
</div>
Next we define the main variables and add a check to determine if this is a page being loaded in a dialog window. This code is needed to prevent the status messages from being loaded in the dialog windows such as the file upload or edit item forms.
The ExecuteOrDelayUntilScriptLoaded() function will delay the execution of the script until the page and all scripts are loaded. The SetStatus variables and control code are shown as follows:
var statusId = '';
var isitDlg = window.location.href.match(/isDlg/i) != null;
if (!isitDlg) {
ExecuteOrDelayUntilScriptLoaded(LoadNotifications, "sp.js");
}
The LoadNotifications() function will use the Client Object Model to format a CAML query, and load the matching items from the Notification list. The
LoadNotifications() function code is shown as follows:
function LoadNotifications() {
var curDate = new Date();
var curDFormatted = curDate.getYear() + "-" +
(curDate.getMonth() + 1) + "-" + curDate.getDate() + "T" +
curDate.getHours() + ":" + curDate.getMinutes() + ":" +
curDate.getSeconds() + "Z";
var listTitle = "Notification";
context = SP.ClientContext.get_current();
var notifList =
context.get_web().get_lists().getByTitle(listTitle);
var camlQuery = new SP.CamlQuery();
camlQuery.set_viewXml("<View><Query><ViewFields><FieldRef
Name='Title' /><FieldRef Name='Notification' /><FieldRef
Name='NotifType' /><FieldRef Name='NotifStart' /><FieldRef
Name='NotifEnd' /><FieldRef Name='InfoLink'
/></ViewFields><Where><And><Leq><FieldRef Name='NotifStart'
/><Value IncludeTimeValue='TRUE' Type='DateTime'>" +
curDFormatted + "</Value></Leq><Geq><FieldRef Name='NotifEnd'
/><Value IncludeTimeValue='TRUE' Type='DateTime'>" +
curDFormatted +
"</Value></Geq></And></Where><OrderBy><FieldRef
Name='NotifStart' /></OrderBy></Query></View>");
this.listItems = notifList.getItems(camlQuery);
context.load(listItems);
context.executeQueryAsync(ReadListItemSucceeded,
ReadListItemFailed);
}
The ReadListItemSucceeded() function will be called if the list read call was successful. Here we will iterate through the returned items and format the status messages that will be displayed. The ReadListItemSucceeded() function code is shown as follows:
function ReadListItemSucceeded(sender, args) {
var message = '';
var items = listItems.getEnumerator();
while (items.moveNext()) {
var listItem = items.get_current();
switch (listItem.get_item('NotifType')) {
case "Emergency":
imageRef = "<img
src='/_layouts/IMAGES/error16by16.gif' align='absmiddle'
border='0' alt='Emergency'>";
break;
case "Warning":
imageRef = "<img
src='/_layouts/IMAGES/warning16by16.GIF' align='absmiddle'
border='0' alt='Warning'>";
break;
default:
imageRef = "<img
src='/_layouts/IMAGES/info16by16.gif' align='absmiddle' border='0'
alt='Information'>";
}
message = listItem.get_item('Notification') + " " +
imageRef;
SetStatus(listItem.get_item("Title") + ":", message,
listItem.get_item('NotifType'));
}
}
The SetStatus() function is called for each status message that needs to be set. It will use the SP.UI.Status methods to add a message and to set the background color of the status container. The SetStatus()function code is shown as follows:
function SetStatus(title, message, type) {
statusId = SP.UI.Status.addStatus(title, message, false);
switch (type) {
case "Emergency":
SP.UI.Status.setStatusPriColor(statusId, 'red');
break;
case "Warning":
SP.UI.Status.setStatusPriColor(statusId, 'yellow');
break;
default:
SP.UI.Status.setStatusPriColor(statusId, 'blue');
}
}
The ReadListItemFailed() function will provide an alert if the status could not be set:
function ReadListItemFailed(sender, args) {
alert('Error: ' + args.get_message());
}
