

Forms and <form> elements are an integral part of any application or website, from a login form to a complete contact or registration form. In HTML4, the <form> elements were very idle, and for any feature or advanced styling, JavaScript was a necessity. And for any interaction, or data submission and validation, it demanded server and client-side scripting, and its functionality was inhibited if the scripting was disabled in the browser. HTML5 brought major improvements to the <form> elements with new attributes and input types, and added features such as browser-based validation and CSS styling that provide a better experience for the users filling it, and all possible simplicity for the developers creating it.
New values for the type attribute are introduced to the <input> element.
HTML5 adds 13 new <input> types to the ones we were already familiar with in HTML4, such as text and checkbox. With this addition, the <input> control now supports types such as range, date, number, telephone, email, and URL. And these new <input> types add intelligent behavior to the element themselves.
The following is the table listing of these types:
Along with the addition to the <input> types, new features have been added to the already existing ones such as the File input element, which now supports multifile selection using the multiple attribute. The browse button will display the file dialog and then you can select files from your local disk or SkyDrive; the files can be sent to the server as part of the form data when the form is submitted.
You can also take advantage of the progress element that represents the progress of a task, as specified by the W3C. It can be used to show the progress of a large file being uploaded or a media resource that is being loaded. The progress of a task is determined by two attributes of this element:
The following code uses a progress element and a button, and the script adds the value specified in the JavaScript function parameter to its existing value. When you load the sample and try it, you will see the progress bar visually updating the completion progress.
The following is the HTML code:
<button id="clickBtn" onclick="updateProgress(10)">Update Progress</button>Progress: <progress id="prog" max="100"></progress>
The following is the JavaScript code:
<script>
//get the progress element and add the value to it with every click var progressBar = document.getElementById('prog');
function updateProgress(newValue){
progressBar.value = progressBar.value + newValue;
}
</script>HTML5's new <input> types along with the validation attributes such as required and pattern, and the pseudo CSS3 selectors allow browser-based validation, where you can catch a form's input errors without a single line of code or script. This was previously impossible and needed a custom JavaScript code or a JavaScript library. Basically, it provides client-side form validation without JavaScript.
We'll start with the most trivial validation, filling a required field. In order to achieve this, we need to add the required attribute to an <input> element.
The required attribute can be set on the <input> elements with type text, URL, email, checkbox, or radio, and on select and textarea elements. It is a Boolean attribute and can only be set on an element.
We specify that filling a value for a field is mandatory by simply adding the required attribute. In the following code listing, you will find a couple of <input> elements with the required attribute:
<form action="/" method="post">
<label>Checkbox:</label>
<input type="checkbox" required />
<label>Radio:</label>
<select>
…
</select>
<label>Text:</label>
<input type="search" required />
<label>Range:</label>
<input type="range" min="5" max="10" step="5" />
<label>URL:</label>
<input type="url" required />
<label>File:</label>
<input type="file" accept=".mp3" />
<input type="submit" name="submit" value=" Submit " />
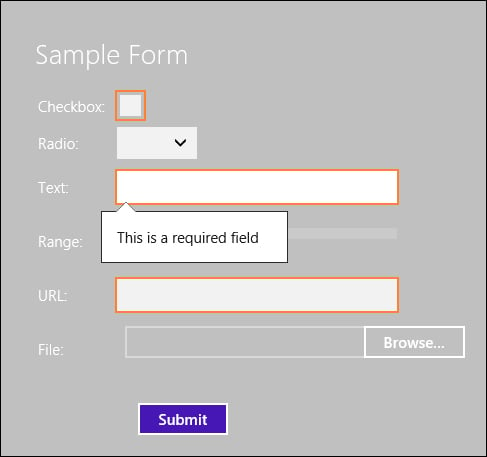
</form>Once the required attribute is added, and then when you click on the submit button, all the fields in the form will be validated; an error is returned if any of the fields are incorrect. The required fields are highlighted, and moreover, default messages are provided to notify the user that these fields are required in the form.
You can see the following screenshot displaying the output of the preceding code:
We can apply one or more styles using the CSS3 pseudo-selector required (more on that in the next chapter). For example, the following style adds a CSS3 pseudo-class required, which will look for all the input elements in the document that have the required attribute, and style it with the yellow border-color.
input:required {
  border-color: Yellow;
}
If you want to apply a style that affects all the non-required elements in the form, well that's very easy; just add the optional pseudo-class and give it a style just as we did with the required class. In the following code, we apply a LightGray border-color to all the input elements that don't have a required attribute.
input:optional {
  border-color: LightGray;
}
HTML5 forms not only validate for required fields, but they also check the content of the field values and validate it either automatically, as in the URL and email input types, or by using the pattern attribute. The pattern attribute uses a regular expression to define the valid format that the element value must match, for example, a telephone number or social security number.
The following example shows the syntax for a password field, which is both required and must have a valid input with a minimum length of eight characters. And here, the default validation message is replaced by the text provided in the title attribute:
<input type="password" required pattern="[^\s]{8}[^\s]*" title="Passwords must be at least 8 characters long."/>There are more attributes that add to the validation technique, such as placeholder, which provides the users with a hint message displayed in light text until the user starts typing inside the element; the hint could be about the value they should enter in the field. For example, you can add a demo e-mail address in the email field such as:
<input type="email" placeholder="[email protected]" />
You can check for the maximum number of characters allowed in a text or a textarea input using the maxlength attribute. Also, we have the min, max, and step attributes used with the range element to validate the values entered for that element. The min and max attributes check for the minimum and maximum values that can be entered, while the step attribute checks for the allowed values.
You can also specify acceptable file MIME types with the accept attribute. As you may have noticed in the preceding code listing, the accept attribute was added to the <input type="file" /> element, which is the only element to be used with it. Once you add this to the file control, and then when you try to browse for a file using Windows 8 File Explorer, only the types that are in the accept list will be displayed.
HTML5 form validation is the default behavior; no code is needed to activate it, but you can turn it off by adding the formnovalidate attribute to the submit button or any <input> element. This attribute allows a form to be submitted without being validated.