
Here you will learn various new features, which could be implemented using various PowerShell modules and cmdlets (command lets) to automate your Windows environment.
In this section, I will illustrate some PowerShell cmdlets, which you can use for file and folder management using PowerShell:
Copy-Item: The
Copy-Itemcmdlet copies an item from one location to another in a namespace.Copy-Itemdoes not delete the items being copied. When the cmdlet is used with filesystems, it can be used to copy files and directories, and when used with Windows Registry, it can be used to copy registry keys and entries.The following command will copy the file
cmdout.log.txtto theC:\Presentationdirectory. The command does not delete the original file.PS C:\> copy-item C:\vins\Logfiles\cmdout.log.txt -destination C:\PresentationThe following command copies the entire content of the
Logdirectory into theBackupdirectory. If the source directory contains files in subdirectories, those subdirectories will be copied with their file trees intact. TheContainerparameter is set totrueby default. This preserves the directory structure.PS C:\> copy-item C:\Log -destination C:\Backup -recurse
The default alias for the
Copy-Itemcmdlet iscopy; you can use the cmdlet alias as follows:PS C:\> copy C:\Log -destination C:\Backup -recurseGet-Item: The
Get-Itemcmdlet gets the item at the specified location. It does not get the contents of the item at the location unless you use a wildcard character (*) to request all the contents of the item. In the filesystem, theGet-Itemcmdlet gets files and folders:PS C:\> Get-ItemThis command gets the current directory. The dot character (
.) represents the item at the current location (not its contents):
The following command gets the current directory of
C:\:PS C:\> Get-Item *The object that is retrieved represents only the directory, not its contents:

The following command gets the items in
C:\:PS C:\> Get-Item C:\The wildcard character (
*) represents all the items in the container, not just the container. You should see the following screenshot now:
The following command gets the
LastAccessTimeproperty of theC:\Windowsdirectory.LastAccessTime, as shown in the following command, is just one property of the file system object:PS C:\> (Get-Item C:\Windows).LastAccessTimeYou should now see the following screenshot:

The following command gets items in the Windows directory with names that include a dot (
.), but do not begin withw*. This command works only when the path includes a wildcard character (*) to specify the contents of the item:PS C:\> Get-Item C:\Windows\*.* -Exclude w*You should now get the following screenshot:

The default alias for the
Get-Itemcmdlet isgi; you can use the cmdlet alias as follows:PS C:\> gi C:\Windows\*.* -Exclude w*Get-ItemProperty: The
Get-ItemPropertycmdlet gets the properties of the specified items. For example, you can useGet-ItemPropertyto get the value of theLastAccessTimeproperty of a file or folder object. You can also useGet-ItemPropertyto view registry entries and their values:PS C:\> Get-ItemProperty C:\WindowsThe previous command gets information about the
C:\Windowsdirectory:
The following command gets the properties of the
C:\Windows\bfsvc.exefile:PS C:\> Get-ItemProperty C:\Windows\bfsvc.exe | Format-ListThe result is piped to the
Format-Listcmdlet to display the output as a list:
The default alias for the
Get-Itemcmdlet isgi; you can use the cmdlet alias as follows:PS C:\> gp C:\Windows\bfsvc.exe | Format-ListInvoke-Item: The
Invoke-Itemcmdlet performs the default action on the specified item. For example, it runs an executable file or opens a document file in the application associated with the document file type. The default action depends on the type of item and is determined by the Windows PowerShell provider that provides access to the data.The following command opens the file alias
counter.csvin Microsoft Excel:PS C :\> invoke-item C:\Counter.csvIn this case, opening in Excel is the default action for
.csvfiles. You should now see the following screenshot:
The following command opens all of the Microsoft Office Excel spreadsheets in the
C:\Documents and Settings\sample\My Documentsfolder:PS C:\> invoke-item "C:\Documents and Settings\sample\My Documents\*.xls"Each spreadsheet is opened in a new instance of Excel. In this case, opening in Excel is the default action for the
.xlsfiles. You should now see the following screenshot:
The default alias for the
Invoke-Itemcmdlet isii; you can use the cmdlet alias as follows:PS C:\> ii C:\Counter.csv | Format-ListMove-Item: The
Move-Itemcmdlet moves an item, including its properties, contents, and child items, from one location to another. The locations must be supported by the same provider. For example, it can move a file or subdirectory from one directory to another, or move a registry subkey from one key to another. When you move an item, it is added to the new location and deleted from its original location.PS C:\> move-item -path C:\test.txt -destination E:\Temp\tst.txtThe previous command moves the
Test.txtfile from theC:\drive to theE:\Tempdirectory and renames it fromtest.txttotst.txt, as shown in the following screenshot:
The following command moves all of the text files (
*.txt) in the current directory (represented by a dot (.)) to theC:\Logsdirectory:PS C:\> move-item -path .\*.txt -destination C:\LogsYou should now see the following screenshot:

The following command moves all of the text files from the current directory and all subdirectories, recursively, to the
C:\TextFilesdirectory:PS C:\> Get-ChildItem -Path .\*.txt -Recurse | Move-Item -Destination C:\TextFilesYou should now see the following screenshot:

The default alias for the
Move-Itemcmdlet ismove,mi, ormv; you can use the cmdlet alias as follows:PS C:\> move .\*.txt -destination C:\Logs PS C:\> mi .\*.txt -destination C:\Logs PS C:\> mv .\*.txt -destination C:\Logs
New-Item: The
New-Itemcmdlet creates a new item and sets its value. The types of items that can be created depend upon the location of the item. For example, in the filesystem,New-Itemis used to create files and folders. In the registry,New-Itemcreates registry keys and entries.PS C:\> new-item -path c:\vinith testfile12.txt -itemtype "file" -value "This is a text string."The previous command creates a text file named
testfile1.txtin thec:\vinithdirectory. The dot (.) in the value of thePathparameter indicates the current directory. The quoted text that follows theValueparameter is added to the file as content:
The following command creates a directory named
Logfilesin theC:\directory:PS C:\> new-item -path c:\ -name logfiles -itemtype directoryThe
ItemTypeparameter specifies that the new item is a directory, not a file or some other filesystem object, as shown in the following screenshot:
The following command uses the
New-Itemcmdlet to create files in two different directories:PS C:\> new-item -itemtype file -path "c:\ps-test\test12.txt", "c:\ps-test\Logs\test12.log"Because the
Pathparameter takes multiple strings, you can use it to create multiple items. You can now see the following screenshot:
The default alias for the
New-Itemcmdlet isni. You can use the cmdlet alias as follows:PS C:\> ni -path c:\ -name logfiles -itemtype directoryRemove-Item: The
Remove-Itemcmdlet deletes one or more items. Because it is supported by many providers, it can delete many different types of items, including files, directories, registry keys, variables, aliases, and functions. In filesystem drives, theRemove-Itemcmdlet deletes files and folders.C:\PS>Remove-Item C:\Test\*.*This command deletes all the files with names that include a dot (
.) from theC:\Testdirectory. Because the command specifies a dot, the command does not delete directories or files with no file name extension. You should now see the following screenshot:
The following command deletes a file that is both hidden and read-only:
C:\PS>Remove-Item -Path C:\Test\Invisible-ROnly-file.txt -ForceIt uses the
Pathparameter to specify the file. It uses theForceparameter to give permission to delete it. WithoutForce, you cannot delete read-only or hidden files.The default alias for the
Remove-Itemcmdlet isdel,erase,rd,ri,rm, andrmdir. You can use the cmdlet alias as follows:C:\PS> del -Path C:\Test\Invisible-ROnly-file.txt -Force C:\PS> erase -Path C:\Test\Invisible-ROnly-file.txt -Force C:\PS> rd -Path C:\Test\Invisible-ROnly-file.txt -Force C:\PS> ri -Path C:\Test\Invisible-ROnly-file.txt -Force C:\PS> rm -Path C:\Test\Invisible-ROnly-file.txt -Force
Get-Acl: The
Get-Aclcmdlet gets objects that represent the security descriptor of a file or resource. The security descriptor contains the access control lists (ACLs) of the resource in an array. The ACL specifies the permissions that users and user groups have to access the resource.The following command gets the security descriptor of the
C:\Windowsdirectory:PS C:\> Get-Acl C:\WindowsYou should now see the following screenshot:

Set-Acl: The
Set-Aclcmdlet changes the security descriptor of a specified item, such as a file or a registry key, to match the values in a security descriptor that you supply. To useSet-Acl, use thePathparameter to identify the item whose security descriptor you want to change. Then, use theAclObjectparameters to supply a security descriptor that has the values you want to apply.The following commands copy the values from the security descriptor of the
123.csvfile to the security descriptor of the123.htmlfile:PS C:\> $ACL = Get-Acl C:\vinith\123.csv PS C:\> Set-Acl -Path C:\vinith\123.html -AclObject $ACL
When the execution of the commands is complete, the security descriptors of the
123.csvand123.htmlfiles are identical. The following screenshot shows the usage of the commands:
The following command is almost the same as the command in the previous example, except that it uses a pipeline operator to send the security descriptor from a
Get-Aclcommand to aSet-Aclcommand:PS C:\> Get-Acl C:\vinith\123.csv | Set-Acl -Path C:\vinith\123.htmlThe following commands apply the security descriptors in the
123.csvfile to all text files in theC:\Tempdirectory and all of its subdirectories:PS C:\> $NewAcl = Get-Acl C:\vinith\123.csv PS C:\> Get-ChildItem c:\temp -Recurse -Include *.txt -Force | Set-Acl -AclObject $NewAcl
You should now see the following screenshot:

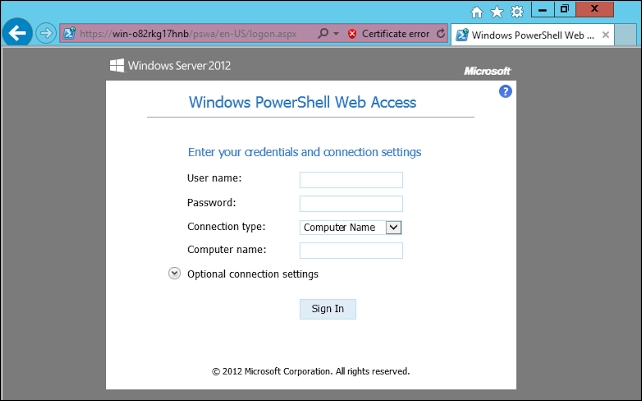
PowerShell Web Access, a web-based Windows PowerShell console, and Windows PowerShell commands and scripts can be run from a Windows PowerShell console in a web browser; with no Windows PowerShell, remote management software, or browser plug-in installation becomes necessary on the client device.
All that is required to run the web-based Windows PowerShell console is a properly configured Windows PowerShell Web Access gateway, and a client device browser that supports JavaScript and accepts cookies.
Examples of client devices include laptops, tablet computers, web kiosks, computers that are not running a Windows-based operating system, and cell phone browsers. IT pros can perform critical management tasks on remote Windows-based servers from devices that have access to an Internet connection and a web browser.
Users can access a Windows PowerShell console by using a web browser. When users open the secured Windows PowerShell Web Access website, they can run a web-based Windows PowerShell console after successful authentication, as shown in the following screenshot:
Here are the steps that I followed to test PSWA (PowerShell Web Access).
Run the following command:
PS C:\Users\Administrator> Install-WindowsFeature WindowsPowerShellWebAccess
You should now see the following screen:

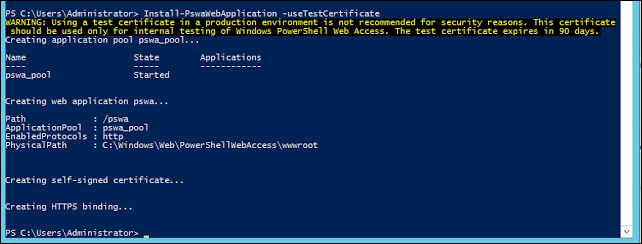
Once we install PowerShell Web Access, we need to start to configuring it.
We will configure Windows PowerShell Web Access by installing the web application and configuring a predefined gateway rule. Now, create just a test certificate and an SSL binding using that certificate for a test environment:
PS C:\Users\Administrator> Install-PswaWebApplication –useTestCertificate
After this, you should see the following screenshot:
Now, set the authorization rule on which all can have rights for PowerShell Web Access; for my test environment, I set it to *, which means all have access:
PS C:\Users\Administrator> Add-PswaAuthorizationRule –ComputerName * -UserName * -ConfigurationName *
This step gives the following output:

Now if you run a Get-PswaAuthorizationRule command, you can see the list of users having access to PSWA:
PS C:\Users\Administrator> Get-PswaAuthorizationRule
The following screenshot shows the output:

Now that PowerShell Web Access is set up, we can access the PSWA page via a web browser. You get an error message, Error! Hyperlink reference not valid. You should see the following options on the screen:
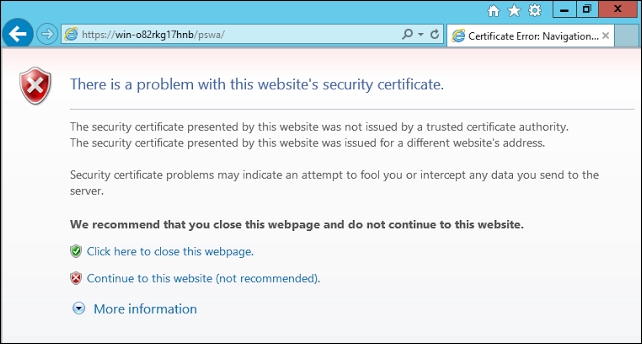
You will receive this error because you are using a test certificate that cannot be validated; click on Continue to this website (not recommended).
You will now reach the following page:
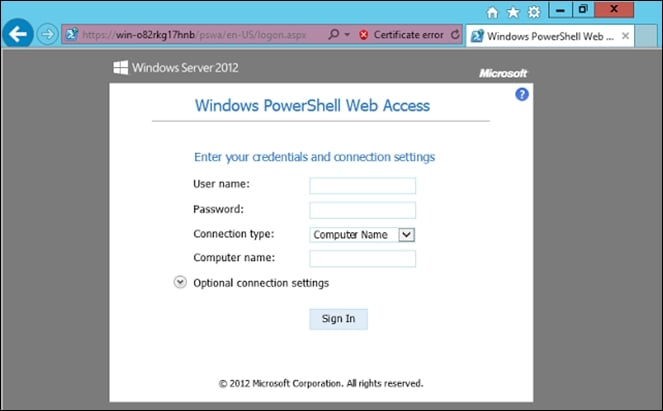
Now enter the username and password to connect to a remote computer, which also accepts IP addresses (specified in computer name block), and voila! You are now logged into the remote console of the server:
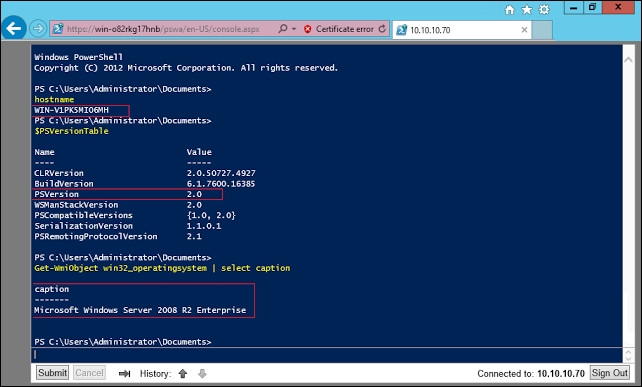
Run a hostname command, $psversiontable, and also query wmi for the operating system installed on your remote system, and it indeed shows that you were logged into the correct host and it also had PowerShell v2 installed:
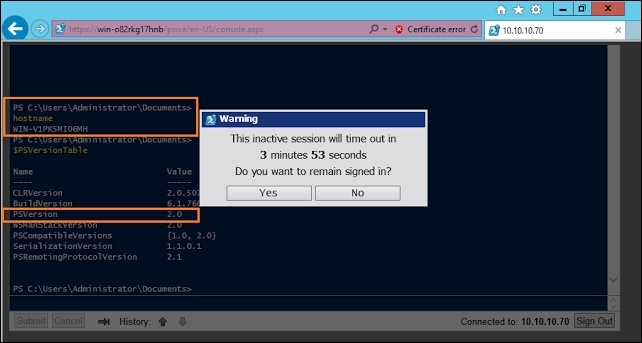
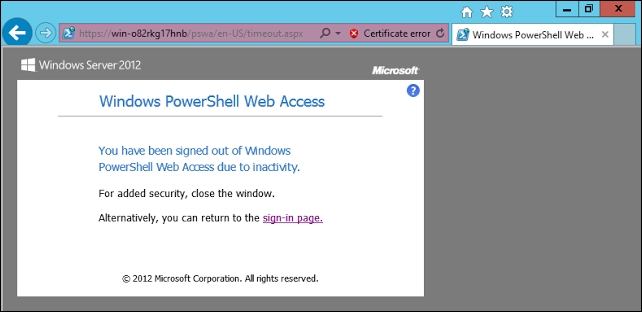
I also wanted to share one more screen along with this example for inactive session timeout which autologged off my session when I was inactive for a certain period of time:
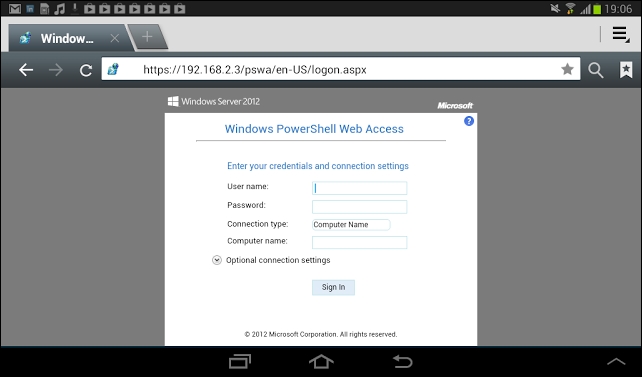
Now let's see a real-world example of PowerShell Web Access. Here's the console when I accessed it from my Android tablet.
So, we can see that with PSWA you can get a fully fledged PowerShell environment on my handheld device:
There are basically two PowerShell cmdlets, which you can use to sign your scripts. Signing your scripts is like imprinting them with a rubber stamp so that the scripts would maintain an identity of who created them. Usually, I in a production environment, the execution policy is set to allsigned, which means that only signed scripts are allowed to run. The (Get/Set)-Authenticode Signature cmdlet can be used to work with script signing.
Get-AuthenticodeSignature: The
Get-AuthenticodeSignaturecmdlet gets information about the Authenticode signature in a file. If the file is not signed, the information is retrieved, but the fields are blank.PS C:\> Get-AuthenticodeSignature C:\Vinith\Export-NaEfficiencyXls.ps1After running the previous command, you should see the following screen:

This command gets information about the Authenticode signature in the
Export-NaEfficiencyXls.ps1file. It uses theFilePathparameter to specify the file.Set-AuthenticodeSignature: The
Set-AuthenticodeSignaturecmdlet adds an Authenticode signature to any file that supports Subject Interface Package (SIP). In a Windows PowerShell script file, the signature takes the form of a block of text that indicates the end of the instructions that are executed in the script. If there is a signature in the file when this cmdlet runs, that signature is removed.Here are some examples on how you can use these cmdlets:
The following command retrieves a code-signing certificate from the Windows PowerShell certificate provider and uses it to sign a Windows PowerShell script:
PS C:\> $cert=Get-ChildItem -Path cert:\CurrentUser\my -CodeSigningCertThe following commands use the
Get-PfxCertificatecmdlet to find a code-signing certificate. Then, they use it to sign a Windows PowerShell script:PS C:\> $cert = Get-PfxCertificate C:\Test\Mysign.pfx PS C:\>Set-AuthenticodeSignature -Filepath Export-NaEfficiencyXls.ps1 -Cert $cert
The first command uses the
Get-PfxCertificatecmdlet to find theC:\Test\MySign.pfxcertificate and store it in the$certvariable.The second command uses
Set-AuthenticodeSignatureto sign the script. TheFilePathparameter ofSet-AuthenticodeSignaturespecifies the path to the script file being signed, and theCertparameter passes the$certvariable containing the certificate toSet-AuthenticodeSignature.If the certificate file is password protected, Windows PowerShell prompts you for the password.
You can carry out most of your routine Active Directory tasks using PowerShell and automate them via scripts; most of the activities which you can perform to secure your AD environment can be done using PowerShell.
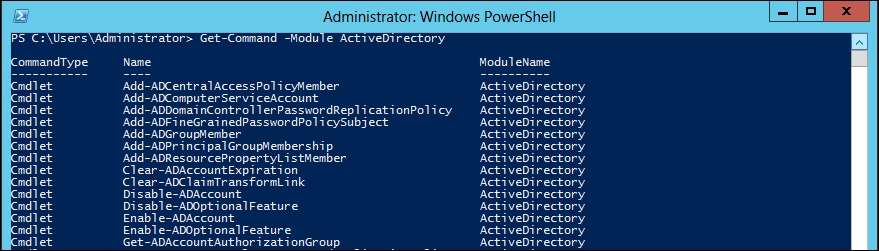
Open a PowerShell session and import the Active Directory module:
PS C:\> Import-Module ActiveDirectory
To see a list of cmdlets which are a part of the Active Directory module, type in the following command:
PS C:\> get-command -module ActiveDirectory
You should now get the following screenshot:
Now let's work on some basic Active Directory security tasks, which you can perform using PowerShell.
Let's start with a frequently used typical IT task, resetting a user's password. We can easily accomplish this by using the Set-ADAccountPassword cmdlet. The password must be specified as a secure string:
PS C:\> $new = Read-Host "Enter the new password" -AsSecureString
PS C:\> Set-ADAccountPassword user1 -NewPassword $new
The output screen should look as follows:

PS C:\> Set-ADAccountPassword user1 –NewPassword (ConvertTo-SecureString -AsPlainText –String "P@ssw3@%%@%%@" -force)

To change user's password at his or her next logon, we can use Set-ADUser:
PS C:\> Set-ADUser user1 -ChangePasswordAtLogon $True
The output screen should look as follows:

The command doesn't write to the pipeline or console unless you use True.
We can use a –whatif parameter to see the changes prior to committing them:
PS C:\> Disable-ADAccount user1 –whatif

PS C:\> Disable-ADAccount user1

Now to enable this account, we can use Enable-ADAccount:
PS C:\> Enable-ADAccount user1
You should now see the following screenshot:

These cmdlets can be used in a pipelined expression to enable or disable as many accounts as you need. For example, the following command disables all user accounts in the sales department:
PS C:\> get-aduser -filter "department -eq 'contractor'" | disable-adaccount
Rather than digging through the GUI to find an account, you can unlock it by using the following simple command:
PS C:\> Unlock-ADAccount Vins
You should see the output screen as follows:

This cmdlet also supports the -Whatif and -Confirm parameters.
You can use the following command to delete a user account:
PS C:\> Remove-ADUser Vins –whatif
You should now see the following output screen:

We can also use PowerShell pipeline to remove a bunch of users and delete them with one simple command:
PS C:\> get-aduser -filter "enabled -eq 'false'"
-property WhenChanged -SearchBase "OU=Employees,
DC=virtualcloud,DC=Local" | where {$_.WhenChanged
-le (Get-Date).AddDays(-360)} | Remove-ADuser -whatif
This one-line command would find and delete all disabled accounts in the employees' organizational unit (OU) that haven't been changed in at least 360 days.
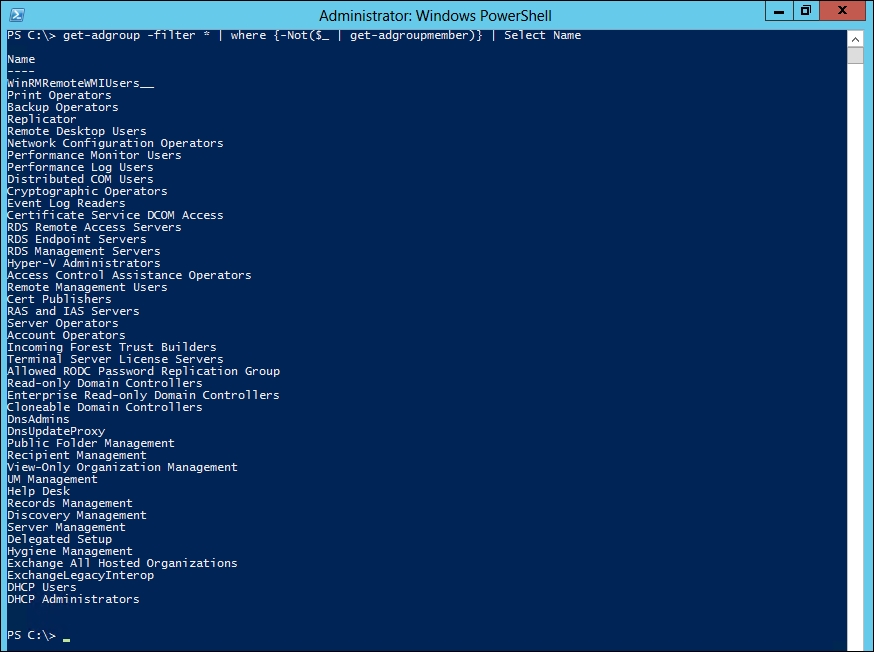
The following code will find all groups in the domain which are empty or do not have any users in them, including built-in groups:
PS C:\> get-adgroup -filter * | where {-Not($_ | get-adgroupmember)} | Select Name
You should get the output as shown in the following screenshot:
Let's add user1 to the Hyper-V Administrators group:
PS C:\> add-adgroupmember " Hyper-V Administrators" -Members user1
You should now see the output as shown in the following screenshot:
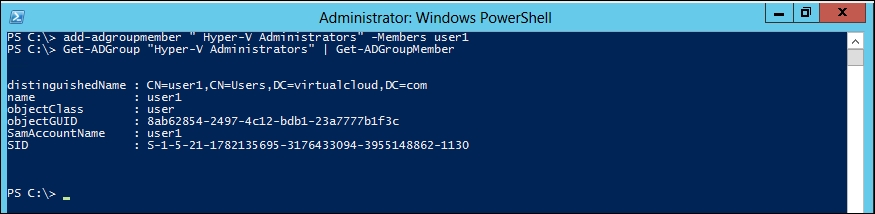
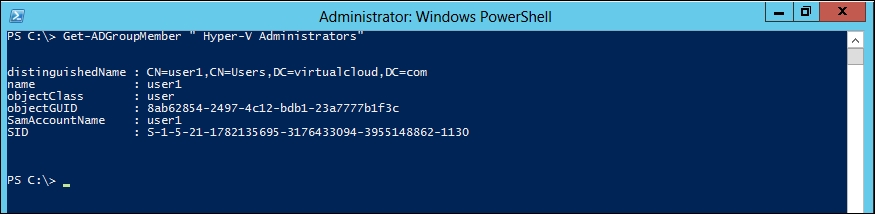
You might want to see who belongs to a given group. For this, you can use the following command:
PS C:\> Get-ADGroupMember " Hyper-V Administrators"
You should see the output as shown in the following screenshot:
The cmdlet writes an AD object for each member to the pipeline.
To get a list of all user accounts in nested user groups, all you need to do is use the -Recursive parameter:
PS C:\> Get-ADGroupMember " Hyper-V Administrators" -Recursive | Select DistinguishedName
Assuming that a computer hasn't changed its password with the domain in a particular period of time, use the following command to filter and find the obsolete computer accounts:
PS C:\> get-adcomputer -filter "Passwordlastset -lt '1/1/2013'" -properties *| Select name,passwordlastset
You should see the filtered computer accounts, as shown in the following screenshot:
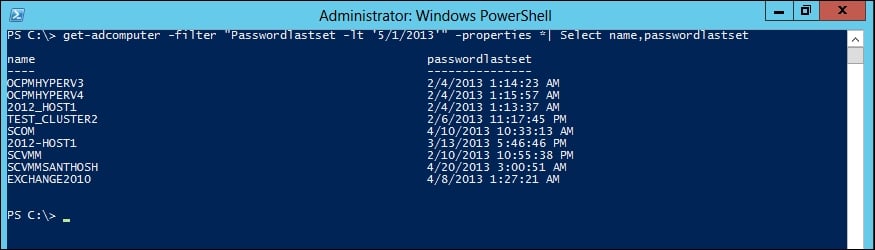
The filter works best with a hard-coded value, but this code will retrieve all computer accounts that haven't changed their password since May 1, 2013.
You can specify which computer account to disable by using the account's samAccountname value:
PS C:\> get-adcomputer "scvmm1" | Disable-ADAccount
You should see the output as shown in the following screenshot:

For more information on the list of cmdlets which can be used for Active Directory administration, please refer to http://technet.microsoft.com/en-us/library/hh852274(v=wps.620).aspx.
In this section, I will provide you with some basic cmdlets, which are a part of the Microsoft.PowerShell.Security module:
ConvertFrom-SecureString: The
ConvertFrom-SecureStringcmdlet converts a secure string (System.Security.SecureString) into an encrypted standard string (System.String). Unlike a secure string, an encrypted standard string can be saved in a file for later use. The encrypted standard string can be converted back to its secure string format by using theConvertTo-SecureStringcmdlet.The following command reads a set of characters from a user and stores it as a secure string in the
$securestringvariable:PS C:\> $SecureString = Read-Host -AsSecureStringThe following command converts the secure string in the
$SecureStringvariable to an encrypted standard string:PS C:\> $StandardString = ConvertFrom-SecureString $SecureStringThe resulting encrypted standard string is stored in the
$StandardStringvariable. You should see the output screen as follows:
ConvertTo-SecureString: The
ConvertTo-SecureStringcmdlet converts encrypted standard strings into secure strings. It can additionally convert plain text to secure strings. The secure string can be converted back to an encrypted, standard string utilizing theConvertFrom-SecureStringcmdlet. This enables it to be stored in a file for later use.If the standard string being converted was encrypted with
ConvertFrom-SecureStringutilizing a specified key, that same key must be provided as the value of theKeyorSecureKeyparameter of theConvertTo-SecureStringcmdlet.The following command converts the plain text string
P@ssW0rD!into a secure string and stores the result in the$secure_string_pwdvariable:PS C:\> $secure_string_pwd = convertto-securestring "P@ssW0rD!" -asplaintext –forceTo utilize the
AsPlainTextparameter, theForceparameter must additionally be included in the command. You should now see the output screen as follows:
In order to get started with administrating PKI, we should first import the PKI module:
PS C:\> Import-Module PKI
In the following list I will show you some basic cmdlets, which you can use to administer the PKI environment:
Export-Certificate: The
Export-Certificatecmdlet exports a certificate from a certificate store to a file. The private key is not included in the export if more than one certificate is being exported.Here is an example of the
Export-Certificatecmdlet in action:PS C:\> $cert = (Get-ChildItem -Path Cert:\CurrentUser\My\C33B8174F1487B2DE2778D7BB7441F89A6709D3B)
Utilize the
Typeparameter to transmute the file format:PS C:\> Export-Certificate -Cert $cert -FilePath c:\certs\user.sst -Type SSTThis example exports a certificate to the filesystem as a Microsoft serialized certificate store without its private key:

PS C:\> $cert = (Get-ChildItem -Path Cert:\CurrentUser\My\C33B8174F1487B2DE2778D7BB7441F89A6709D3B)
PS C:\> Export-Certificate -Cert $cert -FilePath c:\certs\user.cer

This example exports a certificate to the file system as a DER-encoded
.cerfile without its private key.This following commands export all certificates under the
CurrentUser\mystore into a Microsoft serialized certificate storeallcerts.sst:PS C:\> $cert = (Get-ChildItem -Path cert:\CurrentUser\My\EEDEF61D4FF6EDBAAD538BB08CCAADDC3EE28FF) PS C:\> Get-ChildItem -Path cert:\CurrentUser\my | Export-Certificate –FilePath c:\certs\allcerts.sst -Type SST
You should get the output as shown in the following screenshot:

Get-Certificate : The
Get-Certificatecmdlet can be acclimated to submit a certificate request and install the resulting certificate, install a certificate from a pending certificate request, and enroll for ldap. If the request is issued, the returned certificate is installed in the store resolute by theCertStoreLocationparameter and returns the certificate in theEnrollmentResultstructure with statusIssued.Delegation may be required when utilizing this cmdlet with Windows PowerShell remoting and transmuting utilizer configuration.
The following commands submit a certificate request for the
SslWebServertemplate to the specific URL using the username and password credentials:PS C:\> $up = Get-Credential PS C:\> Get-Certificate -Template SslWebServer -DnsName www.virtualcloud.com –Url ` https://www.virtualcloud.com/Policy/service.svc -Credential $up -CertStoreLocation ` cert:\LocalMachine\My
You should see the output as shown in the following screenshot:

In the previous example, the request will have two DNS names in it. This is for a certificate in the machine store. If the request is issued, the returned certificate is installed in the machine's
MYstore and the certificate in theEnrollmentResultstructure is returned with the statusIssued.If the request is pending, it is installed in the machine's
REQUESTstore. The request in theEnrollmentResultstructure is returned with the statusPending.
The following list shows the cmdlets, which can be used to learn how to use the BPA module to analyze the security integrity of a system as per Microsoft requirements:
Get-BpaModel: The
Get-BpaModelcmdlet retrieves and displays the list of models that are supported by Best Practices Analyzer (BPA) and installed on the computer:
Get-BpaResult: The
Get-BpaResultcmdlet retrieves and displays the results of the latest BPA scan for a specific model that is installed on a computer. To use this cmdlet, add theModelIdparameter, and specify the model identifier (ID) for which to view the most recent BPA scan results.The following is an example when
imis extracting the results of theHyper-Vmodel ID:PS C:\> Get-BpaResult -ModelId Microsoft/Windows/Hyper-V | select title,compliance | fl *You should see the output as shown in the following screenshot:

Invoke-BpaModel: The
Invoke-BpaModelcmdlet starts a BPA scan for a specific model that is installed on a Windows-based computer. The model is specified either by using theModelIdparameter, or by piping the results of theGet-BpaModelcmdlet into this cmdlet:PS C:\> Invoke-BpaModel -Id Microsoft/Windows/Hyper-VYou should see the output as shown in the following screenshot:
