

Learning and experimenting with art becomes all the more fun when you can undo your actions, zoom and rotate your art, and even share your creative piece instantly with the world. iPad wins over art on paper when all these factors are taken into account. And if you ever want to convert your artwork to the paper form, just print it out! Let's now look at a couple of iPad apps that can make teaching artwork easy and more effective.
Download Animation Desk™, Procreate – Sketch, paint, create and SketchBook Pro apps from the App Store. The first two apps cost $4.99 each while SketchBook Pro costs just $1.99.
To begin with, let's look at the SketchBook Pro app which has a simple yet powerful user interface. It has a decent range of sketching and painting tools and suits amateurs and professional artists alike. All tools and menus reside in the top bar of the app screen, giving the user a big and neat working canvas. This is shown in the following screenshot. The app provides multiple canvas sizes, the facility to work with multiple layers and a huge variety of brushes and color tools.

The right-most button in the toolbar gives you the facility to work with Layers. The third-right Text button is to insert text into your artwork. This text can be formatted with the help of text toolbar which comes up at the bottom of the screen when Text option is selected. The Brushes button in the middle of the toolbar presents a variety of brushes and their colors. A preview of these can be seen in the next screenshot:
The Undo and Redo buttons are simple but most useful when you want to undo the mistakes you commit or when you just want to try out different painting options.
The SketchBook app makes file handling easy. You can save your artwork and view it by using the Gallery button. Once inside the gallery, you can organize and share all your files.
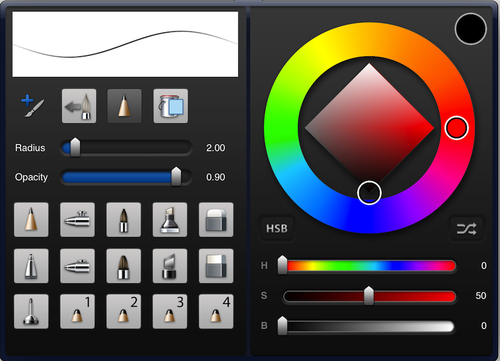
Another popular sketching and painting app is Procreate. Procreate has a dedicated painting engine which makes the painting experience fast and professional. Tools of this app are present in the top and right sidebars and are pretty similar to the ones we just discussed in the Sketchbook app. The smudge feature of this app which can be accessed from the Smudge button, located right next to the Brushes button makes your drawing get a canvas painting type effect with blending colors. Here are a series of screenshots to give you a preview of the basic tools provided in the app:

Those were apps for static painting and sketching. Let's take our learning level one step further by looking at animation creation app, the Animation Desk™ app. The concept and creation of animation is easy to teach and learn using this app. The artist creates a series of Frames (paintings) here to turn it into an animation. This is exactly what professional animators do. To create a painting (a single frame), this app provides lot of tools present on both the sides and bottom of the work-area.

The app also provides a set of dynamic and static backgrounds and other pre-made objects to get students started quickly. Animation being almost every child's fascination, teaching its basics in art classes is a good method to keep attention of students.
As you create frames, they start appearing on the preview scroll at the bottom of the screen. To select and work on any frame, simply tap on it to make it active in the work area. To add sound to your animation, use the Sound Track button at the bottom-left corner of the screen.

Teaching artwork on an iPad gives both teachers and students more power and flexibility to work and modify specific parts of the painting, commit mistakes, and learn from them. The range of painting and sketching tools provided in a single app to create every piece of artwork is much more than that can be available to students at the same time in an art class.
We looked at apps for teaching art and craft, but to make them work effectively in a classroom we need to make use of a couple of teaching aids.
As you demonstrate creating a piece of an art, you will need to use a large display screen. Your iPad screen can be mirrored to a larger one using Airplay which we learnt to use in a previous recipe. Be it sharing your demo art with the students or getting your students to submit their weekly artwork, a file-sharing app is a must! Dropbox, the popular file-sharing app is the ideal solution for both these tasks.