
A mobile device policy is something which your organization can use to manage mobile devices. Policies can be used to distinguish mobile devices between corporate and BYOD devices. They can be used to automate the provisioning of devices into an organization and assign security policies. Before you can configure policies, you must configure your XenMobile server with basic configuration settings. In this section, we will show you how to configure XenMobile.
When you log in to XenMobile for the first time, you will open up a browser and go to https://server_ip_address/zdm. You will enter the username and password you had set during the initial installation. Once you log in, you are presented with a dashboard with a quick view of your system, as shown in the following screenshot:

The dashboard
Don't worry if this looks empty, we will soon enroll devices and start configuring policies. As we enroll devices, our dashboard will start displaying more relevant information.
Select the Option button on the top-right side of the screen. This will bring up the server options page, as shown in the following screenshot. This is where we will enter the basic server and administrative information for our XenMobile server as follows:

Server options
Initial parameters are default, but they can easily be changed based on the needs of an organization. Most options are self-explanatory, however, we will cover the more popular and complex options in further steps.
Apple iOS devices or Google android devices can be jailbroken or rooted. Jailbreaking or rooting a device gives users access to settings and lets them install applications that have not been approved by the manufacturers. This may include Internet tethering applications to allow users to use their devices as mobile modems, tweaking voice settings, or installing applications that are only available in different countries.
Many threats by mobile devices on iOS and Android platforms are caused by software that requires the system to be rooted (Android) or jailbroken (iOS). Rooted and jailbroken applications do not go through the same verification process as normal applications. XenMobile can detect if these devices violate compliance and block them from accessing corporate applications and other resources. The configurations options are shown in the following screenshot:

Blocking Jailbroken and Rooted devices
These options allow the administrator to:
To configure blocking of jailbroken or rooted devices on your system, by navigating to the Security submenu
Select Enable if you want to block jailbroken or rooted devices
XenMobile allows granularity over what type of users and mobile devices you want to manage. In addition, it allows you to set up specific groups of users that will manage the XenMobile server along with specific access rights. This is perfect for setting up specific access rights for desktop administrators and other junior administrators to manage the MDM system. The following screenshot shows how Xenmobile administrators can select different types of differentiated access models:

Blocking Jailbroken and Rooted devices
In addition to the role-based access, XenMobile can use LDAP or Microsoft AD to obtain the users or groups that will be managing the system. Administrators always have the option of using built-in users and groups to manage XenMobile as well. To use AD, open the LDAP Configuration window and add in your AD credentials, as shown in the following screenshot:
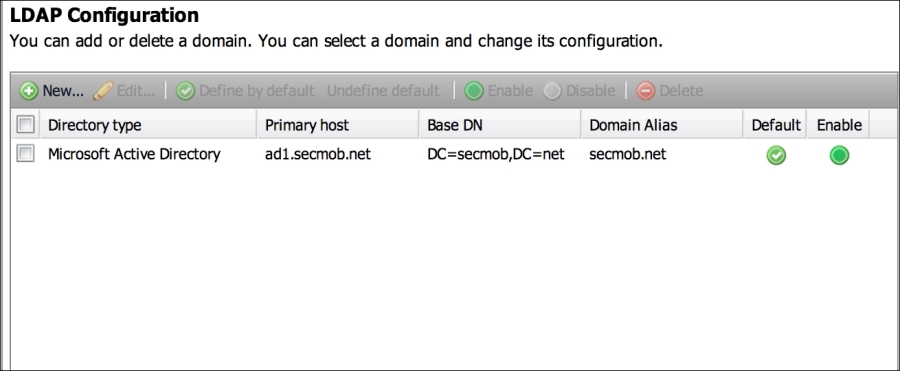
Configuring AD
Many of the advanced features require XenMobile to be configured to be able to relay an e-mail from an e-mail server. The e-mail server must be configured to accept SMTP from XenMobile and forward e-mails to external receipts on behalf of XenMobile.
E-mail settings are configured under the Notification Server options, as shown in the following screenshot:

XenMobile SMTP Configuration
Select a new server to configure the SMTP server. XenMobile can use open relay servers or servers that require explicit authentication. If you are using an open relay server, be sure to check the No Authentication option. The options for setting up the SMTP server are shown in the following screenshot:

SMTP options
As we have completed selecting and configuring the options, we may now click on the Save button at the bottom of the screen.
Congratulations! You are ready to start enrolling devices, configuring policies, and using the advanced features of XenMobile. Now, we will look at all these aspects and start to embed XenMobile in our organization.
XenMobile allows administrators to enroll devices in numerous ways. The most common way to enroll devices are: sending the user an e-mail, sending a user an SMS link, allowing the user to download the enrollment application, or importing a CSV file for bulk enrollment. All the enrollment options can be found by clicking on the Enrollment tab on the main dashboard, as shown in the following screenshot:
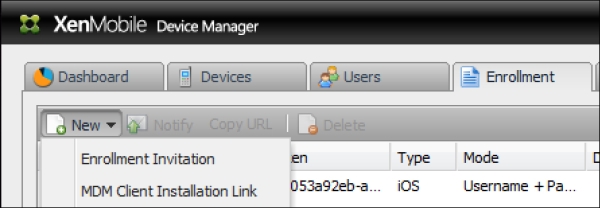
Enrolling options
When administrators enroll devices, they will typically start off creating templates for e-mails and text messages. This allows administrators to set custom messages to users. Specific users or groups of users from a local database or an active directory can enroll devices. We can examine the enrollment options, as shown in the following screenshot:

Enrolling devices
Lastly, it is possible that an administrator wants to enroll multiple devices at the same time. They can do this using the bulk import tool by importing a formatted CSV file. The CSV file will allow administrators to import multiple devices for multiple users and categorize them as personal or corporate devices. When XenMobile parses through the CSV file, it will send out an e-mail or text message to the user giving them further instructions on how to complete the enrollment. In the following screenshot, we can see the option to input a CSV File into XenMobile:

Enrolling devices via the CSV file
Most mobile security policies require a passcode to be set on the device. The first policy which we will create is to set a passcode, by performing the following steps:
Navigate to Policies | iOS | Configurations. (we are selecting iOS but you can apply these steps to any mobile OS).
Navigate to New Configurations | Profiles and Settings | Passcodes. We can see the passcode option, along with other configuration options that are available to us in the following screenshot:
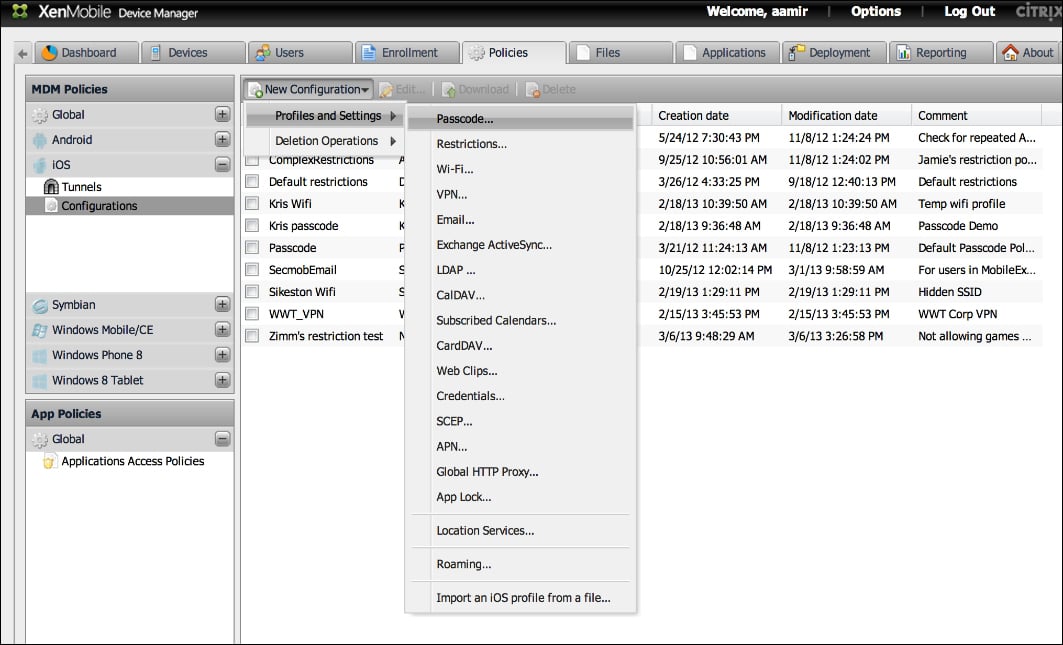
Configuring the Passcode policies
Select Passcode… and create a custom name for this policy.
Click on the Policy tab and configure the passcode policy options. The following screenshot shows us the passcode policy options, which we can set as a Xenmobile administrator:

Configuring the Passcode policies
iOS restrictions enable administrators of XenMobile to control features for voice dialing and camera usage, limiting Siri usage, YouTube, document syncing to iCloud, and other iOS specific features. Some features only work with the latest version of iOS. In addition, there are features that work with using the Apple Configurator.
Most mobile security policies require a passcode to be set on the device. The next policy we will create is to set a passcode.
Navigate to Policies | iOS | Configurations. (we are selecting iOS but you can apply these steps to any mobile OS)
Select Restrictions. The following screenshot shows iOS restrictions. The restriction options are specific to the selected OS and also show the applicable features for the selected OS:

iOS restrictions
iCloud restrictions specifically manage if data can be stored on iCloud. Apple uses iCloud to store data, documents, and photos. Photos on iCloud can be streamed across multiple devices for a user. Many corporations want to ensure that data is not being backed up to a user's personal cloud service. iOS restrictions can manage cloud storage options for iCloud. If a XenMobile adminstrator is concerned about other cloud storage platforms such as Dropbox and Box.net, they need to implement application specific policies (if available) for those specific applications. The iOS restrictions are currently only compatible with Apple's iCloud offering, and not with any third-party solutions. The following screenshot depicts iOS iCloud restrictions, which the XenMobile administrators can configure for their organization:

iCloud restrictions
Apple devices, by default, allow the user to accept and trust unsigned certificates or connections to untrusted servers. If you are a corporation and have your own data servers, you need to inform the Apple devices to trust your server. Therefore, Apple gives the ability to trust third-party certificates. Attackers also use third-party certificates to gain access to mobile platforms. They do this by tricking users into browsing to websites on their mobile phones or having them connect to rogue wireless networks. Therefore, some organizations may want to restrict non-trusted HTTPS prompts and only allow access to trusted sites.
In addition, administrators have the option of disabling JavaScript in the web browser, potentially reducing the likelihood of Java-based exploits. The security and web restrictions policies that can be configured on iOS devices are shown in the following screenshot:

The Security and web Restrictions
Most of the Android devices offer a small subset of restrictions as compared to Apple devices. Android devices also have limited methods for enforcing restrictions. One notable exception is Samsung devices, which offer more granular restrictions than most other Android devices when they are using the Samsung Android SAFE (Samsung Android for Enterprises) architecture. Samsung SAFE gives administrators the ability to provide access to specific built-in applications, hardware restrictions on camera, and wireless settings. In addition, using the SAFE architecture we can manage and restrict over-the-air upgrades: factory reset options, voice dialing, and screenshot captures.
Samsung SAFE allows administrators to provide restrictions on how much data a particular device should use and take action after a predetermined threshold has been met. Restrictions based on network access can come in handy when corporations are being charged for data. XenMobile can help administrators using Samsung devices to properly manage the device data. The following screenshot shows the data and network restrictions that can be configured by XenMobile administrators using the Samsung SAFE architecture:

Samsung SAFE Restrictions
Most mobile security policies require a passcode to be set on the device. Passcode policies enable encryption on devices and secure transactions such as mobile payment through NFC and certificates. We will create the next policy, by performing the following steps:
Navigate to Deployment | iOS Base Package | Edit.
Select Edit. We will edit a base package and add a passcode policy, as shown in the following screenshot:

Deploying a Policy
Select Group of Users. Select the users you want the policy to be applied to.
Select Resources. Add your passcode policy from the available resource pool to the deployment pool.
Select and configure any additional resources you may want to deploy.
Click on Finish.
You have now configured XenMobile, set up server options, enrolled devices, and configured basic policies. In the next section, we will discuss the top features of XenMobile and learn how we can use these features to embed mobile devices into our organization in an efficient and secured manner.