
Passes are built and customized by specifying the relevant information in JSON format. Certain graphical assets can also be provided to further customize the look and feel of the Pass.
As an example, we will build a Pass of a Generic type, to be used as an employee identification card. Once we understand the JSON structure of this type, we will see how other Pass types differ.
You can get the full JSON code, which we will use, from the following link:
http://passkit.pro/example-generic-json
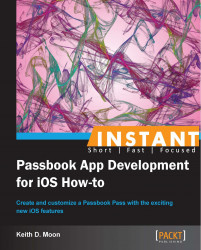
This will create a Pass that looks like the following two images.
The following screenshot shows the front of the Pass:
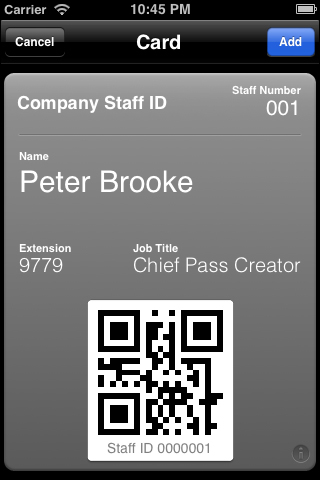
The back of the Pass is shown in the following screenshot:
Save the following JSON code to a file called
pass.json:{ "passTypeIdentifier" : "pass.pro.passkit.example.generic", "formatVersion" : 1, "teamIdentifier" : "YAXJZJ267E", "organizationName" : "Passbook Example Company", "serialNumber" : "0000001", "description" : "Staff Pass for Employee Number 001", "associatedStoreIdentifiers" : [ 375380948 ], "locations" : [ { "latitude" : 51.50506, "longitude" : -0.01960, "relevantText" : "Company Offices" } ], "foregroundColor" : "rgb(255, 255, 255)", "backgroundColor" : "rgb(90, 90, 90)", "labelColor" : "rgb(255, 255, 255)", "logoText" : "Company Staff ID", "barcode" : { "format" : "PKBarcodeFormatQR", "message" : "0000001", "messageEncoding" : "iso-8859-1", "altText" : "Staff ID 0000001" }, "generic" : { "headerFields" : [ { "key" : "staffNumber", "label" : "Staff Number", "value" : "001" } ], "primaryFields" : [ { "key" : "staffName", "label" : "Name", "value" : "Peter Brooke" } ], "secondaryFields" : [ { "key" : "telephoneExt", "label" : "Extension", "value" : "9779" }, { "key" : "jobTitle", "label" : "Job Title", "value" : "Chief Pass Creator" } ], "backFields" : [ { "key" : "managersName", "label" : "Manager's Name", "value" : "Paul Bailey" }, { "key" : "managersExt", "label" : "Manager's Extension", "value" : "9673" }, { "key" : "expiryDate", "dateStyle" : "PKDateStyleShort", "label" : "Expiry Date", "value" : "2013-12-31T00:00-23:59" } ] } }Replace the value for
passTypeIdentifier(currentlypass.pro.passkit.example.generic) with your own Pass Type Identifier created previously.Replace the value for
teamIdentifier(currentlyYAXJZJ267E) with your own Team Identifier, noted previously as the App ID Prefix.A number of graphical assets can be added to further customise the Pass. The only required graphical asset is an icon, which is used when displaying the Pass on the lock screen.
Create an icon for retina screens with dimensions of 58 px by 58 px, this should be named
[email protected]. Create a non-retina version with dimensions 29 px by 29 px, this should be namedicon.png. Example assets can downloaded from http://passkit.pro/example-generic-package.
The pass.json file we've just created contains the following top-level key/value pairs:
passTypeIdentifier: This ties the Pass to your developer account.formatVersion: Currently this is always 1, but it will allow Apple to vary the format in the future, while maintaining backwards compatibility.teamIdentifier: This identifier allows separate apps, by the same developer, to share data through the iOS keychain. For our purposes, this just needs to match the App ID Prefix specified when the Pass Type Identifier was created.organizationName: This is the name of your company or app, this should be how your users know and refer to you. It will be displayed as the title of the notification when a Pass is presented on the lock screen.serialNumber: This should contain a unique reference to the Pass, when updating a Pass, this serial number will be used to request the updated information from your server, and therefore this should uniquely identify only one Pass of this type. In the example of a staff identification Pass, this could be the employee reference number. While it's represented as a number in the example, it can be any text value.description: Used for accessibility features and so should briefly describe the Pass's use and should include enough information to distinguish it from other Passes of the same type.associatedStoreIdentifiers: An array of iTunes Store App Identifiers for Apps that are associated with this Pass. If you already have an app in the App Store, through which Passes will be provided, this should be included. An app's identifier can be found in iTunes Connect. If multiple identifiers are provided, the first one that is available for the device is used. This will present an App information banner on the back of the Pass. This banner will prompt the user to install your app or open the app if it is already installed.
The following two top-level key/value pairs determine under what circumstances the Pass is presented to the user on their lock screen.
locations: This is a list of locations that are relevant to the use of the Pass. This is represented as an array of dictionaries containing the location information. Only one location is provided in the example, however up to 10 may be specified. If the user is within a certain distance of this location, they may be presented with the Pass on their lock screen. The distance from the location that triggers this behavior varies depending on the Pass type, for a generic Pass type the distance is approximately 100 meters. Eachlocationsdictionary contains latitude, longitude, and relevant text that will be displayed on the lock screen when triggered. In thelocationsdictionary you can optionally specify altitude as well.relevantDate: Not included in the example above, as it didn't fit with the employer ID use case. This determines a time period within which the Pass is relevant. The value for this key should be text in the form of a W3C timestamp, for example, "2013-12-31T00:00-23:59", and can also include seconds if necessary. No timezone information should be included, as the timezone set in the device's settings is used.
The behavior of the two relevancy keys described above varies depending on the Pass type. The Pass type determines that for locations and relevantDate, which are required and which are options, it also determines the triggering criteria used in presenting a Pass on the user's lock screen.
An explanation of the differing behavior can be found in Apple's Passbook Programming Guide (Apple Developer account signin required) at:
foregroundColor: The foreground color of the Pass, value provided as an RGB triple.backgroundColor: The background color of the Pass, value provided as an RGB triple.labelColor: The color of the text displayed in the Pass, value provided as an RGB triple.logoText: The text shown in the top-left hand corner of the Pass. This will mostly likely be the name of your company, or an indication of the Pass's use.barcode: This dictionary contains the information to display in a barcode and how to display it. The Pass format supports automatic creation of 2D barcodes in one of the following formats:PKBarcodeFormatQRPKBarcodeFormatPDF417PKBarcodeFormatAztec
Message encoding will typically be
iso-8859-1, unless you know that another encoding format is supported by your barcode scanner.The value to be encoded into the barcode should be defined with the message key and the
altTextkey used to optionally display a more human readable description of the barcode information.generic: This top-level key determines the type of Pass that you will be creating. The types currently available are:
genericboardingPasscouponeventTicketstoreCard
Your choice of Pass type effects many things about the Pass, including overall style, text layout, available graphical asset options, and lock screen behavior. Apple has optimized the Pass types for their individual use cases, so try to pick a Pass type that most closely represents your Pass's use case. If none of the specific Pass types are appropriate, then the generic Pass type can be used.
The Passbook Programming Guide describes the different layout configurations for each Pass type:
Within the Pass type top-level key is a dictionary, containing arrays of various display groups, including headerFields, primaryFields, secondaryFields, and backFields, which are displayed according to Pass type. Each group contains an array of dictionaries, specifying key, label, and value. The label and value fields are displayed on the Pass, while the key field should be unique within your Pass format, and will be used when updating a Pass.
Graphical assets can be provided to further visually customize your Pass. The icon.png asset is required, but the following assets can optionally be included in the Pass package:
logo.pngbackground.pngthumbnail.pngfooter.pngstrip.png
All assets should include a retina version that is twice as wide and twice as high, with @2x at the end of the filename. Therefore, for the icon, you provide the following files:
icon.png: 29 px width x 29 px height[email protected]: 58 px width x 58 px height
The following table provides the available size of each asset, and the space available for each Pass type. The sizes are provided as pixels width x pixels height:
|
Pass Type |
icon 29 x 29 |
logo 160 x 50 |
background 180 x 220 |
thumbnail 90 x 90* |
strip ** |
footer 286x15 |
|---|---|---|---|---|---|---|
|
Generic |
Required |
Optional |
Not used |
Optional |
Not used |
Not used |
|
Boarding pass |
Required |
Optional |
Not used |
Not used |
Not used |
Optional |
|
Coupon |
Required |
Optional |
Not used |
Not used |
Optional |
No |
|
Event ticket |
Required |
Optional |
Optional |
Optional |
Not used |
Not used |
|
(with strip) |
Not used |
Not used |
Optional | |||
|
Store card |
Required |
Optional |
Not used |
Not used |
Optional |
Not used |
* 90px x 90px is the space available, but the graphic must be either 60px x 90px, or 90px x 60px
** Allowed size for the strip asset is 312 x 84 for Event tickets, 312 x 110 when a square barcode is used and 312 x 123 otherwise.
Further details of Pass type layout structures can be found in the Apple Passbook Package Format Reference (Apple Developer account signin required) at: