

We'll see how to work with JRebel on Ant-based Java EE projects: a simple web application will be built and modified without any additional compilation. Also, two cases will be explained: when the server is on the development machine and managed by the IDE, and when the server is running on a remote machine. NetBeans will be used as the main IDE. Please note that Ant-based means that the NetBeans uses Ant to handle the project (such as the classical Java SE Ant-based project); we won't use Ant inside the application itself.
The following steps will help you to test the live code injection in a Java EE project:
Register the GlassFish local server in NetBeans.
Create a simple Java EE servlet-based project.
Enable JRebel on your project.
Try the live code injection with JRebel.
First, register GlassFish in NetBeans (you can use the same GlassFish server that you have installed in the JRebel for standalone GlassFish server (Should know) recipe). To proceed, go to the Services panel and right-click on the Servers node.

Registering GlassFish
Select Add Server…, choose GlassFish Server, locate your GlassFish server-base installation directory, and validate with the Next button.

Locating GlassFish
Choose the Register Local Domain option and validate. Your GlassFish server is now registered into NetBeans.
To enable JRebel on GlassFish, you have the following two options:
As described in the JRebel for standalone GlassFish server (Should know) recipe, you have already added the JRebel Java Agent as a startup parameter. It will automatically enable JRebel on your server.
If you haven't added the JRebel Java Agent to the startup parameters, don't worry, the JRebel plugin can automatically add this Java Agent to any server that is registered in NetBeans. You simply have to check that the JRebel button in the NetBeans toolbar is turned on, and—this is very important—check that the Use IDE's proxy settings feature is activated in the Servers settings. To verify this last point, right-click on the registered server and show its Properties panel. Make sure that the Use IDE's proxy settings feature in checked.

Activating the Use IDE's Proxy Settings feature
Right-click on the registered server and start it. Observe the NetBeans console; you will see a message that indicates JRebel is activated on your server.

The NetBeans console and registered GlassFish
Now, create a new Ant-based web application project by navigating to File | New Project | Java Web | Web Application. Choose a name, select the registered GlassFish server and a Java EE version (version doesn't matter), and click on the Finish button.
Delete the default index.html (or index.jsp) file located in the Web Pages section, displayed in the Projects panel.
Create a package and use the NetBeans assistant to generate a servlet. This can be done by navigating to File | New File | Web | Servlet. Give it a name and click on the Next button. At the Configure Servlet Deployment step, fill the Servlet Name and URL Pattern(s) field.

Configuring the servlet deployment properties
Similar to Java SE projects in the Working with Java SE projects (Should know) recipe, you have to generate a rebel.xml file. Go to the Projects panel, and use the JRebel node to generate this file.
You have to check the following two features in the Projects Properties panel:
Enable the Compile on Save feature
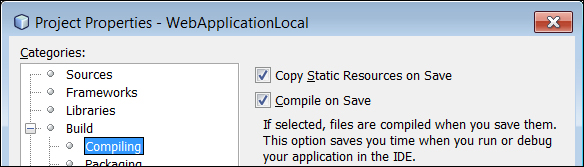
Enabling the Compile on Save feature
Disable the Deploy on Save feature

Disabling Deploy on Save feature
Note
The Deploy on Save and JRebel features are incompatible because they do the same thing: they try to update your web application without any restart. Since we want to use JRebel for its advanced capabilities, we have to disable the Deploy on Save feature. Actually, you can keep it enabled; you will see a warning message that indicates that these two features are incompatible and JRebel has been temporarily turned off.
To test JRebel with our web application, simply press the F6 key. This will deploy your web application and start your web browser to show the main servlet.
We will assume your project is called WebApplicationLocal, and deployed at http://localhost:8080/WebApplicationLocal.
You will see a web page with the following message:
Servlet NewServlet at /WebApplicationLocal
This message is generated by the servlet which was created previously. We will now modify this message without restarting or redeploying anything. To proceed, open the Servlet class in the code editor, and go to the processRequest method. You will see the following line of code:
out.println("<h1>Servlet NewServlet at " + request.getContextPath() + "</h1>");Modify it to display a new message, save it, and refresh only your web browser (do not redeploy); the message has been updated!
Look at the NetBeans console (as with Java SE projects), JRebel writes a message for each class that has been reloaded.
INFO: 2013-07-28 16:59:57 JRebel: Reloading class 'demo.web.NewServlet'.
Congratulations, you can now update your web application by simply saving changes in the code editor!
We will see how to work with a remote Tomcat server and a simple servlet-based web application.
Note
NetBeans is not able to register a remote Tomcat server but JRebel is. So, we will proceed this way: register a (dummy) local Tomcat in NetBeans and configure JRebel to work with the remote Tomcat server.
Register a local Tomcat server in NetBeans the same way you previously registered a local GlassFish server. This is the same assistant. Simply don't forget to enable the Use IDE's proxy settings feature.
Also, install a Tomcat server on a remote computer (you can install it on your local machine for this tutorial; JRebel will simply warn you it is not a common scenario, but it will work fine). Don't forget to add the JRebel Java Agent to its list of startup parameters. In addition, there is another parameter to add, as follows:
-Drebel.remoting_plugin=true
This parameter will allow JRebel to receive new class definitions over the network.
Start the remote server. Compile your web application, upload it to your remote Tomcat server and deploy it via the Tomcat web administration interface. Note down its deployment context.
When it is done, open your web application Projects Properties panel and do the following two things:
Change the targeted server for Tomcat.

Changing the targeted server
In the JRebel Remoting section, fill the Application URL field with your remote web application context (something like
http://yourserver:8080/WebApplicationLocal, where "yourserver" is the name of your remote machine, "8080" is the communication port, and "WebApplicationLocal" is the context path of the web application). Also, click on the Generate keys, Generate rebel.xml, and Generate rebel-remote.xml buttons.
The JRebel Remoting section
