

A Kendo Mobile application is built using HTML5, CSS, and JavaScript. The framework provides JavaScript and CSS files that should be included in your project. A Kendo mobile application can be viewed as being made up of two pieces – the framework and a set of widgets. The framework provides core functionality such as loading views, managing application history, and navigation. The widgets allow you to add visual elements to the page and Kendo UI Mobile comes with several of them that aid you in building the application.
To create an application, include the JavaScript and CSS files in your page. Perform the following steps:
Create an HTML document,
index.html, under your project directory. Please note that this directory should be placed in the web root of your web server.Create the directories
stylesandscriptsunder your project directory.Copy the CSS file
kendo.mobile.all.min.css, from<downloaded directory>/stylesto thestylesdirectory created in step 2. Then add a reference to the CSS file in the head section of the document.Download the jQuery library from jQuery.com. Place this file in the scripts directory and add a reference to this file in the document before closing the body tag. You can also specify the CDN location of the file in the document.
Copy the JavaScript file
kendo.mobile.min.js, from the<downloaded directory>/jstag to thescriptsdirectory created in step 2. Then add a reference to this JavaScript file in the document (after jQuery).Add the text "Hello Kendo!!" in the body tag of the
index.htmlfile as follows:<!DOCTYPE HTML> <html> <head> <title>My first Kendo Mobile Application</title> <link rel="stylesheet" type="text/css" href="styles/kendo.mobile.all.min.css"> </head> <body> Hello Kendo!! <script type="text/javascript" src="scripts/jquery.min.js"> </script> <script type="text/javascript" src="scripts/kendo.mobile.min.js"> </script> </body> </html>
Tip
Downloading the example code
You can download the example code files for all Packt books you have purchased from your account at http://www.packtpub.com. If you purchased this book elsewhere, you can visit http://www.packtpub.com/support and register to have the files e-mailed directly to you.
The preceding code snippet is a simple HTML page with references to Kendo Mobile CSS and JavaScript files. These files are minified and contain all the features, themes, and widgets. In production, you would like to include only those that are required. The downloaded ZIP file includes CSS and JavaScript files for specific features. However, in development you can use the minified files that contain all features.
Tip
Another thing to note is that apart from the reference to the script kendo.mobile.min.js, the page also includes a reference to jQuery. It is the only external dependency for Kendo UI.
When you view this page on a mobile device, you will see the text Hello Kendo!! shown. This page does not include any of the widgets that come as a part of the library. Now let's build on top of our Hello World application and add some visual elements; that is, UI widgets to the page. This can be done with the following steps:
Add a layout first. A mobile application generally has a header, a footer, and multiple views. It is also observed that while navigating through different views in an application, the header and footer remain constant. The framework allows you to define a global layout that may contain a header and a footer for all the views in the application. Also, the framework allows you to define multiple views that can share the same layout. The following is the same page that now includes a header and footer defined in the layout:
<body>

<div
  data-role="layout"
  data-id="defaultLayout">

  <header data-role="header">

    <div data-role="navbar">
      My first application
    </div>

  </header>
  <footer data-role="footer">

    <div data-role="tabstrip">
      <a data-icon="about">About</a>
      <a	data-icon="settings">Settings</a>
     </div>

  </footer>

</div>

</body>
The body contains a few
divtags with data attributes. Let's look into one of these tags in detail.<div data-role="layout" data-id="defaultLayout">
Here, the
divtag contains two data attributes,roleandid. Theroledata attribute is used to initialize and configure a widget. Thedata-roleattribute has a value,layout, identifying the target element as alayoutwidget. All the widgets are expected to have aroledata attribute that helps in marking the target element for a specific purpose. It instructs the library which widget needs to be added to the page. Theiddata attribute is used to identify the widget (thelayoutwidget) in the page. A page may define several layout widgets and each one of these must be identified by a unique ID. Here, thedata-idattribute hasdefaultLayoutas its value. Now there can be many views referring to this layout by its id (views are explained in the next recipe and in detail in the later ones).Similarly, there are other elements in the page with the
data-roleattribute, defining them as one of widgets in the page. Let's take a look at theheaderandfooterwidgets defined inside the layout.<header data-role="header">... </header> <footer data-role="footer">...</footer>
The header and footer tags have the
roledata attribute set toheaderandfooterrespectively. This aligns them to the top and bottom of the page, giving the rest of the available space for different views to render. Also, note that there is anavbarwidget in the header and atabstripwidget defined in the footer. As mentioned earlier, the framework comes with several widgets that can help you build the application rapidly. The usage ofnavbar,tabStrip, and many other widgets will be covered in the later recipes of this book.Now add views to the page. The
index.htmlpage now has a layout defined and when you run the page in the browser, you will see an error message in the console which says:Uncaught Error: Your kendo mobile application element does not contain any direct child elements with data-role="view" attribute set. Make sure that you instantiate the mobile application using the correct container.
Views represent the actual content that has to be displayed between the header and the footer that we defined while creating a layout. A layout cannot exist without a view and hence you see that error message in the console. To fix this error, you need to define a view for your mobile application.
Add the following to your
index.htmlpage:<div data-role="view" data-layout="defaultLayout"> Hello Kendo!! </div>
As mentioned earlier, every widget needs to have a
roledata attribute to identify itself as a particular widget in the page. Here, the target element is defined as aviewwidget and tied to the layout by defining thedata-layoutattribute. Thedata-layoutattribute has a valuedefaultLayoutthat is the same as the value for thedata-idattribute of the layout that we defined earlier. This attaches the view to the layout and you will not see the error message anymore.Similarly, you can have multiple Views defined in the page that can make use of the same layout (we will see this in the later part of this book). Now, there's only one pending task for the application to start working: initializing the application. A Kendo Mobile application can be initialized using the
Applicationobject. To do that, add the following code to the page:<script> var app = new kendo.mobile.Application(); </script>
Include the previous script block right after references to jQuery and Kendo Mobile and before closing the body tag. This single line of JavaScript code will initialize your Kendo Mobile application and all the widgets with the
data-roleattribute.
The Application object is used for many other purposes and those will be covered in the upcoming recipes.
When you run the index.html page in a browser, you will see a navbar and a tabstrip in the header and footer of the page. Also, the message Hello Kendo!! being shown in the body of the page. The following screenshot shows how it will look like when you view the page on an iPhone:
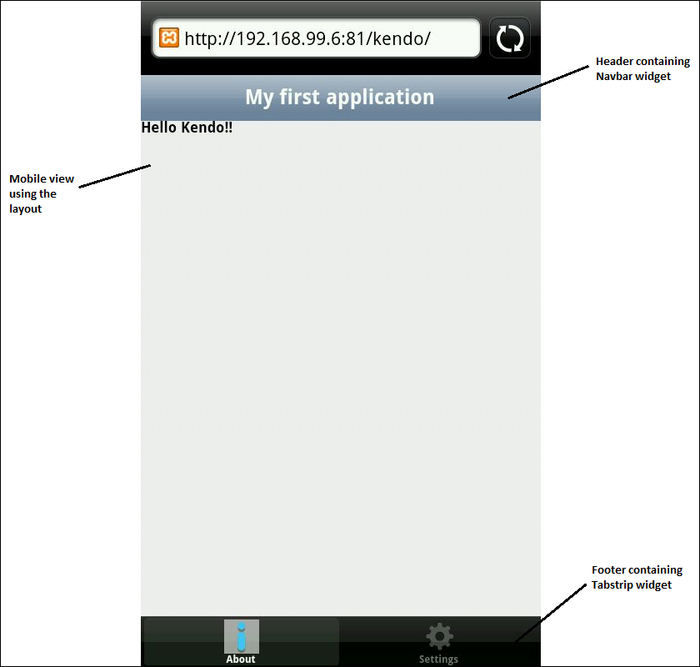
If you have noticed, this looks like a native iOS application. The framework has the capability to render the application that looks like a native application on a device. When you view the same page on an Android device, it will look like an native Android application, as shown in the following screenshot:
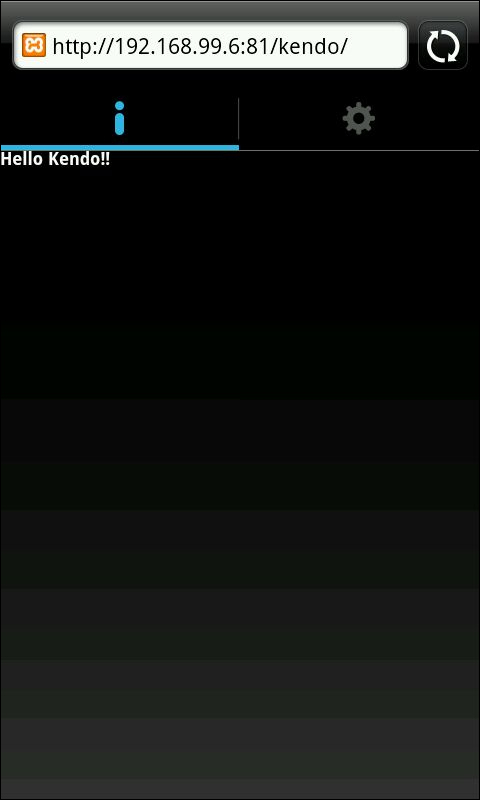
The framework identifies the platform on which the mobile application is being run and then provides native look and feel to the application. There are ways in which you can customize this behavior and this will be covered in the upcoming recipes.
In the next series of recipes, you will learn about the following core components of framework:
Application
Touch events
Views
Forms