

Business analysts and data scientists come across many different types of data in their analytics projects. Most data commonly found in academic and industrial projects can be broadly classified into the following categories:
- Cross-sectional data
- Time series data
- Panel data
Understanding what type of data is needed to solve a problem and what type of data can be obtained from available sources is important for formulating the problem and choosing the right methodology for analysis.
Cross-sectional data or cross-section of a population is obtained by taking observations from multiple individuals at the same point in time. Cross-sectional data can comprise of observations taken at different points in time, however, in such cases time itself does not play any significant role in the analysis. SAT scores of high school students in a particular year is an example of cross-sectional data. Gross domestic product of countries in a given year is another example of cross-sectional data. Data for customer churn analysis is another example of cross-sectional data. Note that, in case of SAT scores of students and GDP of countries, all the observations have been taken in a single year and this makes the two datasets cross-sectional. In essence, the cross-sectional data represents a snapshot at a given instance of time in both the cases. However, customer data for churn analysis can be obtained from over a span of time such as years and months. But for the purpose of analysis, time might not play an important role and therefore though customer churn data might be sourced from multiple points in time, it may still be considered as a cross-sectional dataset.
Often, analysis of cross-sectional data starts with a plot of the variables to visualize their statistical properties such as central tendency, dispersion, skewness, and kurtosis. The following figure illustrates this with the univariate example of military expenditure as a percentage of Gross Domestic Product of 85 countries in the year 2010. By taking the data from a single year we ensure its cross-sectional nature. The figure combines a normalized histogram and a kernel density plot in order to highlight different statistical properties of the military expense data.
As evident from the plot, military expenditure is slightly left skewed with a major peak at roughly around 1.0 %. A couple of minor peaks can also be observed near 6.0 % and 8.0 %.
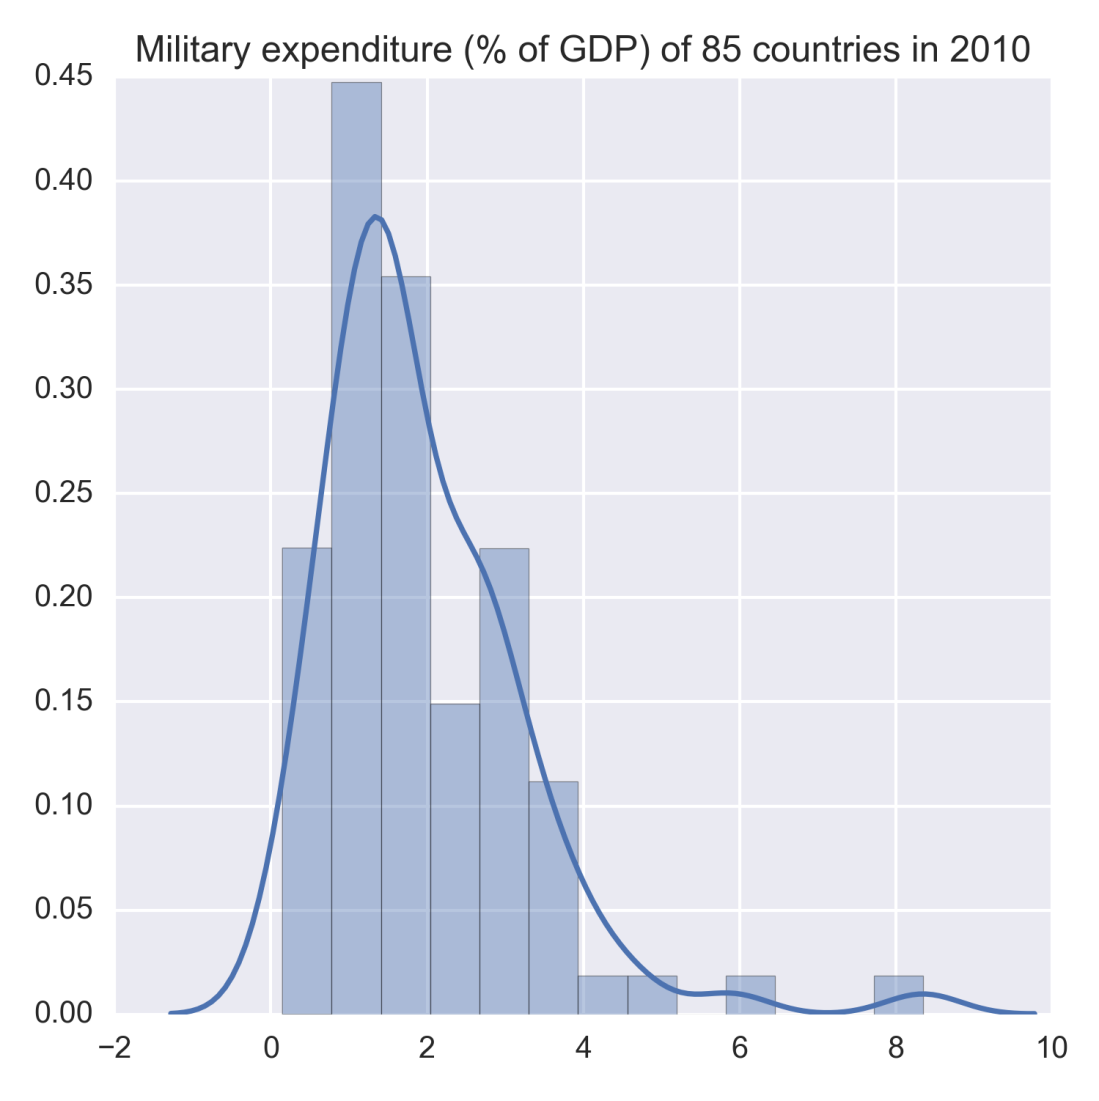
Figure 1.1: Example of univariate cross-sectional data
Exploratory data analysis such as the one in the preceding figure can be done for multiple variables as well in order to understand their joint distribution. Let us illustrate a bivariate analysis by considering total debt of the countries' central governments along with their military expenditure in 2010. The following figure shows the joint distributions of these variables as kernel density plots. The bivariate joint distribution shows no clear correlation between the two, except may be for lower values of military expenditure and debt of central government.
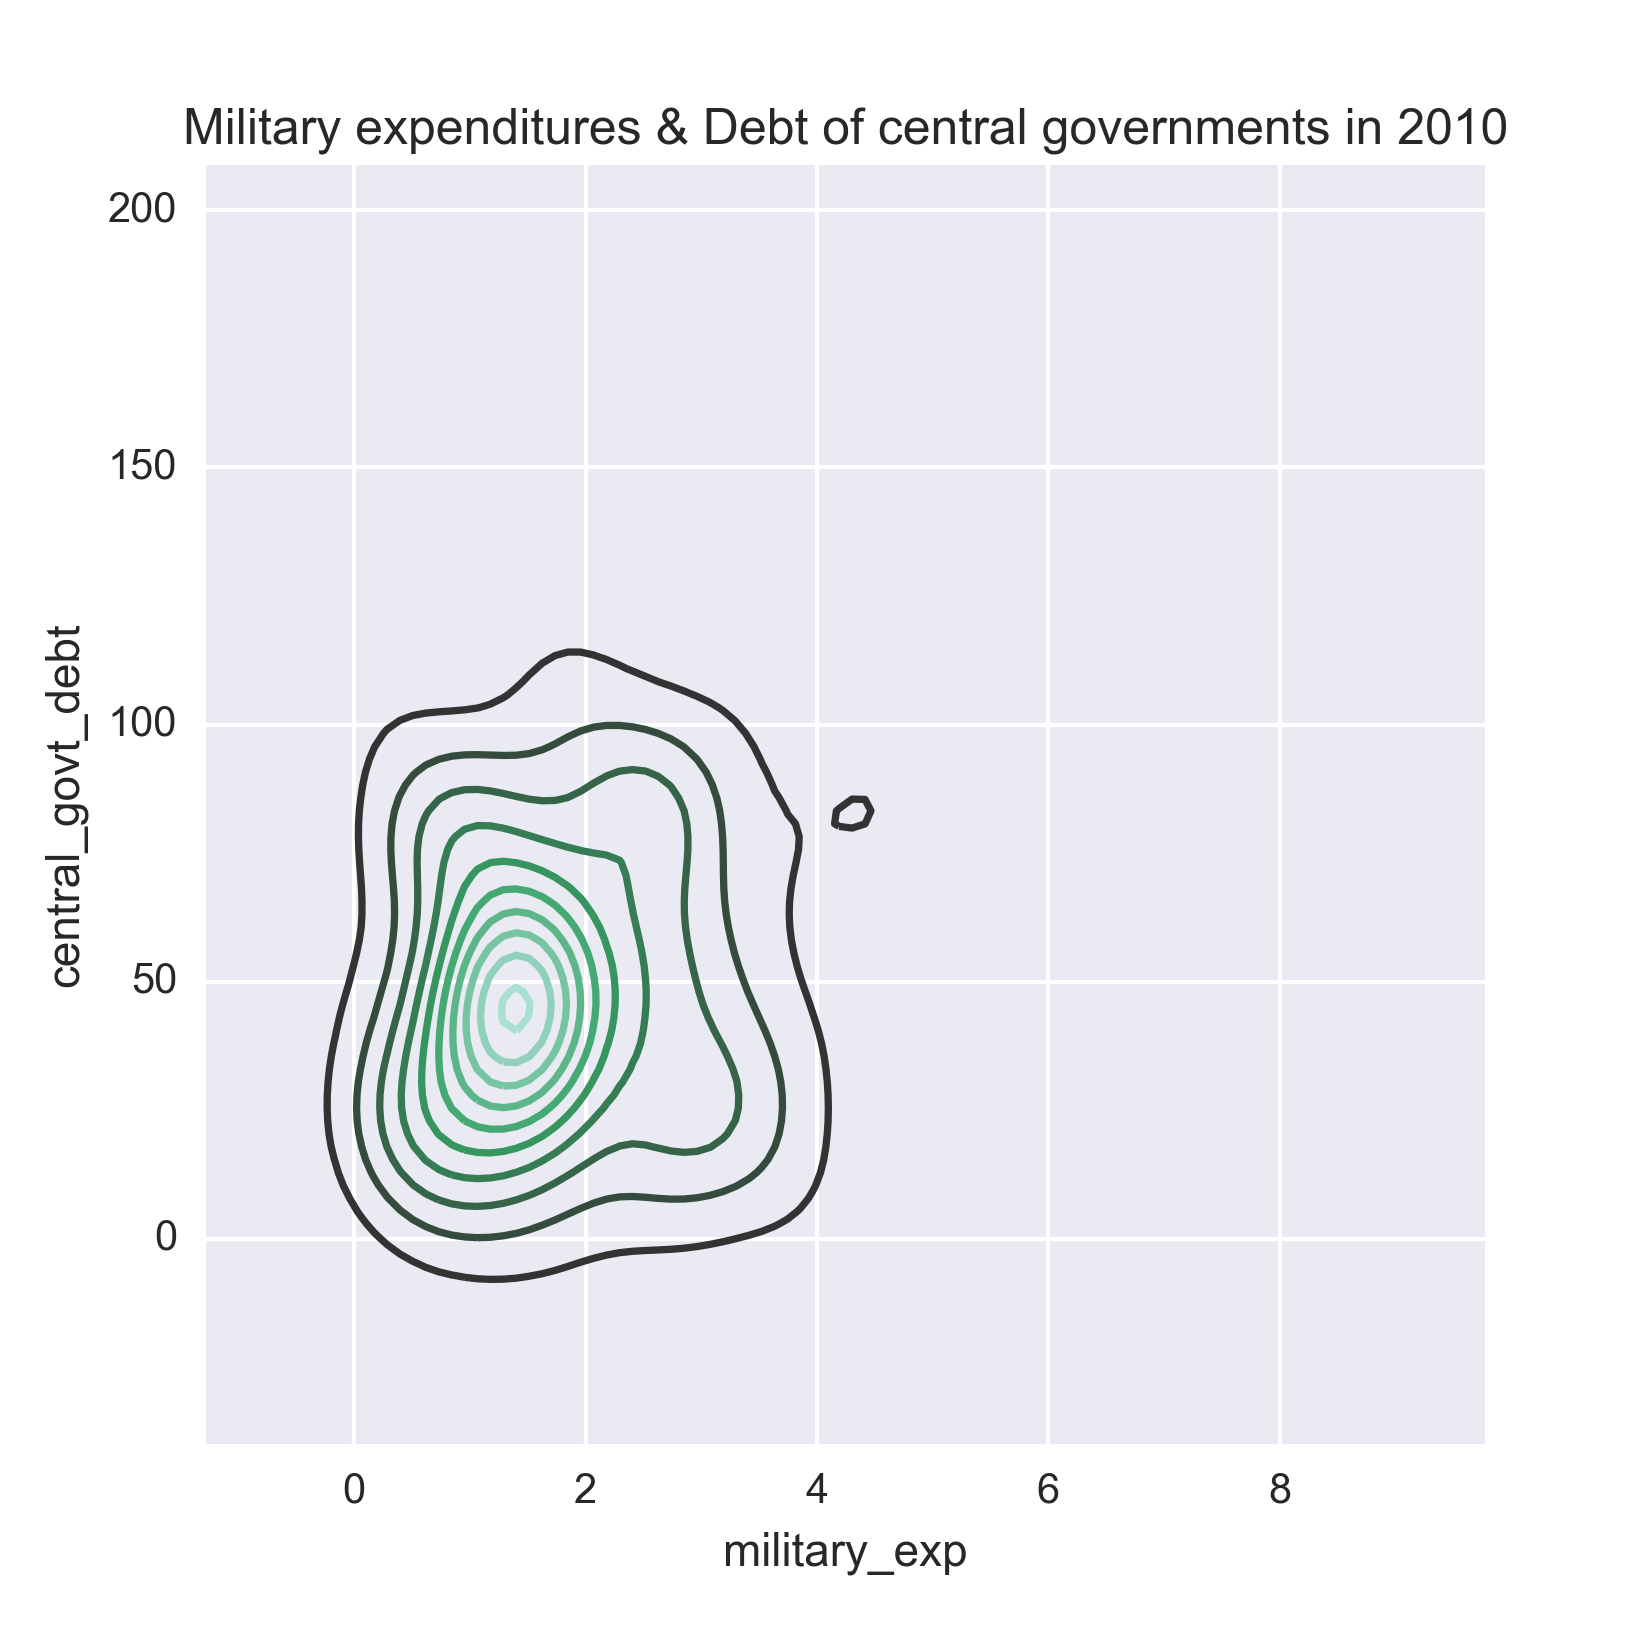
Figure 1.2: Example of bi-variate cross-sectional data
Note
It is noteworthy that analysis of cross-sectional data extends beyond exploratory data analysis and visualization as shown in the preceding example. Advanced methods such as cross-sectional regression fit a linear regression model between several explanatory variables and a dependent variable. For example, in case of customer churn analysis, the objective could be to fit a logistic regression model between customer attributes and customer behavior described by churned or not-churned. The logistic regression model is a special case of generalized linear regression for discrete and binary outcome. It explains the factors that make customers churn and can predict the outcome for a new customer. Since time is not a crucial element in this type of cross-sectional data, predictions can be obtained for a new customer at a future point in time. In this book, we discuss techniques for modeling time series data in which time and the sequential nature of observations are crucial factors for analysis.
The dataset of the example on military expenditures and national debt of countries has been downloaded from the Open Data Catalog of World Bank. You can find the data in the WDIData.csv file under the datasets folder of this book's GitHub repository.
All examples in this book are accompanied by an implementation of the same in Python. So let us now discuss the Python program written to generate the preceding figures. Before we are able to plot the figures, we must read the dataset into Python and familiarize ourselves with the basic structure of the data in terms of columns and rows found in the dataset. Datasets used for the examples and figures, in this book, are in Excel or CSV format. We will use the pandas package to read and manipulate the data. For visualization, matplotlib and seaborn are used. Let us start by importing all the packages to run this example:
from __future__ import print_function
import os
import pandas as pd
import numpy as np
%matplotlib inline
from matplotlib import pyplot as plt
import seaborn as sns
The print_function has been imported from the __future__ package to enable using print as a function for readers who might be using a 2.x version of Python. In Python 3.x, print is by default a function. As this code is written and executed from an IPython notebook, %matplotlib inline ensures that the graphics packages are imported properly and made to work in the HTML environment of the notebook. The os package is used to set the working directory as follows:
os.chdir('D:\Practical Time Series') Now, we read the data from the CSV file and display basic information about it:
data = pd.read_csv('datasets/WDIData.csv')
print('Column names:', data.columns)
This gives us the following output showing the column names of the dataset:
Column names: Index([u'Country Name', u'Country Code', u'Indicator Name',
     u'Indicator Code', u'1960', u'1961', u'1962', u'1963', u'1964',  u'1965',
       u'1966', u'1967', u'1968', u'1969', u'1970', u'1971', u'1972', u'1973',
       u'1974', u'1975', u'1976', u'1977', u'1978', u'1979', u'1980', u'1981',
       u'1982', u'1983', u'1984', u'1985', u'1986', u'1987', u'1988', u'1989',
       u'1990', u'1991', u'1992', u'1993', u'1994', u'1995', u'1996', u'1997',
       u'1998', u'1999', u'2000', u'2001', u'2002', u'2003', u'2004', u'2005',
       u'2006', u'2007', u'2008', u'2009', u'2010', u'2011', u'2012', u'2013',
       u'2014', u'2015', u'2016'],
      dtype='object')
Let us also get a sense of the size of the data in terms of number of rows and columns by running the following line:
print('No. of rows, columns:', data.shape) This returns the following output:
No. of rows, columns: (397056, 62)
This dataset has nearly 400k rows because it captures 1504 world development indicators for 264 different countries. This information about the unique number of indicators and countries can be obtained by running the following four lines:
nb_countries = data['Country Code'].unique().shape[0]
print('Unique number of countries:', nb_countries)
As it appears from the structure of the data, every row gives the observations about an indicator that is identified by columns Indicator Name and Indicator Code and for the country, which is indicated by the columns Country Name and Country Code. Columns 1960 through 2016 have the values of an indicator during the same period of time. With this understanding of how the data is laid out in the DataFrame, we are now set to extract the rows and columns that are relevant for our visualization.
Let us start by preparing two other DataFrames that get the rows corresponding to the indicators Total Central Government Debt (as % of GDP) and Military expenditure (% of GDP) for all the countries. This is done by slicing the original DataFrame as follows:
central_govt_debt = data.ix[data['Indicator Name']=='Central government debt, total (% of GDP)']
military_exp = data.ix[data['Indicator Name']=='Military expenditure (% of GDP)']
The preceding two lines create two new DataFrames, namely central_govt_debt and military_exp. A quick check about the shapes of these DataFrames can be done by running the following two lines:
print('Shape of central_govt_debt:', central_govt_debt.shape)
print('Shape of military_exp:', military_exp.shape)
These lines return the following output:
Shape of central_govt_debt: (264, 62)
Shape of military_exp: (264, 62)
These DataFrames have all the information we need. In order to plot the univariate and bivariate cross-sectional data in the preceding figure, we need the column 2010. Before we actually run the code for plotting, let us quickly check if the column 2010 has missing. This is done by the following two lines:
central_govt_debt['2010'].describe()
military_exp['2010'].describe()
Which generate the following outputs respectively:
count     93.000000
mean      52.894412
std       30.866372
min        0.519274
25%             NaN
50%             NaN
75%             NaN
max      168.474953
Name: 2010, dtype: float64
count    194.000000
mean       1.958123
std        1.370594
min        0.000000
25%             NaN
50%             NaN
75%             NaN
max        8.588373
Name: 2010, dtype: float64
Which tells us that the describe function could not compute the 25th, 50th, and 75th quartiles for either, hence there are missing values to be avoided.
Additionally, we would like the Country Code column to be the row indices. So the following couple of lines are executed:
central_govt_debt.index = central_govt_debt['Country Code']
military_exp.index = military_exp['Country Code']
Next, we create two pandas.Series by taking non-empty 2010 columns from central_govt_debt and military_exp. The newly created Series objects are then merged into to form a single DataFrame:
central_govt_debt_2010 = central_govt_debt['2010'].ix[~pd.isnull(central_govt_debt['2010'])]
military_exp_2010 = military_exp['2010'].ix[~pd.isnull(military_exp['2010'])]
data_to_plot = pd.concat((central_govt_debt_2010, military_exp_2010), axis=1)
data_to_plot.columns = ['central_govt_debt', 'military_exp']
data_to_plot.head()
The preceding lines return the following table that shows that not all countries have information on both Central Government Debt and Military Expense for the year 2010:
central_govt_debt | military_exp | |
AFG | NaN | 1.897473 |
AGO | NaN | 4.244884 |
ALB | NaN | 1.558592 |
ARB | NaN | 5.122879 |
ARE | NaN | 6.119468 |
ARG | NaN | 0.814878 |
ARM | NaN | 4.265646 |
ATG | 75.289093 | NaN |
AUS | 29.356946 | 1.951809 |
AUT | 79.408304 | 0.824770 |
To plot, we have to take only those countries that have both central government debt and military expense. Run the following line, to filter out rows with missing values:
data_to_plot = data_to_plot.ix[(~pd.isnull(data_to_plot.central_govt_debt)) & (~pd.isnull(data_to_plot.military_exp)), :]
The first five rows of the filtered DataFrame are displayed by running the following line:
data_to_plot.head()
central_govt_debt | military_exp | |
|---|---|---|
AUS | 29.356946 | 1.951809 |
AUT | 79.408304 | 0.824770 |
AZE | 6.385576 | 2.791004 |
BEL | 7.022605 | 1.084631 |
BGR | 21.286254 | 1.765384 |
AUS | 29.356946 | 1.951809 |
AUT | 79.408304 | 0.824770 |
AZE | 6.385576 | 2.791004 |
BEL | 7.022605 | 1.084631 |
BGR | 21.286254 | 1.765384 |
The preceding table has only non-empty values and we are now ready to generate the plots for the cross-sectional data. The following lines of code generate the plot on the univariate cross-sectional data on military expense:
plt.figure(figsize=(5.5, 5.5))
g = sns.distplot(np.array(data_to_plot.military_exp), norm_hist=False)
g.set_title('Military expenditure (% of GDP) of 85 countries in 2010')
The plot is saved as a png file under the plots/ch1 folder of this book's GitHub repository. We will also generate the bivariate plot between military expense and central government debt by running the following code:
plt.figure(figsize=(5.5, 5.5))
g = sns.kdeplot(data_to_plot.military_exp, data2=data_to_plot.central_govt_debt)
g.set_title('Military expenditures & Debt of central governments in 2010') The example of cross-sectional data discussed earlier is from the year 2010 only. However, instead if we consider only one country, for example United States, and take a look at its military expenses and central government debt for a span of 10 years from 2001 to 2010, that would get two time series - one about the US federal military expenditure and the other about debt of US federal government. Therefore, in essence, a time series is made up of quantitative observations on one or more measurable characteristics of an individual entity and taken at multiple points in time. In this case, the data represents yearly military expenditure and government debt for the United States. Time series data is typically characterized by several interesting internal structures such as trend, seasonality, stationarity, autocorrelation, and so on. These will be conceptually discussed in the coming sections in this chapter.
The internal structures of time series data require special formulation and techniques for its analysis. These techniques will be covered in the following chapters with case studies and implementation of working code in Python.
The following figure plots the couple of time series we have been talking about:
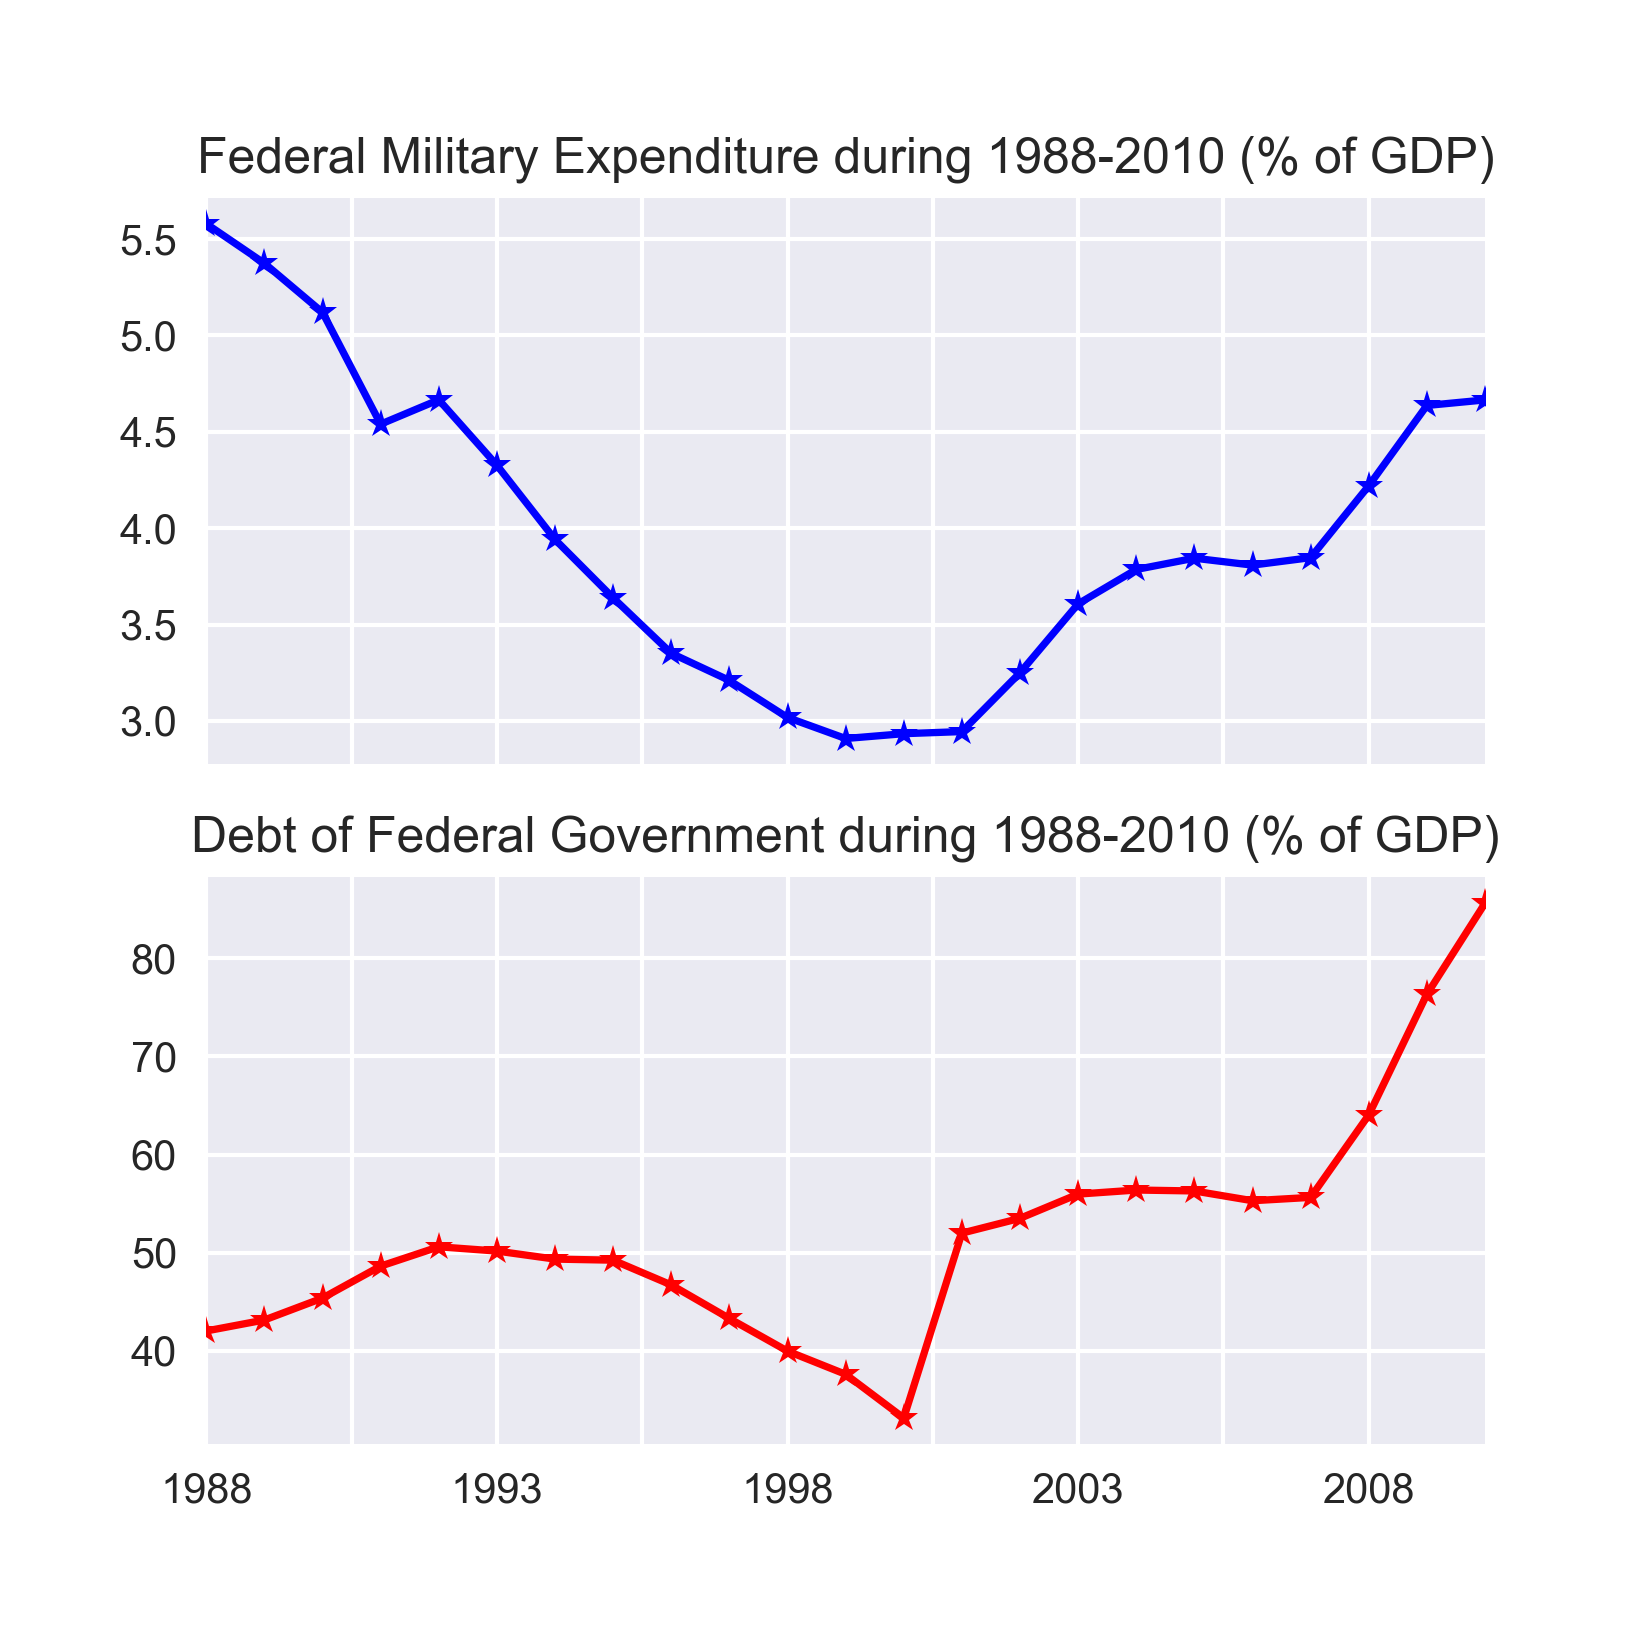
Figure 1.3: Examples of time series data
In order to generate the preceding plots we will extend the code that was developed to get the graphs for the cross-sectional data. We will start by creating two new Series to represent the time series of military expenses and central government debt of the United States from 1960 to 2010:
central_govt_debt_us = central_govt_debt.ix[central_govt_debt['Country Code']=='USA', :].T
military_exp_us = military_exp.ix[military_exp['Country Code']=='USA', :].T
The two Series objects created in the preceding code are merged to form a single DataFrame and sliced to hold data for the years 2001 through 2010:
data_us = pd.concat((military_exp_us, central_govt_debt_us), axis=1)
index0 = np.where(data_us.index=='1960')[0][0]
index1 = np.where(data_us.index=='2010')[0][0]
data_us = data_us.iloc[index0:index1+1,:]
data_us.columns = ['Federal Military Expenditure', 'Debt of Federal  Government']
data_us.head(10)
The data prepared by the preceding code returns the following table:
Federal Military Expenditure | Debt of Federal Government | |
1960 | NaN | NaN |
1961 | NaN | NaN |
1962 | NaN | NaN |
1963 | NaN | NaN |
1964 | NaN | NaN |
1965 | NaN | NaN |
1966 | NaN | NaN |
1967 | NaN | NaN |
1968 | NaN | NaN |
1969 | NaN | NaN |
The preceding table shows that data on federal military expenses and federal debt is not available from several years starting from 1960. Hence, we drop the rows with missing values from the Dataframe data_us before plotting the time series:
data_us.dropna(inplace=True)
print('Shape of data_us:', data_us.shape)
As seen in the output of the print function, the DataFrame has twenty three rows after dropping the missing values:
Shape of data_us: (23, 2)
After dropping rows with missing values, we display the first ten rows of data_us are displayed as follows:
Federal Military Expenditure | Debt of Federal Government | |
1988 | 5.57993 | 42.0258 |
1989 | 5.37472 | 43.1439 |
1990 | 5.12025 | 45.3772 |
1991 | 4.53985 | 48.633 |
1992 | 4.66626 | 50.6016 |
1993 | 4.32693 | 50.1657 |
1994 | 3.94129 | 49.3475 |
1995 | 3.63849 | 49.2366 |
1996 | 3.35074 | 46.7174 |
1997 | 3.2099 | 43.2997 |
Finally, the time series are generated by executing the following code:
# Two subplots, the axes array is 1-d
f, axarr = plt.subplots(2, sharex=True)
f.set_size_inches(5.5, 5.5)
axarr[0].set_title('Federal Military Expenditure during 1988-2010 (% of GDP)')
data_us['Federal Military Expenditure'].plot(linestyle='-', marker='*', color='b', ax=axarr[0])
axarr[1].set_title('Debt of Federal Government during 1988-2010 (% of GDP)')
data_us['Debt of Federal Government'].plot(linestyle='-', marker='*', color='r', ax=axarr[1]) So far, we have seen data taken from multiple individuals but at one point in time (cross-sectional) or taken from an individual entity but over multiple points in time (time series). However, if we observe multiple entities over multiple points in time we get a panel data also known as longitudinal data. Extending our earlier example about the military expenditure, let us now consider four countries over the same period of 1960-2010. The resulting data will be a panel dataset. The figure given below illustrates the panel data in this scenario. Rows with missing values, corresponding to the period 1960 to 1987 have been dropped before plotting the data.

Figure 1.4: Example of panel data
Note
A generic panel data regression model can be stated as y_it = W x _it +b+ ϵ _it, which expresses the dependent variable y_it as a linear model of explanatory variable x_it, where W are weights of x_it, b is the bias term, and ϵ_it is the error. i represents individuals for whom data is collected for multiple points in time represented by j. As evident, this type of panel data analysis seeks to model the variations across both multiple individual and multiple points in time. The variations are reflected by ϵ _it and assumptions determine the necessary mathematical treatment. For example, if ϵ_it is assumed to vary non-stochastically with respect to i and t, then it reduces to a dummy variable representing random noise. This type of analysis is known as fixed effects model. On the other hand, ϵ_it varying stochastically over i and t requires a special treatment of the error and is dealt in a random effects model.
Let us prepare the data that is required to plot the preceding figure. We will continue to expand the code we have used for the cross-sectional and time series data previously in this chapter. We start by creating a DataFrame having the data for the four companies mentioned in the preceding plot. This is done as follows:
chn = data.ix[(data['Indicator Name']=='Military expenditure (% of GDP)')&\
               (data['Country Code']=='CHN'),index0:index1+1
             ]
chn = pd.Series(data=chn.values[0], index=chn.columns)
chn.dropna(inplace=True)

usa = data.ix[(data['Indicator Name']=='Military expenditure (% of GDP)')&\
               (data['Country Code']=='USA'),index0:index1+1
             ]
usa = pd.Series(data=usa.values[0], index=usa.columns)
usa.dropna(inplace=True)

ind = data.ix[(data['Indicator Name']=='Military expenditure (% of GDP)')&\
               (data['Country Code']=='IND'),index0:index1+1
             ]
ind = pd.Series(data=ind.values[0], index=ind.columns)
ind.dropna(inplace=True)

gbr = data.ix[(data['Indicator Name']=='Military expenditure (% of GDP)')&\
               (data['Country Code']=='GBR'),index0:index1+1
             ]
gbr = pd.Series(data=gbr.values[0], index=gbr.columns)
gbr.dropna(inplace=True)
Now that the data is ready for all five countries, we will plot them using the following code:
plt.figure(figsize=(5.5, 5.5))
usa.plot(linestyle='-', marker='*', color='b')
chn.plot(linestyle='-', marker='*', color='r')
gbr.plot(linestyle='-', marker='*', color='g')
ind.plot(linestyle='-', marker='*', color='y')
plt.legend(['USA','CHINA','UK','INDIA'], loc=1)
plt.title('Miltitary expenditure of 5 countries over 10 years')
plt.ylabel('Military expenditure (% of GDP)')
plt.xlabel('Years')s
Note
The Jupyter notebook that has the code used for generating all the preceding figures is Chapter_1_Different_Types_of_Data.ipynb under the code folder in the GitHub repo.
The discussion about different types of data sets the stage for a closer look at time series. We will start doing that by understanding the special properties of data that can be typically found in a time series or panel data with inherent time series in it.