

You can install and use TensorFlow on a number of platforms such as Linux, Mac OS, and Windows. Moreover, you can also build and install TensorFlow from the latest GitHub source of TensorFlow. Furthermore, if you have a Windows machine, you can install TensorFlow via native pip or Anacondas. It is to be noted that TensorFlow supports Python 3.5.x and 3.6.x on Windows.
Also, Python 3 comes with the pip3 package manager, which is the program you'll use to install TensorFlow. So you don't need to install pip if you're using this Python version. For simplicity, in this section, I will show you how to install TensorFlow using native pip. Now to install TensorFlow, start a terminal. Then issue the appropriate pip3 installcommand in that terminal.
To install the CPU-only version of TensorFlow, enter the following command:
C:\> pip3 install --upgrade tensorflow
To install the GPU version of TensorFlow, enter the following command:
C:\> pip3 install --upgrade tensorflow-gpu
When it comes to Linux, the TensorFlow Python API supports Python 2.7 and Python 3.3+, so you need to install Python to start the TensorFlow installation. You must install Cuda Toolkit 7.5 and cuDNN v5.1+ to get the GPU support. In this section, we will show you how to install and get started with TensorFlow. More details on installing TensorFlow on Linux will be shown.
Note
Installing on Mac OS is more or less similar to Linux. Please refer to the https://www.tensorflow.org/install/install_mac for more details. On the other hand, Windows users should refer to https://www.tensorflow.org/install/install_windows.
Note that for this and the rest of the lesson, we will provide most of the source codes with Python 3.x compatible.
In this section, we will show you how to install TensorFlow on Ubuntu 14.04 or higher. The instructions presented here also might be applicable for other Linux distributions with minimal adjustments.
However, before proceeding with formal steps, we need to determine which TensorFlow to install on your platform. TensorFlow has been developed such that you can run data intensive tensor applications on a GPU as well as a CPU. Thus, you should choose one of the following types of TensorFlow to install on your platform:
TensorFlow with CPU support only: If there is no GPU such as NVIDIA® installed on your machine, you must install and start computing using this version. This is very easy and you can do it in just 5 to 10 minutes.
TensorFlow with GPU support: As you might know, a deep learning application requires typically very high intensive computing resources. Thus TensorFlow is no exception, but can typically speed up the data computation and analytics significantly faster on a GPU rather than on a CPU. Therefore, if there's NVIDIA® GPU hardware on your machine, you should ultimately install and use this version.
From our experience, even if you have NVIDIA GPU hardware integrated on your machine, it would be worth installing and trying the CPU-only version first and if you don't experience good performance you should switch for GPU support then.
The GPU-enabled version of TensorFlow has several requirements such as 64-bit Linux, Python 2.7 (or 3.3+ for Python 3), NVIDIA CUDA® 7.5 or higher (CUDA 8.0 required for Pascal GPUs), and NVIDIA cuDNN v4.0 (minimum) or v5.1 (recommended). More specifically, the current development of TensorFlow supports only GPU computing using NVIDIA toolkits and software. Therefore, the following software must have to be installed on your Linux machine to get the GPU support on your predictive analytics applications:.
Python
NVIDIA Driver
CUDA with compute capability >= 3.0
CudNN
TensorFlow
We have already seen how to install Python on a different platform, so we can skip this one. Also, I'm assuming that your machine already has a NVIDIA GPU installed.
To find out if your GPU is really installed properly and working, issue the following command on the terminal:
$ lspci -nnk | grep -i nvidia
# Expected output (of course may vary for your case): 4b:00.0 VGA compatible controller [0300]: NVIDIA Corporation Device [10de:1b80] (rev a1)4b:00.1 Audio device [0403]: NVIDIA Corporation Device [10de:10f0] (rev a1)
Since predictive analytics largely depend on machine learning and deep learning algorithms, make sure you check that some essential packages are installed on your machine such as GCC and some of the scientific Python packages.
Simply issue the following command for doing so on the terminal:
$ sudo apt-get update
$ sudo apt-get install libglu1-mesa libxi-dev libxmu-dev -y
$ sudo apt-get — yes install build-essential
$ sudo apt-get install python-pip python-dev -y
$ sudo apt-get install python-numpy python-scipy –y
Now download the NVIDIA driver (don't forget to choose the right version for your machine) via wget and run the script in silent mode:
$ wget http://us.download.nvidia.com/XFree86/Linux-x86_64/367.44/NVIDIA-Linux-x86_64-367.44.run
$ sudo chmod +x NVIDIA-Linux-x86_64-367.35.run
$ ./NVIDIA-Linux-x86_64-367.35.run --silent
Note
Some GPU cards such as NVidia GTX 1080 comes with the built in–driver. Thus, if your machine has a different GPU other than the GTX 1080, you have to download the driver for that GPU.
To make sure if the driver was installed correctly, issue the following command on the terminal:
$ nvidia-smi
The outcome of the command should be as follows:
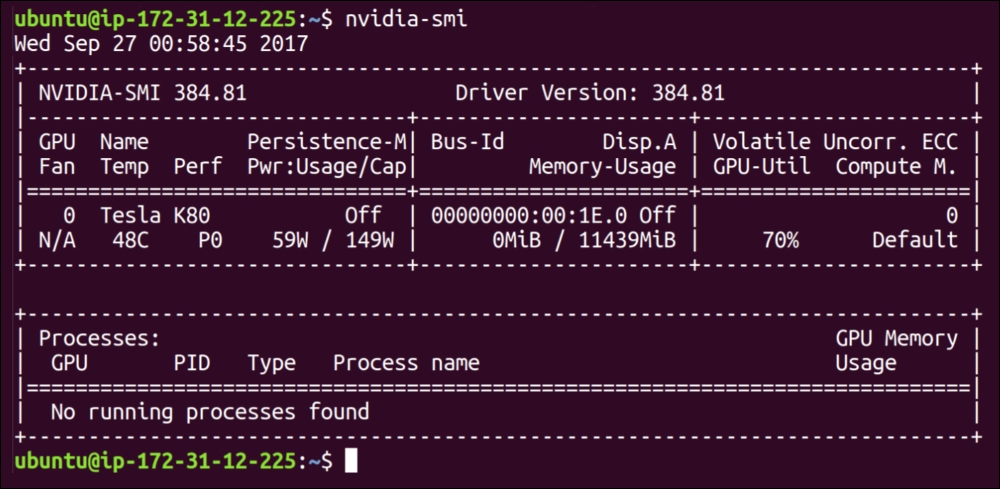
Figure 4: Outcome of the nvidia-smi command
To use TensorFlow with NVIDIA GPUs, CUDA® Toolkit 8.0, and associated NVIDIA drivers with CUDA toolkit 8+ are required to be installed. The CUDA toolkit includes:
GPU-accelerated libraries such as cuFFT for Fast Fourier Transforms (FFT)
cuBLAS for Basic Linear Algebra Subroutines (BLAS)
cuSPARSE for sparse matrix routines
cuSOLVER for dense and sparse direct solvers
cuRAND for random number generation, NPP for image, and video processing primitives
nvGRAPH for NVIDIA Graph Analytics Library
Thrust for template parallel algorithms and data structures and a dedicated CUDA math library
For Linux, download and install required packages:
https://developer.nvidia.com/cuda-downloads using the wget command on Ubuntu as follows:
$ wget https://developer.nvidia.com/compute/cuda/8.0/Prod2/local_installers/cuda_8.0.61_375.26_linux-run
$ sudo chmod +x cuda_8.0.61_375.26_linux.run
$ ./ cuda_8.0.61_375.26_linux.run --driver --silent
$ ./ cuda_8.0.61_375.26_linux.run --toolkit --silent
$ ./ cuda_8.0.61_375.26_linux.run --samples –silent
Also, ensure that you have added the CUDA installation path to the LD_LIBRARY_PATH environment variable as follows:
$ echo 'export LD_LIBRARY_PATH="$LD_LIBRARY_PATH:/usr/local/cuda/lib64:/usr/local/cuda/extras/CUPTI/lib64"' >> ~/.bashrc
$ echo 'export CUDA_HOME=/usr/local/cuda' >> ~/.bashrc
$ source ~/.bashrc
Once the CUDA Toolkit is installed, you should download the cuDNN v5.1 library from for Linux and once downloaded, uncompress the files and copy them into the CUDA Toolkit directory (assumed here to be in /usr/local/cuda/):
$ cd /usr/local
$sudo mkdir cuda
$ cd ~/Downloads/
$ wget http://developer2.download.nvidia.com/compute/machine-learning/cudnn/secure/v6/prod/8.0_20170427/cudnn-8.0-linux-x64-v6.0.tgz
$ sudo tar –xvzf cudnn-8.0-linux-x64-v6.0.tgz
$ cp cuda/lib64/* /usr/local/cuda/lib64/
$ cp cuda/include/cudnn.h /usr/local/cuda/include/
Note that to install the cuDNN v5.1 library, you must need to register for the Accelerated Computing Developer Program at https://developer.nvidia.com/accelerated-computing-developer. Now when you have installed the cuDNN v5.1 library, ensure that you create the CUDA_HOME environment variable.
Lastly, you need to have the libcupti-dev library installed on your machine. This is the NVIDIA CUDA that provides advanced profiling support. To install this library, issue the following command:
$ sudo apt-get install libcupti-dev
Refer to the following section for more step-by-step guidelines on how to install the latest version of TensorFlow for the CPU only and GPU supports with NVIDIA cuDNN and CUDA computing capability. You can install TensorFlow on your machine in a number of ways, such as using virtualenv, pip, Docker, and Anaconda. However, using Docker and Anaconda is a bit advanced and this is why we have decided to use pip and virtualenv instead.
Note
Interested readers can try using Docker and Anaconda from https://www.tensorflow.org/install/.
If steps 1 to 6 are completed, install TensorFlow by invoking one of the following commands. For Python 2.7 and, of course, with only CPU support:
$ pip install tensorflow
# For Python 3.x and of course with only CPU support:
$ pip3 install tensorflow
# For Python 2.7 and of course with GPU support:
$ pip install tensorflow-gpu
# For Python 3.x and of course with GPU support:
$ pip3 install tensorflow-gpu
If step 3 failed somehow, install the latest version of TensorFlow by issuing a command manually:
$ sudo pip install --upgrade TF_PYTHON_URL
#For Python 3.x, use the following command:
$ sudo pip3 install --upgrade TF_PYTHON_URL
For both cases, TF_PYTHON_URL signifies the URL of the TensorFlow Python package presented at https://www.tensorflow.org/install/install_linux#the_url_of_the_tensorflow_python_package.
For example, to install the latest version with CPU-only support (at the time of writing v1.1.0), use the following command:
$ sudo pip3 install --upgrade https://storage.googleapis.com/tensorflow/linux/cpu/tensorflow-1.1.0-cp34-cp34m-linux_x86_64.wh
l
We assume that you already have Python 2+ (or 3+) and pip (or pip3) installed on your system. If so, follow these steps to install TensorFlow:
Create a virtualenv environment as follows:
$ virtualenv --system-site-packages targetDirectoryThe
targetDirectorysignifies the root of thevirtualenvtree. By default, it is~/tensorflow(however, you may choose any directory).Activate virtualenv environment as follows:
$ source ~/tensorflow/bin/activate # bash, sh, ksh, or zsh
   $ source ~/tensorflow/bin/activate.csh  # csh or tcsh
If the command succeeds in step 2, then you should see the following on your terminal:
(tensorflow)$
Installing TensorFlow.
Follow one of the following commands to install TensorFlow in the active virtualenv environment. For Python 2.7 with CPU-only support, use the following command:
 (tensorflow)$ pip install --upgrade tensorflow
#For Python 3.x with CPU support, use the following command:
(tensorflow)$ pip3 install --upgrade tensorflow
#For Python 2.7 with GPU support, use the following command:
(tensorflow)$ pip install --upgrade tensorflow-gpu
#For Python 3.x with GPU support, use the following command:
 (tensorflow)$ pip3 install --upgrade tensorflow-gpu
If the preceding command succeeds, skip step 5. If the preceding command fails, perform step 5. Moreover, if step 3 failed somehow, try to install TensorFlow in the active virtualenv environment by issuing a command of the following format:
#For python 2.7 (select appropriate URL with CPU or GPU support):
(tensorflow)$ pip install --upgrade TF_PYTHON_URL
#For python 3.x (select appropriate URL with CPU or GPU support):
  (tensorflow)$ pip3 install --upgrade TF_PYTHON_URL
Validate the installation.
To validate the installation in step 3, you must activate the virtual environment. If the virtualenv environment is not currently active, issue one of the following commands:
$ source ~/tensorflow/bin/activate  # bash, sh, ksh, or zsh
$ source ~/tensorflow/bin/activate.csh  # csh or tcsh
Uninstalling TensorFlow
To uninstall TensorFlow, simply remove the tree you created. For example:
$ rm -r targetDirectoryFinally, if you want to control which devices are visible to TensorFlow manually, you should set the
CUDA_VISIBLE_DEVICES. For example, the following command can be used to force the use of only GPU 0:$ CUDA_VISIBLE_DEVICES=0 python
The pip installation can cause problems using TensorBoard (this will be discussed later in this lesson). For this reason, I suggest you build TensorFlow directly from the source. The steps are described as follows.
Note
Follow the instructions and guidelines on how to install Bazel on your platform at http://bazel.io/docs/install.html.
At first, clone the entire TensorFlow repository as follows:
$git clone --recurse-submodules https://github.com/tensorflow/tensorflow
Then it's time to install Bazel, which is a tool that automates software builds and tests. Also, for building TensorFlow from source, Bazel build system must be installed on your machine. For this, issue the following command:
$ sudo apt-get install software-properties-common swig
$ sudo add-apt-repository ppa:webupd8team/java
$ sudo apt-get update $ sudo apt-get install oracle-java8-installer
$ echo "deb http://storage.googleapis.com/bazel-apt stable jdk1.8" | sudo tee /etc/apt/sources.list.d/bazel.list
$ curl https://storage.googleapis.com/bazel-apt/doc/apt-key.pub.gpg | sudo apt-key add -
$ sudo apt-get update
$ sudo apt-get install bazel
Then run the Bazel installer by issuing the following command:
$ chmod +x bazel-version-installer-os.sh
$ ./bazel-version-installer-os.sh –-user
Moreover, you might need some Python dependencies such as python-numpy, swig, and python-dev. Now, issue the following command for doing so:
$ sudo apt-get install python-numpy swig python-dev
Now it's time to configure the installation (GPU or CPU). Let's do it by executing the following command:
$ ./configure
Then create your TensorFlow package using bazel:
$ bazel build -c opt //tensorflow/tools/pip_package:
$ build_pip_package
However, to build with the GPU support, issue the following command:
$ bazel build -c opt --config=cuda //tensorflow/tools/pip_package:build_pip_package
Finally, install TensorFlow. Here I have listed, as per the Python version:
For Python 2.7:
$ sudo pip install --upgrade /tmp/tensorflow_pkg/tensorflow-1.1.0-*.whlFor Python 3.4:
$ sudo pip3 install --upgrade /tmp/tensorflow_pkg/tensorflow-1.1.0-*.whl
We start with the popular TensorFlow alias tf. Open a Python terminal (just type python or python3 on terminal) and issue the following lines of code:
>>> import tensorflow as tf
If your favourite Python interpreter doesn't complain, then you're ready to start using TensorFlow!
>>> hello = tf.constant("Hello, TensorFlow!")
>>> sess=tf.Session()
Now to verify your installation just type the following:
>>> print sess.run(hello)
If the installation is OK, you'll see the following output:
Hello, TensorFlow!