
IPython is a special tool for interactive tasks, which contains special commands that help the developer better understand the code that they are currently writing. These are the commands:
<object>? and <object>??: This prints a detailed description (with??being even more verbose) of the<object>%<function>: This uses the special<magic function>
Let's demonstrate the usage of these commands with an example. We first start the interactive console with the ipython command that is used to run IPython, as shown here:
$> ipython
Python 2.7.6 (default, Sep  9 2014, 15:04:36)
Type "copyright", "credits" or "license" for more information.
IPython 2.3.1 -- An enhanced Interactive Python.
?         -> Introduction and overview of IPython's features.
%quickref -> Quick reference.
help      -> Python's own help system.
object?   -> Details about 'object', use 'object??' for extra details.
In [1]: obj1 = range(10)
Then, in the first line of code, which is marked by IPython as [1], we create a list of 10 numbers (from 0 to 9), assigning the output to an object named obj1:
In [2]: obj1?
Type:        list
String form: [0, 1, 2, 3, 4, 5, 6, 7, 8, 9]
Length:      10
Docstring:
list() -> new empty list
list(iterable) -> new list initialized from iterable's items
In [3]: %timeit x=100
10000000 loops, best of 3: 23.4 ns per loop
In [4]: %quickref
In the next line of code, which is numbered [2], we inspect the obj1 object using the IPython command ?. IPython introspects the object, prints its details (obj is a list that contains the values [1, 2, 3..., 9] and elements), and finally prints some general documentation on lists. It's not the case in this example. However, for complex objects, the usage of ??instead of ?gives a more verbose output.
In line [3], we use the magic function timeit to a Python assignment (x=100). The timeit function runs this instruction many times and stores the computational time needed to execute it. Finally, it prints the average time that was taken to run the Python function.
We complete the overview with a list of all the possible IPython special functions by running the helper function quickref, as shown in line [4].
As you noticed, each time we use IPython, we have an input cell and optionally, an output cell, if there is something that has to be printed on stdout. Each input is numbered, so it can be referenced inside the IPython environment itself. For our purposes, we don't need to provide such references in the code of the book. Therefore, we will just report inputs and outputs without their numbers. However, we'll use the generic In: and Out: notations to point out the input and output cells. Just copy the commands after In: to your own IPython cell and expect an output that will be reported on the following Out:.
Therefore, the basic notations will be:
The
In:commandThe
Out:output (wherever it is present and useful to be reported in the book)
Otherwise, if we expect you to operate directly on the Python console, we will use the following form:
>>> command
Wherever necessary, the command-line input and output will be written as follows:
$> command
Moreover, to run the bash command in the IPython console, prefix it with a "!" (an exclamation mark):
In: !ls
Applications    Google Drive    Public          Desktop         Develop
Pictures        env             temp
...
In: !pwd
/Users/mycomputer
The main goal of the IPython Notebook is easy storytelling. Storytelling is essential in data science because you must have the power to do the following:
See intermediate (debugging) results for each step of the algorithm you're developing
Run only some sections (or cells) of the code
Store intermediate results and have the ability to version them
Present your work (this will be a combination of text, code, and images)
Here comes IPython; it actually implements all the preceding actions.
To launch the IPython Notebook, run the following command:
$> ipython notebookA web browser window will pop up on your desktop, backed by an IPython server instance. This is the how the main window looks:
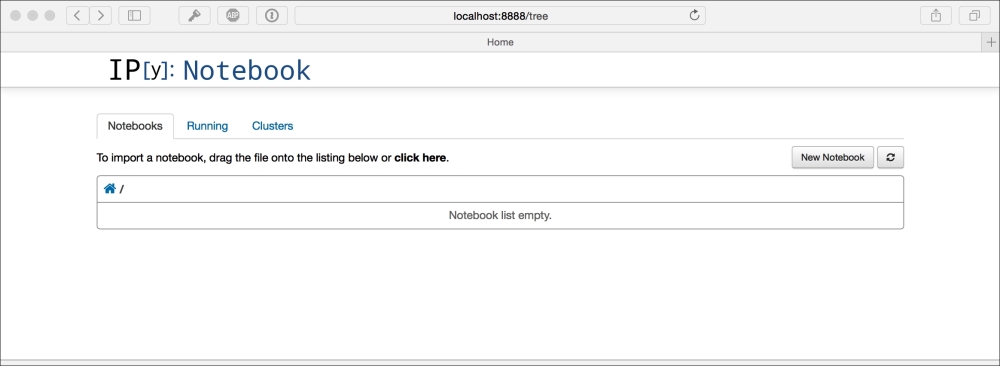
Then, click on New Notebook. A new window will open, as shown in the following screenshot:
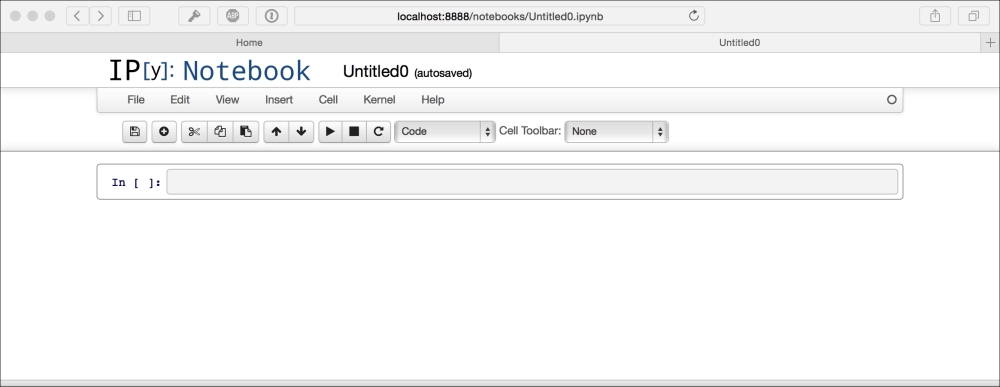
This is the web app that you'll use to compose your story. It's very similar to a Python IDE, with the bottom section (where you can write the code) composed of cells.
A cell can be either a piece of text (eventually formatted with a markup language) or a piece of code. In the second case, you have the ability to run the code, and any eventual output (the standard output) will be placed under the cell. The following is a very simple example of the same:
In: import random
         a = random.randint(0, 100)
         a
Out: 16
In: a*2
Out: 32
In the first cell, which is denoted by In:, we import the random module, assign a random value between 0 and 100 to the variable a, and print the value. When this cell is run, the output, which is denoted as Out:, is the random number. Then, in the next cell, we will just print the double of the value of the variable a.
As you can see, it's a great tool to debug and decide which parameter is best for a given operation. Now, what happens if we run the code in the first cell? Will the output of the second cell be modified since a is different? Actually, no. Each cell is independent and autonomous. In fact, after we run the code in the first cell, we fall in this inconsistent status:
In: import random
         a = random.randint(0, 100)
         a
Out: 56
In: a*2
Out: 32
Note
Also note that the number in the squared parenthesis has changed (from 1 to 3) since it's the third executed command (and its output) from the time the notebook started. Since each cell is autonomous, by looking at these numbers, you can understand their order of execution.
IPython is a simple, flexible, and powerful tool. However, as seen in the preceding example, you must note that when you update a variable that is going to be used later on in your Notebook, remember to run all the cells following the updated code so that you have a consistent state.
When you save an IPython notebook, the resulting .ipynb file is JSON formatted, and it contains all the cells and their content, plus the output. This makes things easier because you don't need to run the code to see the notebook (actually, you also don't need to have Python and its set of toolkits installed). This is very handy, especially when you have pictures featured in the output and some very time-consuming routines in the code. A downside of using the IPython Notebook is that its file format, which is JSON structured, cannot be easily read by humans. In fact, it contains images, code, text, and so on.
Now, let's discuss a data science related example (don't worry about understanding it completely):
In:
%matplotlib inline
import matplotlib.pyplot as plt
from sklearn import datasets
from sklearn.feature_selection import SelectKBest, f_regression
from sklearn.linear_model import LinearRegression
from sklearn.svm import SVR
from sklearn.ensemble import RandomForestRegressor
In the following cell, some Python modules are imported:
In:
boston_dataset = datasets.load_boston()
X_full = boston_dataset.data
Y = boston_dataset.target
print X_full.shape
print Y.shape
Out:
(506, 13)
(506,)
Then, in cell [2], the dataset is loaded and an indication of its shape is shown. The dataset contains 506 house values that were sold in the suburbs of Boston, along with their respective data arranged in columns. Each column of the data represents a feature. A feature is a characteristic property of the observation. Machine learning uses features to establish models that can turn them into predictions. If you are from a statistical background, you can add features that can be intended as variables (values that vary with respect to the observations).
To see a complete description of the dataset, print boston_dataset.DESCR.
After loading the observations and their features, in order to provide a demonstration of how IPython can effectively support the development of data science solutions, we will perform some transformations and analysis on the dataset. We will use classes, such as SelectKBest, and methods, such as .getsupport() or .fit(). Don't worry if these are not clear to you now; they will all be covered extensively later in this book. Try to run the following code:
In:
selector = SelectKBest(f_regression, k=1)
selector.fit(X_full, Y)
X = X_full[:, selector.get_support()]
print X.shape
Out:
(506, 1)
In:, we select a feature (the most discriminative one) of the SelectKBest class that is fitted to the data by using the .fit() method. Thus, we reduce the dataset to a vector with the help of a selection operated by indexing on all the rows and on the selected feature, which can be retrieved by the .get_support() method.
Since the target value is a vector, we can, therefore, try to see whether there is a linear relation between the input (the feature) and the output (the house value). When there is a linear relationship between two variables, the output will constantly react to changes in the input by the same proportional amount and direction.
In:
plt.scatter(X, Y, color='black')
plt.show()
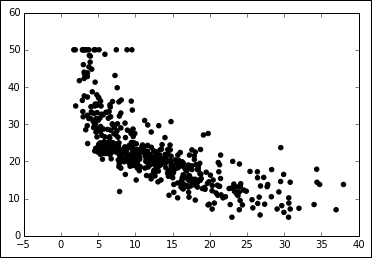
In our example, as X increases, Y decreases. However, this does not happen at a constant rate, because the rate of change is intense up to a certain X value but then it decreases and becomes constant. This is a condition of nonlinearity, and we can furthermore visualize it using a regression model. This model hypothesizes that the relationship between X and Y is linear in the form of y=a+bX. Its a and b parameters are estimated according to a certain criteria.
In the fourth cell, we scatter the input and output values for this problem:
In:
regressor = LinearRegression(normalize=True)
regressor.fit(X, Y)
plt.scatter(X, Y, color='black')
plt.plot(X, regressor.predict(X), color='blue', linewidth=3)
plt.show()
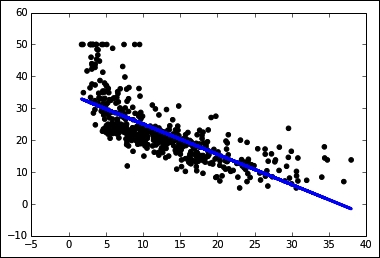
In the next cell, we create a regressor (a simple linear regression with feature normalization), train the regressor, and finally plot the best linear relation (that's the linear model of the regressor) between the input and output. Clearly, the linear model is an approximation that is not working well. We have two possible roads that we can follow at this point. We can transform the variables in order to make their relationship linear, or we can use a nonlinear model. Support Vector Machine (SVM) is a class of models that can easily solve nonlinearities. Also, Random Forests is another model for the automatic solving of similar problems. Let's see them in action in IPython:
In:
regressor = SVR()
regressor.fit(X, Y)
plt.scatter(X, Y, color='black')
plt.scatter(X, regressor.predict(X), color='blue', linewidth=3)
plt.show()
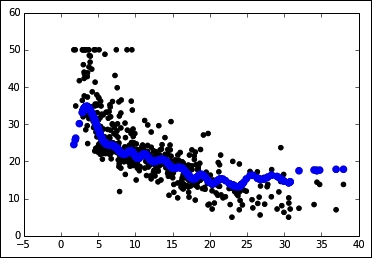
In:
regressor = RandomForestRegressor()
regressor.fit(X, Y)
plt.scatter(X, Y, color='black');
plt.scatter(X, regressor.predict(X), color='blue', linewidth=3)
plt.show()
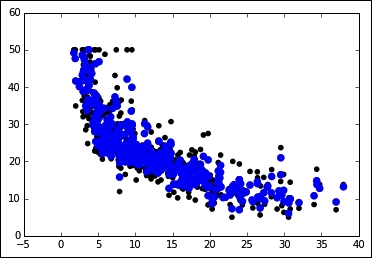
Finally, in the last two cells, we will repeat the same procedure. This time we will use two nonlinear approaches: an SVM and a Random Forest based regressor.
Having been written down on the IPython interface, this demonstrative code solves the nonlinearity problem. At this point, it is very easy to change the selected feature, regressor, the number of features we use to train the model, and so on, by simply modifying the cells where the script is. Everything can be done interactively, and according to the results we see, we can decide both what should be kept or changed and what is to be done next.
As we progress through the concepts presented in this book, in order to facilitate the reader's understanding, learning, and memorizing processes, we will illustrate practical and effective data science Python applications on various explicative datasets. The reader will always be able to immediately replicate, modify, and experiment with the proposed instructions and scripts on the data that we will use in this book.
As for the code that you are going to find in this book, we will limit our discussions to the most essential commands in order to inspire you from the beginning of your data science journey with Python to do more with less by leveraging key functions from the packages we presented beforehand.
Given our previous introduction, we will present the code to be run interactively as it appears on an IPython console or Notebook.
All the presented code will be offered in Notebooks, which is available on the Packt Publishing website (as pointed out in the Preface). As for the data, we will provide different examples of datasets.
The Scikit-learn toy dataset is embedded in the Scikit-learn package. Such datasets can easily be directly loaded into Python by the import command, and they don't require any download from any external Internet repository. Some examples of this type of dataset are the Iris, Boston, and Digits datasets, to name the principal ones mentioned in uncountable publications and books, and a few other classic ones for classification and regression.
Structured in a dictionary-like object, besides the features and target variables, they offer complete descriptions and contextualization of the data itself.
For instance, to load the Iris dataset, enter the following commands:
In: from sklearn import datasets
In: iris = datasets.load_iris()
After loading, we can explore the data description and understand how the features and targets are stored. Basically, all Scikit-learn datasets present the following methods:
.DESCR: This provides a general description of the dataset.data: This contains all the features.feature_names: This reports the names of the features.target: This contains the target values expressed as values or numbered classes.target_names: This reports the names of the classes in the target.shape: This is a method that you can apply to both.dataand.target; it reports the number of observations (the first value) and features (the second value, if present) that are present
Now, let's just try to implement them (no output is reported, but the print commands will provide you with plenty of information):
In: print iris.DESCR
In: print iris.data
In: print iris.data.shape
In: print iris.feature_names
In: print iris.target
In: print iris.target.shape
In: print iris.target_names
Now, you should know something more about the dataset—about how many examples and variables are present and what their names are.
Notice that the main data structures that are enclosed in the iris object are the two arrays, data and target:
In: print type(iris.data)
Out: <type 'numpy.ndarray'>
Iris.data offers the numeric values of the variables named sepal length, sepal width, petal length, and petal width arranged in a matrix form (150,4), where 150 is the number of observations and 4 is the number of features. The order of the variables is the order presented in iris.feature_names.
Iris.target is a vector of integer values, where each number represents a distinct class (refer to the content of target_names; each class name is related to its index number and setosa, which is the zero element of the list, is represented as 0 in the target vector).
The Iris flower dataset was first used in 1936 by Ronald Fisher, who was one of the fathers of modern statistical analysis, in order to demonstrate the functionality of linear discriminant analysis on a small set of empirically verifiable examples (each of the 150 data points represented iris flowers). These examples were arranged into tree balanced species classes (each class consisted of one-third of the examples) and were provided with four metric descriptive variables that, when combined, were able to separate the classes.
The advantage of using such a dataset is that it is very easy to load, handle, and explore for different purposes, from supervised learning to graphical representation. Modeling activities take almost no time on any computer, no matter what its specifications are. Moreover, the relationship between the classes and the role of the explicative variables are well known. So, the task is challenging, but it is not arduous.
For example, let's just observe how classes can be easily separated when you wish to combine at least two of the four available variables by using a scatterplot matrix.
Scatterplot matrices are arranged in a matrix format, whose columns and rows are the dataset variables. The elements of the matrix contain single scatterplots whose x values are determined by the row variable of the matrix and y values by the column variable. The diagonal elements of the matrix may contain a distribution histogram or some other univariate representation of the variable at the same time in its row and column.
The pandas library offers an off-the-shelf function to quickly make up scatterplot matrices and start exploring relationship and distributions between the quantitative variables in a dataset.
In:
import pandas as pd
import numpy as np
In: colors = list()
In: palette = {0: "red", 1: "green", 2: "blue"}
In:
for c in np.nditer(iris.target): colors.append(palette[int(c)])
    # using the palette dictionary, we convert
    # each numeric class into a color string
In: dataframe = pd.DataFrame(iris.data, columns=iris.feature_names)
In: scatterplot = pd.scatter_matrix(dataframe, alpha=0.3, figsize=(10, 10), diagonal='hist', color=colors, marker='o', grid=True)

We encourage you to expriment a lot with this dataset and with similar ones before you work on other complex real data, because the advantage of focusing on an accessible, non-trivial data problem is that it can help you to quickly build your foundations on data science.
After a while, anyway, though useful and interesting for your learning activities, toy datasets will start limiting the variety of different experimentations that you can achieve. In spite of the insight provided, in order to progress, you'll need to gain access to complex and realistic data science topics. We will, therefore, have to resort to some external data.
The second type of example dataset that we will present can be downloaded directly from the machine learning dataset repository, or from the LIBSVM data website. Contrary to the previous dataset, in this case, you will need to have access to the Internet.
First of all, mldata.org is a public repository for machine learning datasets that is hosted by the TU Berlin University and supported by Pattern Analysis, Statistical Modelling, and Computational Learning (PASCAL), a network funded by the European Union.
For example, if you need to download all the data related to earthquakes since 1972 as reported by the United States Geological Survey, in order to analyze the data to search for predictive patterns you will find the data repository at http://mldata.org/repository/data/viewslug/global-earthquakes/ (here, you will find a detailed description of the data).
Note that the directory that contains the dataset is global-earthquakes; you can directly obtain the data using the following commands:
In: from sklearn.datasets import fetch_mldata
In: earthquakes = fetch_mldata('global-earthquakes')
In: print earthquakes.data
In: print earthquakes.data.shape
Out: (59209L, 4L)
As in the case of the Scikit-learn package toy dataset, the obtained object is a complex dictionary-like structure, where your predictive variables are earthquakes.data and your target to be predicted is earthquakes.target. This being the real data, in this case, you will have quite a lot of examples and just a few variables available.
LIBSVM Data (http://www.csie.ntu.edu.tw/~cjlin/libsvmtools/datasets/) is a page-gathering data from many other collections. It offers different regression, binary, and multilabel classification datasets stored in the LIBSVM format. This repository is quite interesting if you wish to experiment with the support vector machine's algorithm.
If you want to load a dataset, first go to the page where you wish to visualize the data. In this case, visit http://www.csie.ntu.edu.tw/~cjlin/libsvmtools/datasets/binary/a1a and take down the address. Then, you can proceed by performing a direct download:
In: import urllib2
In: target_page = 'http://www.csie.ntu.edu.tw/~cjlin/libsvmtools/datasets/binary/a1a'
In: a2a = urllib2.urlopen(target_page)
In: from sklearn.datasets import load_svmlight_file
In: X_train, y_train = load_svmlight_file(a2a)
In: print X_train.shape, y_train.shape
Out: (2265, 119) (2265L,)
In return, you will get two single objects: a set of training examples in a sparse matrix format and an array of responses.
Sometimes, you may have to download the datasets directly from their repository using a web browser or a wget command.
If you have already downloaded and unpacked the data (if necessary) into your working directory, the simplest way to load your data and start working is offered by the NumPy and the pandas library with their respective loadtxt and read_csv functions.
For instance, if you intend to analyze the Boston housing data and use the version present at http://mldata.org/repository/data/viewslug/regression-datasets-housing/, you first have to download the regression-datasets-housing.csv file in your local directory.
Since the variables in the dataset are all numeric (13 continuous and one binary), the fastest way to load and start using it is by trying out the NumPy function loadtxt and directly loading all the data into an array.
Even in real-life datasets, you will often find mixed types of variables, which can be addressed by pandas.read_table or pandas.read_csv. Data can then be extracted by the values method; loadtxt can save a lot of memory if your data is already numeric since it does not require any in-memory duplication.
In: housing = np.loadtxt('regression-datasets-housing.csv',delimiter=',')
In: print type(housing)
Out: <type 'numpy.ndarray'>
In: print housing.shape
Out:(506L, 14L)
The loadtxt function expects, by default, tabulation as a separator between the values on a file. If the separator is a colon (,) or a semi-colon(;), you have to explicit it using the parameter delimiter.
>>>  import numpy as np
>>> type(np.loadtxt)
<type 'function'>
>>> help(np.loadtxt)
Help on function loadtxt in module numpy.lib.npyio.
Another important default parameter is dtype, which is set to float.
Note
This means that loadtxt will force all the loaded data to be converted into a floating point number.
If you need to determinate a different type (for example, an int), you have to declare it beforehand.
For instance, if you want to convert numeric data to int, use the following code:
In: housing_int = np.loadtxt('regression-datasets-housing.csv',delimiter=',', dtype=int)
Printing the first three elements of the row of the housing and housing_int arrays can help you understand the difference:
In: print housing[0,:3], '\n', housing_int[0,:3]
Out:
[  6.32000000e-03   1.80000000e+01   2.31000000e+00]
[ 0 18  2]
Frequently, though not always the case in our example, the data on files feature in the first line a textual header that contains the name of the variables. In this situation, the parameter that is skipped will point out the row in the loadtxt file from where it will start reading the data. Being the header on row 0 (in Python, counting always starts from 0), parameter skip=1 will save the day and allow you to avoid an error and fail to load your data.
The situation would be slightly different if you were to download the Iris dataset, which is present at http://mldata.org/repository/data/viewslug/datasets-uci-iris/. In fact, this dataset presents a qualitative target variable, class, which is a string that expresses the iris species. Specifically, it's a categorical variable with four levels.
Therefore, if you were to use the loadtxt function, you will get a value error due to the fact that an array must have all its elements of the same type. The variable class is string, whereas the other variables are constituted of floating point values.
How to proceed? The pandas library offers the solution, thanks to its DataFrame data structure that can easily handle datasets in a matrix form (row per columns) that is made up of different types of variables.
First of all, just download the datasets-uci-iris.csv file and have it saved in your local directory.
At this point, using pandas' read_csv is quite straightforward:
In: iris_filename = 'datasets-uci-iris.csv'
In: iris = pd.read_csv(iris_filename, sep=',', decimal='.', header=None, names= ['sepal_length', 'sepal_width', 'petal_length', 'petal_width', 'target'])
In: print type(iris)
Out: <class
 'pandas.core.frame.DataFrame'>
Apart from the filename, you can specify the separator (sep), the way the decimal points are expressed (decimal), whether there is a header (in this case, header=None; normally, if you have a header, then header=0), and the name of the variable—where there is one (you can use a list; otherwise, pandas will provide some automatic naming).
Note
Also, we have defined names that use single words (instead of spaces, we used underscores). Thus, we can later directly extract single variables by calling them as we do for methods; for instance, iris.sepal_length will extract the sepal length data.
If, at this point, you need to convert the pandas DataFrame into a couple of NumPy arrays that contain the data and target values, this can be easily done in a couple of commands:
In: iris_data = iris.values[:,:4]
In: iris_target, iris_target_labels = pd.factorize(iris.target)
In: print iris_data.shape, iris_target.shape
Out: (150L, 4L) (150L,)
As a last learning resource, Scikit-learn also offers the possibility to quickly create synthetic datasets for regression, binary and multilabel classification, cluster analysis, and dimensionality reduction.
The main advantage of recurring to synthetic data lies in its instantaneous creation in the working memory of your Python console. It is, therefore, possible to create bigger data examples without having to engage in long downloading sessions from the Internet (and saving a lot of stuff on your disk).
For example, you may need to work on a million example classification problem:
In: from sklearn import datasets # We just import the "datasets" module
In: X,y = datasets.make_classification(n_samples=10**6, n_features=10, random_state=101)
In: print X.shape,  y.shape
Out: (1000000L, 10L) (1000000L,)
After importing just the datasets module, we ask, using the make_classification command, for 1 million examples (the n_samples parameter) and 10 useful features (n_features). The random_state should be 101, so we can be assured that we can replicate the same datasets at a different time and in a different machine.
For instance, you can type the following command:
$> datasets.make_classification(1, n_features=4, random_state=101)
This will always give you the following output:
(array([[-3.31994186, -2.39469384, -2.35882002, 1.40145585]]), array([0]))
No matter what the computer and the specific situation is, random_state assures deterministic results that make your experimentations perfectly replicable.
Defining the random_state parameter using a specific integer number (in this case 101, but it may be any number that you prefer or find useful) allows the easy replication of the same dataset on your machine, the way it is set up, on different operating systems, and on different machines.
By the way, did it take too long?
On a i3-2330M CPU @ 2.20GHz machine, it takes:
In: %timeit X,y = datasets.make_classification(n_samples=10**6, n_features=10, random_state=101)
Out: 1 loops, best of 3: 2.17 s per loop
If it doesn't seem so also on your machine and if you are ready, having set up and tested everything up to this point, we can start our data science journey.