
In this section, we will set up the programming environment that will be useful for following the examples in the rest of the book. Readers may have the following choices of Operating Systems:
- Development Operating Systems(OS) such as Mac, Ubuntu, or Windows
- Deployment Operating Systems such as Mac, Windows, Android, iOs, or Ubuntu installed in Cloud platform such as Amazon Web Services (AWS), Google Cloud Platform (GCP), Azure, Tegra, Raspberry Pi
Irrespective of the platforms, all the code developed in this book should run without any issues. In this chapter, we will cover the installation procedures for the development environment. In Chapter 10, Deployment, we will cover installation for deployment in various other environments, such as AWS, GCP, Azure, Tegra, and Raspberry Pi.
For the development environment, you need to have a lot of computing power as training is significantly computationally expensive. Mac users are rather limited to computing power. Windows and Ubuntu users can beef up their development environment with more processors and General Purpose - Graphics Processing Unit (GP-GPU), which will be explained in the next section.
GP-GPUs are special hardware that speeds up the training process of training deep learning models. The GP-GPUs supplied by NVIDIA company are very popular for deep learning training and deployment as it has well-matured software and community support. Readers can set up a machine with such a GP-GPU for faster training. There are plenty of choices available, and the reader can choose one based on budget. It is also important to choose the RAM, CPU, and hard disk corresponding to the power of the GP-GPU. After the installation of the hardware, the following drivers and libraries have to be installed. Readers who are using Mac, or using Windows/Ubuntu without a GP-GPU, can skip the installation.
The following are the libraries that are required for setting up the environment:
- Computer Unified Device Architecture (CUDA)
- CUDA Deep Neural Network (CUDNN)
CUDA is the API layer provided by NVIDIA, using the parallel nature of the GPU. When this is installed, drivers for the hardware are also installed. First, download the CUDA library from the NVIDIA-portal: https://developer.nvidia.com/cuda-downloads.
Go through the instructions on the page, download the driver, and follow the installation instructions. Here is the screenshot of Ubuntu CUDA and the installation instructions:
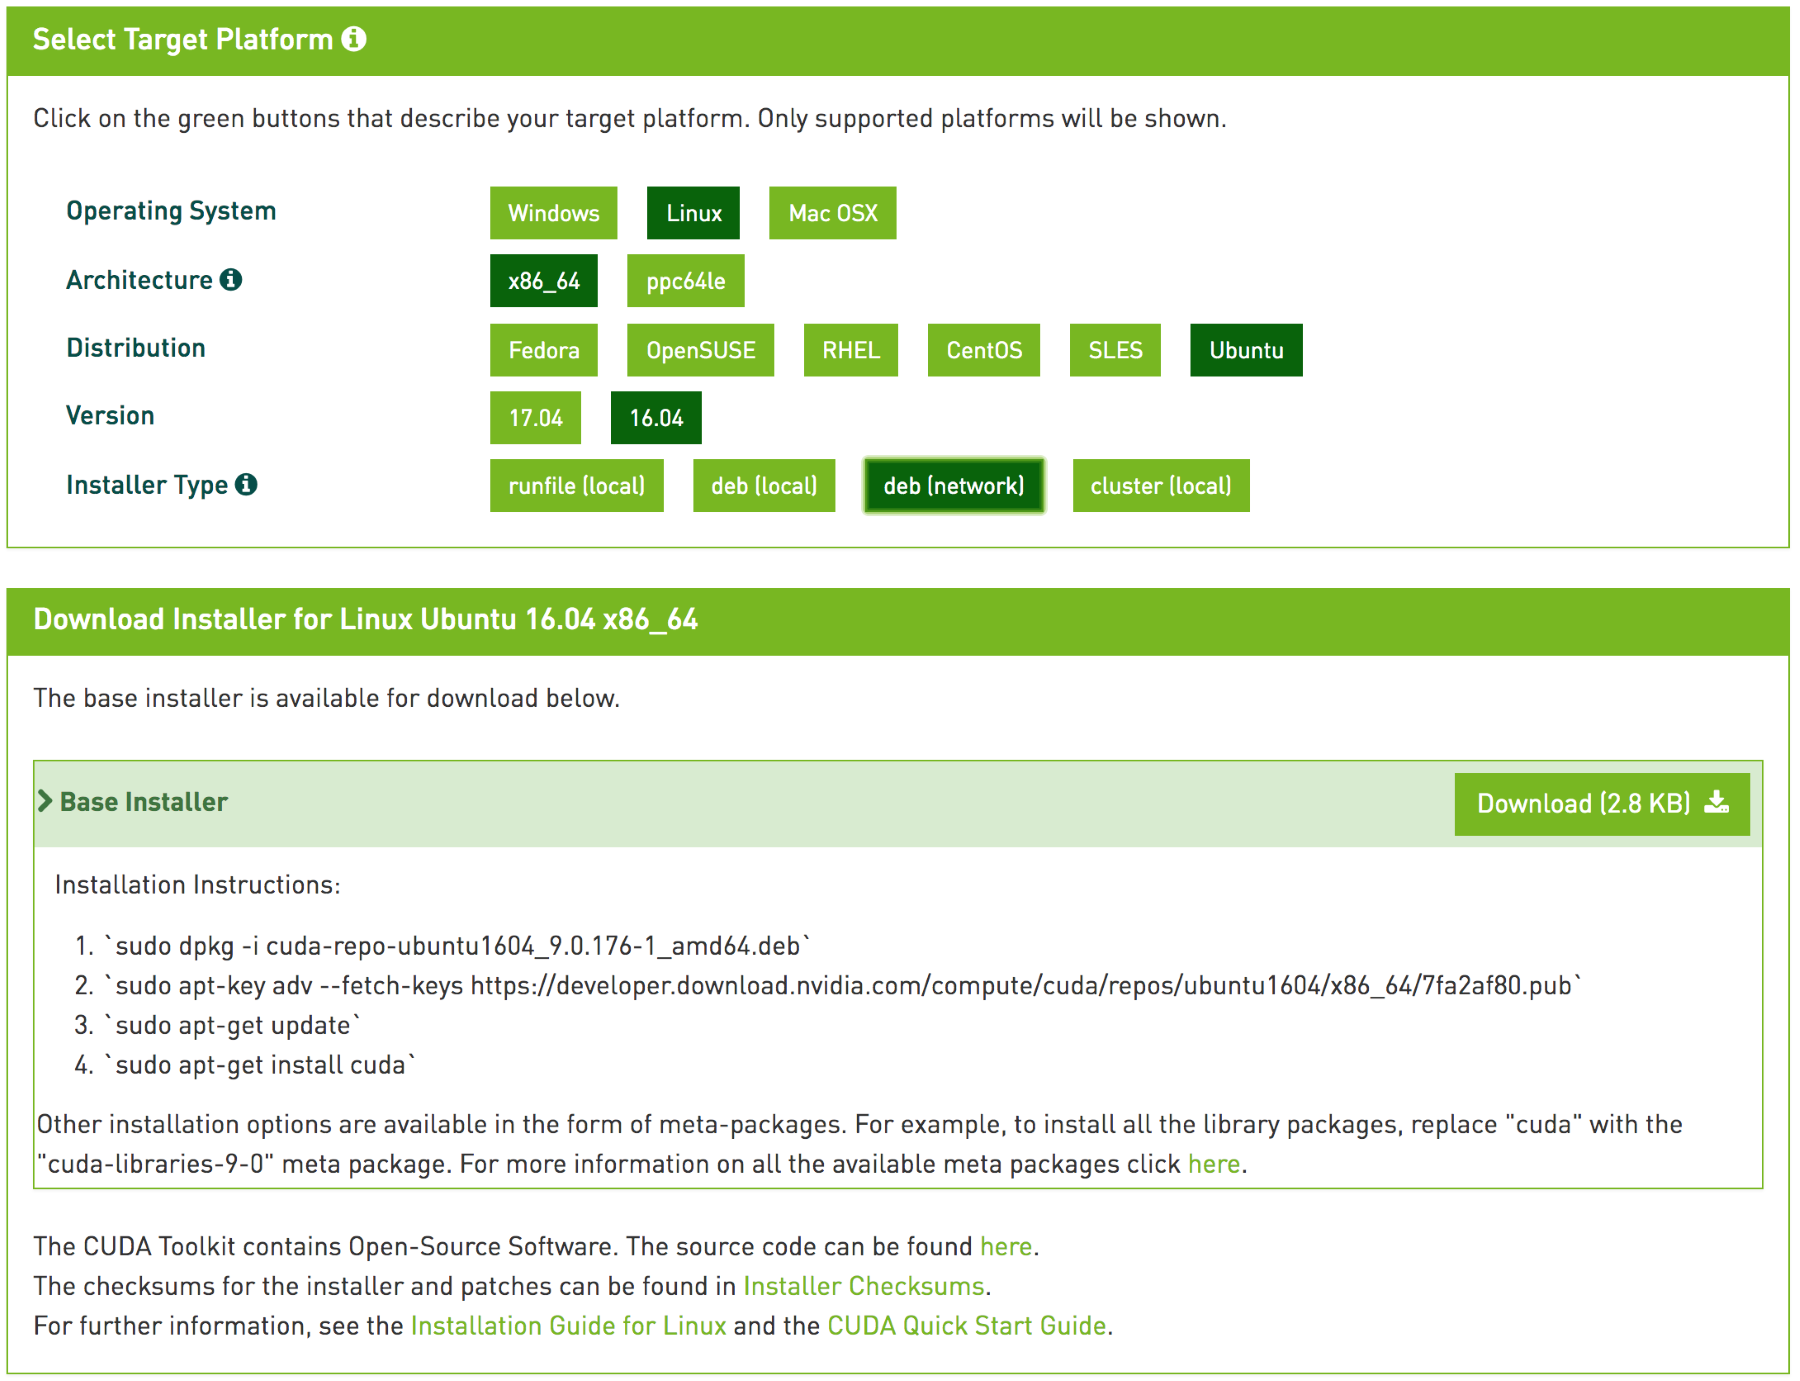
These commands would have installed the cuda-drivers and the other CUDA APIs required.
The CUDNN library provides primitives for deep learning algorithms. Since this package is provided by NVIDIA, it is highly optimized for their hardware and runs faster. Several standard routines for deep learning are provided in this package. These packages are used by famous deep learning libraries such as tensorflow, caffe, and so on. In the next section, instructions are provided for installing CUDNN. You can download CUDNN from the NVIDIA portal at https://developer.nvidia.com/rdp/cudnn-download.
Copy the relevant files to the CUDA folders, making them faster to run on GPUs. We will not use CUDA and CUDNN libraries directly. Tensorflow uses these to work on GP-GPU with optimized routines.
There are several libraries required for trained deep learning models. We will install the following libraries and see the reason for selecting the following packages over the competing packages:
- Python and other dependencies
- OpenCV
- TensorFlow
- Keras
Python is the de-facto choice for any data science application. It has the largest community and support ecosystem of libraries. TensorFlow API for Python is the most complete, and hence, Python is the natural language of choice. Python has two versions—Python2.x and Python3.x. In this book, we will discuss Python3.x. There are several reasons for this choice:
- Python 2.x development will be stopped by 2020, and hence, Python3.x is the future of Python
- Python 3.x avoids many design flaws in the original implementation
- Contrary to popular belief, Python3.x has as many supporting libraries for data science as Python 2.x.
We will use Python version 3 throughout this book. Go to https://www.python.org/downloads/ and download version 3 according to the OS. Install Python by following the steps given in the download link. After installing Python, pip3 has to be installed for easy installation of Python packages. Then install the several Python packages by entering the following command, so that you can install OpenCV and tensorflow later:
sudo pip3 install numpy scipyscikit-learnpillowh5py
The description of the preceding installed packages is given as follows:
numpyis a highly-optimized numerical computation package. It has a powerful N-dimensional package array object, and the matrix operations ofnumpylibrary are highly optimized for speed. An image can be stored as a 3-dimensionalnumpyobject.scipyhas several routines for scientific and engineering calculations. We will use some optimization packages later in the book.scikit-learnis a machine-learning library from which we will use many helper functions.Ppillowis useful for image loading and basic operations.H5pypackage is a Pythonic interface to the HDF5 binary data format. This is the format to store models trained using Keras.
The OpenCV is a famous computer vision library. There are several image processing routines available in this library that can be of great use. Following is the step of installing OpenCV in Ubuntu.
sudo apt-get install python-opencvSimilar steps can be found for other OSes at https://opencv.org/. It is cross-platform and optimized for CPU-intensive applications. It has interfaces for several programming languages and is supported by Windows, Ubuntu, and Mac.
The tensorflow is an open source library for the development and deployment of deep learning models. TensorFlow uses computational graphs for data flow and numerical computations. In other words, data, or tensor, flows through the graph, thus the name tensorflow. The graph has nodes that enable any numerical computation and, hence, are suitable for deep learning operations. It provides a single API for all kinds of platforms and hardware. TensorFlow handles all the complexity of scaling and optimization at the backend. It was originally developed for research at Google. It is the most famous deep learning library, with a large community and comes with tools for visualization and deployment in production.
Install tensorflow using pip3 for the CPU using the following command:
sudo pip3 install tensorflow If you are using GPU hardware and have installed CUDA and CUDNN, install the GPU version of the tensorflow with the following command:
sudo pip3 install tensorflow-gpuNow the tensorflow is installed and ready for use. We will try out a couple of examples to understand how TensorFlow works.
We will do an example using TensorFlow directly in the Python shell. In this example, we will print Hello, TensorFlow using TensorFlow.
- Invoke Python from your shell by typing the following in the command prompt:
python3- Import the
tensorflowlibrary by entering the following command:
>>> import tensorflow as tf- Next, define a constant with the string
Hello, TensorFlow. This is different from the usual Python assignment operations as the value is not yet initialized:
>>> hello = tf.constant('Hello, TensorFlow!')- Create a session to initialize the computational graph, and give a name to the session:
>>> session = tf.Session()The session can be run with the variable hello as the parameter.
- Now the graph executes and returns that particular variable that is printed:
>>> print(session.run(hello))It should print the following:
Hello, TensorFlow!Let us look at one more example to understand how the session and graph work.
Note
Visit https://github.com/rajacheers/DeepLearningForComputerVision to get the code for all the examples presented in the book. The code will be organised according to chapters. You can raise issues and get help in the repository.
Here is another simple example of how TensorFlow is used to add two numbers.
- Create a Python file and import
tensorflowusing the following code:
import tensorflow as tfThe preceding import will be necessary for all the latter examples. It is assumed that the reader has imported the library for all the examples. A placeholder can be defined in the following manner. The placeholders are not loaded when assigned. Here, a variable is defined as a placeholder with a type of float32. A placeholder is an empty declaration and can take values when a session is run.
- Now we define a
placeholderas shown in the following code:
        x = tf.placeholder(tf.float32)
        y = tf.placeholder(tf.float32)
- Now the sum operation of the placeholders can be defined as a usual addition. Here, the operation is not executed but just defined using the following code:
z = x + y- The session can be created as shown in the previous example. The graph is ready for executing the computations when defined as shown below:
session = tf.Session()- Define the value of the
placeholderin a dictionary format:
values = {x: 5.0, y: 4.0}- Run the session with variable
cand the values. The graph feeds the values to appropriate placeholders and gets the value back for variablec:
        result = session.run([z], values)
        print(result)
This program should print [9.0] as the result of the addition.
It's understandable that this is not the best way to add two numbers. This example is to understand how tensors and operations are defined in TensorFlow. Imagine how difficult it will be to use a trillion numbers and add them. TensorFlow enables that scale with ease with the same APIs. In the next section, we will see how to install and use TensorBoard and TensorFlow serving.
TensorBoard is a suite of visualization tools for training deep learning-based models with TensorFlow. The following data can be visualized in TensorBoard:
- Graphs: Computation graphs, device placements, and tensor details
- Scalars: Metrics such as loss, accuracy over iterations
- Images: Used to see the images with corresponding labels
- Audio: Used to listen to audio from training or a generated one
- Distribution: Used to see the distribution of some scalar
- Histograms: Includes histogram of weights and biases
- Projector: Helps visualize the data in 3-dimensional space
- Text: Prints the training text data
- Profile: Sees the hardware resources utilized for training
Tensorboard is installed along with TensorFlow. Go to the python3 prompt and type the following command, similar to the previous example, to start using Tensorboard:
x = tf.placeholder(tf.float32, name='x')
y = tf.placeholder(tf.float32, name='y')
z = tf.add(x, y, name='sum')
Note that an argument name has been provided as an extra parameter to placeholders and operations. These are names that can be seen when we visualize the graph. Now we can write the graph to a specific folder with the following command in TensorBoard:
session = tf.Session()
summary_writer = tf.summary.FileWriter('/tmp/1', session.graph)
This command writes the graph to disk to a particular folder given in the argument. Now Tensorboard can be invoked with the following command:
tensorboard --logdir=/tmp/1Any directory can be passed as an argument for the logdir option where the files are stored. Go to a browser and paste the following URL to start the visualization to access the TensorBoard:
http://localhost:6006/
The browser should display something like this:
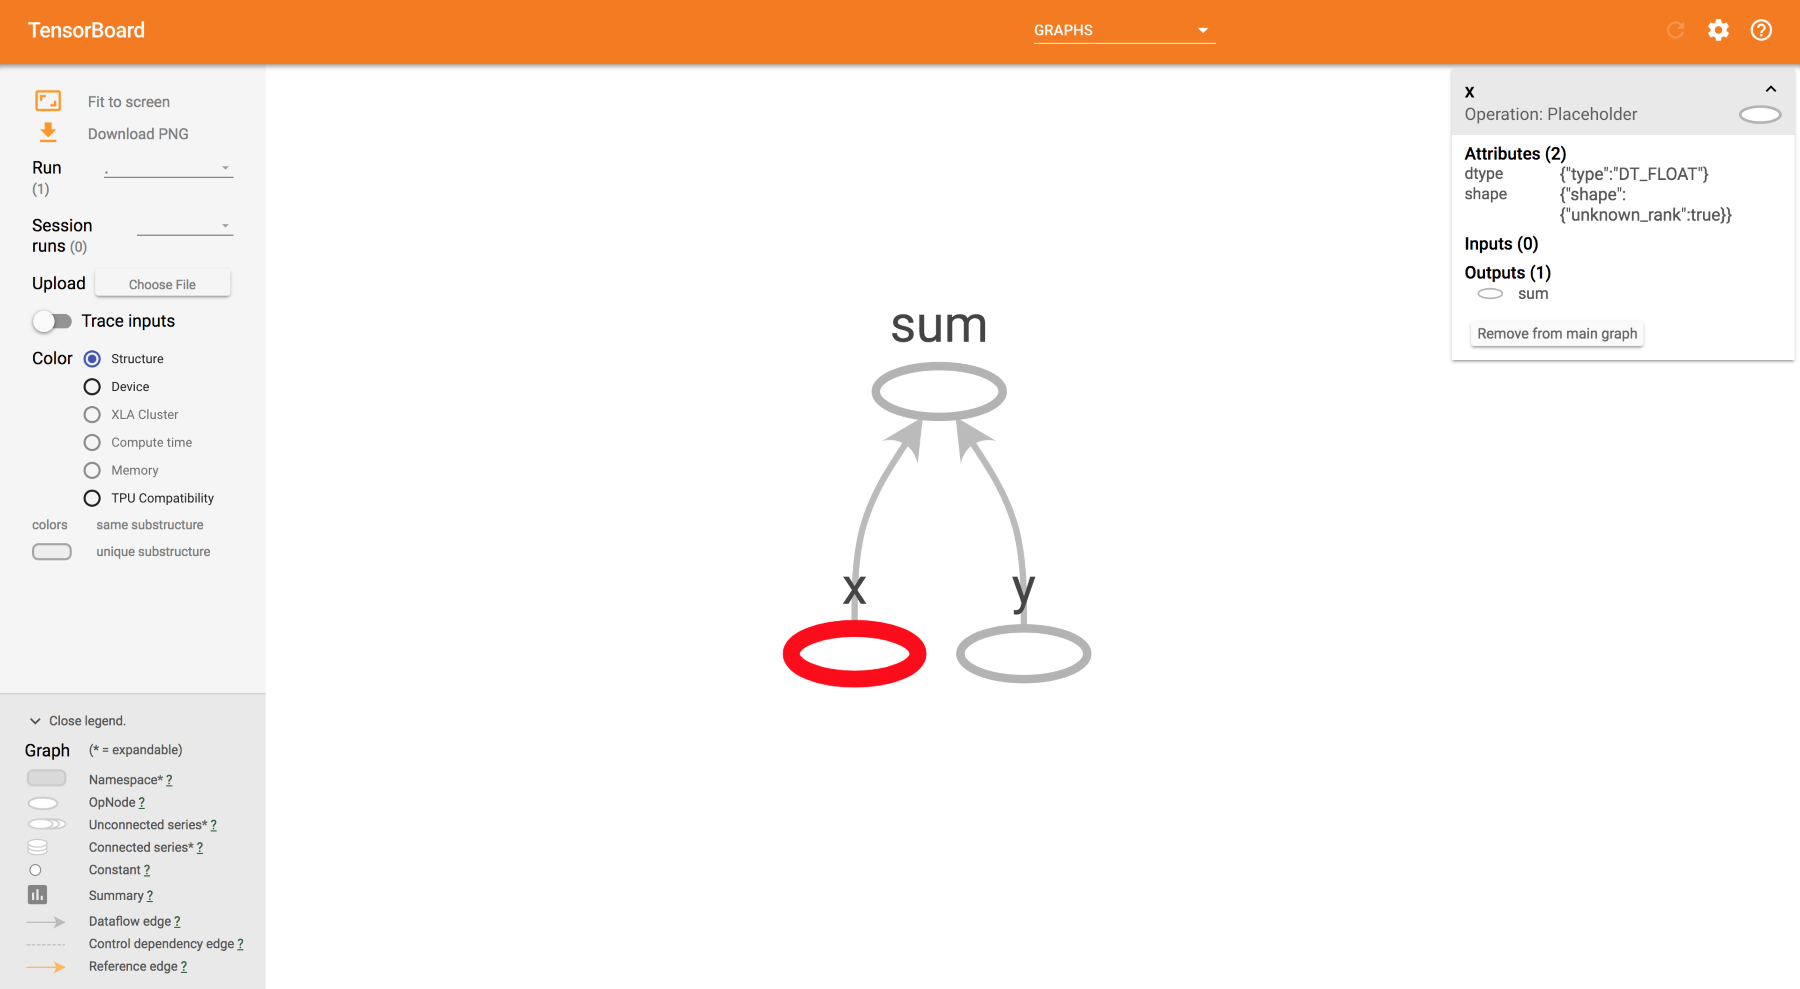
The TensorBoard visualization in the browser window
The graph of addition is displayed with the names given for the placeholders. When we click on them, we can see all the particulars of the tensor for that operation on the right side. Make yourself familiar with the tabs and options. There are several parts in this window. We will learn about them in different chapters. TensorBoard is one the best distinguishing tools in TensorFlow, which makes it better than any other deep learning framework.
TensorFlow Serving is a tool in TensorFlow developed for deployment environments that are flexible, providing high latency and throughput environments. Any deep learning model trained with TensorFlow can be deployed with serving. Install the Serving by running the following command:
sudo apt-get install tensorflow-model-serverStep-by-step instructions on how to use serving will be described in Chapter 3, Image Retrieval. Note that the Serving is easy to install only in Ubuntu; for other OSes, please refer to https://www.tensorflow.org/serving/setup. The following figure illustrates how TensorFlow Serving and TensorFlow interact in production environments:
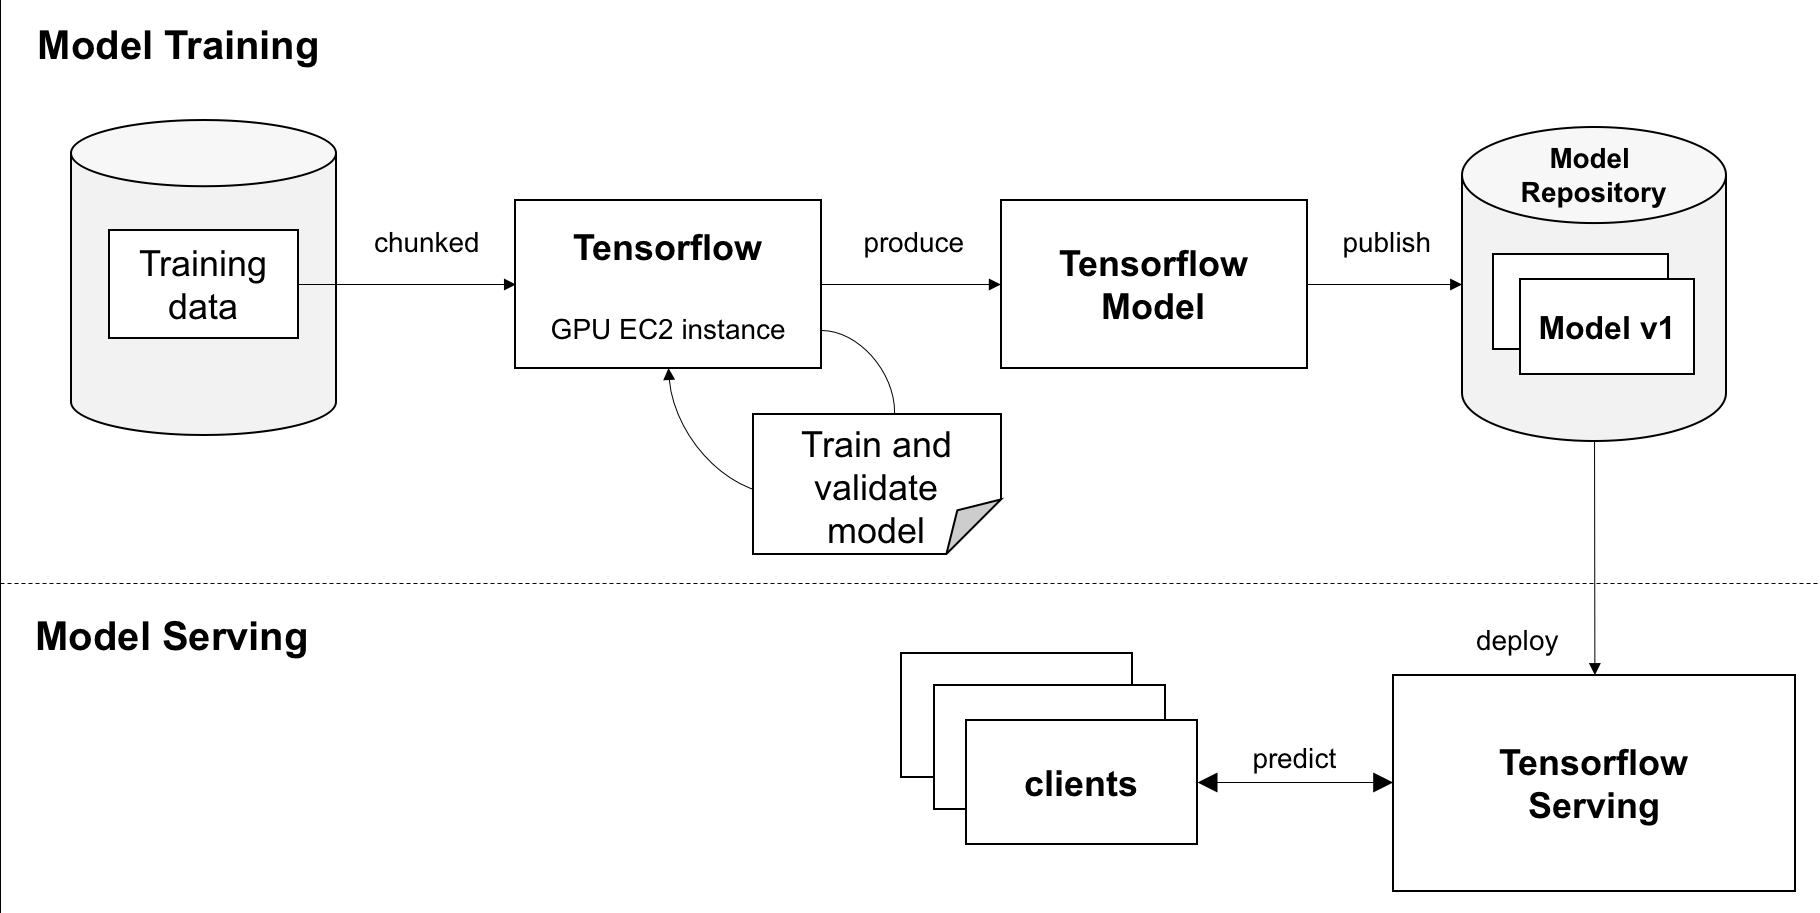
Many models can be produced by the training process, and Serving takes care of switching them seamlessly without any downtime. TensorFlow Serving is not required for all the following chapters, except for Chapter 3, Image Retrieval and Chapter 10, Deployment.
Keras is an open source library for deep learning written in Python. It provides an easy interface to use TensorFlow as a backend. Keras can also be used with Theano, deep learning 4j, or CNTK as its backend. Keras is designed for easy and fast experimentation by focusing on friendliness, modularity, and extensibility. It is a self-contained framework and runs seamlessly between CPU and GPU. Keras can be installed separately or used within TensorFlow itself using the tf.keras API. In this book, we will use the tf.keras API. We have seen the steps to install the required libraries for the development environment. Having CUDA, CUDNN, OpenCV, TensorFlow, and Keras installed and running smoothly is vital for the following chapters.