As you start to use phpMyAdmin, you will realize that there are a wide variety of things that you can do with it. This section will show you the most commonly performed tasks in phpMyAdmin and how to do them.
Probably the most common usage of phpMyAdmin is to look at data. In fact, this is so common that the default action when clicking on a table name in the navigation panel is to browse this table.
Let's see what appears when you click on the department table from the navigation (left) panel:
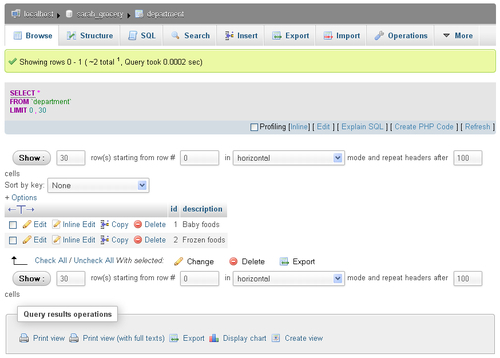
The screen in browse mode can be broken down into various sections, which are explained here, from top to bottom:
The server / database / table locator
The table menu, with Browse being highlighted
The Showing rows line, indicating which rows you are looking at (first row being numbered 0) and the total number of rows
The generated query SELECT * FROM `department` LIMIT 0,30
A navigation line, from which you could specify how many rows you want and the starting row
A Sort by key selector, containing all the indexes for this table from which to choose to sort
An Options link (more on this below)
A big T that enables you to show the full text of lengthy columns
The names of the columns (clickable to sort on each column)
The data lines, prefixed with checkbox action links Edit, Inline Edit, Copy, and Delete
A With selected line, permitting to perform global actions on the lines for which the corresponding checkbox has been marked
The Query results operations section, from which you can generate a Print view of the table, Export the results, or generate a chart from the data
Clicking on Options opens a sliding section, offering you more ways of displaying the data for BLOB columns, binary columns, or relational information:

Browsing is not just looking at raw data; phpMyAdmin can also sort this data. Sorting can be performed on an index, using the Sort by key selector, or simply by clicking on a column header. Clicking again on the same header reverses the sort. You can experiment now by clicking twice on the description header.
When there are numerous rows of data, they are presented by pages and you can navigate back and forth between these pages. Here is an example of navigation controls with a different table, taken from MySQL's sakila database (http://dev.mysql.com/doc/sakila/en/sakila.html):

For small tables like your department and item tables, it's often sufficient to browse them in order to grasp all their data. However, for larger projects involving many tables or many data rows, you have to rely on phpMyAdmin's search mechanisms.
You can search on a single table or on many tables at once. Let's begin by examining the single-table case, using the item table.
You can enter the table Search page with either of these methods:
Opening the
sarah_grocerydatabase on its Structure page and clicking the Search link on the line corresponding to the item tableOpening the item table and clicking the Search menu tab
The initial search page looks like the following, with only the most commonly-used "query by example" section visible:
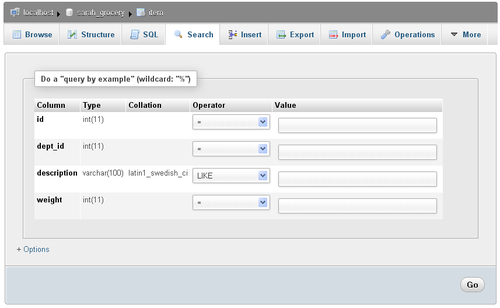
In a query by example search, you fill one or more values corresponding to what you are looking for. You can also apply an operator to a value in order to modify the search behavior.
Let's search for some pizza; for this, you simply enter pizza (with a lowercase p) in the value field next to the description; then you click on Go, which brings the following results screen:
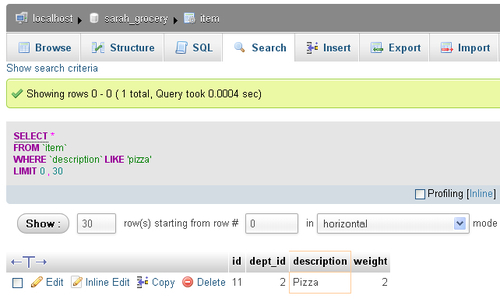
A few remarks about this screen:
We entered pizza but MySQL found Pizza; this is because the
descriptioncolumn uses one of the case-insensitive collations (latin1_swedish_ci, wherecimeans case-insensitive)The description column in the results is highlighted with a colored border
We are now in a normal results panel and all the possibilities related to browsing are available (page navigation, sorting, and so on)
The search criteria panel has been hidden but can be brought back using the Show search criteria link located just under the menu tabs
To practice using a search operator:
Click on Show search criteria.
Enter 10 as a value for id.
Change the operator on the id column, to less than (<).
Click on Go.
No item with a description of Pizza and an id less than 10 exists, so you get the MySQL returned an empty result set (i.e. zero rows) message.
The search Options slider contains controls to restrict which columns will appear in the results, to ask for distinct results, to type in a WHERE clause, to specify the number of rows per page and to choose the display order.
Now you'll have a look at the multi-table (or database) search mechanism. This searching method is handy when you are not sure of the exact table that holds a piece of data you are looking for, or when the same piece of data (say, a city name) appears in more than one table or more than one column.
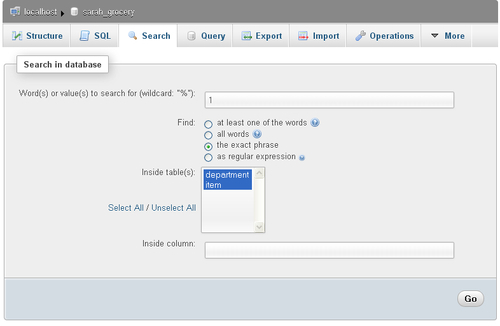
Opening your database and clicking on Search brings the database search panel. You'll first try an exact search for the number 1, in all tables. To accomplish this search:
Enter 1 as the value to search.
Tick the radio button next to the exact phrase.
Click Select All to pick all tables.
Click on Go.
The following image depicts the search panel just before launching the search:
The search results first give an overview of the number of matches for each table, as well as links to browse or delete these matches:
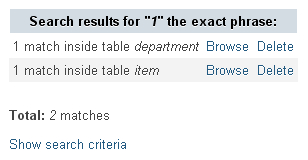
Clicking on Browse fetches the search results for a particular table, while leaving the global search results on the top of screen.
Note that the Show search criteria link is available. You now click on this link and change the search mode (in the Find dialog) from the exact phrase to at least one of the words. Clicking on Go shows different global search results with two matches inside the item table. The reason for this is the addition of the wildcard % character before and after the searched value in the generated query, which now matches the id 10 and 11 of the item table when looking for the number 1.
Heraclitus, a Greek philosopher (and probably database designer precursor) told us that "Nothing is permanent except change". In the database world, not only data values often change but also their supporting structures (column, table, view, and database definitions).
You'll first explore the three graphical methods for editing data, and then you'll go on about changing data structure.
When you have a results page (generated by either browsing a table or searching in it), you notice that for each data row, Edit and Inline Edit links are offered. Moreover, a checkbox appears for each line, permitting you to choose the rows to edit via the Change link underneath.
Let's try the Edit link for the item table. Browsing this table and clicking on Edit for id 10 brings this row in edit mode. Here you have changed the weight value from 1 to 3 and are about to click on Go to save the change:
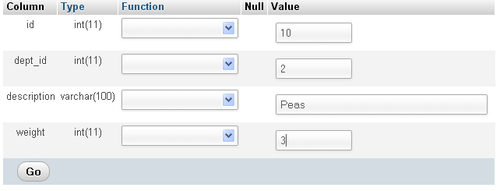
This is the most traditional mechanism to edit a row. Using the checkboxes and the With selected: Change link permits you to put more than one row in the edit mode at once. Here are some reasons why you might want to do this:
To compare data from one row to another while editing
To copy and paste data from one row to another (for example, exchanging the weight value between peas and pizzas)
More recently (in phpMyAdmin 3.4.x), inline editing was made available. Trying it for id 10 brings you this screen:

The advantage is that you did not leave the results page you were on; thus you can keep an eye on the data for the other rows, which can help you decide about the changes to make.
Directly make your changes and click on Save, or decide to Hide the inline edit view, therefore not saving any changes you made.
We will now explore how to modify the structure of data. You begin by opening the department table in Structure — mode this can be done either by clicking Structure for this table, or by clicking the small icon next to this table name in the navigation panel.
The Structure page shows you a great deal of information:
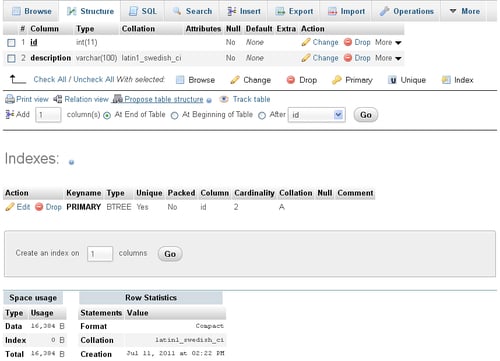
You can see three main sections:
The list of current columns, with a dialog to add more
The Indexes section, where you can edit or drop an index
The statistics about space usage and rows
In the next exercise you will add a column that will be used to record the date of the last inspection for this department. In the dialog Add X column(s) you see that the default is to add one column at the end of the table; then just click on Go, bringing up the following panel in which you type the new column's information:
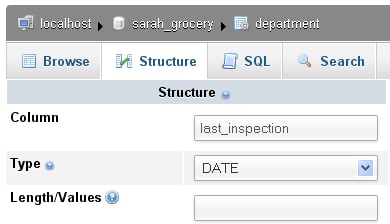
Clicking on Save adds this column to your table. You can now browse the department table and notice that there is a new column, last_inspection, with all the dates set to 0000-00-00 as we did not set any default date.
Editing an existing row shows you a new icon: a small calendar. Clicking on it gives you a standard date picker, shown as follows:
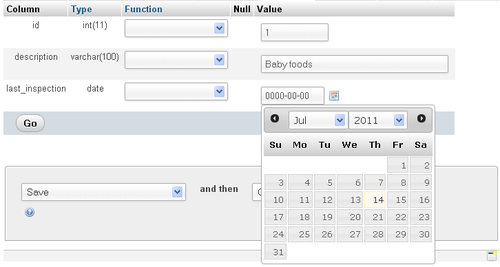
You can also change an existing column's structure—for example, the description column becoming a VARCHAR(110)—but beware of the consequences, should you change the type or size of the column. Data truncation could happen.
Adding an index on the last_inspection column can be done quickly via the More menu that is offered for each column:
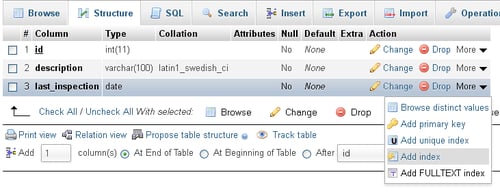
Fine-tuning indexes is accomplished via the Indexes section by using the Edit link for a specific index. Here you can add or remove columns from an index, or even change the number of characters a column uses in this index.
The popularity of Excel means that many people are familiar with this tool and they prefer to do the majority of their data manipulations in it. This task will describe extracting data with the goal of reading it back into Microsoft Excel. Note that any utility that understands the CSV (comma-separated values) format can be used to read the file generated in this task.
You'll first practice exporting in quick mode, and then you'll go through the custom mode for additional options.
Start by opening the department table and clicking Export, which brings up this panel:
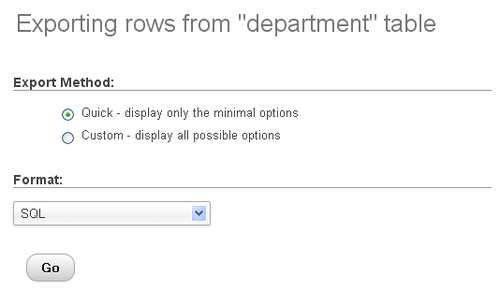
As can be seen, the default export format is SQL because it permits you to quickly produce a complete backup of the table's structure and data. However for this task, you need to change the export format to CSV for MS Excel.
A pure CSV file should use Comma-Separated Values; however as Excel uses semicolons to delineate each value, phpMyAdmin produces a file containing semicolons. You can try this format by choosing it in the Format selector and clicking Go. Your browser offers to save the file or to open it with the default program associated with .csv files (depending on your workstation's OS). Here is what you can see after opening the file with Excel:

Note that in this quick export format, the column names do not appear; you’ll use the custom format to remediate to this.
Contrary to the quick export format, the custom one offers many options. Some of these options (Rows, Output) are common for all export formats and some are adapted for each format.
Selecting CSV for MS Excel, and then choosing Custom produces the following panel:
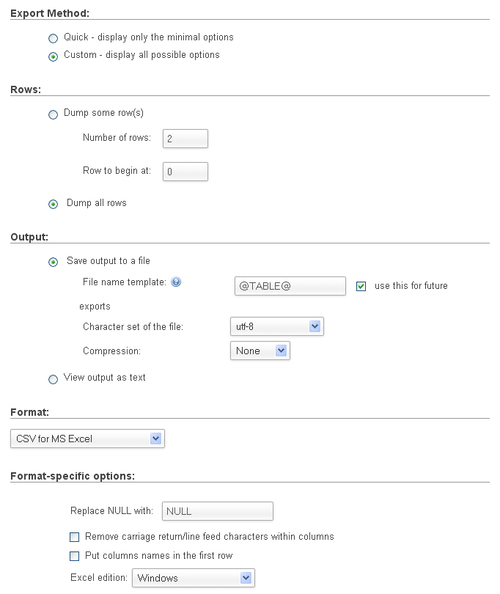
The Rows section enables you to choose to Dump (export) just some rows (with the number of rows and starting row) or all rows.
The Output section permits you to either save output to a file (with a choice of character set and compression) or to view the output as text (which would not save anything but can be useful in case the output format can be interpreted as text — this happens to work with the CSV format).
Next, the format-specific options vary according to the chosen format. Here, the option most likely to be changed would be Put column names in the first row. This would help the person opening the CSV file in Excel to see column headers indicating the original column names.
There is also a selector to pick up which Excel edition is the target for this file (Windows, Mac).
Making relations between tables is very useful. Let's just consider the benefits of defining relations when manipulating tables via phpMyAdmin:
The possibility of choosing the values of one column, based on a related table
A clearer description of the relations between tables
The possibility of generating a schema of the relations
The native way in MySQL to define relations is via the FOREIGN KEY constraints (more details at http://dev.mysql.com/doc/refman/5.5/en/innodb-foreign-key-constraints.html). These constraints are available with the InnoDB storage engine; this is why we created our tables under this engine.
In this task, you'll begin with exploring what can be done with relations using just what MySQL offers natively; then you'll learn the additional possibilities offered by phpMyAdmin, thanks to its configuration storage mechanism.
The goal here is to make a relation between the dept_id column of the item table and the id column of the department table; this is because a department should exist before you use it in the item table. In InnoDB vocabulary, the foreign key for item.dept_id will be department.id.
You first open the item table on its Structure page and then click on Relation view. This produces the following panel:
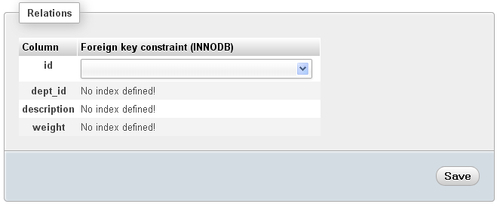
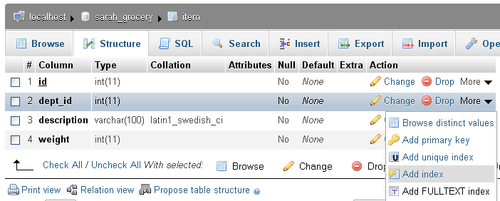
InnoDB requires that all columns referring to a foreign key or referred to as a foreign key, have an index defined. So you must go back to the Structure page for item and, for the dept_id column, use the More selector and choose Add index:
Going back to the Relation view, you can now choose for dept_id the appropriate column department.id. Choosing it makes other selectors appear as well:

The ON DELETE and ON UPDATE are foreign key options; they are explained in the aforementioned MySQL documentation page. For now you'll just keep the default values and click on Save.
At this point, everything went fine because your data respected the constraint (department IDs existed in the department table).
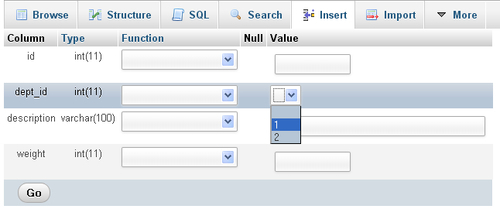
You can immediately see a benefit of the relation by trying to Insert a new item; the possible department IDs appear in a drop-down selector:
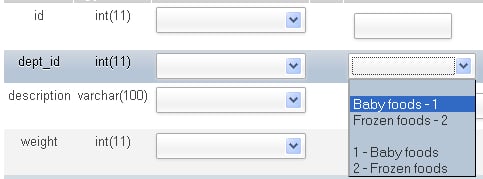
More options can be made available if your installation has the phpMyAdmin configuration storage deployed. In short, this is a special set of tables that contain metadata about various configuration elements. For example, we would like to see the department name in the drop-down selector, when we insert or edit an item. Thus, the metadata called display column is offered in the phpMyAdmin configuration storage, to hold which column best describes each row. Details about installing the configuration storage appear in Documentation.html. The remaining segments of this task assume that the configuration storage has been installed.
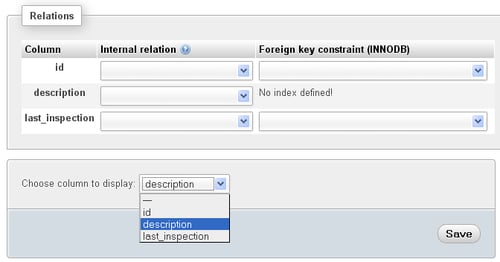
With this in place, you can open the department table in Structure page, click Relation view, and pick the column to display, which is description:
After clicking on Save, you can now open the item table in Insert mode and see the difference, shown as follows:
If too many rows were present in the referenced table, an icon would be offered instead of a drop-down. This icon would open a distinct panel to select among the values, with pagination and search capabilities.
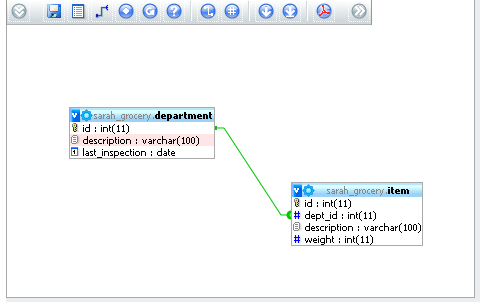
Another handy feature made available by the configuration storage is the Designer. In this panel, available from the database menu, you can define the relations graphically, move the tables around on the workspace, and save their coordinates in order to produce a PDF schema of the relations. The following is an image of the Designer's workspace:
