
This recipe guides you through creating a simple PDI transformation using the graphical development environment Spoon. Using this simple example, we will see how to play with PDI command-line tools. The goal of this recipe is to extract a list of customers located in a selected country. The country to be exported is identified through an input parameter and the export is made to an Excel file located in the same directory where the transformation is run.
To get ready for this recipe, you first need to check that your Java environment is configured properly; to do this, check that the JAVA_HOME environment variable is set. Even if PDI while starting up tries to guess the value of the JAVA_HOME environment variable from the system, it is always good practice to set the JAVA_HOME environment variable. As soon as this is done, you need to start Spoon, the PDI's graphical development environment. You can start Spoon from the command line using the appropriate script located in the PDI's home directory. As soon as you get into the PDI home directory, you can run the proper script depending on the specific operating system environment.
Have a look at the following options:
If you are on Windows, use the script
spoon.batto start the applicationIf you are on Linux or Mac, use the script
spoon.shto start the application
Create a new empty transformation. To do this, you can perform either of the following steps:
Click on the New button from the toolbar menu and select the Transformation item entry.
Select the Transformation item entry by navigating to File | New or by pressing Ctrl + N.
Go to the Transformation properties dialog and define a new transformation parameter called
p_country. To do this, perform the following steps:Open the Transformation settings dialog by either pressing Ctrl + T or by right-clicking anywhere on the working area to the right and selecting Transformation settings from the newly displayed contextual menu.
Once the dialog opens, select the Parameters tab and add a new parameter called
p_country.

Select the Design tab from the left view. The list of category folders will appear in the Steps panel. Perform the following steps on them:
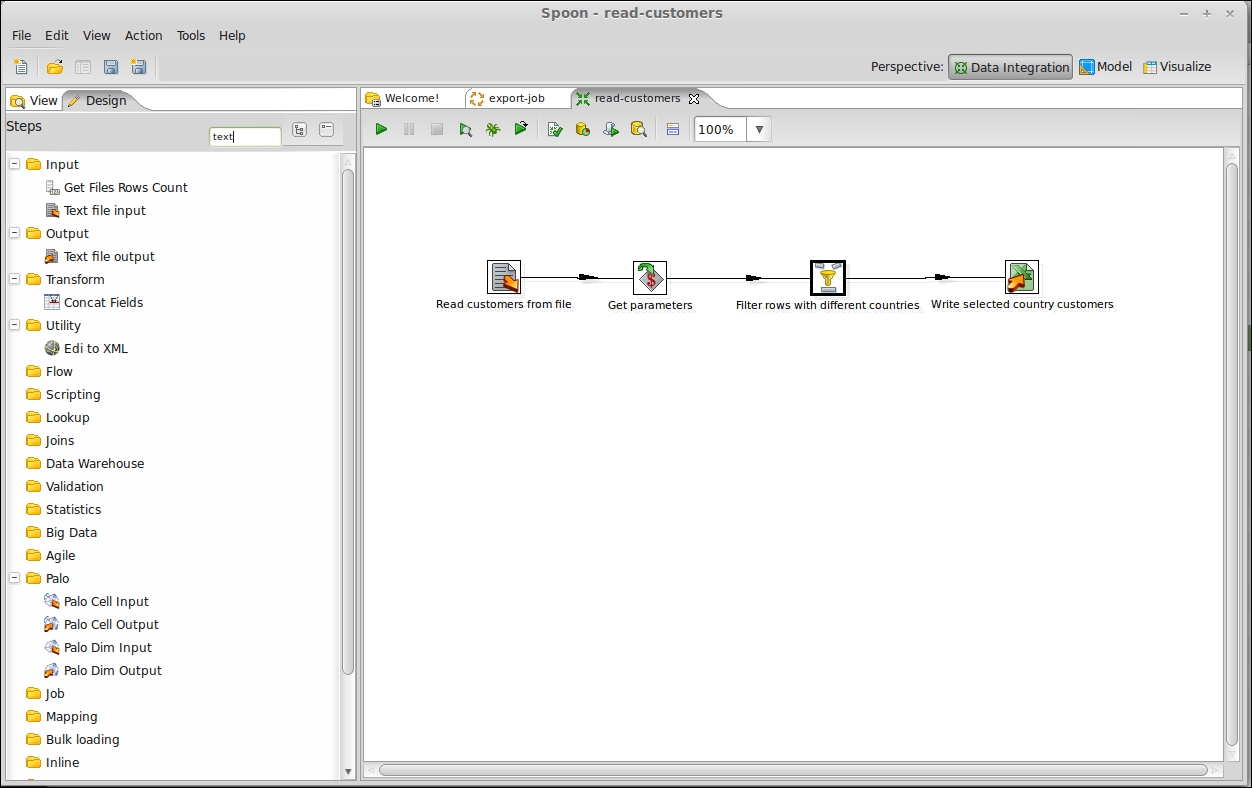
From the Input category folder, get a Text File Input step and drag-and-drop it into the working area on the right.
From the Job category folder, get a Get Variables step and drag-and-drop it into the working area on the right.
From the Flow category folder, get a Filter and a Dummy step and drag-and-drop them into the working area on the right.
Rename the Dummy step
Discarded customers.From the Output category folder, get a Microsoft Excel Output step and drag-and-drop it into the working area on the right.
Connect the steps together in the following specified order:
Connect the Text File Input step to the Get Variable step.
Connect the Get Variable step to the Filter step.
Connect the Filter step to the Microsoft Excel Output step and then connect the Filter step to the Dummy step as well.
Configure the Text File Input step as follows:
Open the Text File Input step properties dialog by either double-clicking on the step icon in the working area or right-clicking on the step icon and selecting Edit step.
Configure the name of the step.
Under the File tab, configure the file to be read by typing the complete name of the file in the File or Directory input field. Because the sample file is located in the same sample directory where the transformation resides, a good approach to naming the file in a way that is location independent is to use a system variable to parameterize the directory name where the file is located. In our case, the complete filename is
${Internal.Transformation.Filename.Directory}/customers.txt.
After the name of the file has been typed in, click on the Add button; the file will be added to the selected files located beneath as follows:
Select the Fields tab. You must fill in the table describing the fields format.
Click on the Get Fields button. The Text File Input step automatically analyzes a first set of 100 rows in the input file and tries to guess the field names to be imported. By the end of this inspection, all the fields will automatically get defined. Remember to verify the guessed data types so that only the
CUSTOMER_KEYfield has an Integer data type while the remaining fields have a String data type.Click on OK and close the Text File Input step properties dialog.
Configure the Get Variable step as follows:
Open the Get Variable step properties by either double-clicking on the step icon in the working area or right-clicking on the step icon and selecting Edit step.
Configure the name of the step.
Click on the first row under the Field column, add a new column; named
filter_countryand press the Tab key.The cursor goes to the next column. Add the name of the parameter whose value is used to populate the new field:
${p_country}. Press the Tab key.In the next column, where the cursor goes, select String as the data type of the new field.
Click on OK and close the Get Variable step properties dialog.
Configure the Filter step as follows:
Open the Filter step properties dialog by either double-clicking on the step icon in the working area or right-clicking on the step icon and selecting Edit step.
From the Send "true" data to step combobox, select the Write selected country customers item entry to set the path that is to be navigated to any time the result of the condition is
true.From the Send "false" data to step combobox, select the Discarded customers item entry to set the path that is to be navigated to anytime the result of the condition is
false.Add a new condition called
COUNTRY = filter_country.To also manage the cases where the
p_countryparameter has not been set by the user, when starting the procedure, add another condition calledfilter_country IS NULL. Set this new condition as an alternate to the previous condition by using theORlogical operator.Click on OK and close the Filter step properties dialog.

Configure the Microsoft Excel Output step as follows:
Open the Microsoft Excel Output step properties dialog by either double-clicking on the step icon in the working area or right-clicking on the step icon and selecting Edit step.
Configure the name of the step.
Under the File tab, configure the name of the export file by typing the complete name of the file in the Filename input field. Remember to write the name of the file without any extension because the file extension is located in the Extension input field. The exported file will be put in the same samples directory where the transformation resides. In any case, a good approach is to type the filename in a way that is location independent, using a system variable to parameterize the directory name where the file is located. In our case, the complete filename is
${Internal.Transformation.Filename.Directory}/selected_country_customers.Select the Fields tab. You must fill in the table describing the field's format.
Click on the Get Fields button. The Text File Input step automatically analyzes a first set of 100 rows in the input file and tries to guess the field names to be imported. At the end of this inspection, all the fields will automatically get defined.
Click on OK and close the Microsoft Excel Output step properties dialog.
Save the transformation with the suggested name
read-customers.ktr.The transformation design is now complete. You can now go to the Design a simple job (Simple) recipe and create the job that will use this transformation.

Now that we have designed a sample transformation, let's analyze a quick way to easily find and get directly to the needed steps.
A set of category folders organizes transformations to facilitate the user's search process. If you are unsure about the right location of the step you are looking for, you can easily find it using the search functionality. To do this, go to the Search input text field located in the upper-left corner of the design view and write the name of the step you are looking for. While you are typing, you will see the items in the Steps panel whose name starts with the letters you are typing appear as shown in the following screenshot: