
VMware created an Application Program Interface (API) that provides a way for third-party vendors and developers to have other software products register and control the vSphere environment. PowerCLI is a group of functions, written in PowerShell, that convert the cryptic commands of the API into a human-readable format to simplify the scriptwriter's job. For example, one of the first commands you write is Connect-VIServer. This single command is programmed as a group of API calls to initiate a connection to the vCenter server, pass user credentials, and open a network socket to the server. Understanding all of the pieces of how to connect to a vCenter server is now irrelevant and the single command is used.
Each edition of vSphere brought with it a long list of features and options permitting the user to do more and more with the Virtual Environment, and with that, more and more cmdlets needed to be written for PowerCLI to enable better control of the environment. One of the best improvements was in vSphere version 4 and was the creation of Distributed Virtual Switches (DVS). PowerCLI had no means to create, manage, or delete such switches, and on numerous occasions, the API had to be used to perform the function. So, with each additional PowerCLI version, the developers of the toolset brought it closer and closer to feature parity. As of version 6 release 1 (R1), the two products are closer than they have ever been. So, having the latest PowerCLI version is optimal for administering the environment as the newest PowerCLI version is still very capable of controlling older versions of vSphere.
To get the PowerCLI version, either watch as you open the interface or type this command:
$(Get-PowerCLIVersion).Major
The preceding command line will produce an output as follows:
6
Otherwise, you can type:
$(Get-PowerCLIVersion).UserFriendlyVersion
Now, this command will produce an output as follows:
VMware vSphere PowerCLI 6.0 Release 1 build 2548067
As shown, the output can be simple or human readable. Either way works for general examination of the command, but both can be used for different purposes. For example, if there is a need to run a specific command that is only available in version 6, then a query of this command may be ideal to stop the display of an error.
These are the highlights of PowerCLI right from version 1.0.1 (when it was named VI Toolkit) up to the latest version 6.0:
VI Toolkit 1.0.1 (released in September 2008): The VI Toolkit was a utility that provided the administrator with simple commands to gather and check the environment for simple information. Even though the majority of the tools still commanded a grasp of the API, the commands provided a huge advantage for conducting repeatable tasks.
VI Toolkit 1.5 (released in January 2009): The release of 1.5 added quite a few new cmdlets, fixed a few bugs in the older version, and notably added
Set Verbto the cmdlets. The key differentiator was now being able to do more than read and report.This version also sparked a number of key players in the community such as Virt-Al, LucD, and ESloof to post numerous blog posts and tons of VMware Community posts on how to do stuff with PowerShell and VMware. This timeframe also sparked the creation of the Virtualization EcoShell Interface and caused the PowerGUI communities to pop up, adding much more credibility to the line.
PowerCLI 4.0 (released in May 2009): Here is the first of the PowerCLI products that aligned with the vSphere release. The highlights were around the Host Profiles and Host security and introduced the
Invoke-vmscriptfunction.PowerCLI 4.0.1 (released on November 19, 2009): As this was a minor release, it added a few more cmdlets and fixed some bugs from the previous build. It started the OS customization portion of the command set, and brought about Power state controls for the Hosts.
PowerCLI 4.1 (released on July 13, 2010): This version started the tradition of being released shortly before VMworld to help coincide with the release of the vSphere version. There were very few new cmdlets, but numerous enhancements and bug fixes for previous versions.
PowerCLI 4.1 U1 (released on December 1, 2010): The largest addition to this release was the ability to run ESXCLI (usually reserved for the command line interface on the host, the vSphere CLI command set, or the VMware Management Appliance). This added a huge subset of commands to the Administrator's tool chest with regard to scripts.
Another feature was the ability to control Distributed vSwitches, through the scripts. This allowed the ability to build an environment through a script by initiating the host profiles, as listed earlier, and now build a distributed vSwitch and provision VMs network interface cards to said dvSwitch.
PowerCLI 5.0 (released in August 24, 2011): The 5.0 release introduced feature parity to the Storage I/O control set and was available for download at the same time as the 5.0 vSphere release. Most of this release added functionality to what was already there and fixed a few bugs in the
Invoke-VMScriptcmdlet.PowerCLI 5.0.1 (released on January 9, 2012): This release added vCloud support to the stack.
PowerCLI 5.1 R1 (released on September 10, 2012): Shortly after VMworld, when vSphere 5.1 was released, v 5.1 was available. This release brought support for Storage Distributed Resource Scheduling (SDRS), Storage vMotion, and added numerous enhancements to the vCloud Director product.
This version also brought a new modification to the tool; it deprecated commands for the first time in the product line. This was significant because a script using the command
Set-VMHostAdvancedConfigurationwould have an error because the command had changed.PowerCLI 5.1 R2 (released on February 11, 2013): Further dvSwitch networking support was added to the cmdlet list, including the ability to export the configuration for product migration. There were a number of vCloud enhancements and additional deprecation of cmdlets.
PowerCLI 5.5 R1 (released on September 19, 2013): Version 5.5 brought a few more dvSwitch cmdlets, introduced tags, allowed management of VSAN, and introduced additional component pieces to the install.
PowerCLI 5.5 R2 (released on March 11, 2014): Release 2 of the 5.5 version added support for PowerShell v4.0, enhanced the tag cmdlets, and at long last, provided 64-bit capability for OS customization. This version also exposed an ability to communicate with a Site Recovery Manager (SRM).
PowerCLI 5.8 R1 (released on September 9, 2014): 2014 was the first VMworld that didn't release a new vSphere version. The enhancement that year was in the upgrade to the suite of products. There was an incremental version numbering of PowerCLI, SRM, vCenter Operations Manager, Infrastructure Navigator, and other related products to version 5.8. The list of enhancements for this version of PowerCLI was also one of the smallest, but the tool had its startup time increased and an enhancement to the error reporting within the tool.
PowerCLI 6.0 (released on March 12, 2015): This release coincided with the release of vSphere 6 and provided support for VVOLs and VSAN enhancements and moved some of the cmdlets to be supported as modules instead of snap-ins, as previously performed. The change log discusses re-examining the script code to support this change. It is a fundamental change to the PowerCLI product line, and the scripts in this book will be reflective of this version.
The version listing, at first glance, may seem irrelevant, but as the product has changed and grown, the script methodology and syntax has changed. From personal experience in numerous client sites, there is a mixture of different versions installed at different times by different administrators. This inconsistency, like the PoSH v2 and v3 section previously discussed, can and will cause scripting errors within the automation of the site.
Note
Further reading of the changes can be done at:
https://www.vmware.com/support/developer/PowerCLI/changelog.html
To get PowerCLI, there are a few places to start. Google always brings the browser first to the VMware blog site, which is all right as that usually has the correct download link. However, the link is provided later for all the versions of PowerCLI.
Note
It is always better to download direct from VMware. There are other links that can be used to download from, but because it is a programmable interface directly within a production virtual environment, it is ideal to get it from the source.
To download the latest version, perform the following steps:
Go to https://www.vmware.com/support/developer/PowerCLI/, and you will see the following window:

Click on the download link shown in the screenshot and the web page takes the browser to the login page.
Enter the VMware ID and the password, and the PowerCLI executable will be downloaded.
The typical installation of PowerCLI, whether it is 4.0 or 6.0, includes the VIX API (discussed earlier), and newer versions include the Remote Console as well. The remote console provides a remote console to any available VM running in the virtual infrastructure.
The installation shown in the following diagram is PowerCLI Version 6.0 on a Windows Server 2008 R2 platform. Let's follow the installation process:
When launching the installation, the shown interface seems a little strange to typical installs:
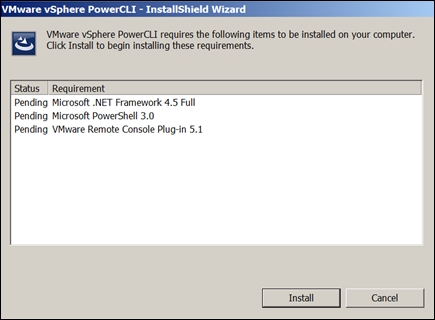
However, the installer runs separate installations of the components, one for the required .NET Framework 4.5 Full, and the PowerShell v3 and remote Console Plug-in 5.1 after. First, the installer downloads the file as follows:

Once the file is downloaded, the installer begins the installation process:

Then, the installer runs the installation file:

Once the .NET framework is installed, PowerShell v3 is installed too.
Note
Don't be surprised if the installation fails at this point. When running through this procedure, the following error popped up:

This popup demands that the Windows Management Framework version 3.0 be installed. (Installing WMF 3.0 is shown in the Installing PowerShell v3 section earlier in the chapter.) The installation will exit with an error if this isn't done. Allow the installer to exit, install WMF 3.0, and rerun the installer.
Once complete, the VMware Remote Console Plug-in is installed. The remote console displays where it will install the web browser plugins on the system.

The Remote Console is installed and the PowerCLI snap-in component is started. A warning about setting the
RemoteSignedexecution policy is displayed, as shown in the following screenshot (this will be further explained in the next section):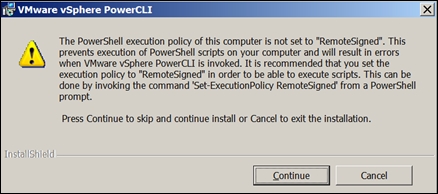
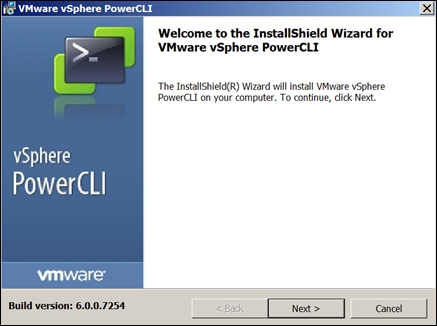
Then, finally, the PowerCLI installation begins after clicking on Continue, which brings you the Welcome screen. Click on Next to continue to the installation wizard for PowerCLI:
This will bring you to the VMware Patents window. Click on Next to continue. This will bring you to the License Agreement window.
Accept the License Agreement, choose the components, set the path of installation, and run the installation process. Finally, you will reach the setup process as shown in the following screenshot:
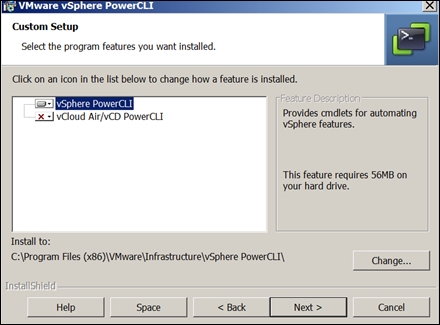
On older versions, the VIX API is shown in the installer, but is not shown in the newer versions.

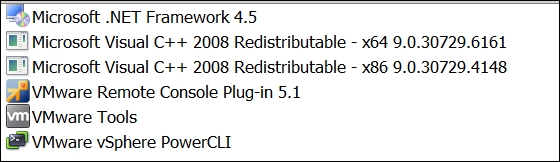
The final list of applications from a base Windows 2008 R2 server installation looks like this:
PoSH v2 installs natively and includes all the help files as installed on a system. Version 3 changes that dichotomy in to forcing the user to download or access the help online. On PoSH v3, the Update-Help command should be run to ensure all help files are downloaded on to the system where the scripts will to be written. This helps reduce the file space usage on systems not being used for script development. If help is needed on systems where the Update-Help command has not been run, a Get-Help <command> -online command can open an associated web page with the appropriate command syntax shown.
Once the help files are downloaded, a simple query such as Get-Help Get-VM will produce a limited explanation of the command with the name of the command, synopsis, syntax, description, related links (similar commands), and remarks. The remarks section will remain the same for every help request, as it outlines alternate switches in the getting help section.
Note
The Get-Help command has an alias of Help that can be also be used for short hand. For example, Get-Help Get-VM can be written as Help Get-VM.
For most help requests, the scriptwriter either needs an understanding of the syntax or to see examples of the command in use. Using the –examples switch displays the example code built into the help files directly. So typing Get-Help Get-VM –examples displays the following output:
NAME
    Get-VM

SYNOPSIS
    This cmdlet retrieves the virtual machines on a vCenter Server system.

    -------------- Example 1 --------------

    C:\PS>Get-VM -Name MyVM*

    Retrieves all virtual machines whose names starting with "MyVM".

    -------------- Example 2 --------------

    C:\PS>$myDatastore = Get-Datastore -Name "MyDatastore"
    Get-VM -Datastore $myDatastore

    Retrieves all virtual machines that reside on the specified datastore.

    -------------- Example 3 --------------

    C:\PS>$myDatacenter = Get-Datacenter -Name "MyDatacenter"
    Get-VM -Location $myDatacenter


    Retrieves all virtual machines in the specified datacenter.

    -------------- Example 4 --------------

    C:\PS>$myVDSwitch = Get-VDSwitch -Name "MyVDSwitch"
    Get-VM -DistributedSwitch $myVDSwitch

    Retrieves all virtual machines connected to the specified distributed switch.
Help is an extremely useful portion of the script writing process and for understanding how to get information, but what if the command to be used to get, say, VM information is not known? Running the Get-Help VM command will show every cmdlet available with VM in the name with a brief synopsis of each one.
Another option is to use a search engine to locate an example of the certain task or information needed. For example, searching for "PowerShell get VM guest information" produces a number of results from the Get-VMGuest command to utilizing Get-View, and even discusses some methods to get this information from a Hyper-V server. Where too much information is daunting, understanding the more specific information to be searched for will mean the more relevant information should be returned.
Lastly, never be afraid to ask. VMware communities were built on this premise and some of the best scripters asked questions at one point.
Once the installation is complete, a couple of minor tweaks are both required and recommended. The first required portion of the environment setup is to set the execution policy. The execution policy definition is taken directly from the PoSH help file:
Get-Help About_Execution_Policies

Windows PowerShell execution policies let you determine the conditions under which Windows PowerShell loads configuration files and runs scripts.

You can set an execution policy for the local computer, for the current user, or for a particular session. You can also use a Group Policy setting to set execution policy for computers and users.

Execution policies for the local computer and current user are stored in the registry. You do not need to set execution policies in your Windows PowerShell profile. The execution policy for a particular session is stored only in memory and is lost when the session is closed.

The execution policy is not a security system that restricts user actions. For example, users can easily circumvent a policy by typing the script contents at the command line when they cannot run a script. Instead, the execution policy helps users to set basic rules and prevents them from violating them unintentionally.
Of all the Execution Policies, Restricted is enabled by default:
"Restricted" is the default policy

  Restricted
    - Default execution policy.
    - Permits individual commands, but will not run scripts.
    - Prevents running of all script files, including formatting and configuration files (ps1xml), module script files (.psm1), and Windows PowerShell profiles (.ps1).
After reading the About_Execution_Policies file about execution policies and reading this default policy, it is clear to see that this will not allow the interface to be very useful when running PowerCLI. In fact, if the PowerCLI icon is clicked on without setting the execution policy to a less restrictive setting, the snap-in will not load.

It shows it in red to ensure that the error is read and understood. To bypass this, the Set-ExecutionPolicy command must be run under an administrator credential. Right-click on the icon for PowerCLI and select Run as Administrator. This enables the User Access Control for the PowerCLI/PowerShell window.
One of the following options must be selected:
AllSigned

- Scripts can run.
- Requires that all scripts and configuration files be signed be a trusted publisher, including script that you write on the local computer.
- Prompts you before running scripts from publishers that you have not yet classified as trusted or untrusted.
- Risks running signed, but malicious, scripts.

RemoteSigned

- Scripts can run.
- Requires a digital signature from a trusted publisher on script and configuration files that are downloaded from the Internet (including e-mail and instant messaging programs).
- Does not require digital signatures on scripts that you have written on the local computer (not downloaded from the Internet).
- Runs Scripts that are downloaded from the Internet and not signed, if the scripts are unblocked, such as by using the Unblock-File cmdlet.
- Risks running unsigned scripts from sources other than the Internet and signed, but malicious, scripts.

UnRestricted

- Unsigned scripts can run. (This risks running malicious scripts.)
- Warns the user before running scripts and configuration files that are downloaded from the Internet.

Bypass

- Nothing is blocked and there are no warnings or prompts.
- This execution policy is designed for configurations in which a Windows PowerShell script is built in to a larger application or for configurations in which Windows PowerShell is the foundation for a program that has its own security model.

Undefined

- There is no execution policy set in the current scope.
- If the execution policy in all scopes is Undefined, the effective execution policy is Restricted, which is the default execution policy.
Typically, most environments use the RemoteSigned option as this allows the functionality to run scripts on other computers and allows some additional security from unsigned scripts. If the environment being set up is a highly secure environment, the AllSigned option may be used when proper Public Key Infrastructure (PKI) is set up. This functionality will not be described in this book, and the RemoteSigned option will be assumed for the remainder of the book:
Set-ExecutionPolicy RemoteSigned
Once the ExecutionPolicy is set, configuration of the interface window should be next as it requires the additional permissions of the Administrator account. Right-click on the Heading window, and select Properties.

The QuickEdit mode allows the right-clicking, copying, and pasting functionality of the Command window. This feature helps tremendously when doing quick one-liners, needing report information or just wanting a portion of a command for another.
Select the Layout tab at the top of the Options window.

Set Screen Buffer Size for Width and Height whenever possible. The width buffer should match the actual width size. This permits the interface to need limited scrolling when getting output. The height buffer should be large, up to 9999, but if memory is a concern for the window, reduce the buffer size. This buffer allows for the output of a command to exceed the window size. For example, if the Get-VM command produces a listing of 3000 VMs, having a small buffer may not allow the window to be scrolled back to view the entire output. If the buffer size is 250, then 250 lines of scroll back will be permitted.
The last thing to check is the PowerCLI configuration. If the environment being worked on has multiple vCenter servers, having the configuration support multiple systems simultaneously can be advantageous. By default, the configuration is to connect to a single vCenter at a time; however, if the session is connected to one vCenter and a second Connect-VIServer command is run, this message pops up on the interface window:
Working with multiple default servers?

Select [Y] if you want to work with more than one default servers. In this case, every time when you connect to a different server using
Connect-VIServer, the new server connection is stored in an array variable together with the previously connected servers. When you run a cmdlet and the target servers cannot be determined from the specified parameters, the cmdlet runs against all servers stored in the array variable.
    Select [N] if you want to work with a single default server. In this case, when you run a cmdlet and the target servers cannot be determined from the specified parameters, the cmdlet runs against the last connected server.

    WARNING: WORKING WITH MULTIPLE DEFAULT SERVERS WILL BE ENABLED BY DEFAULT IN A FUTURE RELEASE. You can explicitly set your own preference at any time by using the DefaultServerMode parameter of Set-PowerCLIConfiguration.

[Y] Yes  [N] No  [S] Suspend  [?] Help (default is "Y"): y
The Get-PowerCLIConfiguration command will show three scopes of the configuration, Session, User, and AllUsers. The standard setup will show the following output:

Based on the preceding command connecting to the second vCenter, the configuration will show the following output:

Now, to allow AllUsers by default, the command to enable that would be as follows:
Set-PowerCLIConfiguration –DefaultVIServerMode Multiple –confirm:$False
Finally, the output would be displayed as follows:

Although there are many other environment options that can be performed, these, in the author's opinion, are the most useful.