

Now that we have a better understanding of the MVVM pattern, let's look at how we might implement it in a WPF application. What should the folder structure of our application be like? Clearly, we'll need somewhere to put our Models, Views, and View Models; however, how we arrange them will somewhat depend on the overall size of our application.
As we have heard, very small projects do not really suit MVVM because implementing it can involve a lot of preparation and often, the benefits do not apply. For small WPF applications, we would typically have just one project in our WPF application. In these cases, our classes would be separated into different folders within the single project.
With larger scale applications, we arrange our classes in the same basic structure, but as there are more classes and more chance that we want to reuse some of this code, it makes sense to use separate projects instead of folders. Either way, our classes should end up with the same CLR namespaces, as they tend to follow the structure of the application, regardless of whether those classes were separated using folders or projects.
While the CLR namespace in our startup project might be something along the lines of CompanyName.ApplicationName, the namespace of the classes in the Models component would be, or start with, CompanyName.ApplicationName.Models. For the purpose of the remainder of this book, we will assume that we are dealing with a large-scale WPF application and using projects for the separation of our classes.
There is nothing in the MVVM pattern that dictates what structure our code base should have, although there are clues. We will clearly need Views and ViewModels projects, but the Models project is less clearly defined. There are several elements within the Models component of MVVM, but we don't necessarily want to group them all into a single project in our code base. There are other projects that will be required too.
Let's visualize some possible structures so that we can get started with building our application.
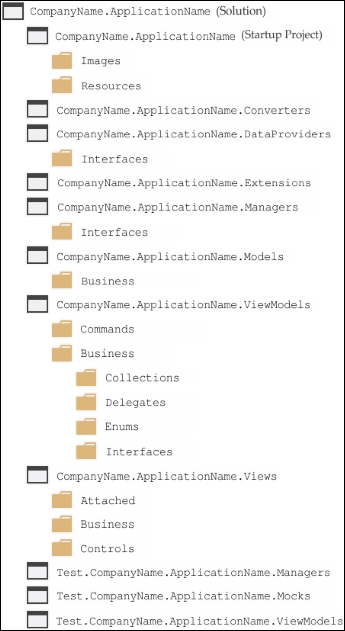
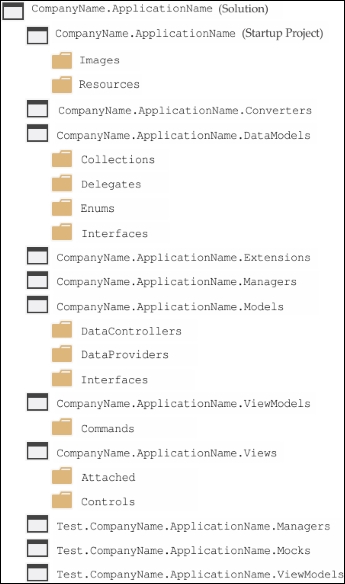
These examples offer an insight into what the project structure of an MVVM-based WPF application might look like. However, nothing is set in stone and we are free to rename and to reorganize our application projects as we see fit. The important thing is how the components are connected together rather than the arrangement of the application files.
After we have developed a number of WPF applications, we get a feel for which project names and which structure we prefer, so I'd suggest trying a few variations and seeing which you feel more comfortable working with. Of course, some of us may not have the luxury of being able to create or alter the structure of the application that we work on. Let's first focus on the projects common to both example structures.
We see that the Images and Resources folders reside in the startup project. While this is customary, they can technically reside in any project or even in their own project. However, I prefer to keep them in this project because it provides a marginal performance benefit. Typically, when using MVVM, the only other files in the startup project will be the MainWindow.xaml, App.xaml (and their constituent code behind files), and app.config files.
The Images folder contains the images and icons that are displayed in the UI controls, whereas the Resources folder normally contains any resource files, such as XML schemas or text or data files that are used by the application.
The next project is named Converters and is fairly self-explanatory. It only contains classes that have implemented the IValueConverter interface and are used for converting data bound values in the Views. These classes are all reusable and the DLL from this project should be kept up to date and shared amongst our other applications.
Both examples show an Extensions project, but this is entirely optional and not a requirement of the MVVM pattern. I just happen to find Extension methods to be an essential part of .NET development, having built up a large collection of invaluable helper methods. After getting used to being able to call Add on an IEnumerable instance or ToObservableCollection on a query result for example, I now reuse them in every application. We'll see some examples of these in Chapter 3
, Writing Custom Application Frameworks, Chapter 8, Implementing Responsive Data Validation, and Chapter 9, Completing That Great User Experience.
The next common project that we can see is a project called Managers. Others may prefer to call this Engines, Services, or something similar, but that is just a personal preference, and either way, the content will be the same. In this project, we typically find a number of classes that together provide a wide variety of functionality to the View Models. For example, in this project, we might find classes named ExportManager, FeedbackManager, HardDriveManager, WindowManager, and so on.
It is important to have a project like this, where we have one common place to provide all of the required specialized functionality for our application, rather than having to repeat the code in each View Model that requires that certain functionality. These classes are totally reusable between applications and this arrangement also promotes behavioral consistency throughout the application.
For example, without consolidating all of our functionality in this project, we might be tempted to copy and paste certain bits of code from one View Model to another. If the code then requires a change in the future, we may not remember that it has been copied and only update it in one View Model, thereby breaking the consistency of the application.
Another benefit to utilizing a project like this is that it reduces the number of references that the other projects need. The Managers project will typically require many references to be added, whereas the View Model and other classes that make use of its functionality will only need to add a single reference to this project.
Some or all of the functionality from these classes can be exposed through a BaseViewModel class and can therefore be made available to every View Model. We'll see more about this in Chapter 3, Writing Custom Application Frameworks, but for now, let's start to look at the differences between the two structures.
In the first structure example, the Business folder within the Models project simply represents the business data models of the application. There's no real need to have these classes in a separate Business folder other than the fact that it highlights that they are connected with the ViewModels.Business View Models and the Views.Business Views.
Technically, the data model classes in our application should represent our business objects and not contain any properties that bear no relevance to the business model, such as properties named CurrentItem or IsSelected. If this were the case and they were defined in their own project, as shown in the first example, then we could reuse their DLL in our other business applications. Alternatively, perhaps we already have a DLL representing the business model from another application that we will be reusing in the next application.
In either of these cases, we would need to add other folders into the ViewModels project in which we would implement an additional View Model class for each business model class to be displayed. This arrangement is shown in the ViewModels.Business folder of the first example and demonstrates the separation of the data model from the Views.
In these classes, we would encapsulate each public business model property in a new property that raised change notification and add any further properties required by the UI. It would look similar to the following example, where the BaseBusinessViewModel class simply implements the INotifyPropertyChanged interface:
using System;

namespace CompanyName.ApplicationName.Models.Business
{
  public class User
  {
    public User(Guid id, string name, int age)
    {
      Id = id;
      Name = name;
      Age = age;
    }

    public Guid Id { get; set; }

    public string Name { get; set; }

    public int Age { get; set; }
  }
}

using System;
using CompanyName.ApplicationName.Models.Business;

namespace CompanyName.ApplicationName.ViewModels.Business
{
  public class UserViewModel : BaseBusinessViewModel
  {
    private User model;
    private bool isSelected = false;

    public UserViewModel(User model)
    {
      Model = model;
    }

    public User Model
    {
      get { return model; }
      set { model = value; NotifyPropertyChanged(); }
    }

    public Guid Id
    {
      get { return Model.Id; }
      set { Model.Id = value; NotifyPropertyChanged(); }
    }

    public string Name
    {
      get { return Model.Name; }
      set { Model.Name = value; NotifyPropertyChanged(); }
    }

    public int Age
    {
      get { return Model.Age; }
      set { Model.Age = value; NotifyPropertyChanged(); }
    }

    public bool IsSelected
    {
      get { return isSelected; }
      set { isSelected = value; NotifyPropertyChanged(); }
    }
  }
}
When implementing this pattern, after each data object was loaded from the data source, it would need to be wrapped in one of these View Model classes before being displayed in the UI:
User user = new User(Guid.NewGuid(), "John Smith", 25);
UserViewModel userViewModel = new UserViewModel(user);
Following the pattern in the first example structure through to the Views project, we see that it also contains a Business folder. Typically, we could find a small, individual object-sized View there for each of these business model-related View Models. However, in the vast majority of applications, this additional level of separation between the business model and the UI is simply unrequired. Also, following this pattern adds a small overhead to all implementation and data access times.
For some, a viable alternative would be to simply add the properties and property change notification required by the UI straight into the data model classes. If we don't need this separation, then there is little point in writing all of the extra code. I am a great fan of Agile practices and one of the twelve principles from the Manifesto for Agile Software Development summarizes this point perfectly:
"Simplicity--the art of maximizing the amount of work not done--is essential"
This simpler, alternative implementation is shown in the DataModels project of the second example, where the business model classes are combined with the UI-related properties along with the business rules or validation logic.
In other types of applications, you may find a separate validation layer that sits between the DAL and the code behind the UI layer. As we'll see in Chapter 8, Implementing Responsive Data Validation, with WPF, we can build validation right into the business classes, along with the properties that they are validating.
This DataModels project contains a number of sub-folders, grouping similar types of classes together. The Collections folder typically contains an extension of the ObservableCollection<T> class for each data model class in the application. The Enums folder is also often well used in most WPF applications, as enumerations are great to use when data bound to either radio buttons or checkboxes.
The interfaces found in the Interfaces folder are essential to enable the functionality of the base classes, as we'll see in Chapter 3, Writing Custom Application Frameworks. If we're likely to use a large number of delegates in our application, then it also makes sense to organize them into a separate Delegates folder as well. Otherwise, if a delegate is strongly tied to a particular class, they can just be declared locally in the classes that will be raising them.
One other alternative would be to have a single class in the Models project that encapsulates all of the application delegates, although this would require prefixing the name of this class to the delegate names when using them, for example, Delegates.CloseRequest. Declaring each delegate in the class that uses them enables us to reference them directly, for example, CloseRequest.
The data model classes in this project could be thought of as View Models too, although View Models that only serve the display of individual objects, as opposed to those that serve the main application Views. They would have a base class that implements the INotifyPropertyChanged interface like the main View Models, but then it would also typically implement a validation error interface too.
They also differ from the main application View Models because they generally provide no functionality other than validation to their associated Views. We can think of these classes as mere data containers with a few extra properties to enable effective communication with the UI.
When following this structure, we can render these individual object-sized View Models in the UI using data templates, so we generally don't need to declare a separate View for each of them. Furthermore, we may want to display the same objects differently in different parts of the application, or even switch their display in response to some user action and that is also easier to accomplish with data templates.
This explains why these objects do not reside in the View Models project along with the main application View Models. If you remember, each View Model should only have one associated View. For the purpose of this book, this simpler, alternative implementation is the pattern that we will be following. Now, let's continue by investigating the DAL of the application.
The DataProviders project from the first example is responsible for providing access to the persisted data source of the application. Another commonly used name is Repositories, but again, you can call it what you like. The important thing is that it has an essential Interfaces folder that contains one or more interfaces that form the connection between the data source(s) and the rest of the application.
The DataProviders and Interfaces folders in the second example appear within the Models project, but they have the same responsibilities. Either way, it is through the use of these interfaces that we are able to disconnect the data source and replace it with a mock source of some kind when testing. We will look at an example of this in Chapter 3, Writing Custom Application Frameworks, but for now, let's continue.
The ViewModels project is fairly easy to understand, as it just contains View Models. You may be wondering why there is a Commands folder inside it. If we were using commands in the old fashioned way, writing a separate class for each command, then we could end up with a great many classes and that would probably warrant putting them into their own project.
However, if you remember, we will be using only one single command, the ActionCommand. As this will be used by the View Model classes alone, it makes sense to include it in their project. We've already covered the differences in the View Models and Views projects between the two example structures, so let's finish off looking at the remaining common parts.
We often find an Attached folder in the Views project that contains the Attached Properties that are used in the application. As these classes contain View-related code and are only used by the Views, it is logical that they should reside here. Alongside that, we see the Controls folder where we find reusable user controls and/or custom controls, such as a custom textbox that spawns a child window to help with editing when clicked or a custom clock face that can be used to enter a time.
At the bottom of both example structures, we see the test projects that contain the code that tests our application. If your application needs testing, this is a good pattern to follow. By prefixing the name of the projects that we will be testing with a Test domain, they will all appear in the Visual Studio Solution Explorer in one group, either above or below the other projects, and in the same order as the projects being tested.
The Mocks project typically hosts the application objects to be used while testing the application. This would normally include any mock data generation or provider classes and mock Manager classes. We may need to create these mock Manager classes if we don't want to use expensive resources while testing, or in case they access any UI elements that we also want to avoid when testing. Let's take a look at an example of one possible method of a UiThreadManager class:
public Task RunAsynchronously(Action method)
{
  return Task.Run(method);
}
This method is fairly straightforward and enables us to pass a reference to any method that we want to run asynchronously. It simply passes the method reference to the Task.Run method and lets it do its thing. It can be called like this:
UiThreadManager.RunAsynchronously(() => GenerateReports());
However, running code asynchronously in unit tests can have unpredictable results that may make them fail. Therefore, when testing, we need to use a MockUiThreadManager class and implement its RunAsynchronously method, as follows:
public Task RunAsynchronously(Action method)
{
  Task task = new Task(method);
  task.RunSynchronously();
  return task;
}
In this method, we can see that we use the RunSynchronously method of the Task class to run the referenced method synchronously, or in other words, immediately and on the same thread. In effect, this simply bypasses the functionality of the original method. Using these mock objects enable us to run different code while testing than we do at runtime. We'll see more examples of these mock objects in Chapter 3, Writing Custom Application Frameworks, but let's first take a look back at what we have covered so far.