
This first recipe to follow, which will help you download and install Scratch to your computer. Follow along and you'll be using Scratch in no time.
Our first recipe is all about getting Scratch up and running. Scratch can easily be used on any computer. Simply visit http://scratch.mit.edu/help/faq/ to see the requirements for Scratch. If you've used Scratch 1.4 before, you'll recall that you had to install Scratch on your computer. The Scratch creators have made it even easier to use Scratch 2.0. Now you can run Scratch directly within your browser. All you need is a recent browser and Adobe Flash Player!
To use Scratch 2.0, simply click on the Create link on the Scratch home page. If you want to use Scratch 1.4, follow these steps. The installer will create a link on your desktop for you as well as a Start menu shortcut. Follow these steps to download and install Scratch:
Open your browser, and then visit http://scratch.mit.edu/scratch_1.4/ to download the version of Scratch you need.
Click on the link to the appropriate version based on your operating system, as shown in the following screenshot:

Depending on your Internet connection speed, it may take a couple of minutes for Scratch to download.
Click on Yes on any prompts that come up confirming you want to open the file.
The Scratch installer will open. Click on Next > to begin the install process.

Next you'll be prompted to choose an install location. The default location will serve most people just fine.

Click on Next >.
Scratch will give you the option to choose a Start menu folder location. It will default to creating a new folder called Scratch. You may change this if you wish.

Click on Install.
Scratch will install, and then give you the following screenshot when finished:

Click on Next >.
The final screen will give you the Start Scratch and Make a shortcut to Scratch on the desktop options.

Click on Finish and then you'll be ready to go!
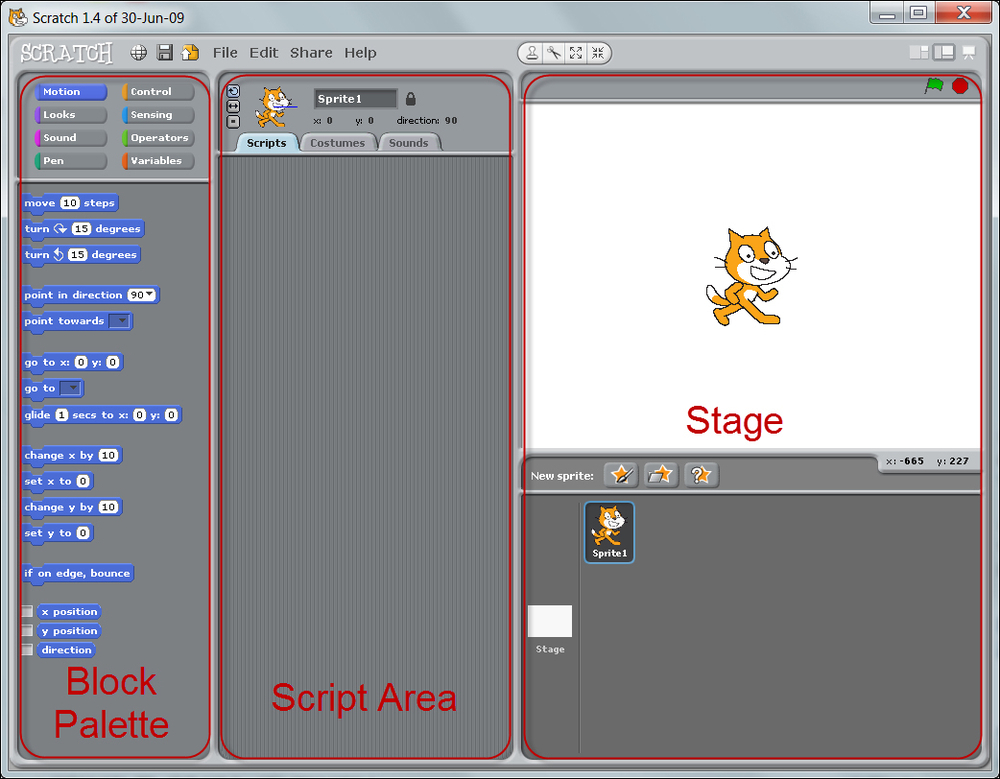
Once you're inside Scratch, play around with the interface. Scratch is broken up into three main areas that you'll be working in. These are called the Block Palette, Script Area, and Stage. These three areas are labeled in the following screenshot:
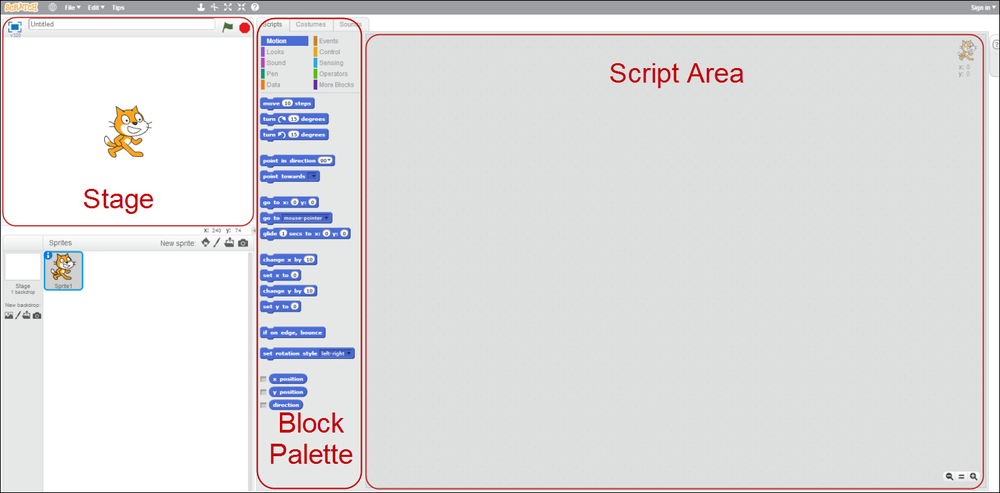
In Scratch 2.0, you'll see these areas in the following manner:
So, what are these three areas all about? How do I use them to build programs?
Each of these areas helps in a different way to build your program. The Block Palette is your library of commands, which you can add to your program. To build programs, all you need to do is drag and-drop these to your Script Area. Notice that there are eight categories of blocks. Each of these is color coded and does something different. We will explore more and more of these with each program we create!
The script area is vital to each individual program. A sprite is an object in Scratch we will program (usually characters). The default is the cat seen in the preceding screenshot. Each sprite as well as the background have their own Script Area, where you can drag blocks from the Block Palette. With more complicated programs, you need to drag more and more of these blocks to the Script Area.
A few examples of sprites you might use in your program are:
Characters for a story or game
Buttons to control things in your program
Things you want to display on the stage, maybe digits for numbers that need to have background programming
The last area of the Scratch interface is probably your favorite: the Stage. Here is where everything you've programmed comes together, and then you can see it in action. Just below the Stage is the collection of all the sprites you've added to your program, this is how you select those individual script areas we mentioned before. Once we get past our first program, most of the magic will happen after you click on the green flag up in the right-hand corner of the stage. You can also stop everything by clicking on the little red button next to the green flag.
Now that you have a basic understanding of the interface of Scratch, we can move on to customizing some of the fun things we'll be programming. Our next recipe, Deleting the default sprite features importing, adding, and changing sprites. See the rest of the recipes in this chapter as well for further basic information you'll need to program with Scratch.